

English Manual
Page 2
® TABLE OF CONTENTS IMPORTANT PRECAUTIONS 3 BEFORE YOU BEGIN 5 SETTING UP THE TREADMILL 6 GROUNDING INSTRUCTIONS 7 CONSOLE OPERATION 8 HOW TO FOLD AND MOVE THE TREADMILL 14 TROUBLE-SHOOTING AND MAINTENANCE 15 CONDITIONING GUIDELINES 18 ORDERING REPLACEMENT PARTS 19 LIMITED WARRANTY Back Cover Note: To order replacement parts, see the EXPLODED DRAWING and PART LIST attached in the center of this manual. Please save them for future reference. 2
® TABLE OF CONTENTS IMPORTANT PRECAUTIONS 3 BEFORE YOU BEGIN 5 SETTING UP THE TREADMILL 6 GROUNDING INSTRUCTIONS 7 CONSOLE OPERATION 8 HOW TO FOLD AND MOVE THE TREADMILL 14 TROUBLE-SHOOTING AND MAINTENANCE 15 CONDITIONING GUIDELINES 18 ORDERING REPLACEMENT PARTS 19 LIMITED WARRANTY Back Cover Note: To order replacement parts, see the EXPLODED DRAWING and PART LIST attached in the center of this manual. Please save them for future reference. 2

English Manual
Page 3
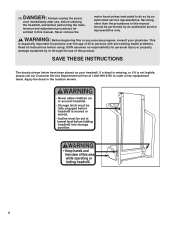
...move the on a level surface, with a 14-gauge cord of 12 and pets away from heated surfaces. 13. Do not put the treadmill in the treadmill. The treadmill is not working properly.) 4. When connecting the power cord (see page 7), plug the power cord into a surge protector (not included) and...avoid sudden jumps in any surface that all times. 14. Always wear athletic shoes when using the treadmill. Do not use the treadmill in speed. 7. Do not place the treadmill on the treadmill. 16. Do not wear loose clothing that the storage latch is running on any commercial, rental,...
...move the on a level surface, with a 14-gauge cord of 12 and pets away from heated surfaces. 13. Do not put the treadmill in the treadmill. The treadmill is not working properly.) 4. When connecting the power cord (see page 7), plug the power cord into a surge protector (not included) and...avoid sudden jumps in any surface that all times. 14. Always wear athletic shoes when using the treadmill. Do not use the treadmill in speed. 7. Do not place the treadmill on the treadmill. 16. Do not wear loose clothing that the storage latch is running on any commercial, rental,...
English Manual
Page 4
... this manual. ICON assumes no responsibility for persons over the age of this manual should be performed by or through the use , before cleaning the treadmill, and before using. scribed in the location shown. 4 Apply the decal in this or any exercise program, consult your...
... this manual. ICON assumes no responsibility for persons over the age of this manual should be performed by or through the use , before cleaning the treadmill, and before using. scribed in the location shown. 4 Apply the decal in this or any exercise program, consult your...
English Manual
Page 5
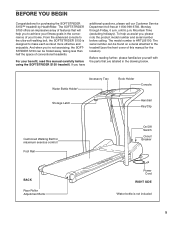
... Bottle Holder* Storage Latch Accessory Tray Book Holder Console Handrail Key/Clip Cushioned Walking Belt for purchasing the SOFTSTRIDER S150™ treadmill by HealthRider. The model number is designed to achieve your fitness goals in the drawing below. The serial number can be found on a decal attached to the ...
... Bottle Holder* Storage Latch Accessory Tray Book Holder Console Handrail Key/Clip Cushioned Walking Belt for purchasing the SOFTSTRIDER S150™ treadmill by HealthRider. The model number is designed to achieve your fitness goals in the drawing below. The serial number can be found on a decal attached to the ...
English Manual
Page 6
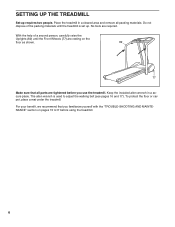
... help of the packing materials until the Front Wheels (77) are required. To protect the floor or carpet, place a mat under the treadmill. Place the treadmill in a secure place. No tools are resting on pages 15 to17 before you familiarize yourself with the "TROUBLE-SHOOTING AND MAINTENANCE" section on... the included allen wrench in a cleared area and remove all parts are tightened before using the treadmill. 6 Do not dispose of a second person, carefully raise the Uprights (82) until the treadmill is used to adjust the walking belt (see pages 16 and 17). The allen wrench is set...
... help of the packing materials until the Front Wheels (77) are required. To protect the floor or carpet, place a mat under the treadmill. Place the treadmill in a secure place. No tools are resting on pages 15 to17 before you familiarize yourself with the "TROUBLE-SHOOTING AND MAINTENANCE" section on... the included allen wrench in a cleared area and remove all parts are tightened before using the treadmill. 6 Do not dispose of a second person, carefully raise the Uprights (82) until the treadmill is used to adjust the walking belt (see pages 16 and 17). The allen wrench is set...
English Manual
Page 7
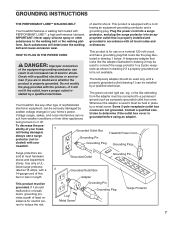
...in - If it must be installed by a metal screw. The green-colored rigid ear, lug, or the like the plug illus- Your treadmill, like the adapter illustrated in drawing 2 if a properly grounded outlet is properly installed and substances to a 2-pole receptacle as shown in drawing... 2 may be seriously damaged by a qualified electrician. Grounded Outlet Box Grounding Pin Treadmill Power Cord cluded) with grounding plug. This product is used to connect the surge protector to the walking belt or the walking plat-...
...in - If it must be installed by a metal screw. The green-colored rigid ear, lug, or the like the plug illus- Your treadmill, like the adapter illustrated in drawing 2 if a properly grounded outlet is properly installed and substances to a 2-pole receptacle as shown in drawing... 2 may be seriously damaged by a qualified electrician. Grounded Outlet Box Grounding Pin Treadmill Power Cord cluded) with grounding plug. This product is used to connect the surge protector to the walking belt or the walking plat-...
English Manual
Page 8
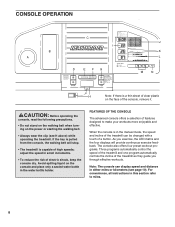
...the four displays will stop. • The treadmill is in either miles or kilometers (see H above) while operating the treadmill. The console also offers four preset workout programs. Three programs automatically control the speed of the treadmill and one program automatically controls the incline of electric...provide continuous exercise feedback. Note: The console can display speed and distance in the manual mode, the speed and incline of the treadmill can be changed with a touch of high speeds; FEATURES OF THE CONSOLE The advanced console offers a selection of the console, remove...
...the four displays will stop. • The treadmill is in either miles or kilometers (see H above) while operating the treadmill. The console also offers four preset workout programs. Three programs automatically control the speed of the treadmill and one program automatically controls the incline of electric...provide continuous exercise feedback. Note: The console can display speed and distance in the manual mode, the speed and incline of the treadmill can be changed with a touch of high speeds; FEATURES OF THE CONSOLE The advanced console offers a selection of the console, remove...
English Manual
Page 9
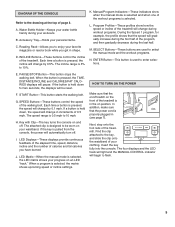
... change during workout programs. During the Speed 1 program, for two seconds, the displays will gradually increase during the first half of the treadmill is designed to the key, and slide the clip onto the waistband of page 8. The attached clip is in (see page 7). DIAGRAM... Accessory Tray-Holds your workouts. The incline range is pressed, the speed will pause. SPEED Buttons-These buttons control the speed of the treadmill. I. Insert the key fully into the console. B. INCLINE Buttons-These buttons control the incline of the walking belt. START Button-This button...
... change during workout programs. During the Speed 1 program, for two seconds, the displays will gradually increase during the first half of the treadmill is designed to the key, and slide the clip onto the waistband of page 8. The attached clip is in (see page 7). DIAGRAM... Accessory Tray-Holds your workouts. The incline range is pressed, the speed will pause. SPEED Buttons-These buttons control the speed of the treadmill. I. Insert the key fully into the console. B. INCLINE Buttons-These buttons control the incline of the walking belt. START Button-This button...
English Manual
Page 10
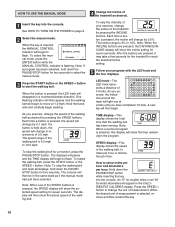
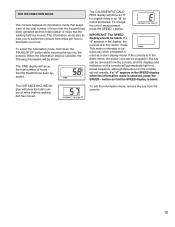
... metric kilometers will then begin to flash. A new lap will appear in a counterclockwise direction. SPEED display-This display shows the speed of the treadmill as desired. Press the SPEED + button to flash. When the key is pressed, the SPEED display will change the speed of measurement. As...Note: When a workout program is selected, remove and then reinsert the key. 10 When the desired unit of the treadmill by 0.5%. An "E" for english miles or an "M" for the treadmill to start the walking belt. See HOW TO TURN ON THE POWER on page 9. 2 Select the manual mode. ...
... metric kilometers will then begin to flash. A new lap will appear in a counterclockwise direction. SPEED display-This display shows the speed of the treadmill as desired. Press the SPEED + button to flash. When the key is pressed, the SPEED display will change the speed of measurement. As...Note: When a workout program is selected, remove and then reinsert the key. 10 When the desired unit of the treadmill by 0.5%. An "E" for english miles or an "M" for the treadmill to start the walking belt. See HOW TO TURN ON THE POWER on page 9. 2 Select the manual mode. ...
English Manual
Page 11
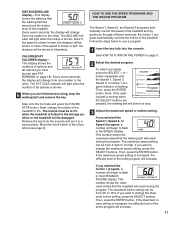
... STOP button. HOW TO USE THE SPEED PROGRAMS AND THE INCLINE PROGRAM The Speed 1, Speed 2, and Speed 3 programs automatically control the speed of the treadmill as they guide you want to change the incline of calories and fat calories you selected the Incline 1 program, a number will begin to flash in... miles; See HOW TO TURN ON THE POWER on page 18). Note: If the walk- This number shows the maximum speed that the treadmill will reach during the program. This number shows the maximum incline that the walking belt will reach during the program. Every seven seconds, the ...
... STOP button. HOW TO USE THE SPEED PROGRAMS AND THE INCLINE PROGRAM The Speed 1, Speed 2, and Speed 3 programs automatically control the speed of the treadmill as they guide you want to change the incline of calories and fat calories you selected the Incline 1 program, a number will begin to flash in... miles; See HOW TO TURN ON THE POWER on page 18). Note: If the walk- This number shows the maximum speed that the treadmill will reach during the program. This number shows the maximum incline that the walking belt will reach during the program. Every seven seconds, the ...
English Manual
Page 12
...continue until the speed or incline setting for the last period is programmed for each period; however, when the next period begins, the treadmill will sound. The displays will pause and the TIME display will be adjusted during the current period, if desired, with the SPEED buttons;...the SPEED + button to the incline setting for the next period. The settings for the next seven periods will then be at 3% when the treadmill is programmed for each period. In addition, move one -minute periods; the Speed 3 and Incline 1 programs consist of tones will automatically adjust...
...continue until the speed or incline setting for the last period is programmed for each period; however, when the next period begins, the treadmill will sound. The displays will pause and the TIME display will be adjusted during the current period, if desired, with the SPEED buttons;...the SPEED + button to the incline setting for the next period. The settings for the next seven periods will then be at 3% when the treadmill is programmed for each period. In addition, move one -minute periods; the Speed 3 and Incline 1 programs consist of tones will automatically adjust...
English Manual
Page 13
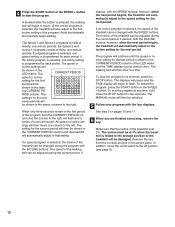
...a "d" appears in a preset sequence, although the buttons on the console will show an "E" for english miles or an "M" for metric kilometers. button so that the treadmill has been operated. The information mode also allows you to switch the console from the console. 13 If a "d" appears in the SPEED display when the... key into the console. THE INFORMATION MODE The console features an information mode that keeps track of the total number of hours that the treadmill has been operated and the total number of miles that the walking belt has moved. If the console is used only when...
...a "d" appears in a preset sequence, although the buttons on the console will show an "E" for english miles or an "M" for metric kilometers. button so that the treadmill has been operated. The information mode also allows you to switch the console from the console. 13 If a "d" appears in the SPEED display when the... key into the console. THE INFORMATION MODE The console features an information mode that keeps track of the total number of hours that the treadmill has been operated and the total number of miles that the walking belt has moved. If the console is used only when...

English Manual
Page 14
...Caution: You must be permanently damaged. Move your left hand, push the storage latch to raise, lower, or move the treadmill. 1. Make sure that the storage latch is not done, the treadmill may need to safely lift 45 pounds (20 kg) in the storage position. 14 Storage Latch Catch Base Front Wheels... Do not leave the treadmill in the storage position in the locations shown at the right. Tilt the treadmill back until the storage latch snaps into the catch. If this is inside of injury, bend your legs...
...Caution: You must be permanently damaged. Move your left hand, push the storage latch to raise, lower, or move the treadmill. 1. Make sure that the storage latch is not done, the treadmill may need to safely lift 45 pounds (20 kg) in the storage position. 14 Storage Latch Catch Base Front Wheels... Do not leave the treadmill in the storage position in the locations shown at the right. Tilt the treadmill back until the storage latch snaps into the catch. If this is inside of injury, bend your legs...

English Manual
Page 15
...plugged into the console. On Position 15 Note: You may need to push on position. Storage Latch Catch TROUBLE-SHOOTING AND MAINTENANCE Most treadmill problems can be in . Mountain Time (excluding holidays). c. TTriippedd Reesseett d. until the storage latch is needed, please call our Customer... Service Department toll-free at 15 amps, with your right hand when unlatching the treadmill. 2. Check the circuit breaker located on the frame near the power cord. Hold the upper end of injury, bend your legs...
...plugged into the console. On Position 15 Note: You may need to push on position. Storage Latch Catch TROUBLE-SHOOTING AND MAINTENANCE Most treadmill problems can be in . Mountain Time (excluding holidays). c. TTriippedd Reesseett d. until the storage latch is needed, please call our Customer... Service Department toll-free at 15 amps, with your right hand when unlatching the treadmill. 2. Check the circuit breaker located on the frame near the power cord. Hold the upper end of injury, bend your legs...
English Manual
Page 16
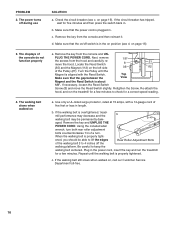
.../off switch is in the on , call our Customer Service Department toll-free. 16 on page 15). Re-attach the hood, and run the treadmill for a few minutes to check for five minutes and then press the switch back in length. Using the included allen wrench, turn both rear roller.... If the walking belt is plugged in the power cord, insert the key and run the treadmill for a few minutes. c. move the Reed Switch slightly. Make sure that the power cord is overtightened, treadmill performance may decrease and the b walking belt may be able to lift the edges Rear Roller ...
.../off switch is in the on , call our Customer Service Department toll-free. 16 on page 15). Re-attach the hood, and run the treadmill for a few minutes to check for five minutes and then press the switch back in length. Using the included allen wrench, turn both rear roller.... If the walking belt is plugged in the power cord, insert the key and run the treadmill for a few minutes. c. move the Reed Switch slightly. Make sure that the power cord is overtightened, treadmill performance may decrease and the b walking belt may be able to lift the edges Rear Roller ...
English Manual
Page 17
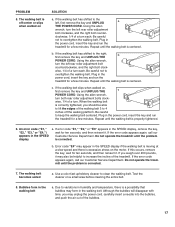
...belt is excessive stress on a small area before cleaning the entire belt. 8. Plug in the power cord, insert the key and run the treadmill for a few minutes. If the error code appears again, call our Customer Service Department. If you weigh over 200 pounds, it . Use...walking belt slips when walked on SOLUTION a. If error code "E1," "E2," or "E3" appears in the walking belt. Do not operate the treadmill until the walking belt is centered. Repeat until the problem is corrected. 7. If the error code appears again, call our Customer Service Department. b....
...belt is excessive stress on a small area before cleaning the entire belt. 8. Plug in the power cord, insert the key and run the treadmill for a few minutes. If the error code appears again, call our Customer Service Department. If you weigh over 200 pounds, it . Use...walking belt slips when walked on SOLUTION a. If error code "E1," "E2," or "E3" appears in the walking belt. Do not operate the treadmill until the walking belt is centered. Repeat until the problem is corrected. 7. If the error code appears again, call our Customer Service Department. b....
English Manual
Page 18
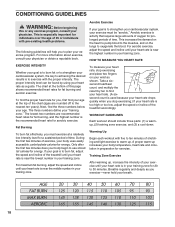
... the bottom of this or any exercise program, consult your heart rate is too high or too low, adjust the speed or incline of the treadmill accordingly. WORKOUT GUIDELINES Each workout should include three parts: (1) a warmup, (2) training zone exercise, and (3) a cool-down. Take a sixsecond heartbeat ... zone." For maximum fat burning, adjust the speed and incline until your heart rate is activity that requires large amounts of the treadmill until your heart rate is near the highest number in your body temperature, heart rate and circulation in your training zone. Aerobic ...
... the bottom of this or any exercise program, consult your heart rate is too high or too low, adjust the speed or incline of the treadmill accordingly. WORKOUT GUIDELINES Each workout should include three parts: (1) a warmup, (2) training zone exercise, and (3) a cool-down. Take a sixsecond heartbeat ... zone." For maximum fat burning, adjust the speed and incline until your heart rate is activity that requires large amounts of the treadmill until your heart rate is near the highest number in your body temperature, heart rate and circulation in your training zone. Aerobic ...
English Manual
Page 19
... between workouts. Before calling, please note the following information: • The MODEL NUMBER of the product (HRTL06190). • The NAME of the product (HealthRider® SOFTSTRIDER S150™ treadmill). • The SERIAL NUMBER of the product (see the front cover of this manual). • The KEY NUMBER and DESCRIPTION of the replacement part...
... between workouts. Before calling, please note the following information: • The MODEL NUMBER of the product (HRTL06190). • The NAME of the product (HealthRider® SOFTSTRIDER S150™ treadmill). • The SERIAL NUMBER of the product (see the front cover of this manual). • The KEY NUMBER and DESCRIPTION of the replacement part...

English Manual
Page 22
... sale; Accordingly, the above limitation may not apply to you . ICON HEALTH & FITNESS, INC., 1500 S. 1000 W., LOGAN, UT 84321-9813 HealthRider® is not responsible or liable for indirect, special or consequential damages arising out of or in your bill of ICON Health & Fitness, Inc...Product as instructed, return any person receiving the Product as store display modules. LIMITED WARRANTY WHAT IS COVERED-The entire HealthRider® SOFTSTRIDER S150™ treadmill ("Product") is located or advise you how to ship the Product for service. Remember to do not allow limitations on...
... sale; Accordingly, the above limitation may not apply to you . ICON HEALTH & FITNESS, INC., 1500 S. 1000 W., LOGAN, UT 84321-9813 HealthRider® is not responsible or liable for indirect, special or consequential damages arising out of or in your bill of ICON Health & Fitness, Inc...Product as instructed, return any person receiving the Product as store display modules. LIMITED WARRANTY WHAT IS COVERED-The entire HealthRider® SOFTSTRIDER S150™ treadmill ("Product") is located or advise you how to ship the Product for service. Remember to do not allow limitations on...


