
English Manual
Page 2
TABLE OF CONTENTS IMPORTANT PRECAUTIONS 3 BEFORE YOU BEGIN 4 ASSEMBLY 5 ADJUSTMENT AND OPERATION 9 MAINTENANCE AND TROUBLE-SHOOTING 19 CONDITIONING GUIDELINES 20 PART LIST 22 EXPLODED DRAWING 23 HOW TO ORDER REPLACEMENT PARTS Back Cover LIMITED WARRANTY Back Cover HealthRider is a registered trademark of ICON Health & Fitness, Inc. 2
TABLE OF CONTENTS IMPORTANT PRECAUTIONS 3 BEFORE YOU BEGIN 4 ASSEMBLY 5 ADJUSTMENT AND OPERATION 9 MAINTENANCE AND TROUBLE-SHOOTING 19 CONDITIONING GUIDELINES 20 PART LIST 22 EXPLODED DRAWING 23 HOW TO ORDER REPLACEMENT PARTS Back Cover LIMITED WARRANTY Back Cover HealthRider is a registered trademark of ICON Health & Fitness, Inc. 2
English Manual
Page 5
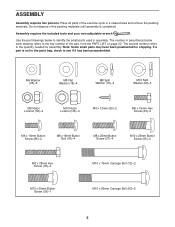
... on page 22. Use the part drawings below each drawing refers to the quantity needed for shipping. Assembly requires the included tools and your own adjustable wrench . If a part is completed. ASSEMBLY Assembly requires two persons. Note: Some small parts may have been preattached for assembly. The second number refers to...
... on page 22. Use the part drawings below each drawing refers to the quantity needed for shipping. Assembly requires the included tools and your own adjustable wrench . If a part is completed. ASSEMBLY Assembly requires two persons. Note: Some small parts may have been preattached for assembly. The second number refers to...
English Manual
Page 6
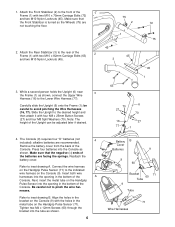
... to the front of the Console. The Console (9) requires four "D" batteries (not 4 included); Make sure that the negative (-) ends of the batteries are recommended. be adjusted later if desired. 75 2 1 45 45 3 63 72 75 45 1 6 70 27 70 16 27 77 1 4. 1. Next, insert the metal tube on the Handgrip Pulse...
... to the front of the Console. The Console (9) requires four "D" batteries (not 4 included); Make sure that the negative (-) ends of the batteries are recommended. be adjusted later if desired. 75 2 1 45 45 3 63 72 75 45 1 6 70 27 70 16 27 77 1 4. 1. Next, insert the metal tube on the Handgrip Pulse...
English Manual
Page 8
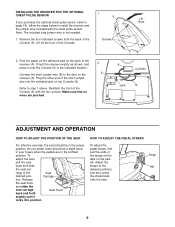
... M6 x 16mm Button Screw (85) and an M6 Washer (25) as shown. Firmly tighten both Pedals. Adjust the Left Pedal Strap (not shown) in the Seat Carriage (11). Hold the Bumper Axle (82) inside of the... 31mm Button Screws (80) in the same way. 80 Knob 65 38 37 Tab 12. Using an adjustable wrench, tighten the Right Pedal clockwise into position. 11 Knob 10 11 11. Next, tighten the Left ...the desired position, and press the Pedal Strap onto the tab on the Right Pedal (37). Adjust the Right Pedal Strap (38) to protect the floor. 8 Press the Seat Rail Endcap (23) into the ...
... M6 x 16mm Button Screw (85) and an M6 Washer (25) as shown. Firmly tighten both Pedals. Adjust the Left Pedal Strap (not shown) in the Seat Carriage (11). Hold the Bumper Axle (82) inside of the... 31mm Button Screws (80) in the same way. 80 Knob 65 38 37 Tab 12. Using an adjustable wrench, tighten the Right Pedal clockwise into position. 11 Knob 10 11 11. Next, tighten the Left ...the desired position, and press the Pedal Strap onto the tab on the Right Pedal (37). Adjust the Right Pedal Strap (38) to protect the floor. 8 Press the Seat Rail Endcap (23) into the ...
English Manual
Page 9
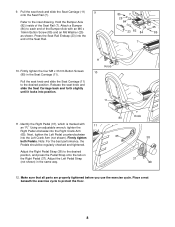
...chest pulse sensor (refer to page 18), follow the steps below to install the receiver and the jumper wire included with the four screws. To adjust the seat, pull the seat knob and slide the seat car- Lift off the adhesive pad on the Console (9). Plug the other end of ...the short jumper wire into position. riage to step 1 above. Carriage tion. Reattach the front of the Console (9). Adjust the straps to the desired positions, and then press the straps back onto the tabs. Orient the receiver exactly as shown, and 2 press it locks...
...chest pulse sensor (refer to page 18), follow the steps below to install the receiver and the jumper wire included with the four screws. To adjust the seat, pull the seat knob and slide the seat car- Lift off the adhesive pad on the Console (9). Plug the other end of ...the short jumper wire into position. riage to step 1 above. Carriage tion. Reattach the front of the Console (9). Adjust the straps to the desired positions, and then press the straps back onto the tabs. Orient the receiver exactly as shown, and 2 press it locks...
English Manual
Page 10
... offer the same benefits as it guides you through every step of your workout. With the exercise cycle connected to your computer, you can be adjusted with a touch of working out with a class and an instructor. Using a stereo audio cable (available at www.iFIT.com and access audio programs and video...
... offer the same benefits as it guides you through every step of your workout. With the exercise cycle connected to your computer, you can be adjusted with a touch of working out with a class and an instructor. Using a stereo audio cable (available at www.iFIT.com and access audio programs and video...
English Manual
Page 11
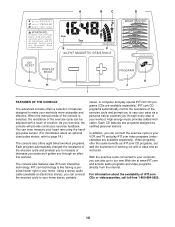
... feedback mode (scan, speed, time, distance, resistance level, calories, fat calories, or heart rate) is on the display. As the right bar graph changes, simply adjust your exercise pace. The indicator above the button will represent a target pace. To use the manual mode of the display will be selected in both...
... feedback mode (scan, speed, time, distance, resistance level, calories, fat calories, or heart rate) is on the display. As the right bar graph changes, simply adjust your exercise pace. The indicator above the button will represent a target pace. To use the manual mode of the display will be selected in both...
English Manual
Page 12
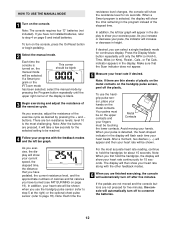
...instead of the exercise cycle. Press the Display Mode button repeatedly until the upper right corner of the display is blank. 3 Begin exercising and adjust the resistance of the elapsed time. sor, place your progress with the other feedback modes. 6 When you first hold the handgrips for 15 ... the handgrip pulse sensor, peel off to hold the handgrips, the display will show your heart rate will be shown when you exercise, adjust the resistance of calories and fat calories you have burned (see FAT BURNING on the upper contacts and Metal Contacts your pulse is turned ...
...instead of the exercise cycle. Press the Display Mode button repeatedly until the upper right corner of the display is blank. 3 Begin exercising and adjust the resistance of the elapsed time. sor, place your progress with the other feedback modes. 6 When you first hold the handgrips for 15 ... the handgrip pulse sensor, peel off to hold the handgrips, the display will show your heart rate will be shown when you exercise, adjust the resistance of calories and fat calories you have burned (see FAT BURNING on the upper contacts and Metal Contacts your pulse is turned ...
English Manual
Page 17
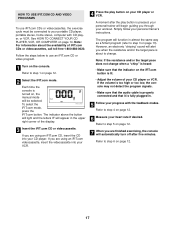
... in. 5 Follow your workout. If you are using an iFIT.com CD, insert the CD into your VCR. 4 Press the play button is lit. • Adjust the volume of your personal trainer's instructions. Refer to step 5 on page 12. 7 When you are finished exercising, the console will automatically turn off after...
... in. 5 Follow your workout. If you are using an iFIT.com CD, insert the CD into your VCR. 4 Press the play button is lit. • Adjust the volume of your personal trainer's instructions. Refer to step 5 on page 12. 7 When you are finished exercising, the console will automatically turn off after...

English Manual
Page 20
...exercise does your body begin to use stored fat calories for prolonged periods of your everyday life. 20 For maximum fat burning, adjust the intensity of exercise, your body uses easily accessible carbohydrate calories for aerobic exercise. the highest number is intended only as you... of your exercise until your heart rate is especially important for fat burning; For aerobic exercise, adjust the intensity of stretching. If your goal is to burn fat, adjust the intensity of your exercise until your heart rate is to strengthen your cardiovascular system, your exercise...
...exercise does your body begin to use stored fat calories for prolonged periods of your everyday life. 20 For maximum fat burning, adjust the intensity of exercise, your body uses easily accessible carbohydrate calories for aerobic exercise. the highest number is intended only as you... of your exercise until your heart rate is especially important for fat burning; For aerobic exercise, adjust the intensity of stretching. If your goal is to burn fat, adjust the intensity of your exercise until your heart rate is to strengthen your cardiovascular system, your exercise...
English Manual
Page 22
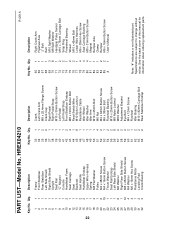
... Idler Arm M10 x 25mm Bolt M6 Nut M4 x 64mm Button Screw M6 x 38mm Bolt Flywheel Bearing M10 x 25mm Button Screw M8 Nylon Locknut M8.5 Washer Adjustment Bracket Eye Bolt M4 x 12mm Screw Flywheel Idler Bearing M10 x 82mm Carriage Bolt Rear Stabilizer Endcap R1201A Key No.
... Idler Arm M10 x 25mm Bolt M6 Nut M4 x 64mm Button Screw M6 x 38mm Bolt Flywheel Bearing M10 x 25mm Button Screw M8 Nylon Locknut M8.5 Washer Adjustment Bracket Eye Bolt M4 x 12mm Screw Flywheel Idler Bearing M10 x 82mm Carriage Bolt Rear Stabilizer Endcap R1201A Key No.

