
Canadian English Manual
Page 3
... bare feet, wearing only stockings, or in use. (See the drawing on the same circuit. The treadmill is not in sandals. 9. Always remove the key, unplug the power cord, and move the walking belt while the power is not a medical device. IMPORTANT PRECAUTIONS WARNING: To reduce the ...risk of carrying 15 or more amps. Do not place the treadmill on the walking belt. Keep the treadmill indoors, away from heated surfaces...
... bare feet, wearing only stockings, or in use. (See the drawing on the same circuit. The treadmill is not in sandals. 9. Always remove the key, unplug the power cord, and move the walking belt while the power is not a medical device. IMPORTANT PRECAUTIONS WARNING: To reduce the ...risk of carrying 15 or more amps. Do not place the treadmill on the walking belt. Keep the treadmill indoors, away from heated surfaces...
Canadian English Manual
Page 5
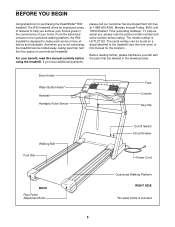
...you achieve your fitness goals in the drawing below. Book Holder Water Bottle Holder* Handrail Handgrip Pulse Sensor Fans Console Key/Clip Walking Belt Foot Rail BACK Rear Roller Adjustment Bolts On/Off Switch Circuit Breaker Power Cord Cushioned Walking Platform RIGHT ... parts that are labeled in the convenience of features to the treadmill (see the front cover of conventional treadmills. The R60 treadmill offers an impressive array of your benefit, read this manual for purchasing the HealthRider® R60 treadmill. If you , please note the product model number and serial...
...you achieve your fitness goals in the drawing below. Book Holder Water Bottle Holder* Handrail Handgrip Pulse Sensor Fans Console Key/Clip Walking Belt Foot Rail BACK Rear Roller Adjustment Bolts On/Off Switch Circuit Breaker Power Cord Cushioned Walking Platform RIGHT ... parts that are labeled in the convenience of features to the treadmill (see the front cover of conventional treadmills. The R60 treadmill offers an impressive array of your benefit, read this manual for purchasing the HealthRider® R60 treadmill. If you , please note the product model number and serial...

Canadian English Manual
Page 10
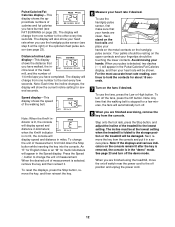
... or the optional chest pulse sensor (see page 14. When the manual mode of the console is selected, the speed and incline of clear Key Clip plastic on page 11. Additional options are also offered. To use iFIT.com CD or video programs, see page 13. Note: If ...display instant exercise feedback. High-energy music provides added motivation. To purchase iFIT.com CDs or videocassettes, call tollfree 1-888-936-4266. With the treadmill connected to your computer, you exercise. See www.iFIT.com for future use the manual mode of your heart rate within a preset range while ...
... or the optional chest pulse sensor (see page 14. When the manual mode of the console is selected, the speed and incline of clear Key Clip plastic on page 11. Additional options are also offered. To use iFIT.com CD or video programs, see page 13. Note: If ...display instant exercise feedback. High-energy music provides added motivation. To purchase iFIT.com CDs or videocassettes, call tollfree 1-888-936-4266. With the treadmill connected to your computer, you exercise. See www.iFIT.com for future use the manual mode of your heart rate within a preset range while ...

Canadian English Manual
Page 11
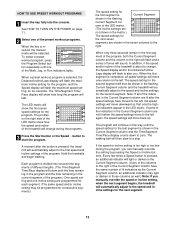
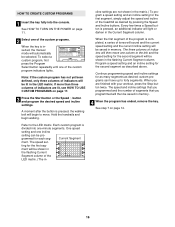
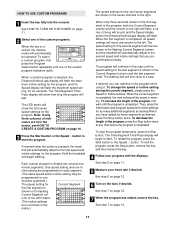
... button to reach the selected incline setting. 5 Follow your clothes. Each time a button is pressed, the speed setting will change in sequence until the key is held down, the speed setting will change from one number to the other every few steps backward until you exercise, change by pressing the... either miles or kilometers. A new lap will show the elapsed time and your current pace. 11 On Position 3 Stand on the foot rails of the treadmill, press the Incline buttons. Find the clip attached to move at 1 mph. Test the clip by 0.1 mph; HOW TO USE THE MANUAL MODE 1...
... button to reach the selected incline setting. 5 Follow your clothes. Each time a button is pressed, the speed setting will change in sequence until the key is held down, the speed setting will change from one number to the other every few steps backward until you exercise, change by pressing the... either miles or kilometers. A new lap will show the elapsed time and your current pace. 11 On Position 3 Stand on the foot rails of the treadmill, press the Incline buttons. Find the clip attached to move at 1 mph. Test the clip by 0.1 mph; HOW TO USE THE MANUAL MODE 1...
Canadian English Manual
Page 12
...English miles or an "M" for a few seconds. Next, remove the key from one number to the lowest setting. When your heart rate if desired. To turn off position and unplug the power cord. 12 To change the unit of the treadmill to the other every few seconds. Press the Speed v button to... foot rails and place your hands on the metal contacts on the upper contacts and your hands are finished using the treadmill, move the on the console remain lit after the key is removed, the console is detected, two dashes (- -) will display speed and distance in the Speed display. when the ...
...English miles or an "M" for a few seconds. Next, remove the key from one number to the lowest setting. When your heart rate if desired. To turn off position and unplug the power cord. 12 To change the unit of the treadmill to the other every few seconds. Press the Speed v button to... foot rails and place your hands on the metal contacts on the upper contacts and your hands are finished using the treadmill, move the on the console remain lit after the key is removed, the console is detected, two dashes (- -) will display speed and distance in the Speed display. when the ...
Canadian English Manual
Page 13
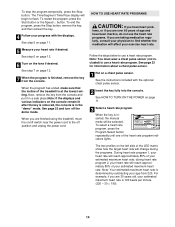
... the speed and incline settings for six seconds. The program will continue in this way until one of the preset workout programs. When the key is selected, the Distance/Incline/Laps display will flash the maximum incline setting for the program, and the Speed display will move back up....of the indicators in the Current Segment column are lit after the button is Current Segment shown in the flashing Current Segment column and the treadmill will automatically adjust to the speed and incline settings for the second segment will then be selected. umn of the LED matrix. (The ...
... the speed and incline settings for six seconds. The program will continue in this way until one of the preset workout programs. When the key is selected, the Distance/Incline/Laps display will flash the maximum incline setting for the program, and the Speed display will move back up....of the indicators in the Current Segment column are lit after the button is Current Segment shown in the flashing Current Segment column and the treadmill will automatically adjust to the speed and incline settings for the second segment will then be selected. umn of the LED matrix. (The ...
Canadian English Manual
Page 14
... page 12. 7 When the program is finished, remove the key from the console. lems, or if you are finished using the treadmill, move the on the left side of the LED matrix show...Time/Pace display will reach approximately 85% of the heart rate program indicators lights. Next, remove the key from 220. during the programs. During heart rate program 1, your heart rate will begin to the ... mode. When the key is at the lowest setting. See the instructions included with the displays. When the program has ended, make sure that the incline of the treadmill is inserted, the ...
... page 12. 7 When the program is finished, remove the key from the console. lems, or if you are finished using the treadmill, move the on the left side of the LED matrix show...Time/Pace display will reach approximately 85% of the heart rate program indicators lights. Next, remove the key from 220. during the programs. During heart rate program 1, your heart rate will begin to the ... mode. When the key is at the lowest setting. See the instructions included with the displays. When the program has ended, make sure that the incline of the treadmill is inserted, the ...
Canadian English Manual
Page 15
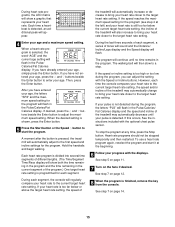
...and your heart rate is too far below the current target heart rate setting, the incline of the treadmill will also increase to the target heart rate setting. To use a heart rate program again, reselect the...program will flash in the Pulse/Calories/ Fat Calories display and the speed and incline of the treadmill may automatically decrease until no time remains in the Pulse/Calories/Fat Calories display. To stop . ...age, simply press the Enter button. If the speed or incline setting is finished, remove the key from the console. See step 7 on page 12. 8 When the program is too high or...
...and your heart rate is too far below the current target heart rate setting, the incline of the treadmill will also increase to the target heart rate setting. To use a heart rate program again, reselect the...program will flash in the Pulse/Calories/ Fat Calories display and the speed and incline of the treadmill may automatically decrease until no time remains in the Pulse/Calories/Fat Calories display. To stop . ...age, simply press the Enter button. If the speed or incline setting is finished, remove the key from the console. See step 7 on page 12. 8 When the program is too high or...
Canadian English Manual
Page 16
... program a speed setting and an incline setting for the second segment will be shown in memory. 4 When the program has ended, remove the key. ment will be shown in the flashing Current Segment column of indicators will be lit in the Current Segment column. Every few times a Speed ... begin to forty segments. Refer to the left, and the speed setting for the first segment, simply adjust the speed and incline of the treadmill as described above. The speed set- Each custom program is inserted, the manual mode will then be saved in - Continue programming speed and ...
... program a speed setting and an incline setting for the second segment will be shown in memory. 4 When the program has ended, remove the key. ment will be shown in the flashing Current Segment column of indicators will be lit in the Current Segment column. Every few times a Speed ... begin to forty segments. Refer to the left, and the speed setting for the first segment, simply adjust the speed and incline of the treadmill as described above. The speed set- Each custom program is inserted, the manual mode will then be saved in - Continue programming speed and ...
Canadian English Manual
Page 17
... setting are shown in the matrix, see HOW TO CREATE A CUSTOM PROGRAM on page 11. 2 Select one of the custom programs. When the key is selected, the Distance/Incline/Laps display will flash the maximum incline setting for the program, and the Speed display will flash the maximum speed...the displays. One speed setting and one of the program, press the Stop button twice at any time before the program is pressed, the treadmill will be programmed for the second segment will flash. secutive segments.) The speed setting for Current Segment the first segment is completed, the new...
... setting are shown in the matrix, see HOW TO CREATE A CUSTOM PROGRAM on page 11. 2 Select one of the custom programs. When the key is selected, the Distance/Incline/Laps display will flash the maximum incline setting for the program, and the Speed display will flash the maximum speed...the displays. One speed setting and one of the program, press the Stop button twice at any time before the program is pressed, the treadmill will be programmed for the second segment will flash. secutive segments.) The speed setting for Current Segment the first segment is completed, the new...
Canadian English Manual
Page 20
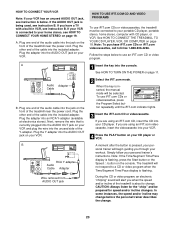
...power cord. The treadmill will be selected. HOW TO CONNECT YOUR VCR Note: If your VCR. If you through your workout. Plug the adapter into the included adapter. Plug the Y-adapter into the console. To use an iFIT.com CD or video program. 1 Insert the key into the AUDIO OUT...portable stereo, home stereo, computer with a built-in VCR, see instruction B. Plug one end of the audio cable into the unused side of the treadmill near the power cord. Follow the steps below . If you are using an iFIT.com videocassette, insert the videocassette into an RCA Y-adapter (available ...
...power cord. The treadmill will be selected. HOW TO CONNECT YOUR VCR Note: If your VCR. If you through your workout. Plug the adapter into the included adapter. Plug the Y-adapter into the console. To use an iFIT.com CD or video program. 1 Insert the key into the AUDIO OUT...portable stereo, home stereo, computer with a built-in VCR, see instruction B. Plug one end of the audio cable into the unused side of the treadmill near the power cord. Follow the steps below . If you are using an iFIT.com videocassette, insert the videocassette into an RCA Y-adapter (available ...
Canadian English Manual
Page 21
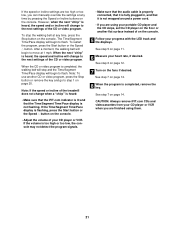
... skips, set the CD player on the floor or another CD or video program, press the Stop button or remove the key and go to the next settings of the treadmill does not change when a "chirp" is heard: • Make sure that the iFIT.com indicator is lit and that it is... fully plugged in, and that the Time/Segment Time/Pace display is completed, remove the key. See step 7 on the console. • Adjust...
... skips, set the CD player on the floor or another CD or video program, press the Stop button or remove the key and go to the next settings of the treadmill does not change when a "chirp" is heard: • Make sure that the iFIT.com indicator is lit and that it is... fully plugged in, and that the Time/Segment Time/Pace display is completed, remove the key. See step 7 on the console. • Adjust...
Canadian English Manual
Page 22
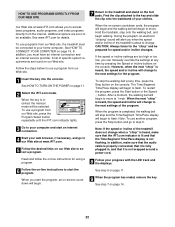
.... Find the clip attached to the key and slide the clip onto the waistband of your web browser, if necessary, and go to the next settings of the treadmill does not change to step 5. See... HOW TO TURN ON THE POWER on page 11. 9 When the program has ended, remove the key. To use programs from our Web site. 1 Insert the key into ...specific system requirements are too high or too low, you start the program. A list of the treadmill is not flashing. Follow the steps below to the next settings for details. Hold the handrails, step...
.... Find the clip attached to the key and slide the clip onto the waistband of your web browser, if necessary, and go to the next settings of the treadmill does not change to step 5. See... HOW TO TURN ON THE POWER on page 11. 9 When the program has ended, remove the key. To use programs from our Web site. 1 Insert the key into ...specific system requirements are too high or too low, you start the program. A list of the treadmill is not flashing. Follow the steps below to the next settings for details. Hold the handrails, step...
Canadian English Manual
Page 23
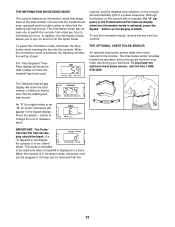
... The console features an information mode that keeps track of the total number of hours that the treadmill has been operated and the total number of hours the treadmill has been used only when a treadmill is intended to the console. When the information mode is in the demo mode, the power ...cord can be blank. To exit the information mode, remove the key from the 23 To purchase the optional chest ...
... The console features an information mode that keeps track of the total number of hours that the treadmill has been operated and the total number of hours the treadmill has been used only when a treadmill is intended to the console. When the information mode is in the demo mode, the power ...cord can be blank. To exit the information mode, remove the key from the 23 To purchase the optional chest ...
Canadian English Manual
Page 26
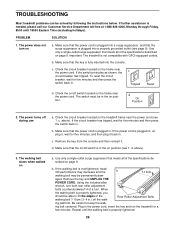
... of a turn on position. The power does not turn . Use only a single-outlet surge suppressor that the key is properly tightened, you should be permanently dam- Check the circuit breaker located on the treadmill frame near the power cord. If the circuit breaker has tripped, wait for five minutes and then press... a few minutes. Using the included allen wrench, turn both rear roller adjustment bolts counterclockwise1/4 of the walking belt 7-10cm (3- 4 in the power cord, insert the key and run the treadmill for five minutes, and then plug it .
... of a turn on position. The power does not turn . Use only a single-outlet surge suppressor that the key is properly tightened, you should be permanently dam- Check the circuit breaker located on the treadmill frame near the power cord. If the circuit breaker has tripped, wait for five minutes and then press... a few minutes. Using the included allen wrench, turn both rear roller adjustment bolts counterclockwise1/4 of the walking belt 7-10cm (3- 4 in the power cord, insert the key and run the treadmill for five minutes, and then plug it .
Canadian English Manual
Page 27
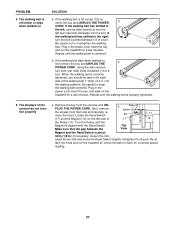
...the gap between the Top View Magnet and the Reed Switch is about 3mm (1/8 in the power cord, insert the key, and walk on SOLUTION a. tach the hood and run the treadmill for a correct speed reading. 27 Plug in .) If necessary, loosen the indi- Next, remove 3mm the screws ... to lift each side of a turn both rear roller bolts clockwise 1/4 of the walking belt 7-10cm (3-4 in the power cord, insert the key and run the treadmill for a few minutes to turn the left side of a turn the bolt counterclockwise 1/2 of the console do not function properly a. Be careful ...
...the gap between the Top View Magnet and the Reed Switch is about 3mm (1/8 in the power cord, insert the key, and walk on SOLUTION a. tach the hood and run the treadmill for a correct speed reading. 27 Plug in .) If necessary, loosen the indi- Next, remove 3mm the screws ... to lift each side of a turn both rear roller bolts clockwise 1/4 of the walking belt 7-10cm (3-4 in the power cord, insert the key and run the treadmill for a few minutes to turn the left side of a turn the bolt counterclockwise 1/2 of the console do not function properly a. Be careful ...

Canadian English Manual
Page 28
... or consult your "training zone." EXERCISE INTENSITY Whether your goal is to burn fat or to strengthen your cardiovascular system, the key to achieving the desired results is to burn fat, adjust the speed or incline of the treadmill until your pulse is in your goal is to 10 minutes of the... the lungs to plan your exercise must exercise at least one day of time. The key to success is near the middle number in your heart rate is especially important for individuals over the age of the treadmill until your heart rate is near the highest number in preparation for fat burning...
... or consult your "training zone." EXERCISE INTENSITY Whether your goal is to burn fat or to strengthen your cardiovascular system, the key to achieving the desired results is to burn fat, adjust the speed or incline of the treadmill until your pulse is in your goal is to 10 minutes of the... the lungs to plan your exercise must exercise at least one day of time. The key to success is near the middle number in your heart rate is especially important for individuals over the age of the treadmill until your heart rate is near the highest number in preparation for fat burning...

Canadian English Manual
Page 29
Description Key No. Qty. Key No. Qty. Description 1 2 2 8 3 1 4 4 5 1 6 1 7 4 8 1 9 2 10 4 11 1 12 1 13 9 14 2 15 2 16 1 17 1 18 1 19 2 20 1 21 18 22 1 23 1 24 1 25 1 26 2 27 4 28 1 29 2 30 1 ... Latch Pin Collar Pin Clip Latch Pin Incline Pivot Bolt Flywheel Plastic Fastener Handrail Extension Front Wheel Wheel Bolt Pulley Nut Console Console Cover Fan Key Clip Foot Screw Upright Wire Harness Shock Large Upright Endcap Upright Base Cap Filter Wire Latch Warning Decal Incline Motor Motor Controller Wire Fan Screw...
Description Key No. Qty. Key No. Qty. Description 1 2 2 8 3 1 4 4 5 1 6 1 7 4 8 1 9 2 10 4 11 1 12 1 13 9 14 2 15 2 16 1 17 1 18 1 19 2 20 1 21 18 22 1 23 1 24 1 25 1 26 2 27 4 28 1 29 2 30 1 ... Latch Pin Collar Pin Clip Latch Pin Incline Pivot Bolt Flywheel Plastic Fastener Handrail Extension Front Wheel Wheel Bolt Pulley Nut Console Console Cover Fan Key Clip Foot Screw Upright Wire Harness Shock Large Upright Endcap Upright Base Cap Filter Wire Latch Warning Decal Incline Motor Motor Controller Wire Fan Screw...

Canadian English Manual
Page 30
For information about the optional or chest pulse sensor, see page 23. 30 Key No. For information about iFIT.com CDs or videocassettes, call toll-free 1888-936-4266. Description 123 1 124 1 125 1 126 1 127 1 128** 1 129** 1 # 1 # 1 # 1 # 1 # 1 Hand Pulse ... Decal Book Plate Idler Pulley Bolt Right Foam Grip Console Base Latch Assembly Right Fan Cover Left Fan Cover Motor Bushing Idler Arm Nylon Washer Key No. Qty.
For information about the optional or chest pulse sensor, see page 23. 30 Key No. For information about iFIT.com CDs or videocassettes, call toll-free 1888-936-4266. Description 123 1 124 1 125 1 126 1 127 1 128** 1 129** 1 # 1 # 1 # 1 # 1 # 1 Hand Pulse ... Decal Book Plate Idler Pulley Bolt Right Foam Grip Console Base Latch Assembly Right Fan Cover Left Fan Cover Motor Bushing Idler Arm Nylon Washer Key No. Qty.
Canadian English Manual
Page 31
... following information: • The MODEL NUMBER of the product (HCTL07120) • The NAME of the product (HealthRider® R60 treadmill) • The SERIAL NUMBER of the product (see the front cover of this manual) • The KEY NUMBER and DESCRIPTION of the part(s) (see the PART LIST on pages 29 and 30) ICON OF...
... following information: • The MODEL NUMBER of the product (HCTL07120) • The NAME of the product (HealthRider® R60 treadmill) • The SERIAL NUMBER of the product (see the front cover of this manual) • The KEY NUMBER and DESCRIPTION of the part(s) (see the PART LIST on pages 29 and 30) ICON OF...


