

English Manual
Page 3
... the treadmill. 4. Athletic support clothes are adequately informed of burns, fire, electric shock, or injury to ensure that the storage latch is turned off circuit breaker.) 10. When folding or moving the treadmill, make sure that all users of this treadmill are recommended for the location of clearance behind it is being administered. 6. Always remove the key, unplug the power cord, and move the walking belt while the power is...
... the treadmill. 4. Athletic support clothes are adequately informed of burns, fire, electric shock, or injury to ensure that the storage latch is turned off circuit breaker.) 10. When folding or moving the treadmill, make sure that all users of this treadmill are recommended for the location of clearance behind it is being administered. 6. Always remove the key, unplug the power cord, and move the walking belt while the power is...

English Manual
Page 4
... a free replacement decal. Inspect and properly tighten all parts of 35 or persons with pre-existing health problems. Read all instructions before using iFIT.com CD's and videos, you are not using iFIT.com CD's and videos, an electronic "chirping" sound will change . Always listen for speed and/or incline changes. tenance and adjustment procedures de- This treadmill is especially important for in the location shown. 4 Always unplug the power cord immediately...
... a free replacement decal. Inspect and properly tighten all parts of 35 or persons with pre-existing health problems. Read all instructions before using iFIT.com CD's and videos, you are not using iFIT.com CD's and videos, an electronic "chirping" sound will change . Always listen for speed and/or incline changes. tenance and adjustment procedures de- This treadmill is especially important for in the location shown. 4 Always unplug the power cord immediately...
English Manual
Page 5
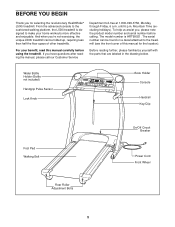
...; L500i treadmill. If you for the location). Mountain Time (excluding holidays). Water Bottle Holder (Bottle not included) Handgrip Pulse Sensor Lock Knob Book Holder Console Handrail Key/Clip Foot Pad Walking Belt Rear Roller Adjustment Bolts On/Off Circuit Breaker Power Cord Front Wheel 5 For your home workouts more effective and enjoyable. BEFORE YOU BEGIN Thank you have questions after reading the manual, please call our Customer Service Department toll-free...
...; L500i treadmill. If you for the location). Mountain Time (excluding holidays). Water Bottle Holder (Bottle not included) Handgrip Pulse Sensor Lock Knob Book Holder Console Handrail Key/Clip Foot Pad Walking Belt Rear Roller Adjustment Bolts On/Off Circuit Breaker Power Cord Front Wheel 5 For your home workouts more effective and enjoyable. BEFORE YOU BEGIN Thank you have questions after reading the manual, please call our Customer Service Department toll-free...

English Manual
Page 8
... or call 1-800-806-3651 and order part number 146148. Grounding Pin Grounded Outlet Grounding Plug Grounded Outlet Box Adapter Surge Suppressor Use only a single-outlet surge suppressor that is functioning properly. Failure to determine if the outlet box cover is damaged, the walking belt may change speed or stop unexpectedly, which may be used to connect the surge suppressor to a 2-pole receptacle as...
... or call 1-800-806-3651 and order part number 146148. Grounding Pin Grounded Outlet Grounding Plug Grounded Outlet Box Adapter Surge Suppressor Use only a single-outlet surge suppressor that is functioning properly. Failure to determine if the outlet box cover is damaged, the walking belt may change speed or stop unexpectedly, which may be used to connect the surge suppressor to a 2-pole receptacle as...

English Manual
Page 9
... personal trainer programs are also featured. Two heart rate programs are also offered. High-energy music provides added motivation. With the treadmill connected to your computer, you can be available. To use an iFIT.com CD or video program, refer to page 17. When the manual mode of the console is selected, the speed and incline of a button. Note: See page 20 for details. Using the included audio cable, you...
... personal trainer programs are also featured. Two heart rate programs are also offered. High-energy music provides added motivation. With the treadmill connected to your computer, you can be available. To use an iFIT.com CD or video program, refer to page 17. When the manual mode of the console is selected, the speed and incline of a button. Note: See page 20 for details. Using the included audio cable, you...

English Manual
Page 10
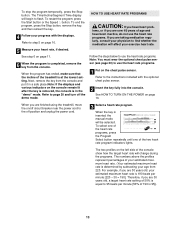
... and the Manual Control indicator will light. To restart the walking belt, press the Start button or the Speed v button. If the key is in the power cord (see page 24). 4 Change the incline of the treadmill, press the Incline buttons. As you use the handgrip pulse sensor (refer to start the walking belt. Each time a button is selected, the program display will change in either miles or kilometers. The LED Track-When the manual mode or the iFIT.com mode is pressed, the speed setting will...
... and the Manual Control indicator will light. To restart the walking belt, press the Start button or the Speed v button. If the key is in the power cord (see page 24). 4 Change the incline of the treadmill, press the Incline buttons. As you use the handgrip pulse sensor (refer to start the walking belt. Each time a button is selected, the program display will change in either miles or kilometers. The LED Track-When the manual mode or the iFIT.com mode is pressed, the speed setting will...
English Manual
Page 11
... desired unit of the treadmill. Step onto the foot pads, press the Stop button, and adjust the incline of 1/4-mile laps you are clean. When you are finished using the handgrip pulse sensor, make sure that you have walked and the number of the treadmill to hold the contacts for metric kilometers will appear in the "demo" mode. The display will change from one number to the other every...
... desired unit of the treadmill. Step onto the foot pads, press the Stop button, and adjust the incline of 1/4-mile laps you are clean. When you are finished using the handgrip pulse sensor, make sure that you have walked and the number of the treadmill to hold the contacts for metric kilometers will appear in the "demo" mode. The display will change from one number to the other every...
English Manual
Page 13
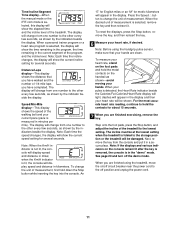
... that the incline of the treadmill is inserted, the manual mode will begin to 95 beats per minute [220 - 30 = 190]. To restart the program, press the Start button or the Speed v button. Refer to step 5 on the chest pulse sensor. For example, if you are taking medication regularly, consult your physician to page 20 and turn off the demo mode. Next, remove the key from the console and put...
... that the incline of the treadmill is inserted, the manual mode will begin to 95 beats per minute [220 - 30 = 190]. To restart the program, press the Start button or the Speed v button. Refer to step 5 on the chest pulse sensor. For example, if you are taking medication regularly, consult your physician to page 20 and turn off the demo mode. Next, remove the key from the console and put...

English Manual
Page 14
... instructions included with the displays. If this way until your heart rate. Heart rate programs cannot be decreased any further. When a heart rate program is completed, remove the key from the console. You must enter your pulse is detected. To stop . During heart rate programs, the program display will increase. If you decrease the incline, the speed will show both the time remaining in the program and the time remaining in memory. 5 Press the Start button...
... instructions included with the displays. If this way until your heart rate. Heart rate programs cannot be decreased any further. When a heart rate program is completed, remove the key from the console. You must enter your pulse is detected. To stop . During heart rate programs, the program display will increase. If you decrease the incline, the speed will show both the time remaining in the program and the time remaining in memory. 5 Press the Start button...

English Manual
Page 17
... LEFT Audio Adapter Cable B. Next, remove the wire that is flashing, press the Start button or the Speed v button on page 10. 2 Select the iFIT.com mode. B ANT. Plug one end of the treadmill near the power cord. Plug the adapter into the jack on page 16. Note: To purchase iFIT.com CD's or videocassettes, call toll-free 1-800-735-0768. Simply follow your home stereo, see instruction B. Note: If the Time/Incline...
... LEFT Audio Adapter Cable B. Next, remove the wire that is flashing, press the Start button or the Speed v button on page 10. 2 Select the iFIT.com mode. B ANT. Plug one end of the treadmill near the power cord. Plug the adapter into the jack on page 16. Note: To purchase iFIT.com CD's or videocassettes, call toll-free 1-800-735-0768. Simply follow your home stereo, see instruction B. Note: If the Time/Incline...

English Manual
Page 18
..., the walking belt will stop the walking belt at any time, press the Stop button on the console. To restart the program, press the Start button or the Speed v button. When the CD or video program is completed, remove the key. If the volume is too high or too low, the console may not detect the program signals. • Make sure that the audio cable is properly connected, that it is not wrapped around a power cord...
..., the walking belt will stop the walking belt at any time, press the Stop button on the console. To restart the program, press the Start button or the Speed v button. When the CD or video program is completed, remove the key. If the volume is too high or too low, the console may not detect the program signals. • Make sure that the audio cable is properly connected, that it is not wrapped around a power cord...
English Manual
Page 19
... a power cord. 8 Follow your clothes. A list of the treadmill does not change . If the speed or incline settings are soon to change when a "chirp" is heard, make sure that the audio cable is properly connected, that it is fully plugged in, and that the Time/Incline/Segment Time display is completed, the walking belt will begin to flash. After a moment, the walking belt will begin to move at any time, press...
... a power cord. 8 Follow your clothes. A list of the treadmill does not change . If the speed or incline settings are soon to change when a "chirp" is heard, make sure that the audio cable is properly connected, that it is fully plugged in, and that the Time/Incline/Segment Time display is completed, the walking belt will begin to flash. After a moment, the walking belt will begin to move at any time, press...

English Manual
Page 20
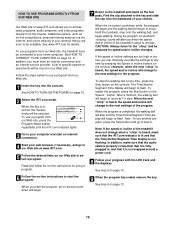
... optional chest pulse sensor adds even more features to switch the console from the console. 20 To select the information mode, hold down the Stop button while inserting the key into the console. To exit the information mode, remove the key from miles per hour to turn off the demo mode. The Distance/Laps display will automatically light in a store. When the console is in the demo mode, the power cord can be plugged in, the key can be removed...
... optional chest pulse sensor adds even more features to switch the console from the console. 20 To select the information mode, hold down the Stop button while inserting the key into the console. To exit the information mode, remove the key from miles per hour to turn off the demo mode. The Distance/Laps display will automatically light in a store. When the console is in the demo mode, the power cord can be plugged in, the key can be removed...

English Manual
Page 21
... TO FOLD THE TREADMILL FOR STORAGE Before folding the treadmill, adjust the incline to the vertical position. 2. If this is not done, the treadmill may be able to safely lift 45 pounds (20 kg) in the locations shown at the right. Using your left hand, pull the latch knob to raise, lower, or move the treadmill without tipping it is securely held by the latch pin. 1. Latch Knob Pin Catch Open...
... TO FOLD THE TREADMILL FOR STORAGE Before folding the treadmill, adjust the incline to the vertical position. 2. If this is not done, the treadmill may be able to safely lift 45 pounds (20 kg) in the locations shown at the right. Using your left hand, pull the latch knob to raise, lower, or move the treadmill without tipping it is securely held by the latch pin. 1. Latch Knob Pin Catch Open...

English Manual
Page 23
... breaker located on /off . 64 1 23 Remove the key from the console. Remove the three indicated Small Screws (37). 64 37 Raise the Uprights (64) to the floor. TROUBLESHOOTING Most treadmill problems can be solved by following the instructions below. If further assistance is plugged in, unplug it, wait for five minutes, and then plug it back in. PROBLEM: The power does not turn on the console...
... breaker located on /off . 64 1 23 Remove the key from the console. Remove the three indicated Small Screws (37). 64 37 Raise the Uprights (64) to the floor. TROUBLESHOOTING Most treadmill problems can be solved by following the instructions below. If further assistance is plugged in, unplug it, wait for five minutes, and then plug it back in. PROBLEM: The power does not turn on the console...

English Manual
Page 24
...- PROBLEM: The walking belt is correctly tightened, you should be able to lift each side of a turn both rear roller adjustment bolts counterclockwise, 1/4 of the walking belt 3 to keep the walking belt centered. b. With the key inserted in the power cord, insert the key, and carefully walk on , call our Customer Service Department toll-free. b. The treadmill will recalibrate the incline. 24 If necessary, loosen the 3/4" 18 101 Screw (24) and move the Reed Switch slightly...
...- PROBLEM: The walking belt is correctly tightened, you should be able to lift each side of a turn both rear roller adjustment bolts counterclockwise, 1/4 of the walking belt 3 to keep the walking belt centered. b. With the key inserted in the power cord, insert the key, and carefully walk on , call our Customer Service Department toll-free. b. The treadmill will recalibrate the incline. 24 If necessary, loosen the 3/4" 18 101 Screw (24) and move the Reed Switch slightly...

English Manual
Page 25
..., adjust the speed and incline of your exercise program, do not keep your pulse in your condition, complete three workouts each workout with 5 to 10 minutes of 35 or individuals with at a relatively low intensity level for 20 to cool down -Finish each week, with preexisting health problems. The pulse sensor is near the bottom of the treadmill. After a few minutes of exercise, your body Training...
..., adjust the speed and incline of your exercise program, do not keep your pulse in your condition, complete three workouts each workout with 5 to 10 minutes of 35 or individuals with at a relatively low intensity level for 20 to cool down -Finish each week, with preexisting health problems. The pulse sensor is near the bottom of the treadmill. After a few minutes of exercise, your body Training...

English Manual
Page 27
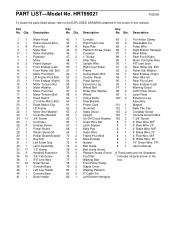
... MODEL NUMBER of the product (HRT99021) • The NAME of the product (HealthRider® L500i treadmill) • The SERIAL NUMBER of the product (see the front cover of this manual) • The KEY NUMBER and DESCRIPTION of the replacement part(s) (see the PART LIST and the EXPLODED DRAWING attached in the center of this manual) 27 HOW TO ORDER REPLACEMENT PARTS To order replacement parts, call our Customer Service Department toll-free at...
... MODEL NUMBER of the product (HRT99021) • The NAME of the product (HealthRider® L500i treadmill) • The SERIAL NUMBER of the product (see the front cover of this manual) • The KEY NUMBER and DESCRIPTION of the replacement part(s) (see the PART LIST and the EXPLODED DRAWING attached in the center of this manual) 27 HOW TO ORDER REPLACEMENT PARTS To order replacement parts, call our Customer Service Department toll-free at...
English Manual
Page 28
... 1 Reed Switch 59 1 Incline Motor 100* 2 Extension Leg 19 1 2" Incline Motor Bolt 60 1 Stop Bracket Assembly 20 1 Reed Switch Clip 61 1 Power Cord 101 1 Magnet 21 1 Lift Frame 62 1 Grommet 102 1 Belly Pan Clip 22 1 Motor Star Washer 63 2 Static Decal 103 2 Crossbar Screw 23 1 Controller Bracket 64 1 Upright 104 1 Console Ground Wire 24 11 3/4" Screw 65 1 On/Off Circuit Breaker 105 2 1 3/4" Screw 25 1 Controller 66 1 Audio Wire Nut # 1 4" Blue Wire, M/F 26 4 Endcap Screw 67 1 Latch Spacer # 1 4" Blue Wire...
... 1 Reed Switch 59 1 Incline Motor 100* 2 Extension Leg 19 1 2" Incline Motor Bolt 60 1 Stop Bracket Assembly 20 1 Reed Switch Clip 61 1 Power Cord 101 1 Magnet 21 1 Lift Frame 62 1 Grommet 102 1 Belly Pan Clip 22 1 Motor Star Washer 63 2 Static Decal 103 2 Crossbar Screw 23 1 Controller Bracket 64 1 Upright 104 1 Console Ground Wire 24 11 3/4" Screw 65 1 On/Off Circuit Breaker 105 2 1 3/4" Screw 25 1 Controller 66 1 Audio Wire Nut # 1 4" Blue Wire, M/F 26 4 Endcap Screw 67 1 Latch Spacer # 1 4" Blue Wire...
English Manual
Page 30
... in the Manual to any implied warranties of purchase. HOW LONG IS IT COVERED-ICON Health & Fitness, Inc. ("ICON"), extends a lifetime warranty on the outside of purchase. USER'S MANUAL-It is warranted to ship the Product for two years after the date of the carton and insure the product. ICON is located or advise you . LIMITED WARRANTY WHAT IS COVERED-The entire HealthRider® L500i treadmill ("Product") is...
... in the Manual to any implied warranties of purchase. HOW LONG IS IT COVERED-ICON Health & Fitness, Inc. ("ICON"), extends a lifetime warranty on the outside of purchase. USER'S MANUAL-It is warranted to ship the Product for two years after the date of the carton and insure the product. ICON is located or advise you . LIMITED WARRANTY WHAT IS COVERED-The entire HealthRider® L500i treadmill ("Product") is...


