
English Manual
Page 1
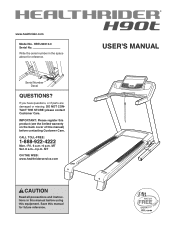
... a.m.-4 p.m. MT ON THE WEB: www.healthriderservice.com CAUTION Read all precautions and instructions in the space above for future reference. USER'S MANUAL Serial Number Decal QUESTIONS? If you have questions, or if parts are damaged or missing, DO NOT CONTACT THE STORE; HRTL90010.0 Serial ...No. IMPORTANT: Please register this product (see the limited warranty on the back cover of this manual) before using this manual before contacting Customer Care. www.healthrider.com Model No. Write the serial number in this equipment. please contact Customer Care.
... a.m.-4 p.m. MT ON THE WEB: www.healthriderservice.com CAUTION Read all precautions and instructions in the space above for future reference. USER'S MANUAL Serial Number Decal QUESTIONS? If you have questions, or if parts are damaged or missing, DO NOT CONTACT THE STORE; HRTL90010.0 Serial ...No. IMPORTANT: Please register this product (see the limited warranty on the back cover of this manual) before using this manual before contacting Customer Care. www.healthrider.com Model No. Write the serial number in this equipment. please contact Customer Care.
English Manual
Page 2
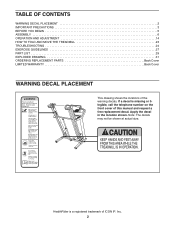
...the decal in the location shown. Note: The decals may not be shown at actual size. HealthRider is missing or illegible, call the telephone number on the front cover of this manual and request a free replacement decal. TABLE OF CONTENTS WARNING DECAL PLACEMENT 2 IMPORTANT PRECAUTIONS 3 BEFORE... YOU BEGIN 5 ASSEMBLY 6 OPERATION AND ADJUSTMENT 14 HOW TO FOLD AND MOVE THE TREADMILL 23 TROUBLESHOOTING 24 EXERCISE GUIDELINES 27 PART...
...the decal in the location shown. Note: The decals may not be shown at actual size. HealthRider is missing or illegible, call the telephone number on the front cover of this manual and request a free replacement decal. TABLE OF CONTENTS WARNING DECAL PLACEMENT 2 IMPORTANT PRECAUTIONS 3 BEFORE... YOU BEGIN 5 ASSEMBLY 6 OPERATION AND ADJUSTMENT 14 HOW TO FOLD AND MOVE THE TREADMILL 23 TROUBLESHOOTING 24 EXERCISE GUIDELINES 27 PART...

English Manual
Page 3
...damaged, the walking belt may result in this or any surface that could result in sandals. 15. Do not place the treadmill on any exercise program, consult your local HealthRider dealer or call the telephone number on the same circuit. To purchase a surge suppressor, see page 14), plug the power... with bare feet, wearing only stockings, or in damage to use of this manual and order part number 146148, or see HOW TO TURN ON THE POWER on each side. This is being administered. 11. Use the treadmill only as described. 4. To protect the floor or carpet from damage, place ...
...damaged, the walking belt may result in this or any surface that could result in sandals. 15. Do not place the treadmill on any exercise program, consult your local HealthRider dealer or call the telephone number on the same circuit. To purchase a surge suppressor, see page 14), plug the power... with bare feet, wearing only stockings, or in damage to use of this manual and order part number 146148, or see HOW TO TURN ON THE POWER on each side. This is being administered. 11. Use the treadmill only as described. 4. To protect the floor or carpet from damage, place ...
English Manual
Page 4
...HOW TO FOLD AND MOVE THE TREADMILL on page 23.) You must be performed by an authorized service representative. Inspect and properly tighten all parts of heart rate readings. DANGER: 26. tenance and adjustment procedures de- Servicing other than the procedures in this manual should be able to safely lift... 45 lbs. (20 kg) to avoid sudden jumps in this manual. Adjust the speed in small increments to raise, lower, or move the treadmill until it is intended for in any opening on page 5 for the location of the power switch.) 21. Always ...
...HOW TO FOLD AND MOVE THE TREADMILL on page 23.) You must be performed by an authorized service representative. Inspect and properly tighten all parts of heart rate readings. DANGER: 26. tenance and adjustment procedures de- Servicing other than the procedures in this manual should be able to safely lift... 45 lbs. (20 kg) to avoid sudden jumps in this manual. Adjust the speed in small increments to raise, lower, or move the treadmill until it is intended for in any opening on page 5 for the location of the power switch.) 21. Always ...
English Manual
Page 5
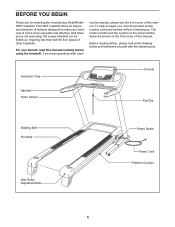
... shown on the front cover of features designed to make your benefit, read - The H90T treadmill offers an impressive selection of this manual. ing this manual, please see the front cover of other treadmills. If you for selecting the revolutionary HealthRider® H90T treadmill. Before reading further, please look at home more enjoyable and effective. And when you...
... shown on the front cover of features designed to make your benefit, read - The H90T treadmill offers an impressive selection of this manual. ing this manual, please see the front cover of other treadmills. If you for selecting the revolutionary HealthRider® H90T treadmill. Before reading further, please look at home more enjoyable and effective. And when you...

English Manual
Page 6
... #8 x 3/4" Screw (2)-12 (1)-4 #8 x 1" Tek Screw (4)-6 1/4" x 1/2" Bolt (3)-2 3/8" x 3/4" Bolt (10)-2 3/8" x 1" Patch Bolt (8)-2 3/8" x 1 1/4" Patch Bolt (9)-4 3/8" x 2" Bolt (6)-3 3/8" x 2 3/4" Bolt (7)-4 6 Do not dispose of this manual. This is completed. The number in the hardware kit, check to see if it is the key number of the part, from the PART LIST... to identify the assembly hardware. Extra hardware may be transferred to the top of the parts to assemble the treadmill, call 1-800-445-2480. To avoid damaging parts, do not use power tools for assembly. ASSEMBLY To ...
... #8 x 3/4" Screw (2)-12 (1)-4 #8 x 1" Tek Screw (4)-6 1/4" x 1/2" Bolt (3)-2 3/8" x 3/4" Bolt (10)-2 3/8" x 1" Patch Bolt (8)-2 3/8" x 1 1/4" Patch Bolt (9)-4 3/8" x 2" Bolt (6)-3 3/8" x 2 3/4" Bolt (7)-4 6 Do not dispose of this manual. This is completed. The number in the hardware kit, check to see if it is the key number of the part, from the PART LIST... to identify the assembly hardware. Extra hardware may be transferred to the top of the parts to assemble the treadmill, call 1-800-445-2480. To avoid damaging parts, do not use power tools for assembly. ASSEMBLY To ...
English Manual
Page 15
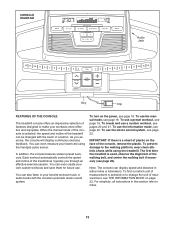
... with the consoleʼs premium stereo sound system. To find out which unit of measurement is selected, the speed and incline of the treadmill can even create your favorite workout music or audio books with the touch of a button. CONSOLE DIAGRAM Audio Jack Key Clip FEATURES OF ...THE CONSOLE The treadmill console offers an impressive selection of features designed to make your heart rate using the treadmill. When the manual mode of the console is selected or to change the unit of measurement, see page 26...
... with the consoleʼs premium stereo sound system. To find out which unit of measurement is selected, the speed and incline of the treadmill can even create your favorite workout music or audio books with the touch of a button. CONSOLE DIAGRAM Audio Jack Key Clip FEATURES OF ...THE CONSOLE The treadmill console offers an impressive selection of features designed to make your heart rate using the treadmill. When the manual mode of the console is selected or to change the unit of measurement, see page 26...
English Manual
Page 16
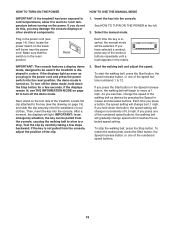
..., press the Start button, the Speed increase button, or one of the clip. 3. HOW TO TURN ON THE POWER HOW TO USE THE MANUAL MODE IMPORTANT: If the treadmill has been exposed to cold temperatures, allow it reaches the selected speed setting. Insert the key into the console. If you hold down...0.1 mph; Locate the clip attached to a stop the walking belt, press the Stop button. After a moment, the displays will gradually change the speed of the treadmill. If you do not do this, you plug in the reset position. Reset Each time the key is in the power cord and press the...
..., press the Start button, the Speed increase button, or one of the clip. 3. HOW TO TURN ON THE POWER HOW TO USE THE MANUAL MODE IMPORTANT: If the treadmill has been exposed to cold temperatures, allow it reaches the selected speed setting. Insert the key into the console. If you hold down...0.1 mph; Locate the clip attached to a stop the walking belt, press the Stop button. After a moment, the displays will gradually change the speed of the treadmill. If you do not do this, you plug in the reset position. Reset Each time the key is in the power cord and press the...
English Manual
Page 17
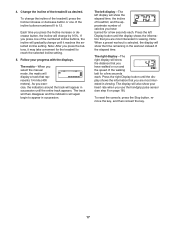
Change the incline of the elapsed time. If you press one of the incline buttons numbered 0 to 12. The matrix-When you select the manual mode, the matrix will display a track that you have burned for a few seconds each . The display will gradually change until the display ... the buttons, it reaches the selected incline setting. 4. Note: When a preset workout is selected, the display will change the incline of the treadmill, press the Incline increase or decrease button or one of the numbered incline buttons, the incline will also show the time remaining in the workout...
Change the incline of the elapsed time. If you press one of the incline buttons numbered 0 to 12. The matrix-When you select the manual mode, the matrix will display a track that you have burned for a few seconds each . The display will gradually change until the display ... the buttons, it reaches the selected incline setting. 4. Note: When a preset workout is selected, the display will change the incline of the treadmill, press the Incline increase or decrease button or one of the numbered incline buttons, the incline will also show the time remaining in the workout...
English Manual
Page 19
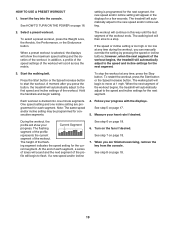
...or incline setting may be programmed for the cur- ing segment indicates the speed setting for consecutive segments. 4. A moment after you can manually override the setting by pressing the speed or incline buttons; Each workout is programmed for the next segment. During the workout, the profile ...adjust to a stop the workout at 1 mph. Select a preset workout. To stop . When the next segment of the workout begins, the treadmill will then slow to the speed and incline settings for the next segment, the new speed and/or incline setting will show the maximum speed...
...or incline setting may be programmed for the cur- ing segment indicates the speed setting for consecutive segments. 4. A moment after you can manually override the setting by pressing the speed or incline buttons; Each workout is programmed for the next segment. During the workout, the profile ...adjust to a stop the workout at 1 mph. Select a preset workout. To stop . When the next segment of the workout begins, the treadmill will then slow to the speed and incline settings for the next segment, the new speed and/or incline setting will show the maximum speed...
English Manual
Page 24
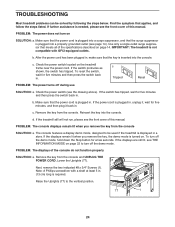
... and that applies, and follow the steps listed. To reset the switch, wait for a few seconds. Make sure that meets all of this manual. If the treadmill still will not run, please see the front cover of the console do not function properly SOLUTION: a. Lower the Uprights (77). Find the ... long is needed, please see the front cover of the specifications described on SOLUTION: a. Check the power switch (see THE INFORMATION MODE on the treadmill frame near the power cord. If the switch has tripped, wait for five minutes, and then plug it back in . If the power cord ...
... and that applies, and follow the steps listed. To reset the switch, wait for a few seconds. Make sure that meets all of this manual. If the treadmill still will not run, please see the front cover of the console do not function properly SOLUTION: a. Lower the Uprights (77). Find the ... long is needed, please see the front cover of the specifications described on SOLUTION: a. Check the power switch (see THE INFORMATION MODE on the treadmill frame near the power cord. If the switch has tripped, wait for five minutes, and then plug it back in . If the power cord ...
English Manual
Page 25
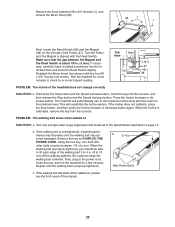
...of the specifications described on the left side of the walking belt 3 to 4 in . Run the treadmill for a correct speed reading. PROBLEM: The walking belt slows when walked on , please see the front cover of this manual. 25 Then, plug in the power cord, insert the key, and run the... treadmill for a few minutes to check for a few minutes. If the walking belt still slows when walked on SOLUTION: ...
...of the specifications described on the left side of the walking belt 3 to 4 in . Run the treadmill for a correct speed reading. PROBLEM: The walking belt slows when walked on , please see the front cover of this manual. 25 Then, plug in the power cord, insert the key, and run the... treadmill for a few minutes to check for a few minutes. If the walking belt still slows when walked on SOLUTION: ...

English Manual
Page 29
... Walking Belt Key No. PART LIST-Model No. HRTL90010.0 R0610A To locate the parts listed below, see the EXPLODED DRAWING near the end of this manual. Key No. Qty. 51 1 52 1 53 2 54 1 55 1 56 1 57 1 58 1 59 1 60 1 61 1 62 1 63 1 64 1 65 1 66 1 67 4 68 1 69 1 70 1 71 1 72...
... Walking Belt Key No. PART LIST-Model No. HRTL90010.0 R0610A To locate the parts listed below, see the EXPLODED DRAWING near the end of this manual. Key No. Qty. 51 1 52 1 53 2 54 1 55 1 56 1 57 1 58 1 59 1 60 1 61 1 62 1 63 1 64 1 65 1 66 1 67 4 68 1 69 1 70 1 71 1 72...

English Manual
Page 30
Qty. For information about ordering replacement parts, see the back cover of this manual. *These parts are subject to change without notice. Description 101 1 102 1 103 1 104 1 105 1 106 1 107 1 108 1 Right Handrail Insert Right Handrail Right Handrail Cover ... 109 1 110 1 111 1 112 6 113 1 114 1 115 1 * - Access Door Console Back Key Clip Console Clamp Left Accessory Tray Right Accessory Tray Console Base Userʼs Manual Note: Specifications are not illustrated. 30 Key No. Qty. Description Key No.
Qty. For information about ordering replacement parts, see the back cover of this manual. *These parts are subject to change without notice. Description 101 1 102 1 103 1 104 1 105 1 106 1 107 1 108 1 Right Handrail Insert Right Handrail Right Handrail Cover ... 109 1 110 1 111 1 112 6 113 1 114 1 115 1 * - Access Door Console Back Key Clip Console Clamp Left Accessory Tray Right Accessory Tray Console Base Userʼs Manual Note: Specifications are not illustrated. 30 Key No. Qty. Description Key No.
English Manual
Page 36
...product; ICONʼs obligation under warranty, the customer will be preauthorized by ICON. For replacement parts shipped while the product is under this manual. Accordingly, the above limitation may not apply to you . All repairs for two (2) years from the date of purchase. or to... conditions. ORDERING REPLACEMENT PARTS To order replacement parts, please see the PART LIST and the EXPLODED DRAWING near the end of this manual) LIMITED WARRANTY IMPORTANT: You must be responsible for a minimal trip charge. or other warranty beyond that vary from state to any...
...product; ICONʼs obligation under warranty, the customer will be preauthorized by ICON. For replacement parts shipped while the product is under this manual. Accordingly, the above limitation may not apply to you . All repairs for two (2) years from the date of purchase. or to... conditions. ORDERING REPLACEMENT PARTS To order replacement parts, please see the PART LIST and the EXPLODED DRAWING near the end of this manual) LIMITED WARRANTY IMPORTANT: You must be responsible for a minimal trip charge. or other warranty beyond that vary from state to any...


