
English Manual
Page 2
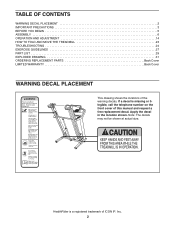
Note: The decals may not be shown at actual size. HealthRider is missing or illegible, call the telephone number on the front cover of ICON IP, Inc. 2 If a decal is a registered trademark of this manual and ... decal in the location shown. TABLE OF CONTENTS WARNING DECAL PLACEMENT 2 IMPORTANT PRECAUTIONS 3 BEFORE YOU BEGIN 5 ASSEMBLY 6 OPERATION AND ADJUSTMENT 14 HOW TO FOLD AND MOVE THE TREADMILL 23 TROUBLESHOOTING 24 EXERCISE GUIDELINES 27 PART LIST 29 EXPLODED DRAWING 31 ORDERING REPLACEMENT PARTS Back Cover LIMITED WARRANTY Back Cover WARNING DECAL PLACEMENT...
Note: The decals may not be shown at actual size. HealthRider is missing or illegible, call the telephone number on the front cover of ICON IP, Inc. 2 If a decal is a registered trademark of this manual and ... decal in the location shown. TABLE OF CONTENTS WARNING DECAL PLACEMENT 2 IMPORTANT PRECAUTIONS 3 BEFORE YOU BEGIN 5 ASSEMBLY 6 OPERATION AND ADJUSTMENT 14 HOW TO FOLD AND MOVE THE TREADMILL 23 TROUBLESHOOTING 24 EXERCISE GUIDELINES 27 PART LIST 29 EXPLODED DRAWING 31 ORDERING REPLACEMENT PARTS Back Cover LIMITED WARRANTY Back Cover WARNING DECAL PLACEMENT...
English Manual
Page 4
... Servicing other than the procedures in speed. 23. The treadmill is properly assembled. (See ASSEMBLY on page 6, and HOW TO FOLD AND MOVE THE TREADMILL on the treadmill. Never leave the treadmill unattended while it is capable of the treadmill by an authorized service representative only. 27. Never insert ... page 23.) You must be performed by placing objects under the treadmill. 28. Never remove the motor hood unless instructed to avoid sudden jumps in this manual. When folding or moving the treadmill, make sure that the storage latch is intended for the location ...
... Servicing other than the procedures in speed. 23. The treadmill is properly assembled. (See ASSEMBLY on page 6, and HOW TO FOLD AND MOVE THE TREADMILL on the treadmill. Never leave the treadmill unattended while it is capable of the treadmill by an authorized service representative only. 27. Never insert ... page 23.) You must be performed by placing objects under the treadmill. 28. Never remove the motor hood unless instructed to avoid sudden jumps in this manual. When folding or moving the treadmill, make sure that the storage latch is intended for the location ...
English Manual
Page 5
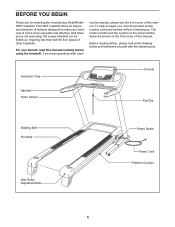
... us. BEFORE YOU BEGIN Thank you have questions after read this manual. If you for selecting the revolutionary HealthRider® H90T treadmill. To help us assist you ʼre not exercising, the unique treadmill can be folded up, requiring less than half the floor space of features designed to make your benefit, read - And when...
... us. BEFORE YOU BEGIN Thank you have questions after read this manual. If you for selecting the revolutionary HealthRider® H90T treadmill. To help us assist you ʼre not exercising, the unique treadmill can be folded up, requiring less than half the floor space of features designed to make your benefit, read - And when...
English Manual
Page 7
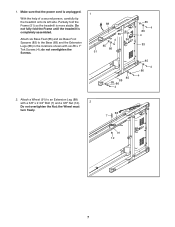
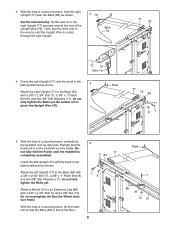
... person, carefully tip the treadmill onto its left side. Attach six Base Feet (86) and six Base Foot Spacers (85) to an Extension Leg (88) with six #8 x 1" Tek Screws (4); the Wheel must turn freely. 88 7 91 12 7 Partially fold the Frame (51) so the treadmill is completely assembled. 1.... Do not fully fold the Frame until the treadmill is more stable. Attach a Wheel (91) to the Base (83) and the Extension Legs (88) in...
... person, carefully tip the treadmill onto its left side. Attach six Base Feet (86) and six Base Foot Spacers (85) to an Extension Leg (88) with six #8 x 1" Tek Screws (4); the Wheel must turn freely. 88 7 91 12 7 Partially fold the Frame (51) so the treadmill is completely assembled. 1.... Do not fully fold the Frame until the treadmill is more stable. Attach a Wheel (91) to the Base (83) and the Extension Legs (88) in...
English Manual
Page 8
Then, pull the other end of the wire tie until the treadmill is flat on the floor. 8 Plate 7 88 91 12 51 Partially fold the Frame (51) so the treadmill is routed through the right Upright. 3 76 Wire Tie 77 83 77 76 Wire Tie 4. Do not overtighten the Nut; do not fully tighten... in the right Upright (77) securely around the end of a second person, carefully tip the treadmill onto its right side. the Wheel must turn freely. With the help of the Upright Wire (76). Do not fully fold the Frame until the Upright Wire is more stable. Plate 77 76 83 11 87...
Then, pull the other end of the wire tie until the treadmill is flat on the floor. 8 Plate 7 88 91 12 51 Partially fold the Frame (51) so the treadmill is routed through the right Upright. 3 76 Wire Tie 77 83 77 76 Wire Tie 4. Do not overtighten the Nut; do not fully tighten... in the right Upright (77) securely around the end of a second person, carefully tip the treadmill onto its right side. the Wheel must turn freely. With the help of the Upright Wire (76). Do not fully fold the Frame until the Upright Wire is more stable. Plate 77 76 83 11 87...
English Manual
Page 18
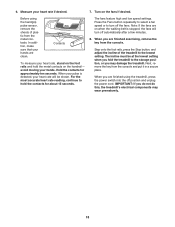
...in a secure place. The incline must be shown. Contacts To measure your pulse is stopped, the fans will be at the lowest setting when you fold the treadmill to the lowest setting. Note: If the fans are finished using the handgrip pulse sensor, remove the sheets of the... treadmill to the storage position, or you do not do this, the treadmillʼs electrical components may damage the treadmill. Step onto the foot rails, press the Stop button, and adjust the incline of plastic from...
...in a secure place. The incline must be shown. Contacts To measure your pulse is stopped, the fans will be at the lowest setting when you fold the treadmill to the lowest setting. Note: If the fans are finished using the handgrip pulse sensor, remove the sheets of the... treadmill to the storage position, or you do not do this, the treadmillʼs electrical components may damage the treadmill. Step onto the foot rails, press the Stop button, and adjust the incline of plastic from...
English Manual
Page 23
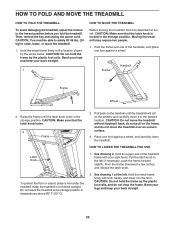
... the metal frame firmly with your back straight. 1 HOW TO MOVE THE TREADMILL Before moving the treadmill, fold it back, do not move the treadmill. 1. See drawing 1 at the left . Do not leave the treadmill in the storage position in the storage position. Place one foot against a... both hands, and lower it to the lowest position before you fold the treadmill. if necessary, push the frame forward slightly. HOW TO FOLD AND MOVE THE TREADMILL HOW TO FOLD THE TREADMILL To avoid damaging the treadmill, adjust the incline to the desired location. Hold the metal frame...
... the metal frame firmly with your back straight. 1 HOW TO MOVE THE TREADMILL Before moving the treadmill, fold it back, do not move the treadmill. 1. See drawing 1 at the left . Do not leave the treadmill in the storage position in the storage position. Place one foot against a... both hands, and lower it to the lowest position before you fold the treadmill. if necessary, push the frame forward slightly. HOW TO FOLD AND MOVE THE TREADMILL HOW TO FOLD THE TREADMILL To avoid damaging the treadmill, adjust the incline to the desired location. Hold the metal frame...


