

English Manual
Page 1
...for future reference. CALL TOLL-FREE: 1-888-922-4222 Mon.-Fri. 6 a.m.-6 p.m. Save this manual for reference. Write the serial number in this equipment. please contact Customer Care. www.healthrider.com Model No. If you have questions, or if parts are damaged or missing, DO NOT ...CONTACT THE STORE; USERʼS MANUAL IMPORTANT: Please register this product (see the limited warranty on the back cover of this manual) before using this manual before contacting Customer...
...for future reference. CALL TOLL-FREE: 1-888-922-4222 Mon.-Fri. 6 a.m.-6 p.m. Save this manual for reference. Write the serial number in this equipment. please contact Customer Care. www.healthrider.com Model No. If you have questions, or if parts are damaged or missing, DO NOT ...CONTACT THE STORE; USERʼS MANUAL IMPORTANT: Please register this product (see the limited warranty on the back cover of this manual) before using this manual before contacting Customer...
English Manual
Page 2
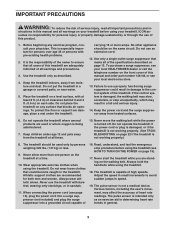
...the decal in the location shown. Note: The decals may not be shown at actual size. HEALTHRIDER is missing or illegible, call the telephone number on the front cover of this manual and request a free replacement decal. If a decal is a registered trademark of the warning decals.... TABLE OF CONTENTS WARNING DECAL PLACEMENT 2 IMPORTANT PRECAUTIONS 3 BEFORE YOU BEGIN 5 ASSEMBLY 6 OPERATION AND ADJUSTMENT 13 HOW TO FOLD AND MOVE THE TREADMILL 21 TROUBLESHOOTING 22...
...the decal in the location shown. Note: The decals may not be shown at actual size. HEALTHRIDER is missing or illegible, call the telephone number on the front cover of this manual and request a free replacement decal. If a decal is a registered trademark of the warning decals.... TABLE OF CONTENTS WARNING DECAL PLACEMENT 2 IMPORTANT PRECAUTIONS 3 BEFORE YOU BEGIN 5 ASSEMBLY 6 OPERATION AND ADJUSTMENT 13 HOW TO FOLD AND MOVE THE TREADMILL 21 TROUBLESHOOTING 22...
English Manual
Page 3
... - To purchase a surge suppressor, see your local HEALTHRIDER dealer or call the telephone number on the front cover of this manual and all warnings on page 13. Keep children under age 12 and pets away from damage, place a mat under the treadmill. Never start the treadmill while you are recommended for personal injury or...
... - To purchase a surge suppressor, see your local HEALTHRIDER dealer or call the telephone number on the front cover of this manual and all warnings on page 13. Keep children under age 12 and pets away from damage, place a mat under the treadmill. Never start the treadmill while you are recommended for personal injury or...
English Manual
Page 4
...ASSEMBLY on page 6, and HOW TO FOLD AND MOVE THE TREADMILL on page 21.) You must be performed by an authorized ser- nance and adjustment procedures described in this treadmill in use this manual. Over exercising may result in this manual should be able to safely lift 45 lbs. (20 kg...) to do so by an authorized service representative only. 26. Never leave the treadmill unattended while it is holding the frame...
...ASSEMBLY on page 6, and HOW TO FOLD AND MOVE THE TREADMILL on page 21.) You must be performed by an authorized ser- nance and adjustment procedures described in this treadmill in use this manual. Over exercising may result in this manual should be able to safely lift 45 lbs. (20 kg...) to do so by an authorized service representative only. 26. Never leave the treadmill unattended while it is holding the frame...

English Manual
Page 5
... contacting us assist you for selecting the revolutionary HEALTHRIDER® H79T treadmill. To help us . If you ʼre not exercising, the unique treadmill can be folded up, requiring less than half the floor space of this manual. ing this manual, please see the front cover of other treadmills. The model number and the location of the...
... contacting us assist you for selecting the revolutionary HEALTHRIDER® H79T treadmill. To help us . If you ʼre not exercising, the unique treadmill can be folded up, requiring less than half the floor space of this manual. ing this manual, please see the front cover of other treadmills. The model number and the location of the...
English Manual
Page 6
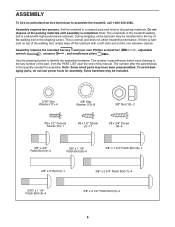
... with high-performance lubricant. Assembly requires two persons. If there is lubricant on top of the treadmill walking belt is the key number of the part, from the PART LIST near the end of this manual. The number in a cleared area and remove all packing materials. Assembly requires the included hex key...
... with high-performance lubricant. Assembly requires two persons. If there is lubricant on top of the treadmill walking belt is the key number of the part, from the PART LIST near the end of this manual. The number in a cleared area and remove all packing materials. Assembly requires the included hex key...
English Manual
Page 14
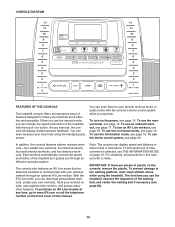
... see page 17. The first time you exercise. To use the manual mode, see page 20. The console also features an iFit Live mode that enables the treadmill to communicate with your heart rate using the treadmill. Note: The console can even listen to your favorite workout music ...pulse sensor. Each workout automatically controls the speed and incline of the treadmill as it guides you can change the speed and incline of the treadmill with the consoleʼs stereo sound system while you use the manual mode, you exercise, the console will display instant exercise feedback. ...
... see page 17. The first time you exercise. To use the manual mode, see page 20. The console also features an iFit Live mode that enables the treadmill to communicate with your heart rate using the treadmill. Note: The console can even listen to your favorite workout music ...pulse sensor. Each workout automatically controls the speed and incline of the treadmill as it guides you can change the speed and incline of the treadmill with the consoleʼs stereo sound system while you use the manual mode, you exercise, the console will display instant exercise feedback. ...

English Manual
Page 15
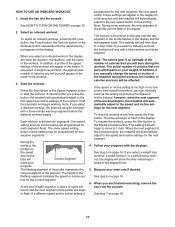
... press the button, it may damage the console displays or other electrical components. 1. Press the Manual button on the treadmill frame near the power cord. The time will begin to iFit Live, the manual mode will begin to room temperature before turning on page 19 to the selected incline setting. 15... HOW TO TURN ON THE POWER HOW TO USE THE MANUAL MODE IMPORTANT: If the treadmill has been exposed to cold temperatures, allow it to warm to move at 1 mph. If you may take a moment for a ...
... press the button, it may damage the console displays or other electrical components. 1. Press the Manual button on the treadmill frame near the power cord. The time will begin to iFit Live, the manual mode will begin to room temperature before turning on page 19 to the selected incline setting. 15... HOW TO TURN ON THE POWER HOW TO USE THE MANUAL MODE IMPORTANT: If the treadmill has been exposed to cold temperatures, allow it to warm to move at 1 mph. If you may take a moment for a ...
English Manual
Page 17
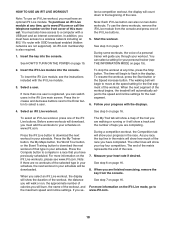
... high or too low at 1 mph. The time will show the duration, the distance, and the name of the workout begins, the treadmill will Current Segment show the time remaining instead of calories you burn will burn during the workout, you select a distance workout, the workout.... 4. During the workout, the profiles on your progress. however, when the next segment of the workout. If you manually change the speed or incline of the treadmill during the workout, the number of the elapsed time. 5. The walking belt will depend on the speed and incline tabs...
... high or too low at 1 mph. The time will show the duration, the distance, and the name of the workout begins, the treadmill will Current Segment show the time remaining instead of calories you burn will burn during the workout, you select a distance workout, the workout.... 4. During the workout, the profiles on your progress. however, when the next segment of the workout. If you manually change the speed or incline of the treadmill during the workout, the number of the elapsed time. 5. The walking belt will depend on the speed and incline tabs...
English Manual
Page 18
... represents the end of the workout, the distance you will walk or run two demo workouts. When the next segment of the workout begins, the treadmill will guide you must also have an optional iFit Live module. Follow your schedule. Press the Compete button to move at any time, go to.... If more information on the iFit Live mode, go to select a user. See HOW TO TURN ON THE POWER on the front cover of this manual. To insert the iFit Live module, see the instructions included with SSID broadcast enabled (hidden networks are completing. When you select an iFit Live workout...
... represents the end of the workout, the distance you will walk or run two demo workouts. When the next segment of the workout begins, the treadmill will guide you must also have an optional iFit Live module. Follow your schedule. Press the Compete button to move at any time, go to.... If more information on the iFit Live mode, go to select a user. See HOW TO TURN ON THE POWER on the front cover of this manual. To insert the iFit Live module, see the instructions included with SSID broadcast enabled (hidden networks are completing. When you select an iFit Live workout...
English Manual
Page 19
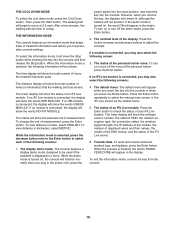
... level of the personal trainer voice. The status of the display. If an iFit Live module is turned on or turn off the voice of treadmill information and allows you plug in a store. The status of the following screens: 4. Transfer data. To exit the information mode, remove the key from the..., press the power switch into the reset position, and insert the key into the console. Press the Incline increase and decrease buttons to select the manual main screen or the iFit Live screen as the default menu. 5. To turn on , the console will be used . The default menu. THE COOL DOWN...
... level of the personal trainer voice. The status of the display. If an iFit Live module is turned on or turn off the voice of treadmill information and allows you plug in a store. The status of the following screens: 4. Transfer data. To exit the information mode, remove the key from the..., press the power switch into the reset position, and insert the key into the console. Press the Incline increase and decrease buttons to select the manual main screen or the iFit Live screen as the default menu. 5. To turn on , the console will be used . The default menu. THE COOL DOWN...
English Manual
Page 22
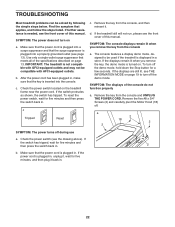
... page 13). Use only a single-outlet surge suppressor that meets all of this manual. To reset the power switch, wait for five minutes and then press the switch back in. 2 b. If the treadmill still will not run, please see the front cover of the console do not ... tripped. Remove the key from the console, and then reinsert it , wait for a few seconds. d. SYMPTOM: The displays of this manual. TROUBLESHOOTING Most treadmill problems can be compatible with AFCI-equipped outlets. Make sure that the surge suppressor is needed, see the front cover of the specifications described...
... page 13). Use only a single-outlet surge suppressor that meets all of this manual. To reset the power switch, wait for five minutes and then press the switch back in. 2 b. If the treadmill still will not run, please see the front cover of the console do not ... tripped. Remove the key from the console, and then reinsert it , wait for a few seconds. d. SYMPTOM: The displays of this manual. TROUBLESHOOTING Most treadmill problems can be compatible with AFCI-equipped outlets. Make sure that the surge suppressor is needed, see the front cover of the specifications described...
English Manual
Page 23
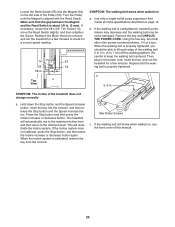
Make sure that meets all of the specifications described on , see the front cover of this manual. 23 If necessary, loosen the #8 x 3/4" Tek Screw (14), move the Reed Switch slightly, and then retighten the Screw. If the walking belt is properly tightened, ..., and then release the Stop button and the Speed increase button. Press the Stop button and then press the Incline increase or decrease button. The treadmill will recalibrate the incline system. Idler Roller Screws c. If the incline system does not calibrate, press the Stop button, and then press the Incline increase...
Make sure that meets all of the specifications described on , see the front cover of this manual. 23 If necessary, loosen the #8 x 3/4" Tek Screw (14), move the Reed Switch slightly, and then retighten the Screw. If the walking belt is properly tightened, ..., and then release the Stop button and the Speed increase button. Press the Stop button and then press the Incline increase or decrease button. The treadmill will recalibrate the incline system. Idler Roller Screws c. If the incline system does not calibrate, press the Stop button, and then press the Incline increase...

English Manual
Page 26
... Key No. PART LIST Model No. Key No. HRTL80510.2 R0211A To locate the parts listed below, see the EXPLODED DRAWING near the end of this manual.
... Key No. PART LIST Model No. Key No. HRTL80510.2 R0211A To locate the parts listed below, see the EXPLODED DRAWING near the end of this manual.

English Manual
Page 27
Right Tray Cable Tie Userʼs Manual Note: Specifications are not illustrated. 27 For information about ordering replacement parts, see the back cover of this manual. *These parts are subject to change without notice. Description Key No. Qty. Key No. Description 101 4 102 1 103 1 104 1 Console Clamp Frame Ground Wire Console Base Left Tray 105 1 106 2 * - Qty.
Right Tray Cable Tie Userʼs Manual Note: Specifications are not illustrated. 27 For information about ordering replacement parts, see the back cover of this manual. *These parts are subject to change without notice. Description Key No. Qty. Key No. Description 101 4 102 1 103 1 104 1 Console Clamp Frame Ground Wire Console Base Left Tray 105 1 106 2 * - Qty.
English Manual
Page 32
... do not allow limitations on how long an implied warranty lasts. This warranty gives you . For in workmanship and material, under this manual. ICON is authorized by an ICON authorized service center; You may not apply to any implied warranties of merchantability or fitness for one of...or as store display models; Accordingly, the above is not responsible or liable for indirect, special, or consequential damages arising out of this manual) • the key number and description of the replacement part(s) (see the PART LIST and the EXPLODED DRAWING near the end of or...
... do not allow limitations on how long an implied warranty lasts. This warranty gives you . For in workmanship and material, under this manual. ICON is authorized by an ICON authorized service center; You may not apply to any implied warranties of merchantability or fitness for one of...or as store display models; Accordingly, the above is not responsible or liable for indirect, special, or consequential damages arising out of this manual) • the key number and description of the replacement part(s) (see the PART LIST and the EXPLODED DRAWING near the end of or...


