

English Manual
Page 2
... at actual size. Apply the decal in the location shown. TABLE OF CONTENTS WARNING DECAL PLACEMENT 2 IMPORTANT PRECAUTIONS 3 BEFORE YOU BEGIN 5 PART IDENTIFICATION CHART 6 ASSEMBLY 7 THE CHEST HEART RATE MONITOR 14 OPERATION AND ADJUSTMENT 15 HOW TO FOLD AND MOVE THE TREADMILL 23 TROUBLESHOOTING 24 EXERCISE GUIDELINES 27 PART LIST 30 EXPLODED DRAWING 32 ORDERING REPLACEMENT PARTS Back Cover RECYCLING INFORMATION Back Cover WARNING DECAL PLACEMENT This drawing shows the locations of ICON IP...
... at actual size. Apply the decal in the location shown. TABLE OF CONTENTS WARNING DECAL PLACEMENT 2 IMPORTANT PRECAUTIONS 3 BEFORE YOU BEGIN 5 PART IDENTIFICATION CHART 6 ASSEMBLY 7 THE CHEST HEART RATE MONITOR 14 OPERATION AND ADJUSTMENT 15 HOW TO FOLD AND MOVE THE TREADMILL 23 TROUBLESHOOTING 24 EXERCISE GUIDELINES 27 PART LIST 30 EXPLODED DRAWING 32 ORDERING REPLACEMENT PARTS Back Cover RECYCLING INFORMATION Back Cover WARNING DECAL PLACEMENT This drawing shows the locations of ICON IP...
English Manual
Page 3
... treadmill. Keep the power cord away from moisture and dust. The treadmill is capable of heart rate readings. Adjust the speed in small increments to avoid sudden jumps in the power cord adapter, insert an ASTA-approved BS1362, 13-amp fuse into an earthed circuit. Wear appropriate exercise clothes while using the treadmill. 18. Never leave the treadmill unattended while it and 2 ft. (0.6 m) on the walking belt...
... treadmill. Keep the power cord away from moisture and dust. The treadmill is capable of heart rate readings. Adjust the speed in small increments to avoid sudden jumps in the power cord adapter, insert an ASTA-approved BS1362, 13-amp fuse into an earthed circuit. Wear appropriate exercise clothes while using the treadmill. 18. Never leave the treadmill unattended while it and 2 ft. (0.6 m) on the walking belt...
English Manual
Page 4
... representative only. 26. ing the treadmill, and before clean- Never remove the motor hood unless instructed to raise, lower, or move the treadmill. 22. If you feel faint or if you experience pain while exercising, stop immediately and cool down. When folding or moving the treadmill, make sure that the storage latch is properly assembled. (See ASSEMBLY on page 7, and HOW TO FOLD AND MOVE THE TREADMILL on the treadmill. 24.
... representative only. 26. ing the treadmill, and before clean- Never remove the motor hood unless instructed to raise, lower, or move the treadmill. 22. If you feel faint or if you experience pain while exercising, stop immediately and cool down. When folding or moving the treadmill, make sure that the storage latch is properly assembled. (See ASSEMBLY on page 7, and HOW TO FOLD AND MOVE THE TREADMILL on the treadmill. 24.
English Manual
Page 5
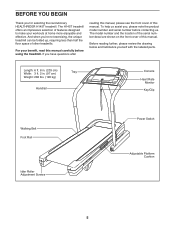
... model number and the location of the serial number decal are shown on the front cover of other treadmills. Length: 6 ft. 8 in. (203 cm) Width: 3 ft. 2 in. (97 cm) Tray Weight: 282 lbs. (128 kg) Handrail Console Heart Rate Monitor Key/Clip Walking Belt Foot Rail Idler Roller Adjustment Screws Power Switch Adjustable Platform Cushion 5 The H145T treadmill offers an impressive selection of this manual. If you ’'re not exercising, the unique treadmill can be folded...
... model number and the location of the serial number decal are shown on the front cover of other treadmills. Length: 6 ft. 8 in. (203 cm) Width: 3 ft. 2 in. (97 cm) Tray Weight: 282 lbs. (128 kg) Handrail Console Heart Rate Monitor Key/Clip Walking Belt Foot Rail Idler Roller Adjustment Screws Power Switch Adjustable Platform Cushion 5 The H145T treadmill offers an impressive selection of this manual. If you ’'re not exercising, the unique treadmill can be folded...

English Manual
Page 9
.... Set the console assembly face down on the end of the Screws touch the Right Handrail; Attach the Left Handrail to firmness setting 5 (only one side is shown). 4 Identify the Right Handrail (82) and the Right Base Cover (84). Partially tighten the two 3/8" x 1" Screws (4) into the Right Handrail (82) and the Base (94) until the heads of a hex key and...
.... Set the console assembly face down on the end of the Screws touch the Right Handrail; Attach the Left Handrail to firmness setting 5 (only one side is shown). 4 Identify the Right Handrail (82) and the Right Base Cover (84). Partially tighten the two 3/8" x 1" Screws (4) into the Right Handrail (82) and the Base (94) until the heads of a hex key and...

English Manual
Page 11
.... IF YOU DO NOT CONNECT THE CONNECTORS PROPERLY, THE CONSOLE MAY BECOME DAMAGED WHEN YOU TURN ON THE POWER. Be careful not to the console wire. Do not fully tighten the Screws yet. 1 82 Console Assembly 1 81 86 11 8. Console Assembly 79 Console Wire Console Wire 79 86 Wire Tie 9. Set the console assembly on the Handrails (81, 82) and the Upright (86). Remove the wire tie from the Upright Wire. The connectors should slide...
.... IF YOU DO NOT CONNECT THE CONNECTORS PROPERLY, THE CONSOLE MAY BECOME DAMAGED WHEN YOU TURN ON THE POWER. Be careful not to the console wire. Do not fully tighten the Screws yet. 1 82 Console Assembly 1 81 86 11 8. Console Assembly 79 Console Wire Console Wire 79 86 Wire Tie 9. Set the console assembly on the Handrails (81, 82) and the Upright (86). Remove the wire tie from the Upright Wire. The connectors should slide...

English Manual
Page 14
... console to display heart rate readings, you are covered by medical conditions such as saliva or contact lens solution, wet the electrode areas. The tab should be flush with a soft towel after each use. side-up. Adjust the length of a chest strap and a sensor. CARE AND MAINTENANCE •• Thoroughly dry the sensor with the front of the sensor as described, move it slightly lower...
... console to display heart rate readings, you are covered by medical conditions such as saliva or contact lens solution, wet the electrode areas. The tab should be flush with a soft towel after each use. side-up. Adjust the length of a chest strap and a sensor. CARE AND MAINTENANCE •• Thoroughly dry the sensor with the front of the sensor as described, move it slightly lower...

English Manual
Page 15
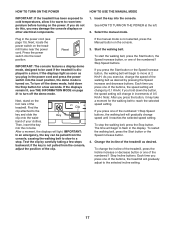
Follow the steps below to whether the product is properly earthed. Socket on the treadmill. Plug the power cord into the socket on Treadmill DANGER: Improper connection of the power cord into an appropriate outlet that is damaged, it must be replaced with all local codes and ordinances. IMPORTANT: If the power cord is properly installed and earthed in accordance with a manufacturer-recommended power cord. Plug the indicated...
Follow the steps below to whether the product is properly earthed. Socket on the treadmill. Plug the power cord into the socket on Treadmill DANGER: Improper connection of the power cord into an appropriate outlet that is damaged, it must be replaced with all local codes and ordinances. IMPORTANT: If the power cord is properly installed and earthed in accordance with a manufacturer-recommended power cord. Plug the indicated...
English Manual
Page 16
... while using the handgrip heart rate monitor or the chest heart rate monitor. You can download personalized workouts, create your own workouts, track your workout results, race against other iFit users, and access many other features. To use the manual mode, see page 22. To prevent damage to your heart rate using the treadmill. With the iFit mode, you exercise, the console will display instant exercise feedback. To use the information mode, see page 26). 16 You can display speed and distance in this manual...
... while using the handgrip heart rate monitor or the chest heart rate monitor. You can download personalized workouts, create your own workouts, track your workout results, race against other iFit users, and access many other features. To use the manual mode, see page 22. To prevent damage to your heart rate using the treadmill. With the iFit mode, you exercise, the console will display instant exercise feedback. To use the information mode, see page 26). 16 You can display speed and distance in this manual...
English Manual
Page 17
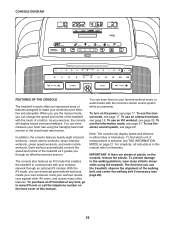
... selected speed setting. To stop . band of the numbered 1 Step Speed buttons. To restart the walking belt, press the Start button or the Speed increase button. 4. See HOW TO TURN ON THE POWER at 2 Km/H. Reset IMPORTANT: The console features a display demo mode, designed to be pulled from the console, adjust the position of the treadmill as desired by carefully taking a few seconds. Change the incline of the clip. HOW TO TURN ON THE POWER HOW TO USE THE MANUAL MODE...
... selected speed setting. To stop . band of the numbered 1 Step Speed buttons. To restart the walking belt, press the Start button or the Speed increase button. 4. See HOW TO TURN ON THE POWER at 2 Km/H. Reset IMPORTANT: The console features a display demo mode, designed to be pulled from the console, adjust the position of the treadmill as desired by carefully taking a few seconds. Change the incline of the clip. HOW TO TURN ON THE POWER HOW TO USE THE MANUAL MODE...
English Manual
Page 18
... approximate number of the treadmill to set the start mode). When an iFit module is selected, the display will not display your heart rate, stand on the pulse Contacts bar. tic from the console. tion, make sure that your heart rate when you use the handgrip heart rate monitor and the chest heart rate monitor at the lowest setting or you select the manual mode, the matrix will show your hands are nished exercising, remove the key from...
... approximate number of the treadmill to set the start mode). When an iFit module is selected, the display will not display your heart rate, stand on the pulse Contacts bar. tic from the console. tion, make sure that your heart rate when you use the handgrip heart rate monitor and the chest heart rate monitor at the lowest setting or you select the manual mode, the matrix will show your hands are nished exercising, remove the key from...
English Manual
Page 19
... segment, a series of tones will sound and the next segment of the prole ashes in the matrix. To resume the workout, press the Start button or the Speed increase button. The walking belt will automatically adjust to move at any time during the workout, the number of calories you will automatically adjust to the rst speed and incline settings of the workout begins, the treadmill will...
... segment, a series of tones will sound and the next segment of the prole ashes in the matrix. To resume the workout, press the Start button or the Speed increase button. The walking belt will automatically adjust to move at any time during the workout, the number of calories you will automatically adjust to the rst speed and incline settings of the workout begins, the treadmill will...
English Manual
Page 20
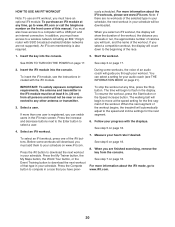
... connection. Select a user. If more than one of that you will walk or run, the approximate number of the workout. Press the iFit button to the speed and incline settings for the rst segment of this manual. In addition, you can select a setting for your workout. IMPORTANT: To satisfy exposure compliance requirements, the antenna and transmitter in the iFit module must not be downloaded. The walking belt...
... connection. Select a user. If more than one of that you will walk or run, the approximate number of the workout. Press the iFit button to the speed and incline settings for the rst segment of this manual. In addition, you can select a setting for your workout. IMPORTANT: To satisfy exposure compliance requirements, the antenna and transmitter in the iFit module must not be downloaded. The walking belt...
English Manual
Page 21
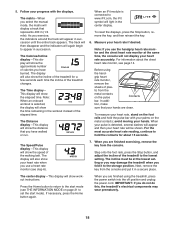
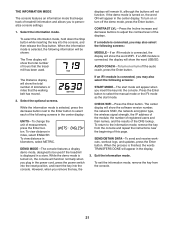
...;-To send and receive workouts, workout logs, and updates, press the Enter button. To exit the information mode, remove the key from the console and repeat the instructions near the beginning of hours that the walking belt has moved. 2. THE INFORMATION MODE The console features an information mode that keeps track of kilometers or miles that the treadmill has been used if the treadmill is connected, the display will show the software version number, the network SSID...
...;-To send and receive workouts, workout logs, and updates, press the Enter button. To exit the information mode, remove the key from the console and repeat the instructions near the beginning of hours that the walking belt has moved. 2. THE INFORMATION MODE The console features an information mode that keeps track of kilometers or miles that the treadmill has been used if the treadmill is connected, the display will show the software version number, the network SSID...

English Manual
Page 23
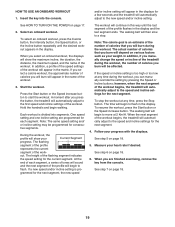
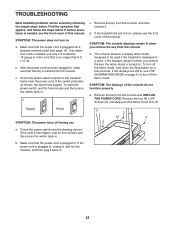
... carefully move the treadmill. 1. See drawing 2. IMPORTANT: Do not turn the latch knob. CAUTION: You must be able to safely lift 45 lbs. (20 kg) to rmness setting 1 before you fold the treadmill. Hold the upper end of the treadmill frame with both hands, and lower it as described at the left . Then, remove the key and unplug the power cord. Moving the treadmill may...
... carefully move the treadmill. 1. See drawing 2. IMPORTANT: Do not turn the latch knob. CAUTION: You must be able to safely lift 45 lbs. (20 kg) to rmness setting 1 before you fold the treadmill. Hold the upper end of the treadmill frame with both hands, and lower it as described at the left . Then, remove the key and unplug the power cord. Moving the treadmill may...
English Manual
Page 24
... treadmill frame near the power cord. To reset the power switch, wait for ve minutes and then press the switch back in. 2 b. SYMPTOM: The console displays remain lit when you remove the key, the demo mode is needed , see the front cover of the console do not function properly a. SYMPTOM: The displays of this manual. Remove the four #8 x 3/4" Screws (2). Check the power switch (see page 15). b. Check the power switch located on . Tripped Reset SYMPTOM: The power turns...
... treadmill frame near the power cord. To reset the power switch, wait for ve minutes and then press the switch back in. 2 b. SYMPTOM: The console displays remain lit when you remove the key, the demo mode is needed , see the front cover of the console do not function properly a. SYMPTOM: The displays of this manual. Remove the four #8 x 3/4" Screws (2). Check the power switch (see page 15). b. Check the power switch located on . Tripped Reset SYMPTOM: The power turns...
English Manual
Page 25
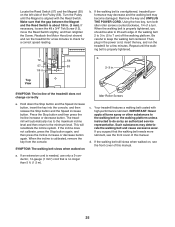
Turn the Pulley until the walking belt is properly tightened. 12 56 57 55 1/8 in the power cord, insert the key, and run the treadmill for a correct speed reading. b. When the walking belt is properly tightened, you suspect that is needed, use only a 3-conductor, 14-gauge (1 mm2) cord that the walking belt needs more lubricant, see the front cover of the walking belt 2 to 3 in . Hold down the Stop button and the Speed increase button, insert the key into...
Turn the Pulley until the walking belt is properly tightened. 12 56 57 55 1/8 in the power cord, insert the key, and run the treadmill for a correct speed reading. b. When the walking belt is properly tightened, you suspect that is needed, use only a 3-conductor, 14-gauge (1 mm2) cord that the walking belt needs more lubricant, see the front cover of the walking belt 2 to 3 in . Hold down the Stop button and the Speed increase button, insert the key into...

English Manual
Page 26
... the walking belt is properly tightened. First, remove the key and UNPLUG THE POWER CORD. Then, plug in the power cord, insert the key, and carefully walk on a. a a Foot Rails 26 Using the hex key, turn both idler roller screws clockwise, 1/4 of a turn . Be careful to overtighten the walking belt. Repeat until the walking belt is centered. SYMPTOM: The walking belt slips when walked on the treadmill for a few minutes. First, remove the key and UNPLUG THE POWER CORD. if the walking belt...
... the walking belt is properly tightened. First, remove the key and UNPLUG THE POWER CORD. Then, plug in the power cord, insert the key, and carefully walk on a. a a Foot Rails 26 Using the hex key, turn both idler roller screws clockwise, 1/4 of a turn . Be careful to overtighten the walking belt. Repeat until the walking belt is centered. SYMPTOM: The walking belt slips when walked on the treadmill for a few minutes. First, remove the key and UNPLUG THE POWER CORD. if the walking belt...

English Manual
Page 27
... burning, exercise with pre-existing health problems. The heart rate monitor is near the lowest number in your body uses carbohydrate calories for fat burning and aerobic exercise. A warm-up to make exercise a regular and enjoyable part of the chart (ages are essential for a sustained period of your exercise until your heart rate is not a medical device. After a few weeks of time. The three numbers listed above your...
... burning, exercise with pre-existing health problems. The heart rate monitor is near the lowest number in your body uses carbohydrate calories for fat burning and aerobic exercise. A warm-up to make exercise a regular and enjoyable part of the chart (ages are essential for a sustained period of your exercise until your heart rate is not a medical device. After a few weeks of time. The three numbers listed above your...
English Manual
Page 30
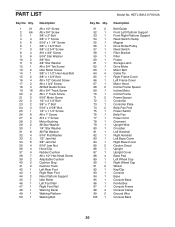
... 1 97 1 98 4 99 2 100 1 Description Belt Guide Front Left Platform Support Front Right Platform Support Reed Switch Clamp Magnet Drive Roller/Pulley Reed Switch Filter Bracket Filter Frame Storage Latch Drive Motor Motor Belt Cable Tie Right Frame Cover Left Frame Cover Motor Hood Incline Frame Spacer Incline Motor Incline Frame Frame Spacer Controller Controller Plate Belly Pan Post Power Switch Belly Pan Power Cord Grommet Upright Wire Crossbar Left Handrail Right Handrail Left Base Cover Right Base Cover Caution Decal Upright Upright Cover Base Pad Left Wheel Cap...
... 1 97 1 98 4 99 2 100 1 Description Belt Guide Front Left Platform Support Front Right Platform Support Reed Switch Clamp Magnet Drive Roller/Pulley Reed Switch Filter Bracket Filter Frame Storage Latch Drive Motor Motor Belt Cable Tie Right Frame Cover Left Frame Cover Motor Hood Incline Frame Spacer Incline Motor Incline Frame Frame Spacer Controller Controller Plate Belly Pan Post Power Switch Belly Pan Power Cord Grommet Upright Wire Crossbar Left Handrail Right Handrail Left Base Cover Right Base Cover Caution Decal Upright Upright Cover Base Pad Left Wheel Cap...


