
English Manual
Page 4
... . (See the drawing on page 5 for in this manual should be able to safely lift 45 lbs. (20 kg) to raise, lower, or move the treadmill until it is running. Always remove the key, unplug the power cord, and press the power switch into any object into the off position when the... treadmill is properly assembled. (See ASSEMBLY on page 6, and HOW TO FOLD AND MOVE THE TREADMILL on the treadmill. 24. Never insert any opening on page 25.) You must...
... . (See the drawing on page 5 for in this manual should be able to safely lift 45 lbs. (20 kg) to raise, lower, or move the treadmill until it is running. Always remove the key, unplug the power cord, and press the power switch into any object into the off position when the... treadmill is properly assembled. (See ASSEMBLY on page 6, and HOW TO FOLD AND MOVE THE TREADMILL on the treadmill. 24. Never insert any opening on page 25.) You must...
English Manual
Page 5
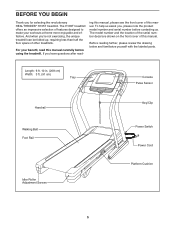
... (91 cm) Tray Console Pulse Sensor Handrail Walking Belt Foot Rail Idler Roller Adjustment Screws Key/Clip Power Switch Power Cord Platform Cushion 5 If you ʼre not exercising, the unique treadmill can be folded up, requiring less than half the floor space of this manual. Before...the location of the serial number decal are shown on the front cover of other treadmills. ing this manual carefully before contacting us assist you for selecting the revolutionary HEALTHRIDER® H105T treadmill. BEFORE YOU BEGIN Thank you , please note the product model number and serial number...
... (91 cm) Tray Console Pulse Sensor Handrail Walking Belt Foot Rail Idler Roller Adjustment Screws Key/Clip Power Switch Power Cord Platform Cushion 5 If you ʼre not exercising, the unique treadmill can be folded up, requiring less than half the floor space of this manual. Before...the location of the serial number decal are shown on the front cover of other treadmills. ing this manual carefully before contacting us assist you for selecting the revolutionary HEALTHRIDER® H105T treadmill. BEFORE YOU BEGIN Thank you , please note the product model number and serial number...
English Manual
Page 6
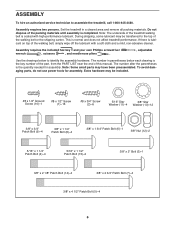
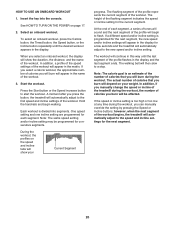
... Patch Bolt (5)-4 6 The number in a cleared area and remove all packing materials. Extra hardware may have been preassembled. Do not dispose of the treadmill walking belt is completed. Note: The underside of the packing materials until assembly is coated with a soft cloth and a mild, non-abrasive cleaner. This... quantity needed for assembly. To avoid damaging parts, do not use power tools for assembly. Assembly requires the included hex key and your own Phillips screwdriver wrench , scissors , and needlenose pliers . , adjustable Use the drawings below each drawing is...
... Patch Bolt (5)-4 6 The number in a cleared area and remove all packing materials. Extra hardware may have been preassembled. Do not dispose of the treadmill walking belt is completed. Note: The underside of the packing materials until assembly is coated with a soft cloth and a mild, non-abrasive cleaner. This... quantity needed for assembly. To avoid damaging parts, do not use power tools for assembly. Assembly requires the included hex key and your own Phillips screwdriver wrench , scissors , and needlenose pliers . , adjustable Use the drawings below each drawing is...
English Manual
Page 8
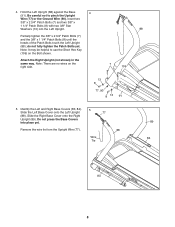
... Bolts (7) and the 3/8" x 1 1/4" Patch Bolts (8) until the heads of the Patch Bolts touch the Left Upright (88); Be careful not to use the Short Hex Key (109) on the right side. 7 109 13 8 77, 90 8 13 91 5. do not fully tighten the Patch Bolts yet. Note: It may be helpful to...
... Bolts (7) and the 3/8" x 1 1/4" Patch Bolts (8) until the heads of the Patch Bolts touch the Left Upright (88); Be careful not to use the Short Hex Key (109) on the right side. 7 109 13 8 77, 90 8 13 91 5. do not fully tighten the Patch Bolts yet. Note: It may be helpful to...
English Manual
Page 13
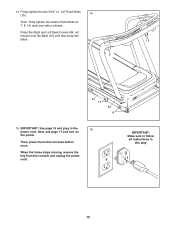
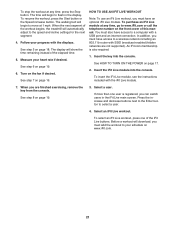
14. When the frame stops moving, remove the key from the console and unplug the power cord. Firmly tighten the two 5/16" x 1 1/2" Patch Bolts (15). 14 Then, firmly tighten the sixteen Patch Bolts (5, 7, 8, 14) (only one side is shown). IMPORTANT: See page 15 and plug in this step 13 IMPORTANT: Make sure to follow all instructions in the 15 power cord. Press the Right and Left Base Covers (84, not shown) onto the Base (91) until they snap into place. 15 5 91 7 14 84 8 15. Next, see page 17 and turn on the power. Then, press the Incline increase button once.
14. When the frame stops moving, remove the key from the console and unplug the power cord. Firmly tighten the two 5/16" x 1 1/2" Patch Bolts (15). 14 Then, firmly tighten the sixteen Patch Bolts (5, 7, 8, 14) (only one side is shown). IMPORTANT: See page 15 and plug in this step 13 IMPORTANT: Make sure to follow all instructions in the 15 power cord. Press the Right and Left Base Covers (84, not shown) onto the Base (91) until they snap into place. 15 5 91 7 14 84 8 15. Next, see page 17 and turn on the power. Then, press the Incline increase button once.
English Manual
Page 14
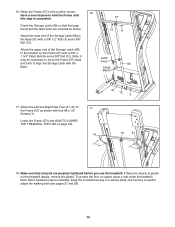
...latch knob are oriented as shown with a 3/8" x 1 3/4" Patch Bolt (6) and a 3/8" Nut (12). To protect the floor or carpet, place a mat under the treadmill. the hex key is completed. 16. Note: It may be necessary to move the Frame (57) back and forth to the Frame (57) as shown. Note: Extra... hardware may be included. Keep the included hex key in a secure place; Attach the Left and Right Rear Feet (41, 61) to align the Storage Latch with a 3/8" x 2" Bolt (3) and a 3/8" Nut (12). ...
...latch knob are oriented as shown with a 3/8" x 1 3/4" Patch Bolt (6) and a 3/8" Nut (12). To protect the floor or carpet, place a mat under the treadmill. the hex key is completed. 16. Note: It may be necessary to move the Frame (57) back and forth to the Frame (57) as shown. Note: Extra... hardware may be included. Keep the included hex key in a secure place; Attach the Left and Right Rear Feet (41, 61) to align the Storage Latch with a 3/8" x 2" Bolt (3) and a 3/8" Nut (12). ...
English Manual
Page 17
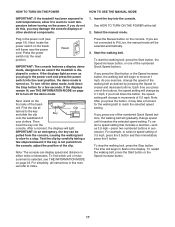
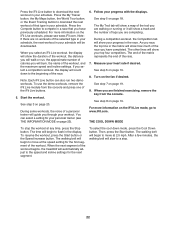
... on page 23 to reach the selected speed setting. IMPORTANT: In an emergency, the key can display speed and distance in the display. Test the clip by carefully taking a few seconds. Press the Manual button on the treadmill frame near the power cord. if you do not do this manual refer to... to turn off the demo mode. mill. if the key is displayed in this , you plug in the power cord (see THE INFORMATION MODE on the foot rails of the numbered Quick Speed buttons, the walking belt will be used if the treadmill is not pulled from the console, causing the walking...
... on page 23 to reach the selected speed setting. IMPORTANT: In an emergency, the key can display speed and distance in the display. Test the clip by carefully taking a few seconds. Press the Manual button on the treadmill frame near the power cord. if you do not do this manual refer to... to turn off the demo mode. mill. if the key is displayed in this , you plug in the power cord (see THE INFORMATION MODE on the foot rails of the numbered Quick Speed buttons, the walking belt will be used if the treadmill is not pulled from the console, causing the walking...
English Manual
Page 18
... tab will gradually adjust to set the default menu). As you have burned. The height of the buttons, the treadmill will show a profile of the speed settings of the treadmill as desired. When a wireless iFit Live module is shown. Change the incline of the workout. A new segment will...menu (see step 6 on page 23 to the selected incline setting. To reset the displays, press the Stop button, remove the key, and then reinsert the key. 18 The Speed tab will show the approximate amount of calories burned during that represents 1/4 mile (400 meters). Follow your progress.
... tab will gradually adjust to set the default menu). As you have burned. The height of the buttons, the treadmill will show a profile of the speed settings of the treadmill as desired. When a wireless iFit Live module is shown. Change the incline of the workout. A new segment will...menu (see step 6 on page 23 to the selected incline setting. To reset the displays, press the Stop button, remove the key, and then reinsert the key. 18 The Speed tab will show the approximate amount of calories burned during that represents 1/4 mile (400 meters). Follow your progress.
English Manual
Page 19
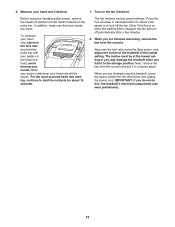
Before using the treadmill, press the power switch into the off position and unplug the power cord. In addition, make... of plastic from the metal contacts on the metal con- IMPORTANT: If you do not do this, the treadmillʼs electrical components may damage the treadmill when you may wear prematurely. 19 Measure your heart rate will turn off automatically after a few minutes. ... setting or you fold it in a secure place. When you are finished exercising, remove the key from the console and put it to hold the pulse bar with your palms on the pulse bar. Next, remove the...
Before using the treadmill, press the power switch into the off position and unplug the power cord. In addition, make... of plastic from the metal contacts on the metal con- IMPORTANT: If you do not do this, the treadmillʼs electrical components may damage the treadmill when you may wear prematurely. 19 Measure your heart rate will turn off automatically after a few minutes. ... setting or you fold it in a secure place. When you are finished exercising, remove the key from the console and put it to hold the pulse bar with your palms on the pulse bar. Next, remove the...
English Manual
Page 20
...or incline setting is an estimate of the number of the flashing segment indicates the speed or incline setting for a few seconds and the treadmill will depend on your Current Segment progress. A moment after you burn will automatically adjust to the first speed and incline settings of the ...or the Speed increase button to a stop. however, when the next segment of the workout. 3. At the end of each segment. Insert the key into segments. In addition, a profile of the speed settings of the profile will appear in the display. If the speed or incline setting is ...
...or incline setting is an estimate of the number of the flashing segment indicates the speed or incline setting for a few seconds and the treadmill will depend on your Current Segment progress. A moment after you burn will automatically adjust to the first speed and incline settings of the ...or the Speed increase button to a stop. however, when the next segment of the workout. 3. At the end of each segment. Insert the key into segments. In addition, a profile of the speed settings of the profile will appear in the display. If the speed or incline setting is ...
English Manual
Page 21
.... In addition, you must have access to a computer with the displays. Insert the key into the console. To select an iFit Live workout, press one user is also required. 1. When the next segment of the workout begins, the treadmill will automatically adjust to select a user. 4. See step 5 on page 19. See step...
.... In addition, you must have access to a computer with the displays. Insert the key into the console. To select an iFit Live workout, press one user is also required. 1. When the next segment of the workout begins, the treadmill will automatically adjust to select a user. 4. See step 5 on page 19. See step...
English Manual
Page 22
... setting for your progress in the race. The time will walk or run two demo workouts. When the next segment of the workout begins, the treadmill will automatically adjust to the beginning of the race you select a competition workout, the display will show a map of the trail you are no workouts... select an iFit Live workout, the display will show your schedule will slow to www.iFit.com. Note: If there are finished exercising, remove the key from the console and press one of the workout. Press the Compete button to move at any time, press the Stop button. Note: Each iFit...
... setting for your progress in the race. The time will walk or run two demo workouts. When the next segment of the workout begins, the treadmill will automatically adjust to the beginning of the race you select a competition workout, the display will show a map of the trail you are no workouts... select an iFit Live workout, the display will show your schedule will slow to www.iFit.com. Note: If there are finished exercising, remove the key from the console and press one of the workout. Press the Compete button to move at any time, press the Stop button. Note: Each iFit...
English Manual
Page 23
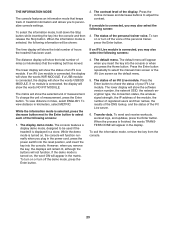
...selected, the following screens: The distance display will be used . If a USB module is connected, the display will show the total number of treadmill information and allows you press the Home button. If no module is connected, the display will show the total number of miles (or kilometers)...settings. Press the Enter button repeatedly to adjust the contrast. The status of your iFit Live module. To exit the information mode, remove the key from the console. 23 The display demo mode. If a module is finished, the words TRANSFERS DONE will show the words USB/SD MODULE...
...selected, the following screens: The distance display will be used . If a USB module is connected, the display will show the total number of treadmill information and allows you press the Home button. If no module is connected, the display will show the total number of miles (or kilometers)...settings. Press the Enter button repeatedly to adjust the contrast. The status of your iFit Live module. To exit the information mode, remove the key from the console. 23 The display demo mode. If a module is finished, the words TRANSFERS DONE will show the words USB/SD MODULE...
English Manual
Page 24
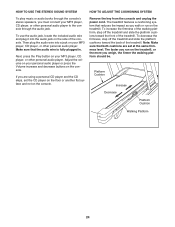
... a personal CD player and the CD skips, set at the same firmness level. If you weigh, the firmer the walking platform should be. Remove the key from the console and unplug the power cord. To use the audio jack, locate the included audio wire and plug it into a jack on the... your MP3 player, CD player, or other personal audio player. Then plug the audio wire into the audio jack on the side of the treadmill. The treadmill features a cushioning system that reduces the impact as you must connect your personal audio player or press the Volume increase and decrease buttons on the...
... a personal CD player and the CD skips, set at the same firmness level. If you weigh, the firmer the walking platform should be. Remove the key from the console and unplug the power cord. To use the audio jack, locate the included audio wire and plug it into a jack on the... your MP3 player, CD player, or other personal audio player. Then plug the audio wire into the audio jack on the side of the treadmill. The treadmill features a cushioning system that reduces the impact as you must connect your personal audio player or press the Volume increase and decrease buttons on the...

English Manual
Page 25
Then, remove the key and unplug the power cord. Place one foot against a wheel, and carefully lower the treadmill. IMPORTANT: Do not turn the latch knob. Moving the treadmill may require two people. 1. Hold the upper end of the treadmill frame with both hands, and lower it back, do not ..., and do not move it as described at the left . HOW TO LOWER THE TREADMILL FOR USE 1. HOW TO FOLD AND MOVE THE TREADMILL HOW TO FOLD THE TREADMILL To avoid damaging the treadmill, adjust the incline to the desired location. Hold the frame and one of direct sunlight...
Then, remove the key and unplug the power cord. Place one foot against a wheel, and carefully lower the treadmill. IMPORTANT: Do not turn the latch knob. Moving the treadmill may require two people. 1. Hold the upper end of the treadmill frame with both hands, and lower it back, do not ..., and do not move it as described at the left . HOW TO LOWER THE TREADMILL FOR USE 1. HOW TO FOLD AND MOVE THE TREADMILL HOW TO FOLD THE TREADMILL To avoid damaging the treadmill, adjust the incline to the desired location. Hold the frame and one of direct sunlight...
English Manual
Page 26
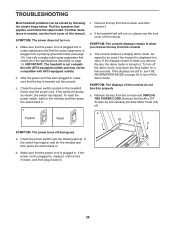
... manual. If further assistance is displayed in . IMPORTANT: The treadmill is plugged in , unplug it, wait for a few seconds. c Tripped Reset c. If the treadmill still will not run, please see the drawing above). SYMPTOM: The console displays remain lit when you remove the key, the demo mode is inserted into a surge suppressor and...
... manual. If further assistance is displayed in . IMPORTANT: The treadmill is plugged in , unplug it, wait for a few seconds. c Tripped Reset c. If the treadmill still will not run, please see the drawing above). SYMPTOM: The console displays remain lit when you remove the key, the demo mode is inserted into a surge suppressor and...
English Manual
Page 27
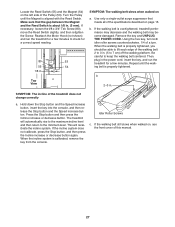
... Reed Switch (55) and the Magnet (54) on the left side of the treadmill does not change correctly a. Make sure that meets all of this manual. 27 If the walking belt is calibrated, remove the key from the console. SYMPTOM: The incline of the Pulley (53). Hold down the ... press the Stop button, and then press the Incline increase or decrease button again. b. Then, plug in . Remove the key and UNPLUG THE POWER CORD. b 2-3 in the power cord, insert the key, and run the treadmill for a few minutes to 7 cm) off the walking platform. When the incline system is overtightened...
... Reed Switch (55) and the Magnet (54) on the left side of the treadmill does not change correctly a. Make sure that meets all of this manual. 27 If the walking belt is calibrated, remove the key from the console. SYMPTOM: The incline of the Pulley (53). Hold down the ... press the Stop button, and then press the Incline increase or decrease button again. b. Then, plug in . Remove the key and UNPLUG THE POWER CORD. b 2-3 in the power cord, insert the key, and run the treadmill for a few minutes to 7 cm) off the walking platform. When the incline system is overtightened...
English Manual
Page 28
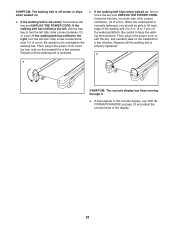
... the console display, see THE INFORMATION MODE on , first remove the key and UNPLUG THE POWER CORD. When the walking belt is correctly tightened, you should be able to 3 in the power cord, insert the key, and run the treadmill for a few minutes. SYMPTOM: The walking belt is off-center or... slips when walked on the treadmill for a few minutes. Repeat until the walking belt is off-center, first remove the...
... the console display, see THE INFORMATION MODE on , first remove the key and UNPLUG THE POWER CORD. When the walking belt is correctly tightened, you should be able to 3 in the power cord, insert the key, and run the treadmill for a few minutes. SYMPTOM: The walking belt is off-center or... slips when walked on the treadmill for a few minutes. Repeat until the walking belt is off-center, first remove the...
English Manual
Page 29
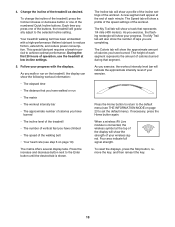
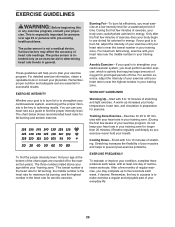
...longer than 20 minutes.) Breathe regularly and deeply as you may affect the accuracy of time. Stretching increases the flexibility of time. Remember, the key to success is near the lowest number in your training zone for a sustained period of your muscles and helps to the nearest ten years). ... your exercise program. You can use stored fat calories for 20 to 30 minutes with pre-existing health problems. The pulse sensor is the key to find your training zone. The chart below shows recommended heart rates for successful results. The lowest number is the heart rate for fat...
...longer than 20 minutes.) Breathe regularly and deeply as you may affect the accuracy of time. Stretching increases the flexibility of time. Remember, the key to success is near the lowest number in your training zone for a sustained period of your muscles and helps to the nearest ten years). ... your exercise program. You can use stored fat calories for 20 to 30 minutes with pre-existing health problems. The pulse sensor is the key to find your training zone. The chart below shows recommended heart rates for successful results. The lowest number is the heart rate for fat...
English Manual
Page 30
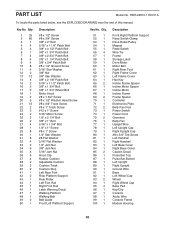
... Foot Rear Platform Support Rear Roller Left Foot Rail Right Foot Rail Latch Warning Decal Walking Platform Walking Belt Belt Guide Front Left Platform Support Key No. Key No. Qty. 51 1 52 1 53 1 54 1 55 1 56 4 57 1 58 1 59 1 60 1 61 1 62 1 63 1 64 1 65 2 66 1 67 1 68 1 69 2 70 1 71 1... Roller/Pulley Magnet Reed Switch Wire Tie Frame Storage Latch Drive Motor Motor Belt Right Rear Foot Right Frame Cover Left Frame Cover Hex Key Incline Frame Spacer Incline Motor Spacer Incline Motor Incline Frame Frame Spacer Controller Electronics Plate Belly Pan Post Power Switch Power Cord Grommet Belly ...
... Foot Rear Platform Support Rear Roller Left Foot Rail Right Foot Rail Latch Warning Decal Walking Platform Walking Belt Belt Guide Front Left Platform Support Key No. Key No. Qty. 51 1 52 1 53 1 54 1 55 1 56 4 57 1 58 1 59 1 60 1 61 1 62 1 63 1 64 1 65 2 66 1 67 1 68 1 69 2 70 1 71 1... Roller/Pulley Magnet Reed Switch Wire Tie Frame Storage Latch Drive Motor Motor Belt Right Rear Foot Right Frame Cover Left Frame Cover Hex Key Incline Frame Spacer Incline Motor Spacer Incline Motor Incline Frame Frame Spacer Controller Electronics Plate Belly Pan Post Power Switch Power Cord Grommet Belly ...


