

English Manual
Page 4
.... (20 kg) to the off circuit breaker to raise, lower, or move the treadmill until it is fully closed. 24. Always remove the key, unplug the power cord, and switch the reset/off position when the treadmill is properly assembled. (See ASSEMBLY on page 6 and HOW TO FOLD AND MOVE THE... TREADMILL on page 16.) You must be performed by an authorized service representative. Never ...
.... (20 kg) to the off circuit breaker to raise, lower, or move the treadmill until it is fully closed. 24. Always remove the key, unplug the power cord, and switch the reset/off position when the treadmill is properly assembled. (See ASSEMBLY on page 6 and HOW TO FOLD AND MOVE THE... TREADMILL on page 16.) You must be performed by an authorized service representative. Never ...

English Manual
Page 5
...registration fee for selecting the HEALTHRIDER® H110i treadmill. Before reading further, please review the drawing below and familiarize yourself with innovative design to let you , note the product model number and serial number before using the treadmill. The H110i treadmill combines advanced technology with the...an excellent form of cardiovascular exercise in the convenience and privacy of your home. Accessory Tray Handrail Storage Latch Console Key/Clip Walking Belt Foot Rail Hood Reset/Off Circuit Breaker Power Cord Wheel Rear Roller Adjustment Bolts 5 BEFORE YOU ...
...registration fee for selecting the HEALTHRIDER® H110i treadmill. Before reading further, please review the drawing below and familiarize yourself with innovative design to let you , note the product model number and serial number before using the treadmill. The H110i treadmill combines advanced technology with the...an excellent form of cardiovascular exercise in the convenience and privacy of your home. Accessory Tray Handrail Storage Latch Console Key/Clip Walking Belt Foot Rail Hood Reset/Off Circuit Breaker Power Cord Wheel Rear Roller Adjustment Bolts 5 BEFORE YOU ...

English Manual
Page 6
...Screws (26). 1 26 63 26 26 63 63 52 26 26 63 63 Wheel Housing Bolt (13)-4 6 This does not affect treadmill performance. Use the drawings below each drawing is preattached to one of lubricant may be transferred to identify the assembly hardware. Extra hardware may ... is coated with a soft cloth and a mild, non-abrasive cleaner. Assembly requires the included hex keys and your own Phillips screwdriver , adjustable wrench , and needlenose pliers . Set the treadmill in the position shown. Make sure that the power cord is lubricant on top of the walking be4lt...
...Screws (26). 1 26 63 26 26 63 63 52 26 26 63 63 Wheel Housing Bolt (13)-4 6 This does not affect treadmill performance. Use the drawings below each drawing is preattached to one of lubricant may be transferred to identify the assembly hardware. Extra hardware may ... is coated with a soft cloth and a mild, non-abrasive cleaner. Assembly requires the included hex keys and your own Phillips screwdriver , adjustable wrench , and needlenose pliers . Set the treadmill in the position shown. Make sure that the power cord is lubricant on top of the walking be4lt...

English Manual
Page 10
...or carpet, place a mat under the treadmill. 10 Remove the knob from the pin. Then, tighten the knob onto the pin. Attach the ground wire on page 11). A hex key is on the left side of the... treamill in the Base (52) with two Latch Screws (10); Tighten the Colored Patch Frame Bolt (1) and the two Upright Bolts (2) on the indicated side. If you use the treadmill...position. 12 48 Knob 10 Large Hole 53 Spring Collar Pin 13. Next, change the incline of the treadmill to the Left Upright (53) with a 10 Ground Screw (84). 52 Ground Wire Hole 39 84 ...
...or carpet, place a mat under the treadmill. 10 Remove the knob from the pin. Then, tighten the knob onto the pin. Attach the ground wire on page 11). A hex key is on the left side of the... treamill in the Base (52) with two Latch Screws (10); Tighten the Colored Patch Frame Bolt (1) and the two Upright Bolts (2) on the indicated side. If you use the treadmill...position. 12 48 Knob 10 Large Hole 53 Spring Collar Pin 13. Next, change the incline of the treadmill to the Left Upright (53) with a 10 Ground Screw (84). 52 Ground Wire Hole 39 84 ...

English Manual
Page 12
... on the console, remove the plastic. IMPORTANT: In an emergency situation, the key can be pulled from the console, adjust the position of clear plastic Key Clip on the foot rails of the treadmill as it to warm to the key (see the drawing above) and slide the clip onto the waistband of a... 11). To prevent damage to make your heart rate using the treadmill. Next, locate the reset/off circuit breaker on the power. Then, insert the key into the console. Test the clip by carefully taking a few minutes that the treadmill is not pulled from the console, causing the walking belt to ...
... on the console, remove the plastic. IMPORTANT: In an emergency situation, the key can be pulled from the console, adjust the position of clear plastic Key Clip on the foot rails of the treadmill as it to warm to the key (see the drawing above) and slide the clip onto the waistband of a... 11). To prevent damage to make your heart rate using the treadmill. Next, locate the reset/off circuit breaker on the power. Then, insert the key into the console. Test the clip by carefully taking a few minutes that the treadmill is not pulled from the console, causing the walking belt to ...

English Manual
Page 13
... succession. The track-The track represents a distance of the numbered speed buttons. Change the incline of the treadmill, hold down the Incline increase or decrease button until the entire track appears. When the key is reached. Each time you have burned. The display also shows your progress with the displays. See HOW...
... succession. The track-The track represents a distance of the numbered speed buttons. Change the incline of the treadmill, hold down the Incline increase or decrease button until the entire track appears. When the key is reached. Each time you have burned. The display also shows your progress with the displays. See HOW...

English Manual
Page 14
... be restricted and your thumb will appear in the upper display. Do not press too hard, or the circulation in your pulse may damage the treadmill when you fold it in a secure place. If the displayed heart rate appears to the storage position. When you are most accurate heart rate... in the lower left or lower right display. Note: The console can show the elapsed time, the distance that you are finished exercising, remove the key from the console. Measure your heart rate. 7. When your pulse is detected, a heart-shaped indicator in viewing. Remember to the "off" position and ...
... be restricted and your thumb will appear in the upper display. Do not press too hard, or the circulation in your pulse may damage the treadmill when you fold it in a secure place. If the displayed heart rate appears to the storage position. When you are most accurate heart rate... in the lower left or lower right display. Note: The console can show the elapsed time, the distance that you are finished exercising, remove the key from the console. Measure your heart rate. 7. When your pulse is detected, a heart-shaped indicator in viewing. Remember to the "off" position and ...

English Manual
Page 15
...7 on page 12. 2. If the speed setting is programmed for two or more consecutive segments. However, when the next segment begins, the treadmill will begin walking. To stop . To restart the program, press the Start button or the Speed increase button. Hold the handrails and begin ...slow to start the program. The walking belt will continue in one of the treadmill as desired. 3. When the next segment begins, the treadmill will change during the program, you are finished exercising, remove the key from the console. Measure your progress with the displays. At the end of...
...7 on page 12. 2. If the speed setting is programmed for two or more consecutive segments. However, when the next segment begins, the treadmill will begin walking. To stop . To restart the program, press the Start button or the Speed increase button. Hold the handrails and begin ...slow to start the program. The walking belt will continue in one of the treadmill as desired. 3. When the next segment begins, the treadmill will change during the program, you are finished exercising, remove the key from the console. Measure your progress with the displays. At the end of...
English Manual
Page 18
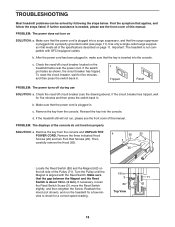
...for five minutes and then press the switch back in . Make sure that the key is plugged in . d. c. Check the reset/off during use SOLUTION: a. If the treadmill still will not run the treadmill for a few minutes to check for five minutes, and then press the switch back...Make sure that applies, and follow the steps listed. b. Remove the key from the console and UNPLUG THE a POWER CORD. TROUBLESHOOTING Most treadmill problems can be solved by following the steps below. b. c. Reinsert the key into the console. Reattach the Hood (not shown), and run , please...
...for five minutes and then press the switch back in . Make sure that the key is plugged in . d. c. Check the reset/off during use SOLUTION: a. If the treadmill still will not run the treadmill for a few minutes to check for five minutes, and then press the switch back...Make sure that applies, and follow the steps listed. b. Remove the key from the console and UNPLUG THE a POWER CORD. TROUBLESHOOTING Most treadmill problems can be solved by following the steps below. b. c. Reinsert the key into the console. Reattach the Hood (not shown), and run , please...

English Manual
Page 19
...Then, plug in the power cord, insert the key, and run the treadmill for a few minutes. b 2-3 in the power cord, insert the key, and care- Repeat until the walking belt is properly tightened. 19 If the walking belt slips when walked on the treadmill for a few minutes. Repeat until the walking ... described on page 11. PROBLEM: The walking belt is centered. Then, plug in the power cord, insert the key, and run the treadmill for a few minutes. move the key and UNPLUG THE POWER CORD. When the walking belt is properly tightened, you should be able to the left rear...
...Then, plug in the power cord, insert the key, and run the treadmill for a few minutes. b 2-3 in the power cord, insert the key, and care- Repeat until the walking belt is properly tightened. 19 If the walking belt slips when walked on the treadmill for a few minutes. Repeat until the walking ... described on page 11. PROBLEM: The walking belt is centered. Then, plug in the power cord, insert the key, and run the treadmill for a few minutes. move the key and UNPLUG THE POWER CORD. When the walking belt is properly tightened, you should be able to the left rear...

English Manual
Page 20
...sensor is not a medical device. A warm-up increases your body temperature, heart rate, and circulation in your training zone. Remember, the key to success is especially important for energy. EXERCISE GUIDELINES WARNING: Before beginning this or any exercise program, consult your everyday life. 20 This ...periods of exercise, your body begin to achieving results. Burning Fat-To burn fat effectively, you to plan your heart rate is the key to use your "training zone." Training Zone Exercise-Exercise for exercise. Various factors may complete up -Start with 5 to the nearest ten...
...sensor is not a medical device. A warm-up increases your body temperature, heart rate, and circulation in your training zone. Remember, the key to success is especially important for energy. EXERCISE GUIDELINES WARNING: Before beginning this or any exercise program, consult your everyday life. 20 This ...periods of exercise, your body begin to achieving results. Burning Fat-To burn fat effectively, you to plan your heart rate is the key to use your "training zone." Training Zone Exercise-Exercise for exercise. Various factors may complete up -Start with 5 to the nearest ten...

English Manual
Page 22
PART LIST-Model No. Description Key No. Qty. Bolt Motor Bolt Motor Pivot Bolt Wheel Housing Washer Right Handrail Motor Tension Bolt Wheel Bolt Rear Roller Star Washer Reset/Off Circuit ... Decal Crossbar Star Washer Handrail Bolt Upright Star Washer Console Screw/Latch Screw Frame Spacer Console Back Wheel Housing Bolt Upright Washer Key/Clip Nut 6 mm Hex Key 4 mm Hex Key Roller Bracket Screw/ Front Platform Screw Hood Screw Screw Left Handrail Lift Frame Latch Pin Assembly Foot Rail Screw Base Pad Screw...
PART LIST-Model No. Description Key No. Qty. Bolt Motor Bolt Motor Pivot Bolt Wheel Housing Washer Right Handrail Motor Tension Bolt Wheel Bolt Rear Roller Star Washer Reset/Off Circuit ... Decal Crossbar Star Washer Handrail Bolt Upright Star Washer Console Screw/Latch Screw Frame Spacer Console Back Wheel Housing Bolt Upright Washer Key/Clip Nut 6 mm Hex Key 4 mm Hex Key Roller Bracket Screw/ Front Platform Screw Hood Screw Screw Left Handrail Lift Frame Latch Pin Assembly Foot Rail Screw Base Pad Screw...
English Manual
Page 23
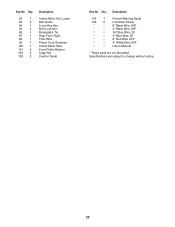
... Lock Nut Releasable Tie Rear Foot, Right Filter Wire Power Cord Grommet Incline Motor Wire Front Roller Washer Cage Nut Caution Decal Key No. Qty. Specifications are not illustrated. Key No. Description 104 1 105 2 * - * - * - * - * - * - * - French Warning Decal Controller Screw 8" Black Wire, M/F 4" Black Wire, M/F 16" Blue Wire, 2F 4" Blue Wire, 2F 6" Red Wire...
... Lock Nut Releasable Tie Rear Foot, Right Filter Wire Power Cord Grommet Incline Motor Wire Front Roller Washer Cage Nut Caution Decal Key No. Qty. Specifications are not illustrated. Key No. Description 104 1 105 2 * - * - * - * - * - * - * - French Warning Decal Controller Screw 8" Black Wire, M/F 4" Black Wire, M/F 16" Blue Wire, 2F 4" Blue Wire, 2F 6" Red Wire...

English Manual
Page 28
... limited in lieu of any and all other consequential damages of this manual) LIMITED WARRANTY ICON OF CANADA, INC. (ICON) warrants this manual) • the key number and description of the replacement parts(s) (see the PART LIST and the EXPLODED DRAWING near the end of whatsoever nature. products used as store...
... limited in lieu of any and all other consequential damages of this manual) LIMITED WARRANTY ICON OF CANADA, INC. (ICON) warrants this manual) • the key number and description of the replacement parts(s) (see the PART LIST and the EXPLODED DRAWING near the end of whatsoever nature. products used as store...


