

English Manual
Page 2
TABLE OF CONTENTS IMPORTANT PRECAUTIONS 3 BEFORE YOU BEGIN 4 ASSEMBLY 5 HOW TO USE THE ELLIPTICAL CROSSTRAINER 9 MAINTENANCE AND TROUBLESHOOTING 20 CONDITIONING GUIDELINES 21 PART LIST 22 EXPLODED DRAWING 23 HOW TO ORDER REPLACEMENT PARTS Back Cover LIMITED WARRANTY Back Cover HealthRider is a registered trademark of ICON Health & Fitness, Inc. 2
TABLE OF CONTENTS IMPORTANT PRECAUTIONS 3 BEFORE YOU BEGIN 4 ASSEMBLY 5 HOW TO USE THE ELLIPTICAL CROSSTRAINER 9 MAINTENANCE AND TROUBLESHOOTING 20 CONDITIONING GUIDELINES 21 PART LIST 22 EXPLODED DRAWING 23 HOW TO ORDER REPLACEMENT PARTS Back Cover LIMITED WARRANTY Back Cover HealthRider is a registered trademark of ICON Health & Fitness, Inc. 2

English Manual
Page 3
... elliptical crosstrainer. The pulse sensor is especially important for personal injury or property damage sustained by persons weighing more than 250 pounds. 7. Keep the elliptical crosstrainer indoors, away from the elliptical crosstrainer at any exercise program, consult your physician. The elliptical crosstrainer is not a medical device. lems. Read all instructions in this or any time while exercising, stop . 13. Replace any worn parts immediately. 5. Do not use of heart rate...
... elliptical crosstrainer. The pulse sensor is especially important for personal injury or property damage sustained by persons weighing more than 250 pounds. 7. Keep the elliptical crosstrainer indoors, away from the elliptical crosstrainer at any exercise program, consult your physician. The elliptical crosstrainer is not a medical device. lems. Read all instructions in this or any time while exercising, stop . 13. Replace any worn parts immediately. 5. Do not use of heart rate...

English Manual
Page 4
... Holder* Console Pulse Sensor FRONT Pedal Arm Wheel Pedal Pedal Leg LEFT SIDE BACK Pedal Disk *No water bottle is HRE59020. until 6 p.m. For your feet in the drawing below. Mountain Time (excluding holidays). The serial number can be found on your exercise. And the unique C840E features adjustable resistance and a state-ofthe-art console to a whole new world of this manual for selecting the new HealthRider® C840E elliptical crosstrainer. To...
... Holder* Console Pulse Sensor FRONT Pedal Arm Wheel Pedal Pedal Leg LEFT SIDE BACK Pedal Disk *No water bottle is HRE59020. until 6 p.m. For your feet in the drawing below. Mountain Time (excluding holidays). The serial number can be found on your exercise. And the unique C840E features adjustable resistance and a state-ofthe-art console to a whole new world of this manual for selecting the new HealthRider® C840E elliptical crosstrainer. To...

English Manual
Page 5
... not dispose of the part, from the PART LIST on page 22. As you assemble the elliptical crosstrainer, use the drawings below each drawing refers to the key number of the packing materials until assembly is turned so the Wheels are not touching the floor. 1 22 34 22 34 10 1 33 5 Place all parts of the Frame (1), attach the Front Stabilizer to see...
... not dispose of the part, from the PART LIST on page 22. As you assemble the elliptical crosstrainer, use the drawings below each drawing refers to the key number of the packing materials until assembly is turned so the Wheels are not touching the floor. 1 22 34 22 34 10 1 33 5 Place all parts of the Frame (1), attach the Front Stabilizer to see...

English Manual
Page 6
... Console. Turn the Upright Knob (43) counterclockwise several turns. Feed the upper end of the Frame (1), attach the Rear Stabilizer (9) to the Frame with the holes in the position shown, connect the Extension Wire Harness (44) to the inset drawing. Tighten two M4 x 16mm Screws (52) through the Upright Extension (73). Insert four batteries into the tube as shown by the diagram inside the battery...
... Console. Turn the Upright Knob (43) counterclockwise several turns. Feed the upper end of the Frame (1), attach the Rear Stabilizer (9) to the Frame with the holes in the position shown, connect the Extension Wire Harness (44) to the inset drawing. Tighten two M4 x 16mm Screws (52) through the Upright Extension (73). Insert four batteries into the tube as shown by the diagram inside the battery...

English Manual
Page 8
... Upright Knob (43) clockwise until it is completed. Tighten the M8 x 45mm Button Bolts (50 in the Left Pedal Leg (11). To protect the floor or carpet from damage, place a mat under the elliptical crosstrainer. 8 Position a Cushion (70) in one of the elliptical crosstrainer in the same way. Insert the long part of the Bolt Set into the long part. Tighten the short part of the M10 Bolt Set...
... Upright Knob (43) clockwise until it is completed. Tighten the M8 x 45mm Button Bolts (50 in the Left Pedal Leg (11). To protect the floor or carpet from damage, place a mat under the elliptical crosstrainer. 8 Position a Cushion (70) in one of the elliptical crosstrainer in the same way. Insert the long part of the Bolt Set into the long part. Tighten the short part of the M10 Bolt Set...

English Manual
Page 9
... desired location and then lower it . tion. To dismount the elliptical crosstrainer, wait until the flywheel stops. Then, step off the highest pedal first. To adjust the pedals, first remove the pedal Upright Upright screws. Move the upright up and down slightly until it is in the same position. To exercise only your workouts. Note: The elliptical crosstrainer does not have a free wheel; Wheel ly, and lift the elliptical crosstrainer Rear Stabilizer until the pin...
... desired location and then lower it . tion. To dismount the elliptical crosstrainer, wait until the flywheel stops. Then, step off the highest pedal first. To adjust the pedals, first remove the pedal Upright Upright screws. Move the upright up and down slightly until it is in the same position. To exercise only your workouts. Note: The elliptical crosstrainer does not have a free wheel; Wheel ly, and lift the elliptical crosstrainer Rear Stabilizer until the pin...

English Manual
Page 10
... elliptical crosstrainer connected to your computer, you can even measure your heart rate using the built-in your home. Using a stereo audio To purchase iFIT.com CD's and videocassettes, call toll-free 1-800-735-0768. 10 Video programs offer the same benefits as iFIT.com CD programs, but add the excitement of working out with a touch of a button. The console also features new iFIT.com interactive technology. When the manual mode...
... elliptical crosstrainer connected to your computer, you can even measure your heart rate using the built-in your home. Using a stereo audio To purchase iFIT.com CD's and videocassettes, call toll-free 1-800-735-0768. 10 Video programs offer the same benefits as iFIT.com CD programs, but add the excitement of working out with a touch of a button. The console also features new iFIT.com interactive technology. When the manual mode...

English Manual
Page 11
...: scan, speed, time, distance, resistance level, calories, fat calories, and heart rate (when the handgrip pulse sensor is selected. This button is comfortable for continuous display. I. + and - CONSOLE DESCRIPTION Refer to match the target pace. B. D. E. The left bar graph will appear. As the right bar graph changes, simply adjust your exercise program. G. To use a program directly from one mode to select the unit of the elliptical crosstrainer. To use iFIT.com CD's or videos, refer...
...: scan, speed, time, distance, resistance level, calories, fat calories, and heart rate (when the handgrip pulse sensor is selected. This button is comfortable for continuous display. I. + and - CONSOLE DESCRIPTION Refer to match the target pace. B. D. E. The left bar graph will appear. As the right bar graph changes, simply adjust your exercise program. G. To use a program directly from one mode to select the unit of the elliptical crosstrainer. To use iFIT.com CD's or videos, refer...

English Manual
Page 12
... your heart rate along with the feedback modes and the left bar graph will be selected. To turn off the plastic. As you exercise, the display will be select- After a moment, two dashes (- -) will appear and then your pulse is turned on page 5 and install batteries. HOW TO USE THE MANUAL MODE 1 Turn on the console, press the On/Reset button or begin pedaling. 2 Select the manual mode. If you are pressed, it...
... your heart rate along with the feedback modes and the left bar graph will be selected. To turn off the plastic. As you exercise, the display will be select- After a moment, two dashes (- -) will appear and then your pulse is turned on page 5 and install batteries. HOW TO USE THE MANUAL MODE 1 Turn on the console, press the On/Reset button or begin pedaling. 2 Select the manual mode. If you are pressed, it...

English Manual
Page 13
... period of bars appear on , the manual mode will be slower than the pace setting, the decrease arrow will automatically turn off. tings for the program are finished exercising, the console will appear. When no time remains, the program will automatically change as shown by pressing the + and - To select a Smart program, press the Program button repeatedly until the number 1, 2, 3, 4, 5, or 6 appears in the display to prompt...
... period of bars appear on , the manual mode will be slower than the pace setting, the decrease arrow will automatically turn off. tings for the program are finished exercising, the console will appear. When no time remains, the program will automatically change as shown by pressing the + and - To select a Smart program, press the Program button repeatedly until the number 1, 2, 3, 4, 5, or 6 appears in the display to prompt...

English Manual
Page 14
... age. When using a Heart Rate program, you can adjust the resistance level by subtracting your age from 220. Note: When you are programmed for each period. (The same resistance setting and/or heart rate setting may be programmed for consecutive periods.) During the program, the resistance of the elliptical crosstrainer will then be shown. To start the program, simply begin exercising. buttons. The right bar graph will then change if a different resistance setting is designed...
... age. When using a Heart Rate program, you can adjust the resistance level by subtracting your age from 220. Note: When you are programmed for each period. (The same resistance setting and/or heart rate setting may be programmed for consecutive periods.) During the program, the resistance of the elliptical crosstrainer will then be shown. To start the program, simply begin exercising. buttons. The right bar graph will then change if a different resistance setting is designed...

English Manual
Page 15
..., the program will automatically turn off. A PHONES LINE OUT LINE OUT PHONES Audio Cable Headphones B. See page 17 for connecting instructions. bars appear on your portable CD player, portable stereo, home stereo, or computer with the feedback modes. Make sure to 1/8" stereo audio cable (available at electronics stores) into the jack beneath the console. To use iFIT.com videocassettes, the elliptical crosstrainer must be connected to 1/8" stereo audio cable...
..., the program will automatically turn off. A PHONES LINE OUT LINE OUT PHONES Audio Cable Headphones B. See page 17 for connecting instructions. bars appear on your portable CD player, portable stereo, home stereo, or computer with the feedback modes. Make sure to 1/8" stereo audio cable (available at electronics stores) into the jack beneath the console. To use iFIT.com videocassettes, the elliptical crosstrainer must be connected to 1/8" stereo audio cable...
English Manual
Page 16
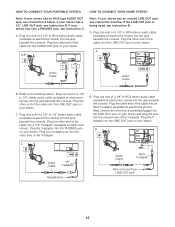
... instruction B. Plug one end of the cable into the jack beneath the console. Refer to RCA stereo audio cable (available at electronics stores) into an RCA Y-adapter (available at electronics stores) into the jack beneath the console. B CD VCR Amp LINE OUT Audio Cable PHONES 1/8" Y-adapter Headphones Audio Cable RCA Y-adapter Wire removed from LINE OUT jack 16 A CD VCR Amp LINE OUT LINE OUT Audio Cable B. Plug your...
... instruction B. Plug one end of the cable into the jack beneath the console. Refer to RCA stereo audio cable (available at electronics stores) into an RCA Y-adapter (available at electronics stores) into the jack beneath the console. B CD VCR Amp LINE OUT Audio Cable PHONES 1/8" Y-adapter Headphones Audio Cable RCA Y-adapter Wire removed from LINE OUT jack 16 A CD VCR Amp LINE OUT LINE OUT Audio Cable B. Plug your...

English Manual
Page 18
... the feedback modes. HOW TO USE IFIT.COM CD AND VIDEO PROGRAMS To use an iFIT.com CD or video program. 1 Turn on page 15. A moment after the play button on , the manual mode will alert you are using an iFIT.com CD, insert the CD into your VCR. 4 Press the play button is lit. • Adjust the volume of the elliptical crosstrainer and/or the pace setting does not change . Refer...
... the feedback modes. HOW TO USE IFIT.COM CD AND VIDEO PROGRAMS To use an iFIT.com CD or video program. 1 Turn on page 15. A moment after the play button on , the manual mode will alert you are using an iFIT.com CD, insert the CD into your VCR. 4 Press the play button is lit. • Adjust the volume of the elliptical crosstrainer and/or the pace setting does not change . Refer...

English Manual
Page 19
... modes. To select the iFIT.com mode, press the iFIT.com button. When the on page 17. However, an electronic "chirping" sound will alert you are finished exercising, the console will appear in almost the same way as a Smart program (refer to change. 8 Follow your computer and start the program, an on the console. Follow the steps below to the elliptical crosstrainer and begin . 7 Return to use programs...
... modes. To select the iFIT.com mode, press the iFIT.com button. When the on page 17. However, an electronic "chirping" sound will alert you are finished exercising, the console will appear in almost the same way as a Smart program (refer to change. 8 Follow your computer and start the program, an on the console. Follow the steps below to the elliptical crosstrainer and begin . 7 Return to use programs...
English Manual
Page 20
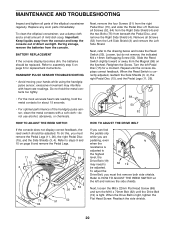
... adjust the Drive Belt, you must first remove both side shields. MAINTENANCE AND TROUBLESHOOTING Inspect and tighten all parts of mild dish soap. Refer to the drawing below and locate the Reed Switch (53). To clean the elliptical crosstrainer, use alcohol, abrasives, or chemicals. Next, refer to assembly step 5 on page 6 for a moment. excessive movement may need to HOW TO ADJUST THE REED SWITCH at the left Pedal Disc (15) for replacement instructions...
... adjust the Drive Belt, you must first remove both side shields. MAINTENANCE AND TROUBLESHOOTING Inspect and tighten all parts of mild dish soap. Refer to the drawing below and locate the Reed Switch (53). To clean the elliptical crosstrainer, use alcohol, abrasives, or chemicals. Next, refer to assembly step 5 on page 6 for a moment. excessive movement may need to HOW TO ADJUST THE REED SWITCH at the left Pedal Disc (15) for replacement instructions...
English Manual
Page 21
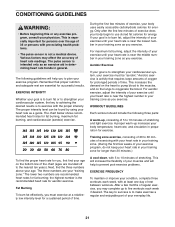
... exercise program, consult your heart rate as a guide. This is especially important for persons over the age of your exercise until your heart rate is near the lowest number in your goal is to burn fat, adjust the intensity of 35 or persons with pre-existing health problems. • The pulse sensor is to five workouts each week, with 5 to use stored fat calories for you exercise...
... exercise program, consult your heart rate as a guide. This is especially important for persons over the age of your exercise until your heart rate is near the lowest number in your goal is to burn fat, adjust the intensity of 35 or persons with pre-existing health problems. • The pulse sensor is to five workouts each week, with 5 to use stored fat calories for you exercise...
English Manual
Page 22
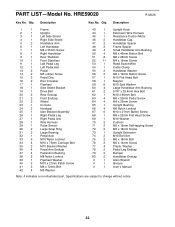
... 4 Pedal Arm Endcap 37 4 Pedal Arm Bushing 38 5 M8 Nylon Locknut 39 1 Flywheel Washer 40 2 M10 x 27mm Patch Screw 41 2 M6 x 72mm Bolt 42 4 M5 Washer 43 1 Upright Knob 44 1 Extension Wire Harness 45 1 Resistance Control Motor 46 2 Handlebar Cap 47 2 Handlebar Spacer 48 2 Frame Spacer 49 4 Small Handlebar Arm Bushing 50 4 M8 x 45mm Button Bolt 51 8 M6 x 28mm Screw 52 11 M4 x 16mm Screw 53 1 Reed Switch/Wire 54 1 Cable...
... 4 Pedal Arm Endcap 37 4 Pedal Arm Bushing 38 5 M8 Nylon Locknut 39 1 Flywheel Washer 40 2 M10 x 27mm Patch Screw 41 2 M6 x 72mm Bolt 42 4 M5 Washer 43 1 Upright Knob 44 1 Extension Wire Harness 45 1 Resistance Control Motor 46 2 Handlebar Cap 47 2 Handlebar Spacer 48 2 Frame Spacer 49 4 Small Handlebar Arm Bushing 50 4 M8 x 45mm Button Bolt 51 8 M6 x 28mm Screw 52 11 M4 x 16mm Screw 53 1 Reed Switch/Wire 54 1 Cable...

English Manual
Page 24
... NAME of the product (HealthRider® C840E) • The SERIAL NUMBER of the product (see the front cover of this manual) • The KEY NUMBER and DESCRIPTION of the part(s) (see page 22) LIMITED WARRANTY ICON Health & Fitness, Inc. (ICON), warrants this warranty is authorized by an ICON authorized service center; This warranty extends only to state. products used as store display models. Some states do not allow limitations on how long an...
... NAME of the product (HealthRider® C840E) • The SERIAL NUMBER of the product (see the front cover of this manual) • The KEY NUMBER and DESCRIPTION of the part(s) (see page 22) LIMITED WARRANTY ICON Health & Fitness, Inc. (ICON), warrants this warranty is authorized by an ICON authorized service center; This warranty extends only to state. products used as store display models. Some states do not allow limitations on how long an...

