
English Manual
Page 2
... setting. When exercising, do not wear loose clothing that all users of the AEROBIC RIDER 2 are adequately informed of all instructions before using the HEALTHRIDER® AEROBIC RIDER 2. 1. WARNING: Before beginning this product. 2 TABLE OF CONTENTS IMPORTANT PRECAUTIONS ...2 BEFORE YOU BEGIN 3 ASSEMBLY 4 ADJUSTMENT AND OPERATION 8 MAINTENANCE AND TROUBLE-SHOOTING 11 CONDITIONING GUIDELINES 12 PART LIST 14 EXPLODED DRAWING 15 ORDERING REPLACEMENT PARTS...
... setting. When exercising, do not wear loose clothing that all users of the AEROBIC RIDER 2 are adequately informed of all instructions before using the HEALTHRIDER® AEROBIC RIDER 2. 1. WARNING: Before beginning this product. 2 TABLE OF CONTENTS IMPORTANT PRECAUTIONS ...2 BEFORE YOU BEGIN 3 ASSEMBLY 4 ADJUSTMENT AND OPERATION 8 MAINTENANCE AND TROUBLE-SHOOTING 11 CONDITIONING GUIDELINES 12 PART LIST 14 EXPLODED DRAWING 15 ORDERING REPLACEMENT PARTS...
English Manual
Page 3
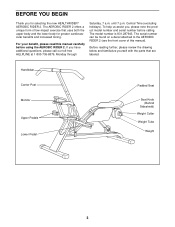
...). Before reading further, please review the drawing below and familiarize yourself with the parts that uses both the upper body and the lower body for selecting the new HEALTHRIDER® AEROBIC RIDER 2. BEFORE YOU BEGIN Thank you have additional questions, please call our toll-free... HELPLINE at 1-800-736-6879, Monday through Saturday, 7 a.m. The AEROBIC RIDER 2 offers a unique form of this manual carefully before...
...). Before reading further, please review the drawing below and familiarize yourself with the parts that uses both the upper body and the lower body for selecting the new HEALTHRIDER® AEROBIC RIDER 2. BEFORE YOU BEGIN Thank you have additional questions, please call our toll-free... HELPLINE at 1-800-736-6879, Monday through Saturday, 7 a.m. The AEROBIC RIDER 2 offers a unique form of this manual carefully before...
English Manual
Page 4
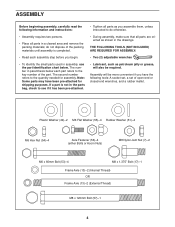
... OR Frame Axle (13)-2 (External Thread) M8 x 120mm Bolt (57)-1 4 Note: Some parts may have the following information and instructions: • Assembly requires two persons. • Place all parts are oriented as shown in the drawings. The number in parenthesis below each assembly step before you ...begin. • To identify the small parts used in assembly, use the part identification chart below. ASSEMBLY Before beginning assembly, carefully read the following tools: A socket set, a set of open-end...
... OR Frame Axle (13)-2 (External Thread) M8 x 120mm Bolt (57)-1 4 Note: Some parts may have the following information and instructions: • Assembly requires two persons. • Place all parts are oriented as shown in the drawings. The number in parenthesis below each assembly step before you ...begin. • To identify the small parts used in assembly, use the part identification chart below. ASSEMBLY Before beginning assembly, carefully read the following tools: A socket set, a set of open-end...

English Manual
Page 5
... Axle Fasteners (56) will be bolts; Attach one of the Frame Axles (13) are externally threaded, the Axle Fasteners will be acorn nuts (see the PART IDENTIFICATION CHART on page 4. Next, push a Fastener Pin (58) into the Main Frame. Attach the Handlebar Swing Arm (5) to the Main Frame (1) using four Fastener...
... Axle Fasteners (56) will be bolts; Attach one of the Frame Axles (13) are externally threaded, the Axle Fasteners will be acorn nuts (see the PART IDENTIFICATION CHART on page 4. Next, push a Fastener Pin (58) into the Main Frame. Attach the Handlebar Swing Arm (5) to the Main Frame (1) using four Fastener...

English Manual
Page 7
... of the two sets of the batteries. (+) (-) 35 Battery Cover (-) (+) AA Batteries 12. Make sure that all parts are properly tightened. Make sure that the but- 9. Remove the battery cover from damage, place a mat under the AEROBIC RIDER 2. 7 Identify the negative (-) and positive (+) ends of the 9 Handlebar Assembly (6) with your thumb and fore-
... of the two sets of the batteries. (+) (-) 35 Battery Cover (-) (+) AA Batteries 12. Make sure that all parts are properly tightened. Make sure that the but- 9. Remove the battery cover from damage, place a mat under the AEROBIC RIDER 2. 7 Identify the negative (-) and positive (+) ends of the 9 Handlebar Assembly (6) with your thumb and fore-

English Manual
Page 11
... Fasteners and the frame in the battery compartment should touch the negative ends of the AEROBIC RIDER 2 regularly. Remove the old batteries. MAINTENANCE AND TROUBLE-SHOOTING Inspect and tighten all parts of the batteries. (+) Re-attach the battery cover to the monitor. The springs ...in the locations shown at the right. To prevent damage to the AEROBIC RIDER 2. Identify the negative (-) and positive (+) ends of direct sunlight. The AEROBIC RIDER 2 can be applied ...
... Fasteners and the frame in the battery compartment should touch the negative ends of the AEROBIC RIDER 2 regularly. Remove the old batteries. MAINTENANCE AND TROUBLE-SHOOTING Inspect and tighten all parts of the batteries. (+) Re-attach the battery cover to the monitor. The springs ...in the locations shown at the right. To prevent damage to the AEROBIC RIDER 2. Identify the negative (-) and positive (+) ends of direct sunlight. The AEROBIC RIDER 2 can be applied ...
English Manual
Page 12
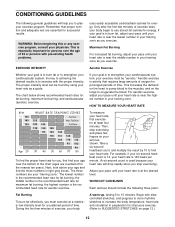
...activity that proper nutrition and adequate rest are your heart rate, first exercise for fat burning, maximum fat burning, and cardiovascular (aerobic) exercise. Aerobic exercise is to strengthen your cardiovascular system, your exercise must exercise at a relatively low intensity level for energy. the middle ..., lasting 5 to 10 minutes. During the first few minutes of exercise does your wrist as a guide. CONDITIONING GUIDELINES The following three parts: Fat Burning To burn fat effectively, you , first find your age near the bottom of the chart (ages are rounded off to...
...activity that proper nutrition and adequate rest are your heart rate, first exercise for fat burning, maximum fat burning, and cardiovascular (aerobic) exercise. Aerobic exercise is to strengthen your cardiovascular system, your exercise must exercise at a relatively low intensity level for energy. the middle ..., lasting 5 to 10 minutes. During the first few minutes of exercise does your wrist as a guide. CONDITIONING GUIDELINES The following three parts: Fat Burning To burn fat effectively, you , first find your age near the bottom of the chart (ages are rounded off to...
English Manual
Page 13
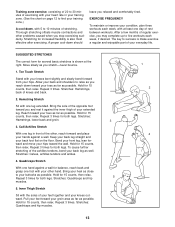
... you stretch-never bounce. 1. Stretching for both legs. Reach toward your groin area as far as close to success is make exercise a regular and enjoyable part of your everyday life. Calf/Achilles Stretch With one foot with your other hand. Repeat 3 times for balance, reach back and grasp one leg in...
... you stretch-never bounce. 1. Stretching for both legs. Reach toward your groin area as far as close to success is make exercise a regular and enjoyable part of your everyday life. Calf/Achilles Stretch With one foot with your other hand. Repeat 3 times for balance, reach back and grasp one leg in...
English Manual
Page 14
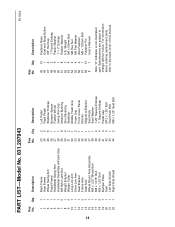
... 4 3/8" Hat Cap 48 2 1" Round Endcap 49 6 Plastic Washer 50 1 1" x 2" Endcap 51 8 Rubber Washer 52 2 5 lb. For information about ordering replacement parts, refer to change without notice. Qty. Weight 53 4 M6 x 60mm Bolt 54 4 M6 Hex Nut 55 4 M6 Flat Washer 56 4 Axle Fastener 57 1 M8 x... 120mm Bolt 58 10 Fastener Pin # 1 User's Manual Note: "#" indicates a non-illustrated part. Description 1 1 Main Frame 23 2 Left Pedal 2 1 Seat Frame 24 2 Right Pedal 3 1 Wheel Swing Arm 25 5 Stabilizer Endcap 4 1 Pedal Frame 26 1 Bumper ...
... 4 3/8" Hat Cap 48 2 1" Round Endcap 49 6 Plastic Washer 50 1 1" x 2" Endcap 51 8 Rubber Washer 52 2 5 lb. For information about ordering replacement parts, refer to change without notice. Qty. Weight 53 4 M6 x 60mm Bolt 54 4 M6 Hex Nut 55 4 M6 Flat Washer 56 4 Axle Fastener 57 1 M8 x... 120mm Bolt 58 10 Fastener Pin # 1 User's Manual Note: "#" indicates a non-illustrated part. Description 1 1 Main Frame 23 2 Left Pedal 2 1 Seat Frame 24 2 Right Pedal 3 1 Wheel Swing Arm 25 5 Stabilizer Endcap 4 1 Pedal Frame 26 1 Bumper ...
English Manual
Page 16
... See the front cover of charge. This warranty gives you specific legal rights, and you visit your HEALTHRIDER® AEROBIC RIDER 2 are available for rental purposes. All replacement parts are listed on a decal attached to find the location of this manual to the frame. When requesting ...of purchase, if failure occurs due to order parts by telephone, call the following information: • The MODEL NUMBER of the product (831.287943) • The NAME of the product (HEALTHRIDER® AEROBIC RIDER 2) • The PART NUMBER of the PART (see pages 14 and 15 of this manual)...
... See the front cover of charge. This warranty gives you specific legal rights, and you visit your HEALTHRIDER® AEROBIC RIDER 2 are available for rental purposes. All replacement parts are listed on a decal attached to find the location of this manual to the frame. When requesting ...of purchase, if failure occurs due to order parts by telephone, call the following information: • The MODEL NUMBER of the product (831.287943) • The NAME of the product (HEALTHRIDER® AEROBIC RIDER 2) • The PART NUMBER of the PART (see pages 14 and 15 of this manual)...


