
Instruction Manual
Page 1
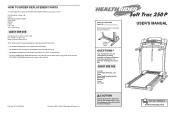
... NAME OF THE PRODUCT (HealthRider® SoftTrac 250P treadmill) • The SERIAL NUMBER OF THE PRODUCT (see the front cover of this manual) • The KEY NUMBER AND DESCRIPTION OF THE PART(S) (see the PART LIST on pages 26 and 27 and the EXPLODED DRAWING attached in the centre of this manual) Part No. 197148 R0603A Printed in USA © 2003 ICON Health & Fitness, Inc. Unit 4 Revie Road...
... NAME OF THE PRODUCT (HealthRider® SoftTrac 250P treadmill) • The SERIAL NUMBER OF THE PRODUCT (see the front cover of this manual) • The KEY NUMBER AND DESCRIPTION OF THE PART(S) (see the PART LIST on pages 26 and 27 and the EXPLODED DRAWING attached in the centre of this manual) Part No. 197148 R0603A Printed in USA © 2003 ICON Health & Fitness, Inc. Unit 4 Revie Road...
Instruction Manual
Page 2
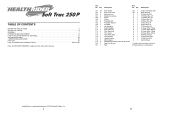
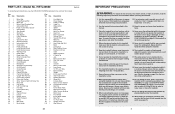
... manual. Description 101 23 102 2 103 2 104 2 105 1 106 1 107 2 108 2 109 1 110 1 111 1 112 1 113 4 114 1 115 1 116 1 117 2 118 1 119 8 120 1 121 1 Short Screw Euro Power Cord Extension Leg Extension Leg Cap Shock Choke Pulse Bar Bolt Pulse Bar Washer Pulse Bar Left Handgrip Right Handgrip Audio Wire Nut Thick Base Pad Trim Guard Hand Pulse Wire Console Back Upright Endcap Motor Sleeve Hood Bracket Screw/Incline Shield Screw Rear Foot Spacer Filter Key...
... manual. Description 101 23 102 2 103 2 104 2 105 1 106 1 107 2 108 2 109 1 110 1 111 1 112 1 113 4 114 1 115 1 116 1 117 2 118 1 119 8 120 1 121 1 Short Screw Euro Power Cord Extension Leg Extension Leg Cap Shock Choke Pulse Bar Bolt Pulse Bar Washer Pulse Bar Left Handgrip Right Handgrip Audio Wire Nut Thick Base Pad Trim Guard Hand Pulse Wire Console Back Upright Endcap Motor Sleeve Hood Bracket Screw/Incline Shield Screw Rear Foot Spacer Filter Key...
Instruction Manual
Page 3
... Power Supply Cable Tie Clamp Cable Tie Walking Belt Splitter Rear Roller Belly Pan Spacer Rear Foot Rear Foot Screw Ground Wire Ground Wire Screw Belly Pan Rear Endcap Rear Roller Adj. When choosing a location for both men and women. Always hold the handrails whilst using the treadmill. Adjust the speed in speed. 6. The pulse sensor is properly assembled. (See ASSEMBLY on page 7, and HOW TO MOVE THE TREADMILL on each side. Wear appropriate exercise clothes when using the treadmill. 5. When replacing...
... Power Supply Cable Tie Clamp Cable Tie Walking Belt Splitter Rear Roller Belly Pan Spacer Rear Foot Rear Foot Screw Ground Wire Ground Wire Screw Belly Pan Rear Endcap Rear Roller Adj. When choosing a location for both men and women. Always hold the handrails whilst using the treadmill. Adjust the speed in speed. 6. The pulse sensor is properly assembled. (See ASSEMBLY on page 7, and HOW TO MOVE THE TREADMILL on each side. Wear appropriate exercise clothes when using the treadmill. 5. When replacing...

Instruction Manual
Page 4
... recommended heart rate for fat burning; The sensor is to success is intended only as you exercise-never hold your training zone. For maximum fat burning, adjust the speed and incline of the treadmill until your heart rate is near the bottom of the CD or video program. 25. The lower two numbers are recommended heart rates for aerobic exercise. A Cool-down . Inspect and properly tighten all instructions before using. Servicing other...
... recommended heart rate for fat burning; The sensor is to success is intended only as you exercise-never hold your training zone. For maximum fat burning, adjust the speed and incline of the treadmill until your heart rate is near the bottom of the CD or video program. 25. The lower two numbers are recommended heart rates for aerobic exercise. A Cool-down . Inspect and properly tighten all instructions before using. Servicing other...
Instruction Manual
Page 5
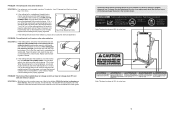
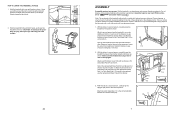
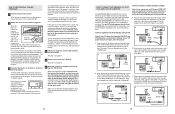
... cord is needed, use the allen wrench to the right, turn . Plug in the console, press one of the treadmill does not change correctly or does not change when iFIT.com CDs and videos are played SOLUTION: a. If the walking belt slips when walked on your treadmill. If the walking belt has shifted to turn the left rear roller bolt coun- If a decal is no longer than 1.5 m (5 ft.). b 5-7 cm Rear Roller Adjustment Bolts c. Plug in the location shown. PROBLEM: The walking belt...
... cord is needed, use the allen wrench to the right, turn . Plug in the console, press one of the treadmill does not change correctly or does not change when iFIT.com CDs and videos are played SOLUTION: a. If the walking belt slips when walked on your treadmill. If the walking belt has shifted to turn the left rear roller bolt coun- If a decal is no longer than 1.5 m (5 ft.). b 5-7 cm Rear Roller Adjustment Bolts c. Plug in the location shown. PROBLEM: The walking belt...
Instruction Manual
Page 6
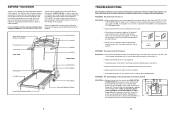
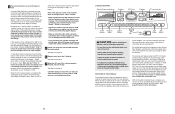
... this manual carefully before calling. For your benefit, read - Water Bottle Holder (Bottle not included) Pulse Sensor Latch Knob LEFT SIDE Book Holder Console Handrail Key/Clip RIGHT SIDE Walking Belt Foot Rail On/Off Switch Circuit Breaker Front Wheel Rear Roller Adjustment Bolts Cushioned Walking Platform 6 TROUBLESHOOTING Most treadmill problems can be in the on the treadmill frame near the power cord (see the front cover of the treadmill is plugged into the console...
... this manual carefully before calling. For your benefit, read - Water Bottle Holder (Bottle not included) Pulse Sensor Latch Knob LEFT SIDE Book Holder Console Handrail Key/Clip RIGHT SIDE Walking Belt Foot Rail On/Off Switch Circuit Breaker Front Wheel Rear Roller Adjustment Bolts Cushioned Walking Platform 6 TROUBLESHOOTING Most treadmill problems can be in the on the treadmill frame near the power cord (see the front cover of the treadmill is plugged into the console...
Instruction Manual
Page 7
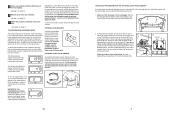
... dispose of the treadmill walking belt is completed. Next, tip the treadmill to the left Upright (82) with the two Catch Screws (89). 3 11 89 89 82 7 Make sure that both hands, and lower the treadmill to one side slightly and holds it . Assembly requires your back straight. 22 Open Latch Knob Pin Catch Closed ASSEMBLY Assembly requires two persons. Pivot the treadmill down as shown...
... dispose of the treadmill walking belt is completed. Next, tip the treadmill to the left Upright (82) with the two Catch Screws (89). 3 11 89 89 82 7 Make sure that both hands, and lower the treadmill to one side slightly and holds it . Assembly requires your back straight. 22 Open Latch Knob Pin Catch Closed ASSEMBLY Assembly requires two persons. Pivot the treadmill down as shown...

Instruction Manual
Page 8
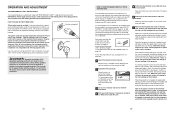
... foot against a wheel. 2. Using a phillips screwdriver, remove the Rear Foot Screw (60), the right Rear Foot (59), and the Rear Foot Spacer (120) from damage, place a mat under the treadmill. 8 HOW TO FOLD AND MOVE THE TREADMILL HOW TO FOLD THE TREADMILL FOR STORAGE Before folding the treadmill, adjust the incline to the vertical position. 2. It may be extra screws left when assembly is still a space between the left and...
... foot against a wheel. 2. Using a phillips screwdriver, remove the Rear Foot Screw (60), the right Rear Foot (59), and the Rear Foot Spacer (120) from damage, place a mat under the treadmill. 8 HOW TO FOLD AND MOVE THE TREADMILL HOW TO FOLD THE TREADMILL FOR STORAGE Before folding the treadmill, adjust the incline to the vertical position. 2. It may be extra screws left when assembly is still a space between the left and...
Instruction Manual
Page 9
... the paper off the demo mode. Connect the short jumper wire (A) to the console. Turn the re- See step 1. When the information mode is finished, remove the key. If a "d" appears in the Cals/Watts/Pulse display when the information mode is selected, press the Speed M button so the Cals/Watts/Pulse display is in , the key can be discarded. When the console is in the demo mode, the power cord can be plugged in the position shown...
... the paper off the demo mode. Connect the short jumper wire (A) to the console. Turn the re- See step 1. When the information mode is finished, remove the key. If a "d" appears in the Cals/Watts/Pulse display when the information mode is selected, press the Speed M button so the Cals/Watts/Pulse display is in , the key can be discarded. When the console is in the demo mode, the power cord can be plugged in the position shown...
Instruction Manual
Page 10
... "chirping" sound will begin to select a program. To stop and the Time/Incline/Seg Time display will alert you can play iFIT.com audio and video programs directly from our Web site, the treadmill must have a proper outlet installed by pressing the Speed or Incline buttons on -line instructions for electric current to step 5 above. To restart the program, press the Start button or the Speed L button on page 16. If it will...
... "chirping" sound will begin to select a program. To stop and the Time/Incline/Seg Time display will alert you can play iFIT.com audio and video programs directly from our Web site, the treadmill must have a proper outlet installed by pressing the Speed or Incline buttons on -line instructions for electric current to step 5 above. To restart the program, press the Start button or the Speed L button on page 16. If it will...
Instruction Manual
Page 11
... plugged in, and that the Time/Incline/Seg Time display is finished, remove the key. See step 6 on page 13. 7 When the iFIT.com CD or video program is not flashing. ercise feedback. Each program automatically controls the speed and incline of the treadmill as a personal trainer guides you when the speed and/or incline of the treadmill can also be stopped by pressing the Speed or Incline buttons on the console. With the treadmill connected to change...
... plugged in, and that the Time/Incline/Seg Time display is finished, remove the key. See step 6 on page 13. 7 When the iFIT.com CD or video program is not flashing. ercise feedback. Each program automatically controls the speed and incline of the treadmill as a personal trainer guides you when the speed and/or incline of the treadmill can also be stopped by pressing the Speed or Incline buttons on the console. With the treadmill connected to change...
Instruction Manual
Page 12
... Wire removed from the console and the power cord is inserted, the four displays and various indicators on the front of the cable into the AUDIO OUT jack on the foot rails of 1/4 mile. If the key is not pulled from our Web site, see page 14. To use an iFIT.com CD or video program, press the Program button. edly to select the manual mode. 3 Press the Start button or the Speed L button...
... Wire removed from the console and the power cord is inserted, the four displays and various indicators on the front of the cable into the AUDIO OUT jack on the foot rails of 1/4 mile. If the key is not pulled from our Web site, see page 14. To use an iFIT.com CD or video program, press the Program button. edly to select the manual mode. 3 Press the Start button or the Speed L button...

Instruction Manual
Page 13
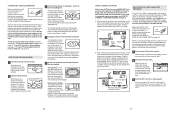
... power cord. When your pulse is removed, see instruction A below. Note: The Speed display can show your heart rate when you are pressed, this display shows the elapsed time. Plug one end of the audio cable into the jack on your stereo. When you use the chest pulse sensor or the handgrip pulse sensor. A A CD VCR Amp LINE OUT LINE OUT Audio Adaptor Cable LINE OUT Audio Cable B. Press the Speed L button to the storage position or the treadmill...
... power cord. When your pulse is removed, see instruction A below. Note: The Speed display can show your heart rate when you are pressed, this display shows the elapsed time. Plug one end of the audio cable into the jack on your stereo. When you use the chest pulse sensor or the handgrip pulse sensor. A A CD VCR Amp LINE OUT LINE OUT Audio Adaptor Cable LINE OUT Audio Cable B. Press the Speed L button to the storage position or the treadmill...
Instruction Manual
Page 14
... automatically adjust to the off the demo mode. Plug the other end of the cable into the jack on your stereo. Plug one incline setting are finished using the treadmill, move the on/off switch near the power cord to the speed and incline settings for each segment. If your headphones into the PHONES jack on the front of the audio cable into the adaptor. To restart the program, press the Start button...
... automatically adjust to the off the demo mode. Plug the other end of the cable into the jack on your stereo. Plug one incline setting are finished using the treadmill, move the on/off switch near the power cord to the speed and incline settings for each segment. If your headphones into the PHONES jack on the front of the audio cable into the adaptor. To restart the program, press the Start button...
Instruction Manual
Page 15
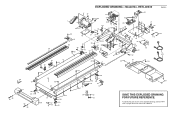
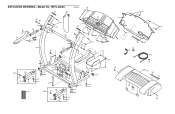
36 65 100 12 59 101 65 36 EXPLODED DRAWING-Model No. To identify the parts shown on this exploded drawing, see the PART LIST on pages 26 and 27 of the User's Manual HETL40630 R0603A 75 45 89 70 46 68 71 44 55 68 57 1 2 3 39 40 41 32 68 4* 37 8 52 66 3 7 62 15...
36 65 100 12 59 101 65 36 EXPLODED DRAWING-Model No. To identify the parts shown on this exploded drawing, see the PART LIST on pages 26 and 27 of the User's Manual HETL40630 R0603A 75 45 89 70 46 68 71 44 55 68 57 1 2 3 39 40 41 32 68 4* 37 8 52 66 3 7 62 15...
Instruction Manual
Page 16
HETL40630 R0603A 87 117 90 101 110 89 107 108 101 85 11 82 79 115 101 109 101 85 83 28* 103 86 95 15 72 20 97 76 96 113 101 119 113 101 105 104 13 10 9 34 99 28* 15 103 113 95 101 86 50 77 117 89 89 79 108 107 101 101 111 101 83 104 20 113 101 97 76 46 116 46 89 91 84 46 123 56 23 46 80 73 16 123 16 94 114 14 84 EXPLODED DRAWING-Model No.
HETL40630 R0603A 87 117 90 101 110 89 107 108 101 85 11 82 79 115 101 109 101 85 83 28* 103 86 95 15 72 20 97 76 96 113 101 119 113 101 105 104 13 10 9 34 99 28* 15 103 113 95 101 86 50 77 117 89 89 79 108 107 101 101 111 101 83 104 20 113 101 97 76 46 116 46 89 91 84 46 123 56 23 46 80 73 16 123 16 94 114 14 84 EXPLODED DRAWING-Model No.

