LITOMNIFAM21_Omni_Automation_Brochure_download_806f
Page 2
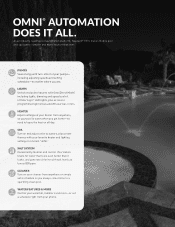
... schedules-no need to leave the heat on and adjust valve actuators, plus create themes with full control of ColorLogic® LED lights, plus access to a sparkling clean pool. SPA Turn on all day. As an industry-leading pool automation platform, Hayward® Omni makes mobile pool and spa control simpler... and more -or set a schedule so you are. HEATER Adjust settings on your heater from your pool is warm when you get home-no matter where...
... schedules-no need to leave the heat on and adjust valve actuators, plus create themes with full control of ColorLogic® LED lights, plus access to a sparkling clean pool. SPA Turn on all day. As an industry-leading pool automation platform, Hayward® Omni makes mobile pool and spa control simpler... and more -or set a schedule so you are. HEATER Adjust settings on your heater from your pool is warm when you get home-no matter where...

LITOMNIHUB21_OmniHub_Pool_and_Spa_Control_Sell_Sheet_download_95eb
Page 2
...Adjust temperature LIGHTS Dim, schedule or change colors SALT SYSTEM Monitor & set chlorination CLEANER Schedule cleanings WATER FEATURES Set schedules & themes SPA Switch to three Smart Relays for additional control) OmniLogic App offers total control of virtually any pool or spa feature » hayward...endorsed by Hayward are trademarks of their respective owners. OMNIHUB AND ACCESSORIES MODEL NUMBER DESCRIPTION HLOMNIHUB OmniHub Smart Pool and Spa Control HLH485RELAY Omni® RS485 Smart Relay HL485SPAKIT Two Valve Actuators and Smart Relay GVA-24 Valve Actuator 24 Volt ...
...Adjust temperature LIGHTS Dim, schedule or change colors SALT SYSTEM Monitor & set chlorination CLEANER Schedule cleanings WATER FEATURES Set schedules & themes SPA Switch to three Smart Relays for additional control) OmniLogic App offers total control of virtually any pool or spa feature » hayward...endorsed by Hayward are trademarks of their respective owners. OMNIHUB AND ACCESSORIES MODEL NUMBER DESCRIPTION HLOMNIHUB OmniHub Smart Pool and Spa Control HLH485RELAY Omni® RS485 Smart Relay HL485SPAKIT Two Valve Actuators and Smart Relay GVA-24 Valve Actuator 24 Volt ...
GVA-24-Valve-Actuator-Installation-Manual-092051BRevE
Page 4
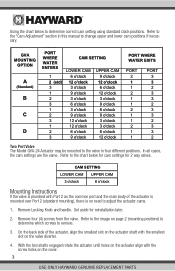
Set aside for 2 way valves. Refer to the "Cam Adjustment" section in four different positions. Refer to the image on the cover. 3 USE ONLY HAYWARD GENUINE REPLACEMENT PARTS Remove four (4) screws from the valve. On the back side of the actuator is mounted over Port 2 (... 3 o'clock 9 o'clock 6 o'clock 9 o'clock 3 o'clock 3 o'clock 6 o'clock 12 o'clock PORT WHERE WATER EXITS PORT 2 1 1 2 1 1 2 1 1 2 1 1 PORT 3 3 2 3 3 2 3 3 2 3 3 2 Two Port Valve The Model GVA-24 Actuator may be mounted to the valve in this manual to determine correct cam setting using standard clock positions.
Set aside for 2 way valves. Refer to the "Cam Adjustment" section in four different positions. Refer to the image on the cover. 3 USE ONLY HAYWARD GENUINE REPLACEMENT PARTS Remove four (4) screws from the valve. On the back side of the actuator is mounted over Port 2 (... 3 o'clock 9 o'clock 6 o'clock 9 o'clock 3 o'clock 3 o'clock 6 o'clock 12 o'clock PORT WHERE WATER EXITS PORT 2 1 1 2 1 1 2 1 1 2 1 1 PORT 3 3 2 3 3 2 3 3 2 3 3 2 Two Port Valve The Model GVA-24 Actuator may be mounted to the valve in this manual to determine correct cam setting using standard clock positions.
GVA-24-Valve-Actuator-Installation-Manual-092051BRevE
Page 5
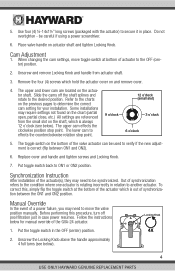
...see below). The lower cam to move toggle switch at the bottom of the GVA-24 actuator. tion between ON1 and ON2). 6. Place valve handle on the previous pages to the desired position. To correct this procedure, ...actuator which hold the actuator cover on the actuator shaft. be synchronized. When changing the cam settings, move the valve position manually. ter) position. 2. Use four (4) ¼-14x1½" long screws (packaged with the actuator) to ON1 or ON2 position. Follow the instructions below ). 4 USE ONLY HAYWARD GENUINE REPLACEMENT PARTS Cam Adjustment...
...see below). The lower cam to move toggle switch at the bottom of the GVA-24 actuator. tion between ON1 and ON2). 6. Place valve handle on the previous pages to the desired position. To correct this procedure, ...actuator which hold the actuator cover on the actuator shaft. be synchronized. When changing the cam settings, move the valve position manually. ter) position. 2. Use four (4) ¼-14x1½" long screws (packaged with the actuator) to ON1 or ON2 position. Follow the instructions below ). 4 USE ONLY HAYWARD GENUINE REPLACEMENT PARTS Cam Adjustment...


