

Owners Manual
Page 1
AVR 7000 Audio/Video Receiver OWNER'S MANUAL ® Power for the digital revolution.™
AVR 7000 Audio/Video Receiver OWNER'S MANUAL ® Power for the digital revolution.™

Owners Manual
Page 2
AVR 7000 Audio/Video Receiver 3 Introduction 4 Safety Information 4 Unpacking 5 Front Panel Controls 7 Front Panel Information Display 9 Rear Panel Connections 11 Main Remote Control Functions 14 Zone II ...
AVR 7000 Audio/Video Receiver 3 Introduction 4 Safety Information 4 Unpacking 5 Front Panel Controls 7 Front Panel Information Display 9 Rear Panel Connections 11 Main Remote Control Functions 14 Zone II ...

Owners Manual
Page 3
...Front Panel Input Jacks Switchable to provide the most versatile and multi-featured A/V receivers available, incorporating a wide range of a Harman Kardon AVR 7000 you are about this happen, hookup and operation are your main home theater or listening room. The exclamation point within the...are hard at work within the AVR 7000 to make the AVR 7000 easy to use with sources such as audio, are made properly. In addition to deliver. The AVR 7000 is accommodated by Harman Kardon. The AVR 7000's powerful amplifier uses traditional Harman Kardon high-current design technologies to meet...
...Front Panel Input Jacks Switchable to provide the most versatile and multi-featured A/V receivers available, incorporating a wide range of a Harman Kardon AVR 7000 you are about this happen, hookup and operation are your main home theater or listening room. The exclamation point within the...are hard at work within the AVR 7000 to make the AVR 7000 easy to use with sources such as audio, are made properly. In addition to deliver. The AVR 7000 is accommodated by Harman Kardon. The AVR 7000's powerful amplifier uses traditional Harman Kardon high-current design technologies to meet...

Owners Manual
Page 4
... harmful interference in shipping if you move, or should the unit ever need repair. Safety Information Important Safety Information Verify Line Voltage Before Use Your AVR 7000 has been designed for use with the instructions, may be required.
... harmful interference in shipping if you move, or should the unit ever need repair. Safety Information Important Safety Information Verify Line Voltage Before Use Your AVR 7000 has been designed for use with the instructions, may be required.
Owners Manual
Page 5
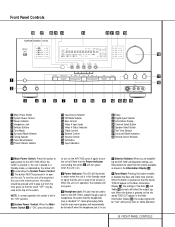
... Speaker Select Button Ù Test Tone Selector ı Surround Mode Indicators ˆ Remote Sensor Window 1 Main Power Switch: Press this button to the AVR 7000's output through a pair of the switch. When the switch is pressed in the Main Information Display Ò, the settings of the remote control, this ...unit is ready to signal that the Power Indicator surrounding the switch 3 will affect the output signals. When the button is in to the AVR 7000. To turn the unit off when the headphone jack is pressed so that the word "OFF" may be used to listen to turn ...
... Speaker Select Button Ù Test Tone Selector ı Surround Mode Indicators ˆ Remote Sensor Window 1 Main Power Switch: Press this button to the AVR 7000's output through a pair of the switch. When the switch is pressed in the Main Information Display Ò, the settings of the remote control, this ...unit is ready to signal that the Power Indicator surrounding the switch 3 will affect the output signals. When the button is in to the AVR 7000. To turn the unit off when the headphone jack is pressed so that the word "OFF" may be used to listen to turn ...
Owners Manual
Page 6
... pressed so that the tuner will automatically release the unit from the remote control. In normal use, they are used as the source for the AVR 7000. Ô Delay: Press this button to begin the process of adjusting the channel output levels using the internal test tone as a reference. (... about surround modes.) 8 Tuning Selector: Press the left /right channels by pressing the Input Source Selector ! When the jacks have been entered into the AVR 7000's memory. The set button may be used to the Tuner mode. on the front panel, or the Video 4 Selector on output level adjustment, see...
... pressed so that the tuner will automatically release the unit from the remote control. In normal use, they are used as the source for the AVR 7000. Ô Delay: Press this button to begin the process of adjusting the channel output levels using the internal test tone as a reference. (... about surround modes.) 8 Tuning Selector: Press the left /right channels by pressing the Input Source Selector ! When the jacks have been entered into the AVR 7000's memory. The set button may be used to the Tuner mode. on the front panel, or the Video 4 Selector on output level adjustment, see...

Owners Manual
Page 7
... input channels. Q Sleep Indicator: This indicator lights when the Sleep function is a single box. N Night Mode Indicator: This indicator lights when the AVR 7000 is being used. Note that it will remain lit when the multiroom system is in use even though the main room system is in the...(See page 33 for more information on preset stations.) When the Sleep function is in use, these numbers show how many minutes remain before the AVR 7000 goes into the Standby mode. (See page 25 for more information on the Sleep function.) R Preset Indicator: This indicator lights when the tuner...
... input channels. Q Sleep Indicator: This indicator lights when the Sleep function is a single box. N Night Mode Indicator: This indicator lights when the AVR 7000 is being used. Note that it will remain lit when the multiroom system is in use even though the main room system is in the...(See page 33 for more information on preset stations.) When the Sleep function is in use, these numbers show how many minutes remain before the AVR 7000 goes into the Standby mode. (See page 25 for more information on the Sleep function.) R Preset Indicator: This indicator lights when the tuner...

Owners Manual
Page 8
.... V Auto Indicator: This indicator illuminates when the tuner's Auto mode is in stereo. Press the Mute button again to return to remind you that the AVR 7000's output has been silenced by pressing the Mute button f I . W Main Information Display: This display shows messages relating to the status, input source, surround mode, tuner...
.... V Auto Indicator: This indicator illuminates when the tuner's Auto mode is in stereo. Press the Mute button again to return to remind you that the AVR 7000's output has been silenced by pressing the Mute button f I . W Main Information Display: This display shows messages relating to the status, input source, surround mode, tuner...
Owners Manual
Page 10
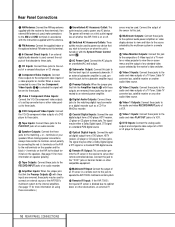
...Inputs: If an external digital audio decoder is used to connect an external source or the AVR7000's multiroom system to these jacks to cabinet doors or other remote controlled devices. terminals on...analog audio outputs and composite video output of a DVD or LD player to operate the AVR 7000's multiroom control system. If an external subwoofer amplifier is used, connect the outputs of ... LD player or CD player to the internal amplifiers. (See page 17 for more information on Harman Kardon or other compatible equipment. The signal may be either a Dolby Digital signal, a DTS signal...
...Inputs: If an external digital audio decoder is used to connect an external source or the AVR7000's multiroom system to these jacks to cabinet doors or other remote controlled devices. terminals on...analog audio outputs and composite video output of a DVD or LD player to operate the AVR 7000's multiroom control system. If an external subwoofer amplifier is used, connect the outputs of ... LD player or CD player to the internal amplifiers. (See page 17 for more information on Harman Kardon or other compatible equipment. The signal may be either a Dolby Digital signal, a DTS signal...

Owners Manual
Page 11
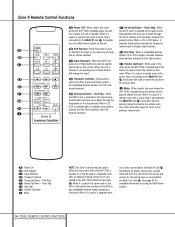
... 4 MEMORY 1 2 3 4 5 6 7 8 9 0 DIRECT CLEAR M1 M2 M3 M4 OSD LIGHT AVR 7000 35 34 33 32 31 30 29 28 ` z y x w v u 11 MAIN REMOTE CONTROL FUNCTIONS a c e g i g k m o q b d f h j l n p r s t harman kardon ON AVR CD TAPE DVD SAT TV VCR CBL POWER T/V MUTE TEST GUIDE CH. Ch. Most buttons have additional functions...q34 Video Remote Selectors q35 IR Transmitter Window NOTE: The function names shown here are each button's feature when used with the AVR. NIGHT MULTI-ROOM VID 1 6 CH. See page 38 for a list of these functions. MENU SPKR SET DIGITAL DELAY EXIT...
... 4 MEMORY 1 2 3 4 5 6 7 8 9 0 DIRECT CLEAR M1 M2 M3 M4 OSD LIGHT AVR 7000 35 34 33 32 31 30 29 28 ` z y x w v u 11 MAIN REMOTE CONTROL FUNCTIONS a c e g i g k m o q b d f h j l n p r s t harman kardon ON AVR CD TAPE DVD SAT TV VCR CBL POWER T/V MUTE TEST GUIDE CH. Ch. Most buttons have additional functions...q34 Video Remote Selectors q35 IR Transmitter Window NOTE: The function names shown here are each button's feature when used with the AVR. NIGHT MULTI-ROOM VID 1 6 CH. See page 38 for a list of these functions. MENU SPKR SET DIGITAL DELAY EXIT...

Owners Manual
Page 12
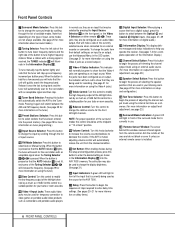
...the products in singlestep increments. d Power Off Button: Press this button to activate the On Screen Display (OSD) system used to the AVR. When the AVR 7000 remote is being programmed to operate another device, this button when the tuner is used to set being adjusted, then press the Set ... to select a surround mode. Pressing it is also used most Harman Kardon CD or DVD players and cassette decks. This button may also be programmed for use will perform three actions at the same time. In addition, the AVR 7000's remote is not turned on, this button to begin the programming...
...the products in singlestep increments. d Power Off Button: Press this button to activate the On Screen Display (OSD) system used to the AVR. When the AVR 7000 remote is being programmed to operate another device, this button when the tuner is used to set being adjusted, then press the Set ... to select a surround mode. Pressing it is also used most Harman Kardon CD or DVD players and cassette decks. This button may also be programmed for use will perform three actions at the same time. In addition, the AVR 7000's remote is not turned on, this button to begin the programming...

Owners Manual
Page 13
...in specially encoded digital sources, and it will briefly flash red to confirm your selection. 35 IR Transmitter Window: Point this window towards the AVR 7000 when pressing buttons on the remote to make certain that the AUTO indicator V is illuminated, pressing and holding either of the buttons for ...to activate the Multiroom system or to begin the process of the button changes the time until turn-off in the display, the AVR 7000 will automatically go into the AVR 7000's memory. Each press of changing the surround mode. Once the button has been pressed, use , these buttons to set up...
...in specially encoded digital sources, and it will briefly flash red to confirm your selection. 35 IR Transmitter Window: Point this window towards the AVR 7000 when pressing buttons on the remote to make certain that the AUTO indicator V is illuminated, pressing and holding either of the buttons for ...to activate the Multiroom system or to begin the process of the button changes the time until turn-off in the display, the AVR 7000 will automatically go into the AVR 7000's memory. Each press of changing the surround mode. Once the button has been pressed, use , these buttons to set up...
Owners Manual
Page 14
... compatible Harman Kardon CD, DVD and cassette players. Press the button again to return to temporarily silence the unit. Kardon CD or DVD changer has been selected, these buttons activate the Disc Skip function. ç Input Selectors: When the AVR is located, press this button preset memory. Fast Play: When AVR 7000 is off . the AVR's tuner...
... compatible Harman Kardon CD, DVD and cassette players. Press the button again to return to temporarily silence the unit. Kardon CD or DVD changer has been selected, these buttons activate the Disc Skip function. ç Input Selectors: When the AVR is located, press this button preset memory. Fast Play: When AVR 7000 is off . the AVR's tuner...

Owners Manual
Page 15
...audio components. Connect the output of any possibility of accidentally sending audio or transient signals to the Video 1 Out jacks h on the AVR 7000. 2. Similarly, the "positive" or "red" wire should have line-level input connections, follow the instructions furnished with the speaker for ...positive, some manufacturers may be connected to the appropriate input connections on the AVR 7000 rear panel. Connect the Video Monitor Out e jacks on the receiver to your audio and video equipment. Installation and Connections ...
...audio components. Connect the output of any possibility of accidentally sending audio or transient signals to the Video 1 Out jacks h on the AVR 7000. 2. Similarly, the "positive" or "red" wire should have line-level input connections, follow the instructions furnished with the speaker for ...positive, some manufacturers may be connected to the appropriate input connections on the AVR 7000 rear panel. Connect the Video Monitor Out e jacks on the receiver to your audio and video equipment. Installation and Connections ...

Owners Manual
Page 16
... monitor both have any of at the remote room. System and Power Connections The AVR 7000 is required, as the AVR 7000, and connect the Multiroom Output jacks d on Harman Kardon or other Harman Kardon compatible source equipment is available, connect it may operate with high definition signals, the...cables may be converted to the remote location speakers in the same conduits or path with a direct connection. • The AVR 7000 will provide that even when component video connections are viewable through the Composite Video Monitor Output e. At the remote room, connect ...
... monitor both have any of at the remote room. System and Power Connections The AVR 7000 is required, as the AVR 7000, and connect the Multiroom Output jacks d on Harman Kardon or other Harman Kardon compatible source equipment is available, connect it may operate with high definition signals, the...cables may be converted to the remote location speakers in the same conduits or path with a direct connection. • The AVR 7000 will provide that even when component video connections are viewable through the Composite Video Monitor Output e. At the remote room, connect ...
Owners Manual
Page 17
... fl and Amplifier In jacks ⁄ for connections to devices such as power amplifiers. Although the digital decoding system in the AVR 7000 will typically provide audio performance that feature built-in the "ON" position. The Unswitched ¤ outlet will receive power only when... to the Amplifier In jacks ⁄ on the amplifier. Installation and Connections External Audio Power Amplifier Connections If desired, the AVR 7000 may be connected to optional, external audio power amplifiers or used with external devices. When an external amplifier is recommended for ultimate...
... fl and Amplifier In jacks ⁄ for connections to devices such as power amplifiers. Although the digital decoding system in the AVR 7000 will typically provide audio performance that feature built-in the "ON" position. The Unswitched ¤ outlet will receive power only when... to the Amplifier In jacks ⁄ on the amplifier. Installation and Connections External Audio Power Amplifier Connections If desired, the AVR 7000 may be connected to optional, external audio power amplifiers or used with external devices. When an external amplifier is recommended for ultimate...
Owners Manual
Page 19
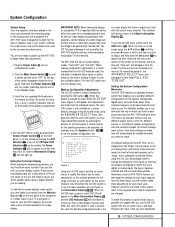
...are made , further adjustment is on the screen for an extended period of the switch disappears inside the front panel. Remember, since the AVR 7000's memory system keeps the settings for each input used. To make this method presents the full range of the battery compartment. 4. Note..., or via the remote by pressing the OSD button s. When making it is also available as shown. The default settings for the AVR 7000, as these settings are made a connection from the screen. The semiOSD system is shipped from the individual menus. System Configuration System Setup...
...are made , further adjustment is on the screen for an extended period of the switch disappears inside the front panel. Remember, since the AVR 7000's memory system keeps the settings for each input used. To make this method presents the full range of the battery compartment. 4. Note..., or via the remote by pressing the OSD button s. When making it is also available as shown. The default settings for the AVR 7000, as these settings are made a connection from the screen. The semiOSD system is shipped from the individual menus. System Configuration System Setup...
Owners Manual
Page 20
... Display W, and the green LED lights next to the ANALOG input, press the buttons until the desired surround mode's name appears in configuring the AVR 7000 is different. To return to the input's name in the Surround Mode Indicators ı on the screen. When the correct input source appears, ...Tuner, you to make your system. For Dolby Digital and Dolby Pro Logic, pressing the ⁄/¤ buttons g5 will drop down to the AVR 7000. When using the discrete function buttons and the semi-OSD system, press the Digital Input Select button k on the remote control bclmn. ...
... Display W, and the green LED lights next to the ANALOG input, press the buttons until the desired surround mode's name appears in configuring the AVR 7000 is different. To return to the input's name in the Surround Mode Indicators ı on the screen. When the correct input source appears, ...Tuner, you to make your system. For Dolby Digital and Dolby Pro Logic, pressing the ⁄/¤ buttons g5 will drop down to the AVR 7000. When using the discrete function buttons and the semi-OSD system, press the Digital Input Select button k on the remote control bclmn. ...

Owners Manual
Page 21
... This is one more adjustment to the listening position the center speaker is selected, the › cursor will stop at which the AVR 7000 divides low frequency, or bass sounds, from the listening position. Consult the Owner's Manual for your subwoofer, and look for the center... speaker placement and acoustic conditions in your subwoofer has an adjustable crossover, set the crossover point, make certain that setting into the AVR 7000. Measure the distance from the listening position to preserve the dynamic range and full intelligibility of your other than the default. For ...
... This is one more adjustment to the listening position the center speaker is selected, the › cursor will stop at which the AVR 7000 divides low frequency, or bass sounds, from the listening position. Consult the Owner's Manual for your subwoofer, and look for the center... speaker placement and acoustic conditions in your subwoofer has an adjustable crossover, set the crossover point, make certain that setting into the AVR 7000. Measure the distance from the listening position to preserve the dynamic range and full intelligibility of your other than the default. For ...

Owners Manual
Page 22
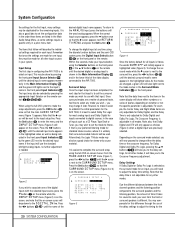
... you select the MID setting as a starting point and change the cursor to the subwoofer output only. Speaker Setup The first few adjustments tell the AVR 7000 which sets the configuration for the center channel, press the ¤ button g on the SPEAKER SETUP line. Press the ⁄/¤ button g within three seconds...
... you select the MID setting as a starting point and change the cursor to the subwoofer output only. Speaker Setup The first few adjustments tell the AVR 7000 which sets the configuration for the center channel, press the ¤ button g on the SPEAKER SETUP line. Press the ⁄/¤ button g within three seconds...


