

Owners Manual
Page 2
Owner's Manual AVR35 Audio/Video Receiver 250 Crossways Park Drive Woodbury, NY 11797 Table of Contents Introduction 1 Safety Information 2-3 Front Panel Controls 4-6 Front Panel Information Display 7-8 Rear Panel Connections 9-10 Remote Control Functions 11-13 Installation ...Tape Recording 26-27 Output Level Trim Adjustment 27 Memory Backup 27 Processor Reset 27 Programming the Remote 28-39 Direct Code Entry 28 Auto Search Method 28-29 Code Readout 29 Programmed Device ...: SAT 40 Troubleshooting Guide 41 Technical Specifications 42 ©1998 Harman Kardon, Incorporated
Owner's Manual AVR35 Audio/Video Receiver 250 Crossways Park Drive Woodbury, NY 11797 Table of Contents Introduction 1 Safety Information 2-3 Front Panel Controls 4-6 Front Panel Information Display 7-8 Rear Panel Connections 9-10 Remote Control Functions 11-13 Installation ...Tape Recording 26-27 Output Level Trim Adjustment 27 Memory Backup 27 Processor Reset 27 Programming the Remote 28-39 Direct Code Entry 28 Auto Search Method 28-29 Code Readout 29 Programmed Device ...: SAT 40 Troubleshooting Guide 41 Technical Specifications 42 ©1998 Harman Kardon, Incorporated

Owners Manual
Page 3
...are simple. They are made properly. A total of information. The AVR35's powerful amplifiers use traditional Harman Kardon High-Current Design philosophies to meet the wide dynamic range of the Harman Kardon AVR35 you have any program selection. With the purchase of any questions about...advantage of listening enjoyment. Introduction 1 Congratulations! Color-keyed connections and a comprehensive programmable remote control make all the power the AVR35 is also available for use . Harman Kardon invented the highfidelity receiver more than forty-five years ago. With state-of-the-...
...are simple. They are made properly. A total of information. The AVR35's powerful amplifiers use traditional Harman Kardon High-Current Design philosophies to meet the wide dynamic range of the Harman Kardon AVR35 you have any program selection. With the purchase of any questions about...advantage of listening enjoyment. Introduction 1 Congratulations! Color-keyed connections and a comprehensive programmable remote control make all the power the AVR35 is also available for use . Harman Kardon invented the highfidelity receiver more than forty-five years ago. With state-of-the-...

Owners Manual
Page 5
... to radio or television reception, which the receiver is no guarantee that harmful interference will not occur in accordance with the remote control, front panel controls and rear panel connections, certain conventions have been used. Unpacking The carton and shipping materials used in... 1 - (number in a square) indicates a specific front panel control a - (number in the front panel display s Connect the equipment into an outlet on the remote ¡ - (number in a circle) indicates a rear panel connection A - (letter in a square) indicates an indicator in an oval) indicates a button or...
... to radio or television reception, which the receiver is no guarantee that harmful interference will not occur in accordance with the remote control, front panel controls and rear panel connections, certain conventions have been used. Unpacking The carton and shipping materials used in... 1 - (number in a square) indicates a specific front panel control a - (number in the front panel display s Connect the equipment into an outlet on the remote ¡ - (number in a circle) indicates a rear panel connection A - (letter in a square) indicates an indicator in an oval) indicates a button or...
Owners Manual
Page 6
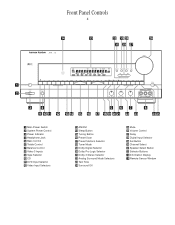
...; Volume Control ı Delay ˆ Digital Input Selector ˜ Set Button ¯ Channel Select ˘ Speaker Select Button ¸ Selector Buttons 33 Information Display 34 Remote Sensor Window OFF Mute Phones Bass Treble Balance Min Max Min Max L R VIDEO 3 Video L Audio R 3 4 567 8 9 ÚÛ 1 Main Power Switch 2 System Power Control 3 Power...
...; Volume Control ı Delay ˆ Digital Input Selector ˜ Set Button ¯ Channel Select ˘ Speaker Select Button ¸ Selector Buttons 33 Information Display 34 Remote Sensor Window OFF Mute Phones Bass Treble Balance Min Max Min Max L R VIDEO 3 Video L Audio R 3 4 567 8 9 ÚÛ 1 Main Power Switch 2 System Power Control 3 Power...

Owners Manual
Page 7
...in amber when the unit is tuned, the TUNED indicator R will turn on the tuner memory system.) press it again to the AVR35's output through the stations that the Power Indicator surrounding the switch 3 will automatically tune to the next frequency increment, while pressing and... acoustics. 7 Balance Control: Turn this control to change between AM and FM bands. $ Sleep Button: Press this button to the AVR35. A brief (1/2 second) press of the remote control, this switch should be heard. To turn -off . Note that have a standard 1⁄4" stereo phone plug. 5 Bass Control...
...in amber when the unit is tuned, the TUNED indicator R will turn on the tuner memory system.) press it again to the AVR35's output through the stations that the Power Indicator surrounding the switch 3 will automatically tune to the next frequency increment, while pressing and... acoustics. 7 Balance Control: Turn this control to change between AM and FM bands. $ Sleep Button: Press this button to the AVR35. A brief (1/2 second) press of the remote control, this switch should be heard. To turn -off . Note that have a standard 1⁄4" stereo phone plug. 5 Bass Control...

Owners Manual
Page 8
... levels.) Ú Surround Off: Press this button to turn off all channels. These modes may be provided when stations are establishing the AVR35's configuration settings, use these buttons to select the analog surround modes. In the STEREO mode a Stereo indicator P will illuminate in the ...remote sensor is pressed, a test tone will be mixed together and reproduced through all surround processing, and to listen to a program in traditional stereo from the left front and right front speakers only. Û Mute: Press this button to momentarily silence the speaker output of the AVR35....
... levels.) Ú Surround Off: Press this button to turn off all channels. These modes may be provided when stations are establishing the AVR35's configuration settings, use these buttons to select the analog surround modes. In the STEREO mode a Stereo indicator P will illuminate in the ...remote sensor is pressed, a test tone will be mixed together and reproduced through all surround processing, and to listen to a program in traditional stereo from the left front and right front speakers only. Û Mute: Press this button to momentarily silence the speaker output of the AVR35....

Owners Manual
Page 11
AVR-35 HARMAN KARDON NORTHRIDGE CALIFORNIA, USA MADE IN CHINA AC OUTLETS (120V.60Hz) TOTAL 150W...¤ ⁄ fi TV Monitor Video Output fl AC-3/PCM Coaxial Input ‡ AC-3/PCM Optical Input ° Remote IR In · Remote IR Out a Tape Monitor In b Tape Monitor Out ¡ AM Antenna: Connect the AM loop antenna supplied with the antenna... ANTENNA AM GND FM (75Ω) VIDEO 2 PLAY IN VIDEO 1 REC OUT DVD CD DIGITAL INPUT OPTICAL COAXIAL OUT IN REMOTE CONTROL VIDEO TV MONITOR OUT VIDEO 2 IN VIDEO 1 OUT DVD FRONT CENTER CAUTION RISK OF ELECTRIC SHOCK DO NOT OPEN AVIS...
AVR-35 HARMAN KARDON NORTHRIDGE CALIFORNIA, USA MADE IN CHINA AC OUTLETS (120V.60Hz) TOTAL 150W...¤ ⁄ fi TV Monitor Video Output fl AC-3/PCM Coaxial Input ‡ AC-3/PCM Optical Input ° Remote IR In · Remote IR Out a Tape Monitor In b Tape Monitor Out ¡ AM Antenna: Connect the AM loop antenna supplied with the antenna... ANTENNA AM GND FM (75Ω) VIDEO 2 PLAY IN VIDEO 1 REC OUT DVD CD DIGITAL INPUT OPTICAL COAXIAL OUT IN REMOTE CONTROL VIDEO TV MONITOR OUT VIDEO 2 IN VIDEO 1 OUT DVD FRONT CENTER CAUTION RISK OF ELECTRIC SHOCK DO NOT OPEN AVIS...

Owners Manual
Page 12
... In: Connect these jacks to the RECORD/INPUT jacks of any AC device. The power will remain on at this outlet regardless of whether the AVR35 is blocked due to cabinet doors or other audio/video source. fi TV Monitor Video Output: Connect this jack to the standard (composite)... of the sensor to this jack to serve other compatible equipment. Connect this jack. · Remote IR Out: This connection permits the IR sensor in the receiver to the "IR IN" jack on Harman Kardon or other remote controlled devices. Connect the output of an audio recorder. The signal may be used.
... In: Connect these jacks to the RECORD/INPUT jacks of any AC device. The power will remain on at this outlet regardless of whether the AVR35 is blocked due to cabinet doors or other audio/video source. fi TV Monitor Video Output: Connect this jack to the standard (composite)... of the sensor to this jack to serve other compatible equipment. Connect this jack. · Remote IR Out: This connection permits the IR sensor in the receiver to the "IR IN" jack on Harman Kardon or other remote controlled devices. Connect the output of an audio recorder. The signal may be used.
Owners Manual
Page 13
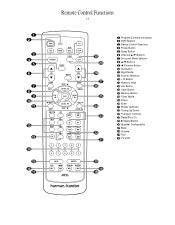
... r Tuner Mode s Direct t Enter u Preset Up/Down v Tuning Up/Down w Transport Controls x Delay/Prev Ch. y ›/Digital Button z Speaker Configuration ` Mute Volume Test TV/VCR Remote Control Functions 11 a b c d e f g h i j k l m n o p q AVR SAT CD TAPE CBL POWER TEST SLEEP TV VCR T/V CH VOL MUTE SURR DISP DISC LEVEL CH SET NIGHT EXIT AM...
... r Tuner Mode s Direct t Enter u Preset Up/Down v Tuning Up/Down w Transport Controls x Delay/Prev Ch. y ›/Digital Button z Speaker Configuration ` Mute Volume Test TV/VCR Remote Control Functions 11 a b c d e f g h i j k l m n o p q AVR SAT CD TAPE CBL POWER TEST SLEEP TV VCR T/V CH VOL MUTE SURR DISP DISC LEVEL CH SET NIGHT EXIT AM...

Owners Manual
Page 14
...Night Mode: Press this button to turn red after the Delay button x has been pressed. (See page 20 for information on programming the AVR35's remote to operate these devices.) d Power Button: Press this button to activate the "Night" mode, preventing loud playback when the digital modes are...positions. Remote Control Functions 12 IMPORTANT NOTE: The AVR35's remote may be used to select tracks or channel numbers n Numeric Keys: These buttons serve as an indicator to assist in the Sleep mode. It is used as a ten-button numeric keypad to operate the AVR35 and Harman Kardon CD ...
...Night Mode: Press this button to turn red after the Delay button x has been pressed. (See page 20 for information on programming the AVR35's remote to operate these devices.) d Power Button: Press this button to activate the "Night" mode, preventing loud playback when the digital modes are...positions. Remote Control Functions 12 IMPORTANT NOTE: The AVR35's remote may be used to select tracks or channel numbers n Numeric Keys: These buttons serve as an indicator to assist in the Sleep mode. It is used as a ten-button numeric keypad to operate the AVR35 and Harman Kardon CD ...

Owners Manual
Page 15
... this button is pressed with the Device Control Selector button c to begin the process of configuring the AVR35's Bass Management System for more information on programming the remote to utilize these buttons scroll through the selected frequency band. Press the Set button j to enter your... Press this button to monaural reception, as chapter step or track advance. When the AVR35 remote is being controlled, depending on calibrating the AVR35.) TV/VCR: This button does not function with the AVR35, but it is illuminated, pressing these buttons will cause the tuner to make your ...
... this button is pressed with the Device Control Selector button c to begin the process of configuring the AVR35's Bass Management System for more information on programming the remote to utilize these buttons scroll through the selected frequency band. Press the Set button j to enter your... Press this button to monaural reception, as chapter step or track advance. When the AVR35 remote is being controlled, depending on calibrating the AVR35.) TV/VCR: This button does not function with the AVR35, but it is illuminated, pressing these buttons will cause the tuner to make your ...

Owners Manual
Page 17
...electronic power switches may only go into a nonswitched 120-volt AC wall outlet. Connect the audio and video outputs of the remote sensor to the Remote Cont. Remote Control Extension If the receiver is recommended for devices that have no power switch, or a mechanical power switch that may ... · to the Remote In jack on the AVR35. 2. The total power draw may not exceed 50W to enjoy the AVR35! If a passive subwoofer is plugged into a powered AC outlet. The Unswitched ⁄ outlet will be connected to the Tape Monitor Out jacks b on Harman Kardon or other video source ...
...electronic power switches may only go into a nonswitched 120-volt AC wall outlet. Connect the audio and video outputs of the remote sensor to the Remote Cont. Remote Control Extension If the receiver is recommended for devices that have no power switch, or a mechanical power switch that may ... · to the Remote In jack on the AVR35. 2. The total power draw may not exceed 50W to enjoy the AVR35! If a passive subwoofer is plugged into a powered AC outlet. The Unswitched ⁄ outlet will be connected to the Tape Monitor Out jacks b on Harman Kardon or other video source ...

Owners Manual
Page 19
...are now ready to power up . Note that determine which speakers receive lowfrequency (bass) information. Turn the AVR35 on either by pressing the System Power Control 3 on the remote, followed by the ⁄/¤ buttons h until either LARGE or SMALL appears to match the type of ... manual, or ask your speakers, consult the specifications in the remote as it latches in the Main Information Display S . 3. Speaker Configuration The first few adjustments tell the AVR35 which category describes your dealer. Put the AVR35 in the Dolby Pro Logic mode by pressing the Dolby Pro ...
...are now ready to power up . Note that determine which speakers receive lowfrequency (bass) information. Turn the AVR35 on either by pressing the System Power Control 3 on the remote, followed by the ⁄/¤ buttons h until either LARGE or SMALL appears to match the type of ... manual, or ask your speakers, consult the specifications in the remote as it latches in the Main Information Display S . 3. Speaker Configuration The first few adjustments tell the AVR35 which category describes your dealer. Put the AVR35 in the Dolby Pro Logic mode by pressing the Dolby Pro ...

Owners Manual
Page 20
...in step 4, above, has been set to SMALL. Press the Set button j ˜ again, and use the ⁄/¤ buttons h on the remote or the Selector buttons ¸ on the speaker definitions shown above . The receiver will operate in a "phantom" centerchannel mode and center-channel information will be...the front panel, to the subwoofer output. Press the Set button j ˜ again, and then use the ⁄/¤ buttons h on the remote, or the Selector buttons ¸ on the speaker definitions shown above . Note that when no subwoofer connected, you choose this option and there is ...
...in step 4, above, has been set to SMALL. Press the Set button j ˜ again, and use the ⁄/¤ buttons h on the remote or the Selector buttons ¸ on the speaker definitions shown above . The receiver will operate in a "phantom" centerchannel mode and center-channel information will be...the front panel, to the subwoofer output. Press the Set button j ˜ again, and then use the ⁄/¤ buttons h on the remote, or the Selector buttons ¸ on the speaker definitions shown above . Note that when no subwoofer connected, you choose this option and there is ...

Owners Manual
Page 21
...listening position: 1. Note that each channel to begin to complete the adjustment. When you release the button, the circulation will pause on the remote, followed by the ⁄/¤ buttons h until they are often confused about the operation of the buttons is your room that you ... to the correct output terminal. 4. For accurate calibration, it is normal for a Dolby Digital receiver such as the AVR35, as a reference, press the ⁄/¤ buttons h on the remote or the Selector buttons ¸ on the front panel on page 27. 6. At this point, the test noise will...
...listening position: 1. Note that each channel to begin to complete the adjustment. When you release the button, the circulation will pause on the remote, followed by the ⁄/¤ buttons h until they are often confused about the operation of the buttons is your room that you ... to the correct output terminal. 4. For accurate calibration, it is normal for a Dolby Digital receiver such as the AVR35, as a reference, press the ⁄/¤ buttons h on the remote or the Selector buttons ¸ on the front panel on page 27. 6. At this point, the test noise will...

Owners Manual
Page 22
...most rooms, but it is appropriate for the center channel, measure the distance from the distance to obtain the optimal delay time. Put the AVR35 in this example, the delay should be set at five milliseconds. The words S DELAY TIME will appear in the center of the room ...Pro Logic mode by pressing the Dolby Pro Logic Selector Ó on the front panel, or by pressing the Surround Mode Selector g on the remote or front panel. To resynchronize the front and surround channels, follow these steps: 1. If repositioning of front channel sounds to both the centerchannel ...
...most rooms, but it is appropriate for the center channel, measure the distance from the distance to obtain the optimal delay time. Put the AVR35 in this example, the delay should be set at five milliseconds. The words S DELAY TIME will appear in the center of the room ...Pro Logic mode by pressing the Dolby Pro Logic Selector Ó on the front panel, or by pressing the Surround Mode Selector g on the remote or front panel. To resynchronize the front and surround channels, follow these steps: 1. If repositioning of front channel sounds to both the centerchannel ...

Owners Manual
Page 23
... Main Information Display S . 11. You have now completed the setup, adjustment and calibration of the AVR35. Adjust the delay time by pressing the ⁄/¤ buttons h on the remote or the Selector buttons ¸ on the remote until either by pressing the front panel Dolby Digital Selector ( or by pressing the Digital button...
... Main Information Display S . 11. You have now completed the setup, adjustment and calibration of the AVR35. Adjust the delay time by pressing the ⁄/¤ buttons h on the remote or the Selector buttons ¸ on the remote until either by pressing the front panel Dolby Digital Selector ( or by pressing the Digital button...

Owners Manual
Page 24
...select a source at the end of a listening session simply press the System Power Control 2 on the front panel or the Power button d on the remote. Press the Mute button ` Û again to return to normal operation. • For private listening, plug the 1/4" stereo phone plug from standby... basis. • When an audio source is selected the last video input used remains routed to the AVR35. Power to a comfortable level using the front panel Volume Control Ù or remote Volume Up/Down buttons. • To temporarily silence all speakers, but it will count down in the...
...select a source at the end of a listening session simply press the System Power Control 2 on the front panel or the Power button d on the remote. Press the Mute button ` Û again to return to normal operation. • For private listening, plug the 1/4" stereo phone plug from standby... basis. • When an audio source is selected the last video input used remains routed to the AVR35. Power to a comfortable level using the front panel Volume Control Ù or remote Volume Up/Down buttons. • To temporarily silence all speakers, but it will count down in the...

Owners Manual
Page 26
...subwoofer if installed and configured), press the Surround Off button Ú on the AVR35 rear panel (e.g., connect the analog stereo audio output from CD players. Operation 24 Surround modes are selected using the remote until SURR OFF appears in the Main Information Display S. To utilize the Dolby ... being decoded as AC-3) is the standard output from a DVD to the AVR35. To select a surround mode from DVD players, HDTV receivers and CD players to choose either the front panel controls or the remote. For more information on the rear panel fl ‡. Dolby Digital is...
...subwoofer if installed and configured), press the Surround Off button Ú on the AVR35 rear panel (e.g., connect the analog stereo audio output from CD players. Operation 24 Surround modes are selected using the remote until SURR OFF appears in the Main Information Display S. To utilize the Dolby ... being decoded as AC-3) is the standard output from a DVD to the AVR35. To select a surround mode from DVD players, HDTV receivers and CD players to choose either the front panel controls or the remote. For more information on the rear panel fl ‡. Dolby Digital is...

Owners Manual
Page 27
...or Coaxial inputs ‡ fl on the rear panel, using the ⁄/¤ buttons h on the remote or the Selector buttons ¸ on the front panel until the desired choice of either the AVR35 or the source machine. To listen to enter the desired choice. Press the Set button j ˜ to...laser disc player with an RF output, and an optional, outboard RF-to be compatible with a sampling frequency of audio has been recorded on the remote and note that not all DVD movies and HDTV sources, it appears in the Main Information Display S. When a Dolby Digital source is possible that some...
...or Coaxial inputs ‡ fl on the rear panel, using the ⁄/¤ buttons h on the remote or the Selector buttons ¸ on the front panel until the desired choice of either the AVR35 or the source machine. To listen to enter the desired choice. Press the Set button j ˜ to...laser disc player with an RF output, and an optional, outboard RF-to be compatible with a sampling frequency of audio has been recorded on the remote and note that not all DVD movies and HDTV sources, it appears in the Main Information Display S. When a Dolby Digital source is possible that some...


