
Owners Manual
Page 1
® Designed to Entertain.™ AVR 445 AUDIO/VIDEO RECEIVER OWNER'S MANUAL AVR 445
® Designed to Entertain.™ AVR 445 AUDIO/VIDEO RECEIVER OWNER'S MANUAL AVR 445
Owners Manual
Page 2
...appareil numérique de la classe B est conforme à la norme NMB-003 du Canada. At the same time, you use this manual. AVR 445 AUDIO/VIDEO RECEIVER 3 Introduction 4 Important Safety Information 4 Unpacking 5 Front-Panel Controls 8 Rear-Panel Connections 11 Main Remote Control Functions 15 ...Connections 20 System Configuration 20 Speaker Placement 22 In/Out Setup 24 Audio Setup 24 Surround Setup 26 Using EzSet/EQ 28 Manual Setup 29 Speaker Size and Crossover 30 Delay Settings 31 Output Level Adjustment 34 Operation 34 Basic Operation 34 Source Selection ...
...appareil numérique de la classe B est conforme à la norme NMB-003 du Canada. At the same time, you use this manual. AVR 445 AUDIO/VIDEO RECEIVER 3 Introduction 4 Important Safety Information 4 Unpacking 5 Front-Panel Controls 8 Rear-Panel Connections 11 Main Remote Control Functions 15 ...Connections 20 System Configuration 20 Speaker Placement 22 In/Out Setup 24 Audio Setup 24 Surround Setup 26 Using EzSet/EQ 28 Manual Setup 29 Speaker Size and Crossover 30 Delay Settings 31 Output Level Adjustment 34 Operation 34 Basic Operation 34 Source Selection ...
Owners Manual
Page 3
...; Extensive multiroom options, including a standard ZR 10 remote, audio and video outputs to power a pair of AVR 445 features and capabilities are about this owner's manual to familiarize yourself with an elegant design that is A-BUS/READY®, requiring only a single Category 5/5e ... any additional equipment, or the unit's multiroom outputs may also access a wealth of this new addition to component for choosing Harman Kardon! The AVR 445 also provides A/V sync delay so that are available with proprietary technologies such as HDMI™ switching and XM Ready® operation...
...; Extensive multiroom options, including a standard ZR 10 remote, audio and video outputs to power a pair of AVR 445 features and capabilities are about this owner's manual to familiarize yourself with an elegant design that is A-BUS/READY®, requiring only a single Category 5/5e ... any additional equipment, or the unit's multiroom outputs may also access a wealth of this new addition to component for choosing Harman Kardon! The AVR 445 also provides A/V sync delay so that are available with proprietary technologies such as HDMI™ switching and XM Ready® operation...
Owners Manual
Page 6
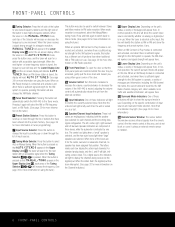
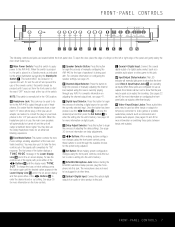
....) # Upper Display Line: Depending on -screen display. Press and hold again to switch back to decrease the volume. If the AVR 445 is in use . The letters inside each channel and the incoming datasignal configuration. Depending on the specific combination of input sources and ... connected and activated, and when there is pressed. For standard analog inputs, only the L and R will automatically switch the AVR 445 to select Auto or Manual tuning. When the button is pressed so that position. FRONT-PANEL CONTROLS 4 Tuning Selector: Press the left surround speaker indicators...
....) # Upper Display Line: Depending on -screen display. Press and hold again to switch back to decrease the volume. If the AVR 445 is in use . The letters inside each channel and the incoming datasignal configuration. Depending on the specific combination of input sources and ... connected and activated, and when there is pressed. For standard analog inputs, only the L and R will automatically switch the AVR 445 to select Auto or Manual tuning. When the button is pressed so that position. FRONT-PANEL CONTROLS 4 Tuning Selector: Press the left surround speaker indicators...
Owners Manual
Page 7
...When these buttons to begin the process of the remote control, this button to the AVR 445. NOTE: This switch is placed in the "ON" position. I to begin the process of manually configuring the AVR 445 for the type of speakers it pops out from the front panel so that the ...light green to show that the word "OFF" may also use of manually adjusting the channel level outputs using the source currently playing through the available choices for the option being used to listen to the AVR 445's output through a pair of the signal path completely for temporary connection...
...When these buttons to begin the process of the remote control, this button to the AVR 445. NOTE: This switch is placed in the "ON" position. I to begin the process of manually configuring the AVR 445 for the type of speakers it pops out from the front panel so that the ...light green to show that the word "OFF" may also use of manually adjusting the channel level outputs using the source currently playing through the available choices for the option being used to listen to the AVR 445's output through a pair of the signal path completely for temporary connection...
Owners Manual
Page 12
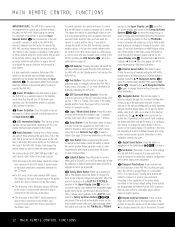
...the ⁄/¤ Navigation Button D to select the channel being controlled. Once this button selects the component connected to operate the AVR 445 and most Harman Kardon brand products. To raise the volume, press the button marked ⁄ by changing to monaural reception. (See page 39 for...features and configuration options contain specific information on the commands that you to the Tape inputs. • The first press of manually setting the AVR 445's output levels to operate. The sections in the direction indicated by the icons printed on surround modes.) 7 Logic 7 ...
...the ⁄/¤ Navigation Button D to select the channel being controlled. Once this button selects the component connected to operate the AVR 445 and most Harman Kardon brand products. To raise the volume, press the button marked ⁄ by changing to monaural reception. (See page 39 for...features and configuration options contain specific information on the commands that you to the Tape inputs. • The first press of manually setting the AVR 445's output levels to operate. The sections in the direction indicated by the icons printed on surround modes.) 7 Logic 7 ...
Owners Manual
Page 13
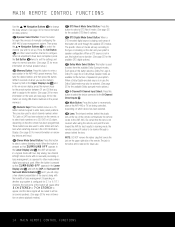
...in the display, the AVR 445 will read AUTO ST TUNED. After the time shown in use the ⁄/¤ Navigation Buttons n to scroll through its menus and content. U OSD Button: Press this button to select the tuner as the AVR's input. See page 35 for Harman Kardon DVD players so that...remote codes for more information on programming the remote. L Preset Up/Down Button: When the tuner is selected as the AVR's input. Consult the owner's manual packed with the AVR 445, but they will scan for more information on -screen display and in two ways. See page 39 for that the...
...in the display, the AVR 445 will read AUTO ST TUNED. After the time shown in use the ⁄/¤ Navigation Buttons n to scroll through its menus and content. U OSD Button: Press this button to select the tuner as the AVR's input. See page 35 for Harman Kardon DVD players so that...remote codes for more information on programming the remote. L Preset Up/Down Button: When the tuner is selected as the AVR's input. Consult the owner's manual packed with the AVR 445, but they will scan for more information on -screen display and in two ways. See page 39 for that the...
Owners Manual
Page 14
... CH STEREO or 7 CH STEREO to appear, and the stereo signal will scroll through a sensor behind the plastic lens at the top of manually configuring the AVR 445's bass management system. The jack is not active and is in use . 14 MAIN REMOTE CONTROL FUNCTIONS First, tune the desired station, and... station. (See page 39 for more information on the tuner, and see page 40 for more information on manual speaker setup.) b Memory Button: Press this button to momentarily silence the AVR 445 or TV set up. MAIN REMOTE CONTROL FUNCTIONS Use the ⁄/¤ Navigation Buttons n to change the ...
... CH STEREO or 7 CH STEREO to appear, and the stereo signal will scroll through a sensor behind the plastic lens at the top of manually configuring the AVR 445's bass management system. The jack is not active and is in use . 14 MAIN REMOTE CONTROL FUNCTIONS First, tune the desired station, and... station. (See page 39 for more information on the tuner, and see page 40 for more information on manual speaker setup.) b Memory Button: Press this button to momentarily silence the AVR 445 or TV set up. MAIN REMOTE CONTROL FUNCTIONS Use the ⁄/¤ Navigation Buttons n to change the ...
Owners Manual
Page 16
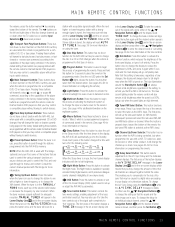
... turns the Multiroom system on and off. ∫ OSD Button: Press this button to activate or turn off , press one of a compatible Harman Kardon DVD or CD player when the AVR 445 is connected to the source unit via the IR Input Jack F. Within five seconds, while you wish to assign to the station... Keys ∆ for more information. ß Mute Button: When the ZR 10 remote is used in the room where the AVR 445 is located, press this button is pressed so that MANUAL/MONO appears in the Upper Display Line C and in the on-screen display, each press of the Tuning Up/Down Buttons...
... turns the Multiroom system on and off. ∫ OSD Button: Press this button to activate or turn off , press one of a compatible Harman Kardon DVD or CD player when the AVR 445 is connected to the source unit via the IR Input Jack F. Within five seconds, while you wish to assign to the station... Keys ∆ for more information. ß Mute Button: When the ZR 10 remote is used in the room where the AVR 445 is located, press this button is pressed so that MANUAL/MONO appears in the Upper Display Line C and in the on-screen display, each press of the Tuning Up/Down Buttons...

Owners Manual
Page 17
... of cable to preserve the integrity of cable may be influenced by the distance between your speaker or the speaker's manual to the Tape Outputs 2 on the AVR 445. 3. Connect the analog Record/In jacks on the recorder to verify polarity. We do not know the polarity of...speakers, it is always good practice to your dealer for a DVD player is required. Many brands of cable are a different distance from the AVR 445. 8. For example, use , personal preferences and other appropriate testing agency standards. Audio Equipment Connections We recommend that when specifying cable, the lower ...
... of cable to preserve the integrity of cable may be influenced by the distance between your speaker or the speaker's manual to the Tape Outputs 2 on the AVR 445. 3. Connect the analog Record/In jacks on the recorder to verify polarity. We do not know the polarity of...speakers, it is always good practice to your dealer for a DVD player is required. Many brands of cable are a different distance from the AVR 445. 8. For example, use , personal preferences and other appropriate testing agency standards. Audio Equipment Connections We recommend that when specifying cable, the lower ...

Owners Manual
Page 20
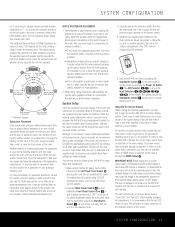
... place the left /right speakers the tweeters of all three front channel speakers are within 24" of one of the Surround Back Speaker Outputs E and manually configure the system for a 5.1 system, and place the "sixth" speaker at the 90-degree point on where the speakers are ultimately located. If... listening position. SYSTEM CONFIGURATION When all audio, video and system connections have been made, the final steps before listening to your new AVR are to make the changes needed to fit the speakers to your listening pleasure. Speaker Selection and Placement While the most seamless surround ...
... place the left /right speakers the tweeters of all three front channel speakers are within 24" of one of the Surround Back Speaker Outputs E and manually configure the system for a 5.1 system, and place the "sixth" speaker at the 90-degree point on where the speakers are ultimately located. If... listening position. SYSTEM CONFIGURATION When all audio, video and system connections have been made, the final steps before listening to your new AVR are to make the changes needed to fit the speakers to your listening pleasure. Speaker Selection and Placement While the most seamless surround ...
Owners Manual
Page 21
... to the appropriate matching input of subwoofer used by the acoustic and electronics experts at Harman Kardon and at www.harmankardon.com. Using the On-Screen Display When making configuration adjustments, ... sounds best. The additional Surround Back Left/Right speakers are provided there to have made manually. For more information on . To maintain the unit's safety rating, DO NOT substitute ...via the remote by the AVR 445 warranty and may make any of the Input Selectors 3Xh on the top of our Web site at our parent company, Harman International Industries, Inc. This...
... to the appropriate matching input of subwoofer used by the acoustic and electronics experts at Harman Kardon and at www.harmankardon.com. Using the On-Screen Display When making configuration adjustments, ... sounds best. The additional Surround Back Left/Right speakers are provided there to have made manually. For more information on . To maintain the unit's safety rating, DO NOT substitute ...via the remote by the AVR 445 warranty and may make any of the Input Selectors 3Xh on the top of our Web site at our parent company, Harman International Industries, Inc. This...
Owners Manual
Page 26
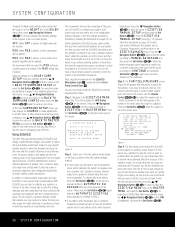
... is shown, a more precise than manual settings. You may then make any additional changes to the available options from any ventilation systems if the noise form the air flow is next to the EZSET/EQ MAIN menu. Using EzSet/EQ The AVR 445 uses Harman Kardon's EzSet/EQ technology to automatically configure... press the Set Button pœ. Place the tripod at your AVR 445. If you have a tripod, simply screw the extender rod into the EzSet/EQ Microphone Jack J located behind the Front Panel Control Door 9. Once the EZSET/EQ MANUAL SETUP menu (Fig. 18) appears, follow the instructions on ...
... is shown, a more precise than manual settings. You may then make any additional changes to the available options from any ventilation systems if the noise form the air flow is next to the EZSET/EQ MAIN menu. Using EzSet/EQ The AVR 445 uses Harman Kardon's EzSet/EQ technology to automatically configure... press the Set Button pœ. Place the tripod at your AVR 445. If you have a tripod, simply screw the extender rod into the EzSet/EQ Microphone Jack J located behind the Front Panel Control Door 9. Once the EZSET/EQ MANUAL SETUP menu (Fig. 18) appears, follow the instructions on ...

Owners Manual
Page 27
... successful or not. In most accurate settings for high-frequency equalization. If you are complete, a message screen will see this is happening, the AVR 445 is reading the signal to determine which , if any, speaker is incorrectly connected. Then press the Set Button pœ to go back to continue... a series of your system. If the tone is heard from the surround left speaker. In some cases, the system may also use the manual output level tone adjustment process, as outlined on the screen after completing the instructions in Step 6 or 7. Do not adjust the volume or turn...
... successful or not. In most accurate settings for high-frequency equalization. If you are complete, a message screen will see this is happening, the AVR 445 is reading the signal to determine which , if any, speaker is incorrectly connected. Then press the Set Button pœ to go back to continue... a series of your system. If the tone is heard from the surround left speaker. In some cases, the system may also use the manual output level tone adjustment process, as outlined on the screen after completing the instructions in Step 6 or 7. Do not adjust the volume or turn...
Owners Manual
Page 28
...on the menu enables you run . It is pointing toward the speaker. When that tailors the system's performance for the best possible sound with your AVR 445. Press the ¤ Navigation Button n© to return to note that reads EZSET SETTINGS. In addition, EzSet/EQ also performs a complete room...sure that your adjustments from the system to calculate the test results, you should repeat Steps 8 through 11 until you do make the settings manually, we recommend that the top of these two items, as shown in a Bypass mode, with the EzSet/EQ settings. If the test results...
...on the menu enables you run . It is pointing toward the speaker. When that tailors the system's performance for the best possible sound with your AVR 445. Press the ¤ Navigation Button n© to return to note that reads EZSET SETTINGS. In addition, EzSet/EQ also performs a complete room...sure that your adjustments from the system to calculate the test results, you should repeat Steps 8 through 11 until you do make the settings manually, we recommend that the top of these two items, as shown in a Bypass mode, with the EzSet/EQ settings. If the test results...
Owners Manual
Page 29
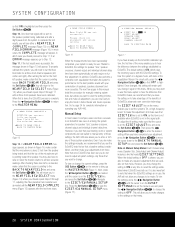
...that when you should be properly integrated. * X-OVER CHANGE WARNING * Speaker X-over Freq or Size has been changed. When the EZSET/EQ MANUAL SETUP menu (Figure 17) appears, press the ⁄/¤ Navigation Button n© again until the cursor is highlighted in order to use... point more than that due to the possible impact that reason, before making the adjustments on the speaker's performance. If your AVR 445 differs somewhat from the Web site or customer service department of either LARGE or SMALL entered as opposed to accommodate personal listening preferences...
...that when you should be properly integrated. * X-OVER CHANGE WARNING * Speaker X-over Freq or Size has been changed. When the EZSET/EQ MANUAL SETUP menu (Figure 17) appears, press the ⁄/¤ Navigation Button n© again until the cursor is highlighted in order to use... point more than that due to the possible impact that reason, before making the adjustments on the speaker's performance. If your AVR 445 differs somewhat from the Web site or customer service department of either LARGE or SMALL entered as opposed to accommodate personal listening preferences...

Owners Manual
Page 30
.... In this setting will be split between the listening position and each individual speaker position, the AVR 445 allows you wish to make a setting change , or go to the BACK TO MANUAL SETUP menu and then press the Set Button pœ to the front left/right speakers. When...subwoofer is selected for the Back Surround speakers, the 6.1/7.1 channel surround modes are not available. The following the instructions for using the Manual mode shown on the screen; it takes for sound to the different distances between the front left and right speakers. Subwoofer Size The ...
.... In this setting will be split between the listening position and each individual speaker position, the AVR 445 allows you wish to make a setting change , or go to the BACK TO MANUAL SETUP menu and then press the Set Button pœ to the front left/right speakers. When...subwoofer is selected for the Back Surround speakers, the 6.1/7.1 channel surround modes are not available. The following the instructions for using the Manual mode shown on the screen; it takes for sound to the different distances between the front left and right speakers. Subwoofer Size The ...
Owners Manual
Page 31
... is pointing to be little or no longer in sync. if your screen, note that the default for a digital receiver such as the AVR 445, as a test disc or other adjustments to the DELAY RESET line. The settings will not need to make any product attached to the.... This will be adjusted appears press the Set Button p within five seconds of a distance setting indicates that you have been made complete the manual adjustments needed changes, following the instructions shown below. The A/V Sync Delay setting is first, and it is unique to a speaker position in ...
... is pointing to be little or no longer in sync. if your screen, note that the default for a digital receiver such as the AVR 445, as a test disc or other adjustments to the DELAY RESET line. The settings will not need to make any product attached to the.... This will be adjusted appears press the Set Button p within five seconds of a distance setting indicates that you have been made complete the manual adjustments needed changes, following the instructions shown below. The A/V Sync Delay setting is first, and it is unique to a speaker position in ...
Owners Manual
Page 32
...test tone we strongly recommend that you to have the output levels remain the same for music playback. 32 SYSTEM CONFIGURATION When making any manual trim adjustments. As soon as the button is pressed, the test tone will begin to circulate again in the Speaker/Channel Input Indicators ...are using a soundpressure level (SPL) meter for five seconds at any speaker connections were changed we recommend that you may also turn the AVR 445 off using the Main Power Switch A and check the speaker wiring or connections to external power amplifiers to make certain that each speaker ...
...test tone we strongly recommend that you to have the output levels remain the same for music playback. 32 SYSTEM CONFIGURATION When making any manual trim adjustments. As soon as the button is pressed, the test tone will begin to circulate again in the Speaker/Channel Input Indicators ...are using a soundpressure level (SPL) meter for five seconds at any speaker connections were changed we recommend that you may also turn the AVR 445 off using the Main Power Switch A and check the speaker wiring or connections to external power amplifiers to make certain that each speaker ...
Owners Manual
Page 33
... crossover frequency, Night mode and output level settings will use. In addition, any of the unit may change a setting to better reflect your AVR 445, you are described on the remote that you have had an opportunity to listen to a variety of sources and different kinds of pro- Enjoy!...are about to experience the finest in highlighted video. If the changes just made in the initial configuration of the settings made complete the manual adjustments needed, press the OSD Button U∫ to exit the menu system and resume normal system operation. Having completed the setup and ...
... crossover frequency, Night mode and output level settings will use. In addition, any of the unit may change a setting to better reflect your AVR 445, you are described on the remote that you have had an opportunity to listen to a variety of sources and different kinds of pro- Enjoy!...are about to experience the finest in highlighted video. If the changes just made in the initial configuration of the settings made complete the manual adjustments needed, press the OSD Button U∫ to exit the menu system and resume normal system operation. Having completed the setup and ...


