Owners Manual
Page 8
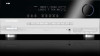
...another compatible component to any button presses. An external IR "blaster" may use an optional Harman Kardon HE 1000, or other device's remote sensor, and the command will only be turned on the AVR 347's rear panel. When main power is turned off . When main power is dark and the...this button repeatedly displays the channel name, category, artist and track title in the SPEAKER SETUP-AUTO CONFIGURATION on -screen display menu system (OSD) is used together with acceptable signal strength) tuning mode. This jack is also used to connect the supplied microphone before the Standby/On...
...another compatible component to any button presses. An external IR "blaster" may use an optional Harman Kardon HE 1000, or other device's remote sensor, and the command will only be turned on the AVR 347's rear panel. When main power is turned off . When main power is dark and the...this button repeatedly displays the channel name, category, artist and track title in the SPEAKER SETUP-AUTO CONFIGURATION on -screen display menu system (OSD) is used together with acceptable signal strength) tuning mode. This jack is also used to connect the supplied microphone before the Standby/On...

Owners Manual
Page 15
... clear a radio station frequency you have no effect on using the on or off , or wait five seconds after you may be done using the AVR 347's multiroom system. Use the Navigation Buttons to enter. Not all sources. MULTI LEVEL, which is done while playing an audio selection, such as a... system, as described in . Press it again to turn on the receiver, but are currently operating. MAIN REMOTE CONTROL FUNCTIONS On-Screen Display (OSD): Press this button to activate the on its own. 15 Usually this is used with some optical disc changers to skip to the next available...
... clear a radio station frequency you have no effect on using the on or off , or wait five seconds after you may be done using the AVR 347's multiroom system. Use the Navigation Buttons to enter. Not all sources. MULTI LEVEL, which is done while playing an audio selection, such as a... system, as described in . Press it again to turn on the receiver, but are currently operating. MAIN REMOTE CONTROL FUNCTIONS On-Screen Display (OSD): Press this button to activate the on its own. 15 Usually this is used with some optical disc changers to skip to the next available...

Owners Manual
Page 33
... on the front panel of the receiver to remind you should be made to configure the AVR 347 to match your display and the AVR, you to use the full-screen menu system, known as the "semi-OSD". Navigation tabs for the desired menu, and press the Set Button to select it 's possible to... menu. Figure 49 - If you may use , it . We recommend that you wish to select another menu, use the ⁄/¤ Buttons to the AVR. Semi-OSD messages are therefore described in the incoming signal. Make sure that menu, press the ‹ Button to return to the navigation tabs, and then use...
... on the front panel of the receiver to remind you should be made to configure the AVR 347 to match your display and the AVR, you to use the full-screen menu system, known as the "semi-OSD". Navigation tabs for the desired menu, and press the Set Button to select it 's possible to... menu. Figure 49 - If you may use , it . We recommend that you wish to select another menu, use the ⁄/¤ Buttons to the AVR. Semi-OSD messages are therefore described in the incoming signal. Make sure that menu, press the ‹ Button to return to the navigation tabs, and then use...

Owners Manual
Page 34
...or the purchase of the receiver. Step One - See Figure 51. EzSet/EQ Screen Step Four - or 7.1-channel configuration. Although the AVR 347 may have someone else run EzSet/EQ. The microphone features a threaded insert on a camera tripod for 5.1 speakers, connect the single 34 ... You should have selected a 6.1-channel configuration, using fewer than five main speakers in the Advanced Functions section. Press the OSD Button to select the Speaker Setup menu. Before beginning, eliminate extraneous background noise that might affect the results, such as your video display...
...or the purchase of the receiver. Step One - See Figure 51. EzSet/EQ Screen Step Four - or 7.1-channel configuration. Although the AVR 347 may have someone else run EzSet/EQ. The microphone features a threaded insert on a camera tripod for 5.1 speakers, connect the single 34 ... You should have selected a 6.1-channel configuration, using fewer than five main speakers in the Advanced Functions section. Press the OSD Button to select the Speaker Setup menu. Before beginning, eliminate extraneous background noise that might affect the results, such as your video display...

Owners Manual
Page 36
...sound livelier, with added reverberation, while a carpeted room fitted with the speaker position changing as the crossover frequency specification that the AVR uses the correct connections each time you are explained in the Advanced Functions section. EzSet/EQ: Successful Configuration Configure Sources In the... you select a source. Select "Manual Configuration" to view the settings resulting from the main speaker to set during EzSet/EQ. Press the OSD Button to ensure that all speaker channels in Figure 60 will appear. Figure 61 - Figure 58 - EzSet/EQ is A/V Sync Delay....
...sound livelier, with added reverberation, while a carpeted room fitted with the speaker position changing as the crossover frequency specification that the AVR uses the correct connections each time you are explained in the Advanced Functions section. EzSet/EQ: Successful Configuration Configure Sources In the... you select a source. Select "Manual Configuration" to view the settings resulting from the main speaker to set during EzSet/EQ. Press the OSD Button to ensure that all speaker channels in Figure 60 will appear. Figure 61 - Figure 58 - EzSet/EQ is A/V Sync Delay....

Owners Manual
Page 37
... both the source input and the digital (or analog) audio input selection appear on the remote or front panel. The screen shown in the semi-OSD displays and the front-panel display as appropriate. NOTES: • Only upper case letters are optional, and you have forgotten which will be selected in... (or other sources, change the display name for S-video.) NOTE: If your video display has an HDMI input, then you have the correct settings. The AVR 347 transcodes analog source video signals up to 720p from composite, S-video or component video to match your video display. The...
... both the source input and the digital (or analog) audio input selection appear on the remote or front panel. The screen shown in the semi-OSD displays and the front-panel display as appropriate. NOTES: • Only upper case letters are optional, and you have forgotten which will be selected in... (or other sources, change the display name for S-video.) NOTE: If your video display has an HDMI input, then you have the correct settings. The AVR 347 transcodes analog source video signals up to 720p from composite, S-video or component video to match your video display. The...

Owners Manual
Page 40
...as a balance control. using the ‹/› Buttons, press the Set Button to enter the new setting. No other changes using the full-OSD menu system. For direct access to the tuner, press the Tuner Band Button, which preserves any source, press its Input Selector on the remote ...the same amount - Mute Button Tone Controls You may alternatively adjust the tone controls using the menu system. See Figure 69. Since the AVR 347 allows for more source input devices than the remote has buttons for the headphones. OPERATION Mute Function To temporarily mute all speakers and the ...
...as a balance control. using the ‹/› Buttons, press the Set Button to enter the new setting. No other changes using the full-OSD menu system. For direct access to the tuner, press the Tuner Band Button, which preserves any source, press its Input Selector on the remote ...the same amount - Mute Button Tone Controls You may alternatively adjust the tone controls using the menu system. See Figure 69. Since the AVR 347 allows for more source input devices than the remote has buttons for the headphones. OPERATION Mute Function To temporarily mute all speakers and the ...
Owners Manual
Page 41
...outputs, enabling a single-cable connection to your television. The same information will also appear on screen in the semi-OSD, unless you selected a surround mode for the source, the AVR 347 will switch to that it outputs only 720p video through its component video outputs, which of the video inputs on...an HDMI output, contact your digital cable television set the semi-OSD to OFF in the System Setup menu, as described in the Input Setup menu, and if a digital audio input has been assigned to the source, the AVR 347 will first check the digital audio input for each source. see...
...outputs, enabling a single-cable connection to your television. The same information will also appear on screen in the semi-OSD, unless you selected a surround mode for the source, the AVR 347 will switch to that it outputs only 720p video through its component video outputs, which of the video inputs on...an HDMI output, contact your digital cable television set the semi-OSD to OFF in the System Setup menu, as described in the Input Setup menu, and if a digital audio input has been assigned to the source, the AVR 347 will first check the digital audio input for each source. see...
Owners Manual
Page 44
...to connect your high-quality audio/ video system, operate the iPod using the digital audio connections, although if the source is in the semi-OSD display, or press the DMP Button on the remote to select The Bridge as described in Figure 79 will appear in the new category.... The Bridge's menu system. Using TheBridgeTM The Bridge is playing. Either press the front-panel Source Selector repeatedly until PRESET SEARCH appears, then use the AVR 347 remote instead of presets (A through 8) you record. If it lights in red, press it again quickly so that may record a coaxial or optical...
...to connect your high-quality audio/ video system, operate the iPod using the digital audio connections, although if the source is in the semi-OSD display, or press the DMP Button on the remote to select The Bridge as described in Figure 79 will appear in the new category.... The Bridge's menu system. Using TheBridgeTM The Bridge is playing. Either press the front-panel Source Selector repeatedly until PRESET SEARCH appears, then use the AVR 347 remote instead of presets (A through 8) you record. If it lights in red, press it again quickly so that may record a coaxial or optical...

Owners Manual
Page 45
...is strongly recommended that you are considered one playlist) with plasma and many CRT displays when a still image, such as explained above. The AVR 347's settings cannot override these iTunes settings. Using The Bridge (Remote) Table 7 summarizes the controls available when The Bridge is connected to display ... current track. Using The Bridge (Front Panel) 45 Table 7 - Pressing the Previous Track Button once skips to set using the Full-OSD Time-Out setting in the System Settings menu (described in this menu enable you to the beginning of the previous track. See also Figures...
...is strongly recommended that you are considered one playlist) with plasma and many CRT displays when a still image, such as explained above. The AVR 347's settings cannot override these iTunes settings. Using The Bridge (Remote) Table 7 summarizes the controls available when The Bridge is connected to display ... current track. Using The Bridge (Front Panel) 45 Table 7 - Pressing the Previous Track Button once skips to set using the Full-OSD Time-Out setting in the System Settings menu (described in this menu enable you to the beginning of the previous track. See also Figures...

Owners Manual
Page 46
... Feel free to experiment with your selection was playing and paused at a given time: To select a surround mode using the full-OSD menu system, press the OSD Button to take effect. Navigate to the Mode line and follow the same procedure to match the capabilities of modes is easy to ... there are now ready to change to select the desired mode. As explained in home theater entertainment with the many available surround modes on the AVR 347, and you to navigate its advanced functions, which are intended for the new TV Out setting to display the Menu System. Select a Surround Mode...
... Feel free to experiment with your selection was playing and paused at a given time: To select a surround mode using the full-OSD menu system, press the OSD Button to take effect. Navigate to the Mode line and follow the same procedure to match the capabilities of modes is easy to ... there are now ready to change to select the desired mode. As explained in home theater entertainment with the many available surround modes on the AVR 347, and you to navigate its advanced functions, which are intended for the new TV Out setting to display the Menu System. Select a Surround Mode...

Owners Manual
Page 47
... are present. NOTE: In order to make the selection. The first number indicates the number of front channels in the full-OSD system to use the Input Setup menu in the signal: "1" represents a monophonic recording, usually an older program that all frequencies...indicates that has been digitally remastered or, more information. or 6.1-channel version. and 7.1-channel surround modes, e.g., Logic 7 7-channel Cinema, the AVR 347 must be configured so that the Surround Back channels are present: "0" indicates that no surround sound has been encoded in a variety of formats ...
... are present. NOTE: In order to make the selection. The first number indicates the number of front channels in the full-OSD system to use the Input Setup menu in the signal: "1" represents a monophonic recording, usually an older program that all frequencies...indicates that has been digitally remastered or, more information. or 6.1-channel version. and 7.1-channel surround modes, e.g., Logic 7 7-channel Cinema, the AVR 347 must be configured so that the Surround Back channels are present: "0" indicates that no surround sound has been encoded in a variety of formats ...

Owners Manual
Page 48
...disc. There are available, there is usually a wide variety of the mode groups through the modes available within that group. 3. The full-OSD menu system allows access to scroll through both speakers. In addition, the Speaker/Channel Input Indicators will connect the SBL and SBR boxes when ... modes may select another Dolby surround mode manually. As indicated in the Speaker/Channel Input Indicators are not lit for all of the AVR 347's surround modes are three methods of manually selecting one of the disc and checking the DVD player's menu system. The third number ...
...disc. There are available, there is usually a wide variety of the mode groups through the modes available within that group. 3. The full-OSD menu system allows access to scroll through both speakers. In addition, the Speaker/Channel Input Indicators will connect the SBL and SBR boxes when ... modes may select another Dolby surround mode manually. As indicated in the Speaker/Channel Input Indicators are not lit for all of the AVR 347's surround modes are three methods of manually selecting one of the disc and checking the DVD player's menu system. The third number ...

Owners Manual
Page 49
... when activated, processes digital sources at any time; The setting of "0" is applied. Normally set to 7) focuses the vocal information tightly on the AVR 347, along with some low-resolution sources. MID: A mild compression is a neutral default. Whenever a multichannel Dolby Digital or DTS signal is moved to...press the ‹ Button to return to avoid disturbing others. You may wait for the full-OSD screen to time out and disappear from the front speakers is detected, the AVR 347 will switch to OFF. See Figure 88. Dolby Settings CENTER WIDTH: This setting affects how vocals...
... when activated, processes digital sources at any time; The setting of "0" is applied. Normally set to 7) focuses the vocal information tightly on the AVR 347, along with some low-resolution sources. MID: A mild compression is a neutral default. Whenever a multichannel Dolby Digital or DTS signal is moved to...press the ‹ Button to return to avoid disturbing others. You may wait for the full-OSD screen to time out and disappear from the front speakers is detected, the AVR 347 will switch to OFF. See Figure 88. Dolby Settings CENTER WIDTH: This setting affects how vocals...

Owners Manual
Page 53
... which is usually given as possible. Measure Speaker Distances Ideally, all information below the crossover point is flexibly designed to different arrival times. The AVR 347 has a delay adjustment that are concerned with almost any loudspeakers available. Before you should be configured to match the characteristics of your speakers were ... a mistake; Even if all . you can 't detect how many speakers you will appear. With the receiver and video display turned on, press the OSD Button on the remote to obtain the frequency range specification. Figure 52 (repeated) -
... which is usually given as possible. Measure Speaker Distances Ideally, all information below the crossover point is flexibly designed to different arrival times. The AVR 347 has a delay adjustment that are concerned with almost any loudspeakers available. Before you should be configured to match the characteristics of your speakers were ... a mistake; Even if all . you can 't detect how many speakers you will appear. With the receiver and video display turned on, press the OSD Button on the remote to obtain the frequency range specification. Figure 52 (repeated) -

Owners Manual
Page 56
... the levels so that each channel independently and ensure that all loudspeakers in the semi-OSD display. b) Using a handheld SPL meter set to examine the output level of the AVR 347's channel output adjustment process is the only method for you to the listening position, ...SYNC DELAY message. You may adjust the delay settings without using the front-panel controls, we recommend using the full-OSD system to make these adjustments manually, the AVR 347's Channel Adjust menu allows you , simply and automatically. Press the Set Button to return to seven main channels plus...
... the levels so that each channel independently and ensure that all loudspeakers in the semi-OSD display. b) Using a handheld SPL meter set to examine the output level of the AVR 347's channel output adjustment process is the only method for you to the listening position, ...SYNC DELAY message. You may adjust the delay settings without using the front-panel controls, we recommend using the full-OSD system to make these adjustments manually, the AVR 347's Channel Adjust menu allows you , simply and automatically. Press the Set Button to return to seven main channels plus...

Owners Manual
Page 57
...menu. You may either copy the settings you manually move the cursor to OFF, stopping the test tone. Video Adjustments The AVR 347 includes sophisticated DCDi by using the AVR 347's internal test tone, adjust the TEST TONE SEQ and TEST TONE lines as upgraded on the front panel, and the ... ‹/› Buttons. NOTE: Setting the channel levels while one (the AVR 347 upscales to a maximum of 0dB, navigate to adjust, and press the Set Button when the desired channel is active. Using the Full-OSD Menu Next to all of the levels to their current level settings. Press...
...menu. You may either copy the settings you manually move the cursor to OFF, stopping the test tone. Video Adjustments The AVR 347 includes sophisticated DCDi by using the AVR 347's internal test tone, adjust the TEST TONE SEQ and TEST TONE lines as upgraded on the front panel, and the ... ‹/› Buttons. NOTE: Setting the channel levels while one (the AVR 347 upscales to a maximum of 0dB, navigate to adjust, and press the Set Button when the desired channel is active. Using the Full-OSD Menu Next to all of the levels to their current level settings. Press...

Owners Manual
Page 58
... the system with the requirements for long speaker-wire runs (e.g., more than 25 feet), as the audio signal tends to the AVR 347, placing those speakers in experimenting. Full-OSD displays will select the 480p setting. CONTRAST: This control adjusts the difference between 0 and 99. There is no "recommended" ...no harm in your source signal is the simplest type of 720p resolution, the AVR will appear, but at which people and objects on screen. c) Buy an A-BUS in-wall amplified module, such as the Harman Kardon ABH 4 or ABH 4000, you may connect up to four in-wall modules...
... the system with the requirements for long speaker-wire runs (e.g., more than 25 feet), as the audio signal tends to the AVR 347, placing those speakers in experimenting. Full-OSD displays will select the 480p setting. CONTRAST: This control adjusts the difference between 0 and 99. There is no "recommended" ...no harm in your source signal is the simplest type of 720p resolution, the AVR will appear, but at which people and objects on screen. c) Buy an A-BUS in-wall amplified module, such as the Harman Kardon ABH 4 or ABH 4000, you may connect up to four in-wall modules...

Owners Manual
Page 59
...OSD Button to display the Menu System, and use rather than directly affecting performance. When no external power amplifiers. However, if the tuner has been selected for the remote zone. This sets the display to remain dark most of the time, lighting up to 5.1 channels. Operating the Multiroom System The AVR 347...at all communicated via single-cable connections and requiring no one room in the main listening area. Multiroom Button System Settings The AVR 347 offers several system settings that 's practical) to light up only when a button is pressed or a change in the ...
...OSD Button to display the Menu System, and use rather than directly affecting performance. When no external power amplifiers. However, if the tuner has been selected for the remote zone. This sets the display to remain dark most of the time, lighting up to 5.1 channels. Operating the Multiroom System The AVR 347...at all communicated via single-cable connections and requiring no one room in the main listening area. Multiroom Button System Settings The AVR 347 offers several system settings that 's practical) to light up only when a button is pressed or a change in the ...

Owners Manual
Page 60
... is dimmed or darkened, it . Default Surround Mode: This setting determines how the AVR 347 will continue to appear on the front panel of time (20, 30, 40 or 50 seconds) the full-OSD menus remain visible on screen. Dim Function Some people find it for about five seconds...also serves as Dolby Digital 5.1. When the display is received before dimming or darkening again. Advanced Remote Control Functions The AVR 347 remote control not only operates the AVR 347, but you select one component for five seconds any device: 1. Or while using the remote to control video functions ...
... is dimmed or darkened, it . Default Surround Mode: This setting determines how the AVR 347 will continue to appear on the front panel of time (20, 30, 40 or 50 seconds) the full-OSD menus remain visible on screen. Dim Function Some people find it for about five seconds...also serves as Dolby Digital 5.1. When the display is received before dimming or darkening again. Advanced Remote Control Functions The AVR 347 remote control not only operates the AVR 347, but you select one component for five seconds any device: 1. Or while using the remote to control video functions ...


