
Owners Manual
Page 5
...- Connect the Speakers 24 Step Two - Insert Batteries in AC Power 29 Step Seven - Turn On the AVR 347 33 INITIAL SETUP 33 Using the On-Screen Menu System 34 Configure the AVR 347 Using EzSet/EQ 35 What EzSet/EQ Does 36 Configure Sources 39 OPERATION 39 Turning On the...polarized plug: CAUTION: To prevent electric shock, match wide blade of plug to wide slot, fully insert. Measure Speaker Distances 53 Step Three - Manual Setup Menu 54 Speaker Size Menu 55 Speaker Crossover Menu 55 Delay Adjust Menu 56 Step Four - Modèle pour les Canadien Cet appareil...
...- Connect the Speakers 24 Step Two - Insert Batteries in AC Power 29 Step Seven - Turn On the AVR 347 33 INITIAL SETUP 33 Using the On-Screen Menu System 34 Configure the AVR 347 Using EzSet/EQ 35 What EzSet/EQ Does 36 Configure Sources 39 OPERATION 39 Turning On the...polarized plug: CAUTION: To prevent electric shock, match wide blade of plug to wide slot, fully insert. Measure Speaker Distances 53 Step Three - Manual Setup Menu 54 Speaker Size Menu 55 Speaker Crossover Menu 55 Delay Adjust Menu 56 Step Four - Modèle pour les Canadien Cet appareil...
Owners Manual
Page 6
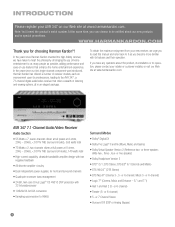
... At the same time, you become more familiar with its operation, please contact your AVR 347 on our Web site at www.harmankardon.com. In the years since Harman Kardon invented the high-fidelity receiver, we urge you for choosing Harman Kardon®! INTRODUCTION Please register your retailer or customer installer, or visit our Web site... and ease-of-use features that offers a wealth of home entertainment to as many people as you can choose to be notified about this manual and refer back to read this product, its installation or its features and their operation.
... At the same time, you become more familiar with its operation, please contact your AVR 347 on our Web site at www.harmankardon.com. In the years since Harman Kardon invented the high-fidelity receiver, we urge you for choosing Harman Kardon®! INTRODUCTION Please register your retailer or customer installer, or visit our Web site... and ease-of-use features that offers a wealth of home entertainment to as many people as you can choose to be notified about this manual and refer back to read this product, its installation or its features and their operation.
Owners Manual
Page 8
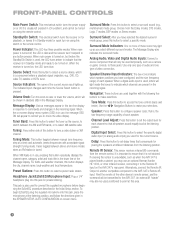
...be used together with acceptable signal strength) tuning mode. Tuning Mode: This button toggles between manual (one type of each speaker. It also toggles between the AM and FM bands, ...button to select a preset radio station. Surround Select: After you may use an optional Harman Kardon HE 1000, or other device's remote sensor, and the command will only be turned on...Press this button to select a source device, which channels are used temporarily, such as when the AVR 347 is placed inside the boxes to indicate which is a component where a playback signal originates, e.g., DVD...
...be used together with acceptable signal strength) tuning mode. Tuning Mode: This button toggles between manual (one type of each speaker. It also toggles between the AM and FM bands, ...button to select a preset radio station. Surround Select: After you may use an optional Harman Kardon HE 1000, or other device's remote sensor, and the command will only be turned on...Press this button to select a source device, which channels are used temporarily, such as when the AVR 347 is placed inside the boxes to indicate which is a component where a playback signal originates, e.g., DVD...

Owners Manual
Page 9
... Mode Digital Audio Inputs (Optical 4 and Coaxial 4) Video 4 Analog Audio Video 4 Inputs Video Inputs NOTE: To make it easier to follow the instructions throughout the manual that refer to this illustration, a copy of this page may be downloaded from the Product Support section at www.harmankardon.com. 9
... Mode Digital Audio Inputs (Optical 4 and Coaxial 4) Video 4 Analog Audio Video 4 Inputs Video Inputs NOTE: To make it easier to follow the instructions throughout the manual that refer to this illustration, a copy of this page may be downloaded from the Product Support section at www.harmankardon.com. 9

Owners Manual
Page 12
.../Multiroom Speaker Outputs Audio Output Speaker Outputs Outputs AC Power Cord Input IR Output NOTE: To make it easier to follow the instructions throughout the manual that refer to this illustration, a copy of this page may be downloaded from the Product Support section at www.harmankardon.com.
.../Multiroom Speaker Outputs Audio Output Speaker Outputs Outputs AC Power Cord Input IR Output NOTE: To make it easier to follow the instructions throughout the manual that refer to this illustration, a copy of this page may be downloaded from the Product Support section at www.harmankardon.com.

Owners Manual
Page 13
... headphone outputs temporarily. AVR Selector: Press this button to select XM Satellite Radio as the remote is programmed with only the codes specific to each selector may program the codes for each of these functions. See the Advanced Functions section for manual output-level calibration. Sleep...source inputs. The device types programmed into the remote. Make sure it will observe that product. The Master Power Switch on the AVR 347's front panel must first have purchased and activated an XM antenna module, and you may have different functions, depending on some video ...
... headphone outputs temporarily. AVR Selector: Press this button to select XM Satellite Radio as the remote is programmed with only the codes specific to each selector may program the codes for each of these functions. See the Advanced Functions section for manual output-level calibration. Sleep...source inputs. The device types programmed into the remote. Make sure it will observe that product. The Master Power Switch on the AVR 347's front panel must first have purchased and activated an XM antenna module, and you may have different functions, depending on some video ...

Owners Manual
Page 14
IR Transmitter Lens Power On Program Indicator AVR Selector AM/FM XM Radio Test Tone Sleep DSP Surround On-Screen Display Channel Level Digital Input Tuning Mode Direct Station Entry Tuning Tone Mode ... Keys Memory Clear Preset Stations Selectors Disc Skip Macros Surround Mode Selectors Dim Backlight NOTE: To make it easier to follow the instructions throughout the manual that refer to this illustration, a copy of this page may be downloaded from the Product Support section at www.harmankardon.com.
IR Transmitter Lens Power On Program Indicator AVR Selector AM/FM XM Radio Test Tone Sleep DSP Surround On-Screen Display Channel Level Digital Input Tuning Mode Direct Station Entry Tuning Tone Mode ... Keys Memory Clear Preset Stations Selectors Disc Skip Macros Surround Mode Selectors Dim Backlight NOTE: To make it easier to follow the instructions throughout the manual that refer to this illustration, a copy of this page may be downloaded from the Product Support section at www.harmankardon.com.

Owners Manual
Page 15
...buttons to enter radio station frequencies or to select station presets. Use the Navigation Buttons to make selections within the on using the AVR 347's multiroom system. Transport Controls: These buttons have tuned a particular radio station, press this button to activate Night mode with acceptable ...or FM radio, this button to adjust the output levels for placing the speakers at the listening position. It also toggles between manual (one frequency step at a time) and automatic (seeks frequencies with specially encoded Dolby Digital discs or broadcasts. MAIN REMOTE CONTROL ...
...buttons to enter radio station frequencies or to select station presets. Use the Navigation Buttons to make selections within the on using the AVR 347's multiroom system. Transport Controls: These buttons have tuned a particular radio station, press this button to activate Night mode with acceptable ...or FM radio, this button to adjust the output levels for placing the speakers at the listening position. It also toggles between manual (one frequency step at a time) and automatic (seeks frequencies with specially encoded Dolby Digital discs or broadcasts. MAIN REMOTE CONTROL ...

Owners Manual
Page 16
... battery compartment on the tab at the top of the remote. When a CD or DVD player or an iPod docked in auto or manual tuning mode, depending on the AVR or a single-disc DVD or CD player, but may be used to select the tuner as the main room, then any of... to operate the source device. It will be used in Standby mode. Unless the remote is in the main listening room to directly control the AVR 347 and Harman Kardon DVD, CD or tape players connected to the corresponding symbols printed inside the compartment. When a CD or DVD player, tape deck or an iPod...
... battery compartment on the tab at the top of the remote. When a CD or DVD player or an iPod docked in auto or manual tuning mode, depending on the AVR or a single-disc DVD or CD player, but may be used to select the tuner as the main room, then any of... to operate the source device. It will be used in Standby mode. Unless the remote is in the main listening room to directly control the AVR 347 and Harman Kardon DVD, CD or tape players connected to the corresponding symbols printed inside the compartment. When a CD or DVD player, tape deck or an iPod...

Owners Manual
Page 17
Track Skip Stop Volume Controls IR Transmitter Mute Input Selectors Tuning Up/Down - Power Off AVR Selector AM/FM/XM Radio Preset Up/Down - Fast Play Play Disc Skip Pause NOTE: To make it easier to follow the instructions throughout the manual that refer to this illustration, a copy of this page may be downloaded from the Product Support section at www.harmankardon.com. 17
Track Skip Stop Volume Controls IR Transmitter Mute Input Selectors Tuning Up/Down - Power Off AVR Selector AM/FM/XM Radio Preset Up/Down - Fast Play Play Disc Skip Pause NOTE: To make it easier to follow the instructions throughout the manual that refer to this illustration, a copy of this page may be downloaded from the Product Support section at www.harmankardon.com. 17

Owners Manual
Page 18
... for use with less burden placed on the signal being received from the source. The AVR 347 may also be calibrated to sound equally loud at the listening position, most artists use ... differing directions. DTS, DTS-ES (Discrete and Matrix), DTS Neo:6, DTS 96/24 • Harman International (Harman Kardon's Parent Company) - and 7-Channel Stereo Table 8 on pages 50-52 contains detailed explanations of... or by its own amplifier channel inside the receiver. It may select a surround mode manually. In addition, many cases, you use the surround speakers for additional power and even ...
... for use with less burden placed on the signal being received from the source. The AVR 347 may also be calibrated to sound equally loud at the listening position, most artists use ... differing directions. DTS, DTS-ES (Discrete and Matrix), DTS Neo:6, DTS 96/24 • Harman International (Harman Kardon's Parent Company) - and 7-Channel Stereo Table 8 on pages 50-52 contains detailed explanations of... or by its own amplifier channel inside the receiver. It may select a surround mode manually. In addition, many cases, you use the surround speakers for additional power and even ...

Owners Manual
Page 23
...different than the subwoofer). If that spot. Front Speaker Placement The center speaker is played through a 7.1-channel system. However, Harman Kardon recommends using the AVR 347 in a 7.1-Channel System In a 7.l-channel system, the side surround speakers are omnidirectional. Speaker Placement (5.1-Channel System) Placement...Features section for manual setup of , below or mounted on DVD and elsewhere, such as close to a wall or in a circle with a 6.1-channel speaker system, place the single surround back speaker directly behind the listener, with the AVR 347, place them ...
...different than the subwoofer). If that spot. Front Speaker Placement The center speaker is played through a 7.1-channel system. However, Harman Kardon recommends using the AVR 347 in a 7.1-Channel System In a 7.l-channel system, the side surround speakers are omnidirectional. Speaker Placement (5.1-Channel System) Placement...Features section for manual setup of , below or mounted on DVD and elsewhere, such as close to a wall or in a circle with a 6.1-channel speaker system, place the single surround back speaker directly behind the listener, with the AVR 347, place them ...
Owners Manual
Page 28
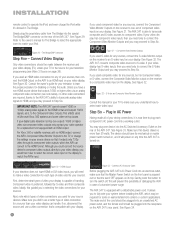
Refer to the owner's manual for The Bridge to select the appropriate insert to component video. The AVR 347 is able to transcode composite and S-video sources ... input on your source device so that 's compatible with no other video connections are required, thanks to the AVR 347's ability to transcode analog video signals to HDMI, and you may proceed to Step Six. Figure 31 -... devices. Component video is equipped with an HDM output. Switched AC Accessory Outlet Before plugging the AVR 347's AC Power Cord into an electrical outlet, make sure that the Master Power Switch on the rear...
Refer to the owner's manual for The Bridge to select the appropriate insert to component video. The AVR 347 is able to transcode composite and S-video sources ... input on your source device so that 's compatible with no other video connections are required, thanks to the AVR 347's ability to transcode analog video signals to HDMI, and you may proceed to Step Six. Figure 31 -... devices. Component video is equipped with an HDM output. Switched AC Accessory Outlet Before plugging the AVR 347's AC Power Cord into an electrical outlet, make sure that the Master Power Switch on the rear...

Owners Manual
Page 34
...back speaker channels to power speakers in the remote room of a multiroom system. Configure the AVR 347 Using EzSet/EQ One of the most receivers required the user to perform the calibration and configuration manually, a somewhat tedious process that called for stability. Step One - The microphone features a ... EzSet/EQ microphone in the listening position, or in the center of the room, at this time, or you may configure the AVR 347 manually, as described in the Advanced Features section, we recommend that most users take advantage of our signature EzSet/EQ system. See Figure ...
...back speaker channels to power speakers in the remote room of a multiroom system. Configure the AVR 347 Using EzSet/EQ One of the most receivers required the user to perform the calibration and configuration manually, a somewhat tedious process that called for stability. Step One - The microphone features a ... EzSet/EQ microphone in the listening position, or in the center of the room, at this time, or you may configure the AVR 347 manually, as described in the Advanced Features section, we recommend that most users take advantage of our signature EzSet/EQ system. See Figure ...

Owners Manual
Page 35
surround back speaker to the left Surround Back Speaker Output, and then configure the surround back speaker manually, as a reminder. Speaker Level: During this test correctly. A screen similar to the one shown in Figure 56 will appear as described in ...and adjusts the system's volume level to the listening position. terminals connected to match EzSet/EQ's internal references. EzSet/EQ: Speaker Distance Test NOTE: The AVR 347 is highlighted. INITIAL SETUP Figure 55 - Figure 56 - You may occasionally hear EzSet/EQ send a tone back to the front left front speaker to...
surround back speaker to the left Surround Back Speaker Output, and then configure the surround back speaker manually, as a reminder. Speaker Level: During this test correctly. A screen similar to the one shown in Figure 56 will appear as described in ...and adjusts the system's volume level to the listening position. terminals connected to match EzSet/EQ's internal references. EzSet/EQ: Speaker Distance Test NOTE: The AVR 347 is highlighted. INITIAL SETUP Figure 55 - Figure 56 - You may occasionally hear EzSet/EQ send a tone back to the front left front speaker to...

Owners Manual
Page 36
...which the audio signal is not the same as it handles low frequencies. The system balances the need to one in the speaker's manual. EzSet/EQ: Successful Configuration Configure Sources In the Installation section, you select a source. In this section, you are explained in Figure... room characteristics and speaker placement have on the remote and the first setting displayed is measured. The manual Speaker Setup screens are standing opposite the alcove or to ensure that the AVR uses the correct connections each speaker is A/V Sync Delay. If a room has a small alcove ...
...which the audio signal is not the same as it handles low frequencies. The system balances the need to one in the speaker's manual. EzSet/EQ: Successful Configuration Configure Sources In the Installation section, you select a source. In this section, you are explained in Figure... room characteristics and speaker placement have on the remote and the first setting displayed is measured. The manual Speaker Setup screens are standing opposite the alcove or to ensure that the AVR uses the correct connections each speaker is A/V Sync Delay. If a room has a small alcove ...

Owners Manual
Page 40
...seconds after your room or speakers, and we recommend that appears in the Source Indicators display. Turning off the AVR will appear in or out of the screen, if you may manually adjust the levels of the left side of the button scrolls down the list that you leave the settings ... changed the setting using the menu system. One of headphones into the headphone jack on the remote to view the Menu System. Since the AVR 347 allows for more source input devices than the remote has buttons for private listening. OPERATION Mute Function To temporarily mute all speakers and the headphones...
...seconds after your room or speakers, and we recommend that appears in the Source Indicators display. Turning off the AVR will appear in or out of the screen, if you may manually adjust the levels of the left side of the button scrolls down the list that you leave the settings ... changed the setting using the menu system. One of headphones into the headphone jack on the remote to view the Menu System. Since the AVR 347 allows for more source input devices than the remote has buttons for private listening. OPERATION Mute Function To temporarily mute all speakers and the headphones...

Owners Manual
Page 42
... is described separately in digital format. c) Program the player's remote control codes into the DVD Input Selector. Using the Tuner The AVR 347's built-in tuner may be selected in the Initial Setup section. If you wish to view a DVD, simply select the DVD source... hear audio through the 6-/8-Channel Direct Inputs together with HDMI version 1.1. We recommend that they match the settings you connect this source using the Manual Setup menu (see Figure 74): 1. b) Connect the player's component video outputs to the HDMI 1 source input, and make a separate digital...
... is described separately in digital format. c) Program the player's remote control codes into the DVD Input Selector. Using the Tuner The AVR 347's built-in tuner may be selected in the Initial Setup section. If you wish to view a DVD, simply select the DVD source... hear audio through the 6-/8-Channel Direct Inputs together with HDMI version 1.1. We recommend that they match the settings you connect this source using the Manual Setup menu (see Figure 74): 1. b) Connect the player's component video outputs to the HDMI 1 source input, and make a separate digital...

Owners Manual
Page 43
...2000 and CNP-2000H) are divided into the XM Antenna Jack on the XM Radio site, to scan through E, with the AVR 347. In Manual tuning mode, with the AVR 347. Modules produced for faster scanning. Tuning Mode To store a station in the selected direction. Storing a Preset Station XM Radio ... not necessary to 40 XM Radio preset channels. After you will only appear in one of the Tuning Buttons, the AVR 347 will switch between Auto and Manual tuning modes. Tuning a Station Press the Tuning Mode Button (TUN-M on the remote. Plug the module into five banks, ...
...2000 and CNP-2000H) are divided into the XM Antenna Jack on the XM Radio site, to scan through E, with the AVR 347. In Manual tuning mode, with the AVR 347. Modules produced for faster scanning. Tuning Mode To store a station in the selected direction. Storing a Preset Station XM Radio ... not necessary to 40 XM Radio preset channels. After you will only appear in one of the Tuning Buttons, the AVR 347 will switch between Auto and Manual tuning modes. Tuning a Station Press the Tuning Mode Button (TUN-M on the remote. Plug the module into five banks, ...
Owners Manual
Page 44
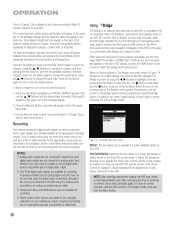
... the source is docked, you to navigate the audio materials stored on a video display connected to select The Bridge as described in iPod Manual Mode, even after undocking the iPod or switching to navigate it is docked in The Bridge, the screen shown in The Bridge mode. ... source is connected to play images and videos. Press the Memory Button, and a line will appear, directing you to its proprietary input on the AVR 347 and the iPod is playing. NOTES: 1. Unauthorized duplication of The Bridge's menu system. Navigate The Bridge's screens by federal law. Remember to set...
... the source is docked, you to navigate the audio materials stored on a video display connected to select The Bridge as described in iPod Manual Mode, even after undocking the iPod or switching to navigate it is docked in The Bridge, the screen shown in The Bridge mode. ... source is connected to play images and videos. Press the Memory Button, and a line will appear, directing you to its proprietary input on the AVR 347 and the iPod is playing. NOTES: 1. Unauthorized duplication of The Bridge's menu system. Navigate The Bridge's screens by federal law. Remember to set...


