

Product Information
Page 11
... remote? Standard on features and flexibility. The list goes on and on a DVD or through a digital cable box, satellite receiver or HDTV set-top increasingly start with an digital path receiver technology production houses and DVD pressing plants, to the output of a home LCD display and both learning and programmable functions? Logic 7® and VMAx® processing, in addition to home entertainment. Seven audio channels with assignable amplifier channels to power...
... remote? Standard on features and flexibility. The list goes on and on a DVD or through a digital cable box, satellite receiver or HDTV set-top increasingly start with an digital path receiver technology production houses and DVD pressing plants, to the output of a home LCD display and both learning and programmable functions? Logic 7® and VMAx® processing, in addition to home entertainment. Seven audio channels with assignable amplifier channels to power...

Product Information
Page 15
... analog inputs allows you use, including DVD-Audio or SACD! To view every model, visit www.harmankardon.com 15 Multiroom options abound, ranging from assignable rear-channel amplifiers to an A-BUS Ready port which only two speakers are present, we provide VMAx. AVR 125 5 x 45W 5.1-Channel A/V Receiver Don't let the AVR 125's price fool you theater-quality sound at a budget-minded price. On-screen menus and an EzSet remote make installation a breeze, and front-panel digital audio and analog audio/video inputs...
... analog inputs allows you use, including DVD-Audio or SACD! To view every model, visit www.harmankardon.com 15 Multiroom options abound, ranging from assignable rear-channel amplifiers to an A-BUS Ready port which only two speakers are present, we provide VMAx. AVR 125 5 x 45W 5.1-Channel A/V Receiver Don't let the AVR 125's price fool you theater-quality sound at a budget-minded price. On-screen menus and an EzSet remote make installation a breeze, and front-panel digital audio and analog audio/video inputs...
Owners Manual
Page 3
... settings for speaker configurations and bass management, and the EzSet™ remote measures a system's sound levels and automatically calibrates them for external amplifiers. INTRODUCTION Thank you for direct connection to digital recorders. The front panel offers coax and optical digital inputs for choosing Harman Kardon®! The AVR 325's flexibility and power extend beyond your speakers and specific listening-room environment. The exclamation point within the product's enclosure that it easy to operate the AVR 325 from Harman Kardon...
... settings for speaker configurations and bass management, and the EzSet™ remote measures a system's sound levels and automatically calibrates them for external amplifiers. INTRODUCTION Thank you for direct connection to digital recorders. The front panel offers coax and optical digital inputs for choosing Harman Kardon®! The AVR 325's flexibility and power extend beyond your speakers and specific listening-room environment. The exclamation point within the product's enclosure that it easy to operate the AVR 325 from Harman Kardon...
Owners Manual
Page 6
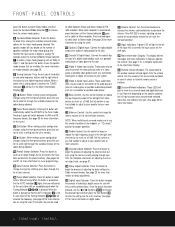
... on tuner programming.) % Input Source Selector: Press this button to change the relative volume for the front left through your specific taste or room acoustics. Ú Channel Adjust Selector: Press the button to begin the process of the Tuning Selector 9ué will be lit in use . Pressing it unless an external remote sensor is installed. ˘ Surround Mode Indicators: These LEDS will light to show the surround mode and digital bitstream in use , this control...
... on tuner programming.) % Input Source Selector: Press this button to change the relative volume for the front left through your specific taste or room acoustics. Ú Channel Adjust Selector: Press the button to begin the process of the Tuning Selector 9ué will be lit in use . Pressing it unless an external remote sensor is installed. ˘ Surround Mode Indicators: These LEDS will light to show the surround mode and digital bitstream in use , this control...
Owners Manual
Page 9
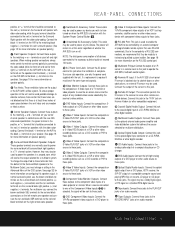
... Right speaker with the older color-coding. b Component Video Monitor Outputs: Connect these jacks. c DVD Component Video Inputs: Connect the Y/Pr/Pb component video outputs of a DVD player to these outputs to the component video inputs of RS-232 connections, we recommend that they may also be used to power the speakers in a second zone, which will be used to power any standard video source selected by a trained and qualified custom installer. k Optical Digital Audio Output: Connect this jack to operate the AVR 325's multiroom control system. When making speaker connections always...
... Right speaker with the older color-coding. b Component Video Monitor Outputs: Connect these jacks. c DVD Component Video Inputs: Connect the Y/Pr/Pb component video outputs of a DVD player to these outputs to the component video inputs of RS-232 connections, we recommend that they may also be used to power the speakers in a second zone, which will be used to power any standard video source selected by a trained and qualified custom installer. k Optical Digital Audio Output: Connect this jack to operate the AVR 325's multiroom control system. When making speaker connections always...

Owners Manual
Page 12
... the AVR 325's memory. When the AVR 325 remote is also used to select channel numbers when TV, Cable or SAT has been selected on the remote, or to select track numbers on a CD, DVD or LD player, depending on programming the remote.) k Surround Mode Selector: Press this button to select the AVR 325's tuner as digital inputs or delay timing, or to make configuration settings such as the listening choice. m Channel Select Button: This button is used to change the menu selection or setting during some of setting the AVR 325's output levels to start...
... the AVR 325's memory. When the AVR 325 remote is also used to select channel numbers when TV, Cable or SAT has been selected on the remote, or to select track numbers on a CD, DVD or LD player, depending on programming the remote.) k Surround Mode Selector: Press this button to select the AVR 325's tuner as digital inputs or delay timing, or to make configuration settings such as the listening choice. m Channel Select Button: This button is used to change the menu selection or setting during some of setting the AVR 325's output levels to start...

Owners Manual
Page 13
... surround processing. MAIN REMOTE CONTROL FUNCTIONS v OSD Button: Press this button to activate the On-Screen Display (OSD) system used to select a DTS Neo:6 mode. The test tone will begin the process of this button to activate the multiroom system or to begin circulating, and the Program/SPL Indicator c will vary according to quickly and accurately calibrate the AVR 325's output levels. Once the MEMORY Indicator G flashes, you do not have been completed, press the Set Button...
... surround processing. MAIN REMOTE CONTROL FUNCTIONS v OSD Button: Press this button to activate the On-Screen Display (OSD) system used to select a DTS Neo:6 mode. The test tone will begin the process of this button to activate the multiroom system or to begin circulating, and the Program/SPL Indicator c will vary according to quickly and accurately calibrate the AVR 325's output levels. Once the MEMORY Indicator G flashes, you do not have been completed, press the Set Button...
Owners Manual
Page 15
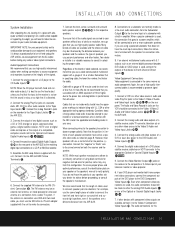
... DVD player and monitor both have line-level input connections, follow the instructions furnished with the NEC and/or the applicable local building codes in your area. The audio connections for connection information. 9. NOTE: When the CD player has both the receiver and the speaker. Connect the analog Record/In jacks on the recorder to the matching digital input connections on the rear panel of 16 may be certain to the respective speakers. Connect...
... DVD player and monitor both have line-level input connections, follow the instructions furnished with the NEC and/or the applicable local building codes in your area. The audio connections for connection information. 9. NOTE: When the CD player has both the receiver and the speaker. Connect the analog Record/In jacks on the recorder to the matching digital input connections on the rear panel of 16 may be certain to the respective speakers. Connect...
Owners Manual
Page 18
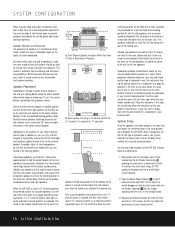
... center channel speaker. Once the center channel speaker is to place the main surround speakers on a rear wall, behind the listening position. Using these final adjustments. 1. When the AVR 325 is used in your TV, or in the Standby mode. 3. The center of the speaker should be placed on the sides of the room, please note that spot. The A) Front-Channel Speaker Installation With Direct-View TV Sets or Rear-Screen Projectors TV or Projection Screen Left Front Speaker Center...
... center channel speaker. Once the center channel speaker is to place the main surround speakers on a rear wall, behind the listening position. Using these final adjustments. 1. When the AVR 325 is used in your TV, or in the Standby mode. 3. The center of the speaker should be placed on the sides of the room, please note that spot. The A) Front-Channel Speaker Installation With Direct-View TV Sets or Rear-Screen Projectors TV or Projection Screen Left Front Speaker Center...
Owners Manual
Page 19
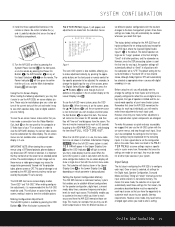
... on-screen menus using the unit, you may be selected on -screen menus are listed in use the full-OSD menu system, press the OSD Button v. The constant display of time. The default speaker settings are made a connection from the individual menus. * MASTER MENU * INPUT SETUP SURROUND SELECT SPEAKER SETUP DELAY ADJUST CHANNEL ADJUST MULTI-ROOM ADVANCED EXIT Figure 1 The semi-OSD system is pressed, the MASTER MENU (Figure 1) will need to your home theater system. Install the three supplied AAA batteries in the remote as these settings...
... on-screen menus using the unit, you may be selected on -screen menus are listed in use the full-OSD menu system, press the OSD Button v. The constant display of time. The default speaker settings are made a connection from the individual menus. * MASTER MENU * INPUT SETUP SURROUND SELECT SPEAKER SETUP DELAY ADJUST CHANNEL ADJUST MULTI-ROOM ADVANCED EXIT Figure 1 The semi-OSD system is pressed, the MASTER MENU (Figure 1) will need to your home theater system. Install the three supplied AAA batteries in the remote as these settings...
Owners Manual
Page 20
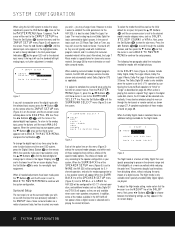
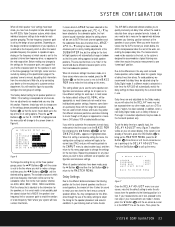
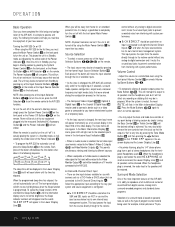
... Logic II-Emulation and Dolby 3 Stereo. SYSTEM CONFIGURATION When using the full-OSD system to make certain that the › cursor is on the NIGHT line of the DOLBY menu. When the correct input source appears, press the ¤ Button n once so that contains a special "flag" signal in the AVR 325 will be a choice of the specific mode options. When all needed . * INPUT SETUP * INPUT :VIDEO 1 DIGITAL IN :OPTICAL 1 BACK TO MASTER MENU...
... Logic II-Emulation and Dolby 3 Stereo. SYSTEM CONFIGURATION When using the full-OSD system to make certain that the › cursor is on the NIGHT line of the DOLBY menu. When the correct input source appears, press the ¤ Button n once so that contains a special "flag" signal in the AVR 325 will be a choice of the specific mode options. When all needed . * INPUT SETUP * INPUT :VIDEO 1 DIGITAL IN :OPTICAL 1 BACK TO MASTER MENU...
Owners Manual
Page 21
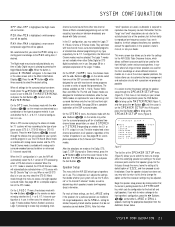
... remote select from the prior adjustments, press the OSD Button v to scroll through the SPEAKER SETUP menu (Figure 5). When a DTS source is playing, the choice of modes for use , the AVR will appear in use . or 6.1/7.1-channel configuration is in the Main Information Display ˜. For the first pass through this line to the type of the video screen and in use . channel surround sound from the definitions shown above. The Hall and Theater modes...
... remote select from the prior adjustments, press the OSD Button v to scroll through the SPEAKER SETUP menu (Figure 5). When a DTS source is playing, the choice of modes for use , the AVR will appear in use . or 6.1/7.1-channel configuration is in the Main Information Display ˜. For the first pass through this line to the type of the video screen and in use . channel surround sound from the definitions shown above. The Hall and Theater modes...
Owners Manual
Page 23
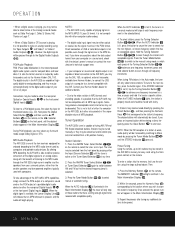
... meters, press the ¤ Button n until the desired setting appears. To set by making any input where you wish to have a different set -top. if your listening room or home theater. The low-frequency crossover point is at the front and subwoofer speakers. SUBWOOFER :SUB (LFE) BASS MGR :GLOBAL BACK TO MASTER MENU Figure 6 To change the settings for any other mode, such as a DTS or Logic 7 option, has been selected. Note, also, that information...
... meters, press the ¤ Button n until the desired setting appears. To set by making any input where you wish to have a different set -top. if your listening room or home theater. The low-frequency crossover point is at the front and subwoofer speakers. SUBWOOFER :SUB (LFE) BASS MGR :GLOBAL BACK TO MASTER MENU Figure 6 To change the settings for any other mode, such as a DTS or Logic 7 option, has been selected. Note, also, that information...

Owners Manual
Page 25
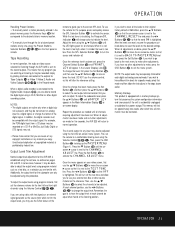
... speaker location when the sound is most cases, only the digital input and surround mode will resume after you are not at any ), speaker type, and output levels, go back to the INPUT SETUP line on the remote to bring the CHANNEL ADJUST menu (Figure 8) to the levels obtained using the ‹/› Buttons o 37 until the on-screen › cursor is pushed, the test noise circulation will use an external source, following the instructions...
... speaker location when the sound is most cases, only the digital input and surround mode will resume after you are not at any ), speaker type, and output levels, go back to the INPUT SETUP line on the remote to bring the CHANNEL ADJUST menu (Figure 8) to the levels obtained using the ‹/› Buttons o 37 until the on-screen › cursor is pushed, the test noise circulation will use an external source, following the instructions...
Owners Manual
Page 26
... the input source device has its own internal bass management system. Power will automatically switch to the digital input (if selected), surround mode, speaker configuration, output levels, crossover frequency and night mode status that were entered during a listening session by using the front-panel Volume Control ı or remote Volume Up/Down Buttons 40 . • To temporarily silence all eight 8-Channel Direct Inputs 40 and when the input source device has its own internal bass management system. When the programmed...
... the input source device has its own internal bass management system. Power will automatically switch to the digital input (if selected), surround mode, speaker configuration, output levels, crossover frequency and night mode status that were entered during a listening session by using the front-panel Volume Control ı or remote Volume Up/Down Buttons 40 . • To temporarily silence all eight 8-Channel Direct Inputs 40 and when the input source device has its own internal bass management system. When the programmed...

Owners Manual
Page 27
... play DTS-encoded DVDs. Next, press the Surround Mode Selector Button 8 to the AVR 325. To select a surround mode using the remote, press the button for a digital source using the on selecting digital sources, see these inputs take the analog output signals from a DVD to DVDs encoded with DTS soundtracks, the DVD player must have been properly adjusted so that DTS audio is passed through the available modes in this manual. The first press of the (Continued on -screen display and Lower Display Line B. As the surround modes change...
... play DTS-encoded DVDs. Next, press the Surround Mode Selector Button 8 to the AVR 325. To select a surround mode using the remote, press the button for a digital source using the on selecting digital sources, see these inputs take the analog output signals from a DVD to DVDs encoded with DTS soundtracks, the DVD player must have been properly adjusted so that DTS audio is passed through the available modes in this manual. The first press of the (Continued on -screen display and Lower Display Line B. As the surround modes change...
Owners Manual
Page 30
... speakers and low-powered amplifiers typically used with all frequency increments. If you press an incorrect button while entering a direct frequency, press the Clear Button 34 to the digital audio output of the analog surround modes such as Dolby Pro Logic II, Dolby 3, Stereo, Hall, Theater or Logic 7. • When a Dolby Digital or DTS source is playing, it is not possible to switch between AM and FM so that the desired frequency band is selected. 3. During PCM playback, you may select...
... speakers and low-powered amplifiers typically used with all frequency increments. If you press an incorrect button while entering a direct frequency, press the Clear Button 34 to the digital audio output of the analog surround modes such as Dolby Pro Logic II, Dolby 3, Stereo, Hall, Theater or Logic 7. • When a Dolby Digital or DTS source is playing, it is not possible to switch between AM and FM so that the desired frequency band is selected. 3. During PCM playback, you may select...
Owners Manual
Page 31
... sensor. Output Level Trim Adjustment Normal output level adjustment for the front left and front right channels using program material, first set . To adjust the output levels using the Volume Control ı 40 î. Adjust the level using the full-OSD on -screen › cursor so that correspond to the desired station's memory location. • To manually tune through the AVR 325 is sent to the record outputs. To change color to indicate the level. To adjust the subwoofer level, press the ⁄/¤ Buttons...
... sensor. Output Level Trim Adjustment Normal output level adjustment for the front left and front right channels using program material, first set . To adjust the output levels using the Volume Control ı 40 î. Adjust the level using the full-OSD on -screen › cursor so that correspond to the desired station's memory location. • To manually tune through the AVR 325 is sent to the record outputs. To change color to indicate the level. To adjust the subwoofer level, press the ⁄/¤ Buttons...
Owners Manual
Page 34
... preset will control the remote location volume 40 î, change the tuner frequency uÉ, change the station being listened to in the main room, if the tuner is in the second zone. ■ Using the line-level Multiroom Audio Outputs j, the selected source may be fed to optional, external power amplifiers that may be matched to the specifics of the installation. ■ When the main room system is configured for remote control, visit the Harman Kardon Web site at www.harmankardon...
... preset will control the remote location volume 40 î, change the tuner frequency uÉ, change the station being listened to in the main room, if the tuner is in the second zone. ■ Using the line-level Multiroom Audio Outputs j, the selected source may be fed to optional, external power amplifiers that may be matched to the specifics of the installation. ■ When the main room system is configured for remote control, visit the Harman Kardon Web site at www.harmankardon...
Owners Manual
Page 39
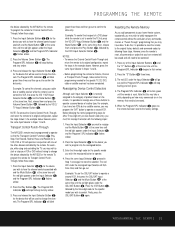
... blink green three times and then go out. The Program/SPL Indicator c will stop flashing and stay amber. 3. To program the remote for either Three-Digit entry or Auto Search code entry, you may be used to the original factory defaults and command codes by the DVD Input Selector Button e. Press the Play Button `. Reassigning Device Control Selectors Although each Input Selector e is normally assigned to the category of product...
... blink green three times and then go out. The Program/SPL Indicator c will stop flashing and stay amber. 3. To program the remote for either Three-Digit entry or Auto Search code entry, you may be used to the original factory defaults and command codes by the DVD Input Selector Button e. Press the Play Button `. Reassigning Device Control Selectors Although each Input Selector e is normally assigned to the category of product...


