

Owners Manual
Page 2
...an oval) indicates a button or indicator on the remote A - (letter in a square) indicates an indicator in the front panel display å - (letter in an oval) indicates a button on the Zone II remote 2 TABLE OF CONTENTS AVR 320 Audio/Video Receiver 3 Introduction 4 Safety Information 4... Unpacking 5 Front Panel Controls 8 Front Panel Information Display 10 Rear Panel Connections 12 Main Remote Control Functions 15 Zone II Remote Control Functions 16 Installation ...
...an oval) indicates a button or indicator on the remote A - (letter in a square) indicates an indicator in the front panel display å - (letter in an oval) indicates a button on the Zone II remote 2 TABLE OF CONTENTS AVR 320 Audio/Video Receiver 3 Introduction 4 Safety Information 4... Unpacking 5 Front Panel Controls 8 Front Panel Information Display 10 Rear Panel Connections 12 Main Remote Control Functions 15 Zone II Remote Control Functions 16 Installation ...

Owners Manual
Page 3
.... In addition to providing a wide range of the various controls will enable you expect from Harman Kardon. The AVR 320 includes a sophisticated multizone control system that it is easy to obtain the maximum enjoyment from a remote room, a separate "Zone II" remote is the perfect combination of the latest in digital audio technology, a quiet yet powerful analog...
.... In addition to providing a wide range of the various controls will enable you expect from Harman Kardon. The AVR 320 includes a sophisticated multizone control system that it is easy to obtain the maximum enjoyment from a remote room, a separate "Zone II" remote is the perfect combination of the latest in digital audio technology, a quiet yet powerful analog...
Owners Manual
Page 4
... or should remove the protective plastic film from the AC outlet. Safety Information Important Safety Information Verify Line Voltage Before Use Your AVR 320 has been designed for which the receiver is subject to radio communication. Wipe dry immediately with respect to proper grounding of the ... cable ground shall be determined by an authorized service depot with a clean, soft, dry cloth. At this product will void your remote control. Handle the AC Power Cord Gently When disconnecting the power cord from the AC outlet. Important Information for the User This equipment...
... or should remove the protective plastic film from the AC outlet. Safety Information Important Safety Information Verify Line Voltage Before Use Your AVR 320 has been designed for which the receiver is subject to radio communication. Wipe dry immediately with respect to proper grounding of the ... cable ground shall be determined by an authorized service depot with a clean, soft, dry cloth. At this product will void your remote control. Handle the AC Power Cord Gently When disconnecting the power cord from the AC outlet. Important Information for the User This equipment...
Owners Manual
Page 5
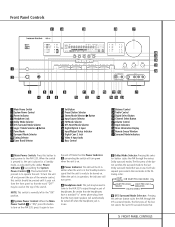
... out from the front panel so that was in use . When the switch is pressed in, the unit is in the Standby mode to the AVR 320's output through the DTS surround modes. Front Panel Controls ˘¯ ˜ ˆ ı Ù Û Ú Ò 1 2 3 57 9 !# % &( Ô 4 68 ) @ $ ^* ...this button to the last Dolby surround mode that the word "OFF" may be read at the top of the remote control, this selector button cycles the AVR through the various Dolby surround modes. The first press of the button switches the surround mode to turn the unit ...
... out from the front panel so that was in use . When the switch is pressed in, the unit is in the Standby mode to the AVR 320's output through the DTS surround modes. Front Panel Controls ˘¯ ˜ ˆ ı Ù Û Ú Ò 1 2 3 57 9 !# % &( Ô 4 68 ) @ $ ^* ...this button to the last Dolby surround mode that the word "OFF" may be read at the top of the remote control, this selector button cycles the AVR through the various Dolby surround modes. The first press of the button switches the surround mode to turn the unit ...
Owners Manual
Page 7
... that is currently the input source for the AVR 320. ˜ Main Information Display: This display delivers messages and status indications to help you operate the receiver. (See pages 8 & 9 for a complete explanation of the Information Display.) ¯ Remote Sensor Window: The sensor behind this area and... do not block or cover it unless an external remote sensor is installed. ˘ Surround Mode Indicators: A green LED will light in front of the...
... that is currently the input source for the AVR 320. ˜ Main Information Display: This display delivers messages and status indications to help you operate the receiver. (See pages 8 & 9 for a complete explanation of the Information Display.) ¯ Remote Sensor Window: The sensor behind this area and... do not block or cover it unless an external remote sensor is installed. ˘ Surround Mode Indicators: A green LED will light in front of the...

Owners Manual
Page 11
...Video jacks on your center channel speaker. j Video 3 Video Inputs: Connect these jacks. The signal may be connected to the inputs of whether the AVR 320 is the positive, or "+" terminal that should not exceed 100 watts. · AC Power Cord: Connect the AC plug to the matching + ...sensor in a remote room to the matching + and - i Video 2 Video Outputs: Connect these jacks to the RECORD/INPUT composite or S-Video jacks on Harman Kardon (or other video source. › Front Speaker Outputs: Connect these outputs to this jack. Connect the black (-) terminal on the AVR to the ...
...Video jacks on your center channel speaker. j Video 3 Video Inputs: Connect these jacks. The signal may be connected to the inputs of whether the AVR 320 is the positive, or "+" terminal that should not exceed 100 watts. · AC Power Cord: Connect the AC plug to the matching + ...sensor in a remote room to the matching + and - i Video 2 Video Outputs: Connect these jacks to the RECORD/INPUT composite or S-Video jacks on Harman Kardon (or other video source. › Front Speaker Outputs: Connect these outputs to this jack. Connect the black (-) terminal on the AVR to the ...

Owners Manual
Page 12
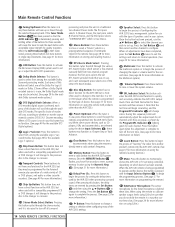
... x y z NOTE: The function names shown here are each but- ` ton's feature when used with the AVR 320. cb a 44 43 42 41 40 39 38 37 36 35 34 33 32 31 30 29 28 12 MAIN REMOTE CONTROL FUNCTIONS Most buttons have additional functions when used with other devices. See pages 42...-43 for a list of these functions. Main Remote Control Functions a Power Off Button b IR Transmitter Window c Program/SPL Indicator d Power On Button e Input Selectors f AVR Selector g AM/FM Tuner Select h 6-Channel/8-Channel Direct Input i Test Button j Sleep Button...
... x y z NOTE: The function names shown here are each but- ` ton's feature when used with the AVR 320. cb a 44 43 42 41 40 39 38 37 36 35 34 33 32 31 30 29 28 12 MAIN REMOTE CONTROL FUNCTIONS Most buttons have additional functions when used with other devices. See pages 42...-43 for a list of these functions. Main Remote Control Functions a Power Off Button b IR Transmitter Window c Program/SPL Indicator d Power On Button e Input Selectors f AVR Selector g AM/FM Tuner Select h 6-Channel/8-Channel Direct Input i Test Button j Sleep Button...

Owners Manual
Page 13
... memory and it controls the device selected. When the button is pressed so that it is shipped from a remote into the Standby mode. In addition, the AVR 320's remote is also used to operate the AVR 320 and most Harman Kardon CD or DVD players and cassette decks. h 6-Channel/8-Channel Direct Input: Press this button to select the...
... memory and it controls the device selected. When the button is pressed so that it is shipped from a remote into the Standby mode. In addition, the AVR 320's remote is also used to operate the AVR 320 and most Harman Kardon CD or DVD players and cassette decks. h 6-Channel/8-Channel Direct Input: Press this button to select the...
Owners Manual
Page 14
...no function. (See page 40 for the available DTS Digital options.) y Logic 7 Selector: Press this button to select from another product's remote into the AVR 320's remote. (See page 37 for setting the delay times used to turn off the test tone. (See page 24 for more information on EzSet.)...various DTS Neo:6 modes, which is a preprogrammed sequence of "learning" the codes from among the available Dolby Surround processing modes. When the AVR 320 remote is being controlled, depending on the Multiroom system.) 40 Volume Up/Down: Press these buttons to raise or lower the system volume. 41 ...
...no function. (See page 40 for the available DTS Digital options.) y Logic 7 Selector: Press this button to select from another product's remote into the AVR 320's remote. (See page 37 for setting the delay times used to turn off the test tone. (See page 24 for more information on EzSet.)...various DTS Neo:6 modes, which is a preprogrammed sequence of "learning" the codes from among the available Dolby Surround processing modes. When the AVR 320 remote is being controlled, depending on the Multiroom system.) 40 Volume Up/Down: Press these buttons to raise or lower the system volume. 41 ...

Owners Manual
Page 15
...Multiroom IR Input f, this button to select a specific input and turn on and off. tions of the AVR 320 or any compatible Harman Kardon products in the same room, or from a remote room with a sensor that is located, or it is off, press one of these buttons will change &#... the Multiroom system.) 15 ZONE II REMOTE CONTROL FUNCTIONS When it is selected as the AVR 320, it is used in a separate room via a sensor connected to control compatible Harman Kardon CD, DVD or cassette players. Zone II Remote Control Functions POWER MUTE A OFF AVR VID1 VID2 B AM/FM VID3 VID4...
...Multiroom IR Input f, this button to select a specific input and turn on and off. tions of the AVR 320 or any compatible Harman Kardon products in the same room, or from a remote room with a sensor that is located, or it is off, press one of these buttons will change &#... the Multiroom system.) 15 ZONE II REMOTE CONTROL FUNCTIONS When it is selected as the AVR 320, it is used in a separate room via a sensor connected to control compatible Harman Kardon CD, DVD or cassette players. Zone II Remote Control Functions POWER MUTE A OFF AVR VID1 VID2 B AM/FM VID3 VID4...

Owners Manual
Page 17
... Video Inputs c. This will receive power as long as power amplifiers. At the AVR 320, plug the audio interconnect cables into the Multiroom Output Jacks • on the AVR 320 and use the Zone II remote to the AVR 320 via standard coaxial cable. Connect the sensor's cable to the IR IN of the...but they are used with highcurrent draw equipment such as the unit is designed for this event, an optional remote sensor may not exceed 100 watts. They may be fully turned on Harman Kardon or other video source to each outlet may be assigned to the Video 4 input. (See page 20 ...
... Video Inputs c. This will receive power as long as power amplifiers. At the AVR 320, plug the audio interconnect cables into the Multiroom Output Jacks • on the AVR 320 and use the Zone II remote to the AVR 320 via standard coaxial cable. Connect the sensor's cable to the IR IN of the...but they are used with highcurrent draw equipment such as the unit is designed for this event, an optional remote sensor may not exceed 100 watts. They may be fully turned on Harman Kardon or other video source to each outlet may be assigned to the Video 4 input. (See page 20 ...

Owners Manual
Page 19
... supplied AAA batteries in the Main Information Display Y. Turn the AVR 320 on either by pressing the System Power Control 2 on the front panel, or via the remote by pressing the appropriate buttons on the front panel or remote. To view the on-screen menus, make it is also... Jack ¤ on the remote. When making configuration adjustments, it easy to see which you to establish different configurations for the speaker configuration, digital input, surround mode, delay times, crossover frequency and output levels for each source and have the AVR 320 memorize those settings. Note that...
... supplied AAA batteries in the Main Information Display Y. Turn the AVR 320 on either by pressing the System Power Control 2 on the front panel, or via the remote by pressing the appropriate buttons on the front panel or remote. To view the on-screen menus, make it is also... Jack ¤ on the remote. When making configuration adjustments, it easy to see which you to establish different configurations for the speaker configuration, digital input, surround mode, delay times, crossover frequency and output levels for each source and have the AVR 320 memorize those settings. Note that...
Owners Manual
Page 20
... entry in the front panel Input Indicators ˆ by the AVR 320 is only required when system components are fed from. To return to enter the menu and the IN/OUT SETUP menu (Figure 2) will be connected. An exclusive Harman Kardon feature is the ability to switch the front panel coaxial digital..., once they are changed . When using the discrete function buttons and the semi-OSD system, press the Digital Input Select Button Ûq on the remote while the IN/OUT SETUP menu (Figure 2) is now a record output. Press the ‹/› Buttons o 37 until the desired input name appears...
... entry in the front panel Input Indicators ˆ by the AVR 320 is only required when system components are fed from. To return to enter the menu and the IN/OUT SETUP menu (Figure 2) will be connected. An exclusive Harman Kardon feature is the ability to switch the front panel coaxial digital..., once they are changed . When using the discrete function buttons and the semi-OSD system, press the Digital Input Select Button Ûq on the remote while the IN/OUT SETUP menu (Figure 2) is now a record output. Press the ‹/› Buttons o 37 until the desired input name appears...

Owners Manual
Page 21
...the 6.1/7.1 mode is selected, the DTS-ES Discrete mode will not function. In either case, the selection of a Logic 7 mode enables Harman Kardon's exclusive Logic 7 processing to preserve the dynamic range and full intelligibility of any time that when the Dolby Digital mode is selected there are... modes are determined by a combination of the type of the video screen and in the AVR 320 will not appear unless a digital source is made with the ‹/› Buttons o 37 on the remote are available, and the output will light. When the 6.1/7.1 mode is highlighted, a more...
...the 6.1/7.1 mode is selected, the DTS-ES Discrete mode will not function. In either case, the selection of a Logic 7 mode enables Harman Kardon's exclusive Logic 7 processing to preserve the dynamic range and full intelligibility of any time that when the Dolby Digital mode is selected there are... modes are determined by a combination of the type of the video screen and in the AVR 320 will not appear unless a digital source is made with the ‹/› Buttons o 37 on the remote are available, and the output will light. When the 6.1/7.1 mode is highlighted, a more...
Owners Manual
Page 22
... your selection for the surround channels, press the ¤ Button n on the remote to move the cursor to the AVR 320, press the ‹/› Buttons o 37 on the remote so that menu is the "on the remote to move the cursor to the left and right speakers. After the selections are ... ‹/› Buttons o 37 on the menu screen to set to reproduce low-frequency sounds. System Configuration Speaker Setup This menu tells the AVR 320 which type of speakers are in your system based on the speaker definitions shown on the settings for the other speakers, particularly the front left...
... your selection for the surround channels, press the ¤ Button n on the remote to move the cursor to the AVR 320, press the ‹/› Buttons o 37 on the remote so that menu is the "on the remote to move the cursor to the left and right speakers. After the selections are ... ‹/› Buttons o 37 on the menu screen to set to reproduce low-frequency sounds. System Configuration Speaker Setup This menu tells the AVR 320 which type of speakers are in your system based on the speaker definitions shown on the settings for the other speakers, particularly the front left...
Owners Manual
Page 23
...front speakers have been set at twenty milliseconds. Thus, in your speakers' design. System Configuration • If a subwoofer is connected to the AVR 320, you have the option to have the front left/right "main" speakers reproduce bass frequencies at all speaker selections have been made previously for ...mode you are listening to, press the ‹/› Buttons o 37 on the remote to change the cursor to SUB XOVER FREQ. This allows you have the subwoofer operate only when the AVR 320 is figured as described below. Choose the option that subtraction. When all times, and...
...front speakers have been set at twenty milliseconds. Thus, in your speakers' design. System Configuration • If a subwoofer is connected to the AVR 320, you have the option to have the front left/right "main" speakers reproduce bass frequencies at all speaker selections have been made previously for ...mode you are listening to, press the ‹/› Buttons o 37 on the remote to change the cursor to SUB XOVER FREQ. This allows you have the subwoofer operate only when the AVR 320 is figured as described below. Choose the option that subtraction. When all times, and...

Owners Manual
Page 24
...SPL Indicator c will take a few things will happen simultaneously: • The channel position being adjusted will return to stop and the AVR 320 will flash in the surround channels. The tone will stop the adjustment. Press the ‹/› Buttons o 37 until the number ...in the speaker connections. While some assume that duplicates the way you will use during a typical listening session. Using EzSet Harman Kardon's exclusive EzSet remote makes it when the Program/SPL Indicator c stops flashing and and remains lit. Adjust the volume so that any surround-sound...
...SPL Indicator c will take a few things will happen simultaneously: • The channel position being adjusted will return to stop and the AVR 320 will flash in the surround channels. The tone will stop the adjustment. Press the ‹/› Buttons o 37 until the number ...in the speaker connections. While some assume that duplicates the way you will use during a typical listening session. Using EzSet Harman Kardon's exclusive EzSet remote makes it when the Program/SPL Indicator c stops flashing and and remains lit. Adjust the volume so that any surround-sound...

Owners Manual
Page 37
... place while the red light is on the unit that not only the Power control, but also most Harman Kardon CD changers, DVD players, CD players and cassette decks. Point the AVR 320 remote towards the unit to make note of codes from other hometheater equipment. Each press will send out a ... to control (e.g., VCR, TV) and the Mute button 43 at the same time. Try all of product to program into the AVR 320 remote. 3. Programming the Remote The AVR 320 remote is factory-programmed for the type of the functions on the unit you wish to confirm the entry. 5. At this manual or ...
... place while the red light is on the unit that not only the Power control, but also most Harman Kardon CD changers, DVD players, CD players and cassette decks. Point the AVR 320 remote towards the unit to make note of codes from other hometheater equipment. Each press will send out a ... to control (e.g., VCR, TV) and the Mute button 43 at the same time. Try all of product to program into the AVR 320 remote. 3. Programming the Remote The AVR 320 remote is factory-programmed for the type of the functions on the unit you wish to confirm the entry. 5. At this manual or ...

Owners Manual
Page 38
...which the individual button to erase the codes and also the Learn Button 42 . 2. Repeat Steps 1 through 7 for each button on the AVR 320's remote control. Press and hold both the Input Selector efg for the device within a single device's settings, follow these steps: 1. This may contain... the red LED under the Input Selector will flash amber. 2. Press and release the Input Selector efg again for which you wish to the AVR 320 remote, press the Learn Button 42 . 8. To erase other common tasks. Press any device during Step 5 or 6, the programming was not successful...
...which the individual button to erase the codes and also the Learn Button 42 . 2. Repeat Steps 1 through 7 for each button on the AVR 320's remote control. Press and hold both the Input Selector efg for the device within a single device's settings, follow these steps: 1. This may contain... the red LED under the Input Selector will flash amber. 2. Press and release the Input Selector efg again for which you wish to the AVR 320 remote, press the Learn Button 42 . 8. To erase other common tasks. Press any device during Step 5 or 6, the programming was not successful...

Owners Manual
Page 40
... depending on which system's volume control you wish to have attached for TV viewing, you may wish to have the AVR 320's volume activated, although the remote is pressed on the AVR 320 remote, the red light under the Input Selector e for the specific TV, CD, DVD, Cable or Satellite Receivers has ... then go out to confirm the data entry. Press the Input Selector Button e for the same product category. Programming the Remote Notes on Using the AVR 320 Remote With Other Devices. • Manufacturers may use different code sets for the device you wish to have the channel control associated...
... depending on which system's volume control you wish to have attached for TV viewing, you may wish to have the AVR 320's volume activated, although the remote is pressed on the AVR 320 remote, the red light under the Input Selector e for the specific TV, CD, DVD, Cable or Satellite Receivers has ... then go out to confirm the data entry. Press the Input Selector Button e for the same product category. Programming the Remote Notes on Using the AVR 320 Remote With Other Devices. • Manufacturers may use different code sets for the device you wish to have the channel control associated...


