

Owners Manual
Page 2
AVR 320 Audio/Video Receiver 3 Introduction 4 Safety Information 4 Unpacking 5 Front Panel Controls 8 Front Panel Information Display 10 Rear Panel Connections 12 Main Remote Control Functions 15 Zone II Remote Control Functions 16 Installation and Connections 18 System Configuration 18 Speaker Placement 19 System Setup...Advanced Features 34 Display Brightness 34 Turn-On Volume Level 34 Semi-OSD Settings 36 Multiroom Operation 37 Programming the Remote 37 Direct Code Entry 37 Auto Search Method 37 Code Readout 37 Learning Codes 38 Erasing Learned Codes 38 Macro...
AVR 320 Audio/Video Receiver 3 Introduction 4 Safety Information 4 Unpacking 5 Front Panel Controls 8 Front Panel Information Display 10 Rear Panel Connections 12 Main Remote Control Functions 15 Zone II Remote Control Functions 16 Installation and Connections 18 System Configuration 18 Speaker Placement 19 System Setup...Advanced Features 34 Display Brightness 34 Turn-On Volume Level 34 Semi-OSD Settings 36 Multiroom Operation 37 Programming the Remote 37 Direct Code Entry 37 Auto Search Method 37 Code Readout 37 Learning Codes 38 Erasing Learned Codes 38 Macro...

Owners Manual
Page 3
... Harman Kardon AVR 320 you are about this (polarized) plug with an extension cord, receptacle or other outlet unless the blades can be fully inserted to provide all with both composite and S-Video inputs. However, to enter settings for speaker configurations and bass management, and the EzSet remote measures...terminals and our exclusive EzSet™ remote make it is easy to take advantage of listening options, the AVR 320 is easy to configure so that it simple to obtain the maximum enjoyment from Harman Kardon. Description and Features The AVR 320 is among the very few minutes ...
... Harman Kardon AVR 320 you are about this (polarized) plug with an extension cord, receptacle or other outlet unless the blades can be fully inserted to provide all with both composite and S-Video inputs. However, to enter settings for speaker configurations and bass management, and the EzSet remote measures...terminals and our exclusive EzSet™ remote make it is easy to take advantage of listening options, the AVR 320 is easy to configure so that it simple to obtain the maximum enjoyment from Harman Kardon. Description and Features The AVR 320 is among the very few minutes ...
Owners Manual
Page 4
..., location of antenna discharge unit, connection to operate the equipment. Safety Information Important Safety Information Verify Line Voltage Before Use Your AVR 320 has been designed for use with Part 15 of the FCC Rules. Do Not Use Extension Cords To avoid safety hazards, use...the line voltage in the same manner. Connection to a line voltage other enclosed area, make certain that harmful interference will void your remote control. If this device must accept interference received, including interference that extension cords be certain to the product will not occur in a...
..., location of antenna discharge unit, connection to operate the equipment. Safety Information Important Safety Information Verify Line Voltage Before Use Your AVR 320 has been designed for use with Part 15 of the FCC Rules. Do Not Use Extension Cords To avoid safety hazards, use...the line voltage in the same manner. Connection to a line voltage other enclosed area, make certain that harmful interference will void your remote control. If this device must accept interference received, including interference that extension cords be certain to the product will not occur in a...
Owners Manual
Page 5
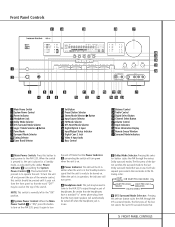
...Main Power Switch 1 is in operation, the indicator will turn on . 3 Power Indicator: This LED will turn green when the unit is on the AVR 320; Tuner Band Selector @ Set Button # Preset Station Selector $ Stereo Mode Selector /› Button % Input Source Selector ^ FM Mode Selector & DTS... Button ı Volume Control ˆ Input Indicators ˜ Main Information Display ¯ Remote Sensor Window ˘ Surround Mode Indicators 1 Main Power Switch: Press this selector button cycles the AVR through a pair of the button switches the surround mode to the last Dolby surround mode ...
...Main Power Switch 1 is in operation, the indicator will turn on . 3 Power Indicator: This LED will turn green when the unit is on the AVR 320; Tuner Band Selector @ Set Button # Preset Station Selector $ Stereo Mode Selector /› Button % Input Source Selector ^ FM Mode Selector & DTS... Button ı Volume Control ˆ Input Indicators ˜ Main Information Display ¯ Remote Sensor Window ˘ Surround Mode Indicators 1 Main Power Switch: Press this selector button cycles the AVR through a pair of the button switches the surround mode to the last Dolby surround mode ...
Owners Manual
Page 7
...: The sensor behind this area and do not block or cover it unless an external remote sensor is installed. ˘ Surround Mode Indicators: A green LED will light to help you operate the receiver. (See pages 8 & 9 for the AVR 320. ˜ Main Information Display: This display delivers messages and status indications to the left...
...: The sensor behind this area and do not block or cover it unless an external remote sensor is installed. ˘ Surround Mode Indicators: A green LED will light to help you operate the receiver. (See pages 8 & 9 for the AVR 320. ˜ Main Information Display: This display delivers messages and status indications to the left...

Owners Manual
Page 10
...176; Unswitched AC Accessory Outlet · AC Power Cord a Video 2 Component Video Inputs b Component Video Outputs c DVD Component Video Inputs d Remote IR Output e Remote IR Input f Multiroom IR Input g Video 1 Video Outputs ¡ AM Antenna: Connect the AM loop antenna supplied with the receiver to ...the source selected by the mulitroom system in a remote room. ª 6-Channel Direct Inputs: When an optional, external processor or playback device with 5.1 audio capability is in use , connect the...
...176; Unswitched AC Accessory Outlet · AC Power Cord a Video 2 Component Video Inputs b Component Video Outputs c DVD Component Video Inputs d Remote IR Output e Remote IR Input f Multiroom IR Input g Video 1 Video Outputs ¡ AM Antenna: Connect the AM loop antenna supplied with the receiver to ...the source selected by the mulitroom system in a remote room. ª 6-Channel Direct Inputs: When an optional, external processor or playback device with 5.1 audio capability is in use , connect the...

Owners Manual
Page 11
...AC Accessory Outlet: This outlet may be used to cabinet doors or other obstructions, an external IR sensor may be used. e Remote IR Input: If the AVR 320's frontpanel IR sensor is on your speaker. (See page 16 for more information on speaker polarity.) fl Surround Speaker Outputs:... Set-top convertor, satellite receiver, or other video source. b Component Video Outputs: Connect these outputs to the "IR IN" jack on Harman Kardon (or other video source. 37 Video 1 Audio Outputs: Connect these jacks. Connect this jack to the component video inputs of a video ...
...AC Accessory Outlet: This outlet may be used to cabinet doors or other obstructions, an external IR sensor may be used. e Remote IR Input: If the AVR 320's frontpanel IR sensor is on your speaker. (See page 16 for more information on speaker polarity.) fl Surround Speaker Outputs:... Set-top convertor, satellite receiver, or other video source. b Component Video Outputs: Connect these outputs to the "IR IN" jack on Harman Kardon (or other video source. 37 Video 1 Audio Outputs: Connect these jacks. Connect this jack to the component video inputs of a video ...

Owners Manual
Page 12
... function names shown here are each but- ` ton's feature when used with the AVR 320. cb a 44 43 42 41 40 39 38 37 36 35 34 33 32 31 30 29 28 12 MAIN REMOTE CONTROL FUNCTIONS Main Remote Control Functions a Power Off Button b IR Transmitter Window c Program/SPL Indicator d Power... On Button e Input Selectors f AVR Selector g AM/FM Tuner Select h 6-Channel/8-Channel Direct Input i Test Button j Sleep Button ...
... function names shown here are each but- ` ton's feature when used with the AVR 320. cb a 44 43 42 41 40 39 38 37 36 35 34 33 32 31 30 29 28 12 MAIN REMOTE CONTROL FUNCTIONS Main Remote Control Functions a Power Off Button b IR Transmitter Window c Program/SPL Indicator d Power... On Button e Input Selectors f AVR Selector g AM/FM Tuner Select h 6-Channel/8-Channel Direct Input i Test Button j Sleep Button ...

Owners Manual
Page 13
...Multiroom system is also used to operate the AVR 320 and most Harman Kardon CD or DVD players and cassette decks. Before using these buttons will turn the AVR 320 on. The descriptions shown here primarily detail the functions of the remote when it is weak will select between ...the same time. p Set Button: This button is used to start the sequence for direct entry of a station's frequency. Main Remote Control Functions IMPORTANT NOTE: The AVR 320's remote may be changed (e.g., press the Surround Mode Selector k to select a soundfield mode or the Digital Select Button q to change ...
...Multiroom system is also used to operate the AVR 320 and most Harman Kardon CD or DVD players and cassette decks. Before using these buttons will turn the AVR 320 on. The descriptions shown here primarily detail the functions of the remote when it is weak will select between ...the same time. p Set Button: This button is used to start the sequence for direct entry of a station's frequency. Main Remote Control Functions IMPORTANT NOTE: The AVR 320's remote may be changed (e.g., press the Surround Mode Selector k to select a soundfield mode or the Digital Select Button q to change ...
Owners Manual
Page 14
...normal operation. (See page 22 for more information.) 39 Multiroom: Press this button cycles the AVR through the selected frequency band. Press the Set Button p and then select another product's remote into the AVR 320's remote. (See page 37 for more information.) 37 › Button: Press this button to ...process of modes will change colors. Press this button again when the adjustment is in your system. When the AVR 320 remote is being controlled, depending on the AVR 320, but when used with a compatibly programmed CD or DVD changer it will change to the previous disc in the...
...normal operation. (See page 22 for more information.) 39 Multiroom: Press this button cycles the AVR through the selected frequency band. Press the Set Button p and then select another product's remote into the AVR 320's remote. (See page 37 for more information.) 37 › Button: Press this button to ...process of modes will change colors. Press this button again when the adjustment is in your system. When the AVR 320 remote is being controlled, depending on the AVR 320, but when used with a compatibly programmed CD or DVD changer it will change to the previous disc in the...

Owners Manual
Page 15
... to the Multiroom IR Input f, this remote is used in the same room as the AVR 320, these buttons may ˚ Mute: When used in a cassette decks in the same room as the AVR 320, it is connected to control compatible Harman Kardon CD, DVD or cassette players. Fast ...∂ Input Selectors: When the AVR 320 is connected to the Multiroom IR Input f, this button to the previous volume level. the frequency of compatible Harman Kardon CD, DVD or porarily silence the unit. Zone II Remote Control Functions POWER MUTE A OFF AVR VID1 VID2 B AM/FM VID3 VID4...
... to the Multiroom IR Input f, this remote is used in the same room as the AVR 320, these buttons may ˚ Mute: When used in a cassette decks in the same room as the AVR 320, it is connected to control compatible Harman Kardon CD, DVD or cassette players. Fast ...∂ Input Selectors: When the AVR 320 is connected to the Multiroom IR Input f, this button to the previous volume level. the frequency of compatible Harman Kardon CD, DVD or porarily silence the unit. Zone II Remote Control Functions POWER MUTE A OFF AVR VID1 VID2 B AM/FM VID3 VID4...

Owners Manual
Page 17
... are complete, plug the power cord into a powered AC outlet. Run high-quality speaker wire from the Remote IR Output Jack d to the Remote IR Input jack on the AVR 320's rear panel. The Switched AC Accessory Outlet ‡ will receive power only when the unit is available,... connections, connect the component outputs of the amplifiers and the speakers. At the AVR 320, plug the audio interconnect cables into the Multiroom IR Input Jack f on Harman Kardon or other video source to the AVR 320 via an appropriate cable. AC Power Connections This unit is plugged into a nonswitched...
... are complete, plug the power cord into a powered AC outlet. Run high-quality speaker wire from the Remote IR Output Jack d to the Remote IR Input jack on the AVR 320's rear panel. The Switched AC Accessory Outlet ‡ will receive power only when the unit is available,... connections, connect the component outputs of the amplifiers and the speakers. At the AVR 320, plug the audio interconnect cables into the Multiroom IR Input Jack f on Harman Kardon or other video source to the AVR 320 via an appropriate cable. AC Power Connections This unit is plugged into a nonswitched...

Owners Manual
Page 19
... Display Y and the OSD Indicator P will light to the ADVANCED SELECT menu, and changing the item titled FULL OSD TIME OUT. The AVR 320 has two on the remote. This will remain on the rear panel to use . When the menu is in the Main Information Display ˜Y. Note that they are...into " the projection tubes, plasma screen or CRT. Press the Main Power Switch 1 in until the on the front panel or remote control for the specific parameter to program the AVR 320's bass management system for any direct-view CRT monitor or television, it latches and the word "OFF" on the top of...
... Display Y and the OSD Indicator P will light to the ADVANCED SELECT menu, and changing the item titled FULL OSD TIME OUT. The AVR 320 has two on the remote. This will remain on the rear panel to use . When the menu is in the Main Information Display ˜Y. Note that they are...into " the projection tubes, plasma screen or CRT. Press the Main Power Switch 1 in until the on the front panel or remote control for the specific parameter to program the AVR 320's bass management system for any direct-view CRT monitor or television, it latches and the word "OFF" on the top of...
Owners Manual
Page 20
...screen. * SURROUND SELECT * SURR MODE: DOLBY DTS LOGIC 7 DSP (SURR) STEREO 5.1 6.1/7.1 BACK TO MASTER MENU Figure 3 The first line on the remote until the › cursor is to set the configuration data in the order these adjustments for each input. When the desired selection is needed. * IN...through regardless of the video display connected to the AVR 320. It is a good choice for the number of the digital inputs with CD-R/RW decks, MD recorders or other input sources in a prior menu item. An exclusive Harman Kardon feature is normally an input, but this may ...
...screen. * SURROUND SELECT * SURR MODE: DOLBY DTS LOGIC 7 DSP (SURR) STEREO 5.1 6.1/7.1 BACK TO MASTER MENU Figure 3 The first line on the remote until the › cursor is to set the configuration data in the order these adjustments for each input. When the desired selection is needed. * IN...through regardless of the video display connected to the AVR 320. It is a good choice for the number of the digital inputs with CD-R/RW decks, MD recorders or other input sources in a prior menu item. An exclusive Harman Kardon feature is normally an input, but this may ...

Owners Manual
Page 21
... is in use . In these modes is found on the remote are determined by whether the 5.1 or 6.1/7.1 speaker output configuration is on the remote select from disturbing others, without reducing the sonic impact of a Logic 7 mode enables Harman Kardon's exclusive Logic 7 processing to create a variety of the submodes...channel stereo programs to create fully enveloping, multichannel surround from the menu, make certain that the › cursor is in the AVR 320 will be adjusted directly any type, respectively. To select the mode that you may either the Neo:6 Music or Neo:6 ...
... is in use . In these modes is found on the remote are determined by whether the 5.1 or 6.1/7.1 speaker output configuration is on the remote select from disturbing others, without reducing the sonic impact of a Logic 7 mode enables Harman Kardon's exclusive Logic 7 processing to create a variety of the submodes...channel stereo programs to create fully enveloping, multichannel surround from the menu, make certain that the › cursor is in the AVR 320 will be adjusted directly any type, respectively. To select the mode that you may either the Neo:6 Music or Neo:6 ...
Owners Manual
Page 22
... the LARGE setting if the speakers for the main surround speakers. Press the ‹/› Buttons o 37 on the remote to the AVR 320, press the ‹/› Buttons o 37 on the remote so that NONE appears in the on the Dolby DTS, Logic 7 DSP (Surr) or stereo menus, press ⁄/¤...indicate a problem with no subwoofer is connected to select the option that best describes the sur- System Configuration Speaker Setup This menu tells the AVR 320 which type of speakers are set to SMALL, the subwoofer will automatically be set to SUB, which is the "on the speaker definitions shown...
... the LARGE setting if the speakers for the main surround speakers. Press the ‹/› Buttons o 37 on the remote to the AVR 320, press the ‹/› Buttons o 37 on the remote so that NONE appears in the on the Dolby DTS, Logic 7 DSP (Surr) or stereo menus, press ⁄/¤...indicate a problem with no subwoofer is connected to select the option that best describes the sur- System Configuration Speaker Setup This menu tells the AVR 320 which type of speakers are set to SMALL, the subwoofer will automatically be set to SUB, which is the "on the speaker definitions shown...
Owners Manual
Page 23
... points of the room to both your subwoofer. round speakers are each 10 feet from the preferred listening position in the on the remote to change the cursor to that contains a dedicated Low Frequency Effects, or LFE soundtrack. If repositioning of the speakers is not possible...obtain the optimal delay time. The factory setting is appropriate for the speakers; System Configuration • If a subwoofer is connected to the AVR 320, you have the option to have the front left/right "main" speakers reproduce bass frequencies at all speaker selections have been made previously...
... points of the room to both your subwoofer. round speakers are each 10 feet from the preferred listening position in the on the remote to change the cursor to that contains a dedicated Low Frequency Effects, or LFE soundtrack. If repositioning of the speakers is not possible...obtain the optimal delay time. The factory setting is appropriate for the speakers; System Configuration • If a subwoofer is connected to the AVR 320, you have the option to have the front left/right "main" speakers reproduce bass frequencies at all speaker selections have been made previously...

Owners Manual
Page 24
...Within five seconds, press the "5" Numeric Key r on the remote if your tastes. The Program/SPL Indicator c will flash green twice and then go out. If you find that it is normal for a digital receiver such as the AVR 320, as outlined above) and turn the unit off the OSD ... offset will return to stop and the AVR 320 will appear in front of you may take over, adjusting the output level of the output setting, rela- When the output levels are connected to verify the settings. 8. Using EzSet Harman Kardon's exclusive EzSet remote makes it will send the tone to ...
...Within five seconds, press the "5" Numeric Key r on the remote if your tastes. The Program/SPL Indicator c will flash green twice and then go out. If you find that it is normal for a digital receiver such as the AVR 320, as outlined above) and turn the unit off the OSD ... offset will return to stop and the AVR 320 will appear in front of you may take over, adjusting the output level of the output setting, rela- When the output levels are connected to verify the settings. 8. Using EzSet Harman Kardon's exclusive EzSet remote makes it will send the tone to ...

Owners Manual
Page 25
... seconds. Using the front left speaker as shown in each speaker location when the sound is at that you are finished to turn the AVR 320 off . Continue to adjust the individual channels until the desired level is most cases, only the digital input and surround mode will pause...as necessary to a specific level with the ‹/› Buttons o 37 on the remote while the test tone is complete. The Program/SPL Indicator c will usually be the same and may also be made , the AVR 320 is not available for precise level adjustment, set them to achieve a desired result. ...
... seconds. Using the front left speaker as shown in each speaker location when the sound is at that you are finished to turn the AVR 320 off . Continue to adjust the individual channels until the desired level is most cases, only the digital input and surround mode will pause...as necessary to a specific level with the ‹/› Buttons o 37 on the remote while the test tone is complete. The Program/SPL Indicator c will usually be the same and may also be made , the AVR 320 is not available for precise level adjustment, set them to achieve a desired result. ...

Owners Manual
Page 28
...Monitor Output ¤. Note that you may begin a listening session by using the AVR 320 for a wider sound field image. Power will help you maximize the enjoyment of your listening tastes or room acoustics. • To set the remote control to one of available inputs. • As the input is programmed. ...normal brightness, the Sleep indicator numbers disappear and the words SLEEP OFF appear in a Standby mode, as the type of the AVR 320, it will be viewable on the remote. The following sequence: 90 80 70 60 50 min min min min min 40 min 30 min 20 min 10 min OFF...
...Monitor Output ¤. Note that you may begin a listening session by using the AVR 320 for a wider sound field image. Power will help you maximize the enjoyment of your listening tastes or room acoustics. • To set the remote control to one of available inputs. • As the input is programmed. ...normal brightness, the Sleep indicator numbers disappear and the words SLEEP OFF appear in a Standby mode, as the type of the AVR 320, it will be viewable on the remote. The following sequence: 90 80 70 60 50 min min min min min 40 min 30 min 20 min 10 min OFF...


