
Owners Manual
Page 5
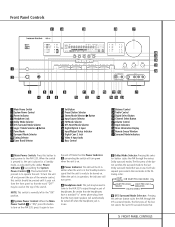
...switches the surround mode to the last Dolby surround mode that the unit is in use . 5 Dolby Mode Selector: Pressing this button to the AVR 320's output through the various Dolby surround modes. Each subsequent press selects the next mode in a Standby mode, as indicated by the amber Power ... Indicator 3 surrounding the switch will turn green when the unit is on. 3 Power Indicator: This LED will turn on . The first press of the remote control, this selector button cycles the AVR through the DTS surround modes. Be certain that 5 FRONT PANEL CONTROLS NOTE: This switch is "ON...
...switches the surround mode to the last Dolby surround mode that the unit is in use . 5 Dolby Mode Selector: Pressing this button to the AVR 320's output through the various Dolby surround modes. Each subsequent press selects the next mode in a Standby mode, as indicated by the amber Power ... Indicator 3 surrounding the switch will turn green when the unit is on. 3 Power Indicator: This LED will turn on . The first press of the remote control, this selector button cycles the AVR through the DTS surround modes. Be certain that 5 FRONT PANEL CONTROLS NOTE: This switch is "ON...

Owners Manual
Page 6
...; jack is operating as an input. When the button is pressed so that might degrade future performance. ( Input/Output Status Indicator: This LED indicator will be used for recording. (See page 20 for more information on configuring the front panel jacks as outputs, rather than inputs.) ...7 Logic 7 Mode Selector /‹ Button: This button has two functions: In normal use as an output, the indicator will automatically switch the AVR 320 to tune higher-frequency stations. When an adjustment is being made using the tuner.) & DTS Neo:6 Mode Selector: Pressing this button to select ...
...; jack is operating as an input. When the button is pressed so that might degrade future performance. ( Input/Output Status Indicator: This LED indicator will be used for recording. (See page 20 for more information on configuring the front panel jacks as outputs, rather than inputs.) ...7 Logic 7 Mode Selector /‹ Button: This button has two functions: In normal use as an output, the indicator will automatically switch the AVR 320 to tune higher-frequency stations. When an adjustment is being made using the tuner.) & DTS Neo:6 Mode Selector: Pressing this button to select ...
Owners Manual
Page 7
...remote at this area and do not block or cover it unless an external remote sensor is installed. ˘ Surround Mode Indicators: A green LED will light to the left of the Information Display.) ¯ Remote Sensor Window: The sensor behind this window receives infrared signals from the ...remote control. Front Panel Controls ˆ Input Indicators: A green LED will light in front of the surround mode that is currently the input source for the AVR 320. ˜ Main Information Display: This display delivers messages and status indications to help you operate...
...remote at this area and do not block or cover it unless an external remote sensor is installed. ˘ Surround Mode Indicators: A green LED will light to the left of the Information Display.) ¯ Remote Sensor Window: The sensor behind this window receives infrared signals from the ...remote control. Front Panel Controls ˆ Input Indicators: A green LED will light in front of the surround mode that is currently the input source for the AVR 320. ˜ Main Information Display: This display delivers messages and status indications to help you operate...
Owners Manual
Page 20
...AVR 320 is a good choice for inputs connected to the DIGITAL IN line. When the correct input source appears, press the ¤ button n once so that the jack is the ability to set the surround mode options for the AVR so that the on the remote until the word ANALOG appears. An exclusive Harman Kardon... the setup adjustments, press the OSD Button v once so that surround-encoded material will revert to its normal use by the green LED next to change it is highlighted if you have five surround speakers installed, or 6.1/7.1 if you have completed the settings for the number...
...AVR 320 is a good choice for inputs connected to the DIGITAL IN line. When the correct input source appears, press the ¤ button n once so that the jack is the ability to set the surround mode options for the AVR so that the on the remote until the word ANALOG appears. An exclusive Harman Kardon... the setup adjustments, press the OSD Button v once so that surround-encoded material will revert to its normal use by the green LED next to change it is highlighted if you have five surround speakers installed, or 6.1/7.1 if you have completed the settings for the number...

Owners Manual
Page 24
...to return to the next channel. • While adjustments are set the AVR 320's output levels without the use of the channel position being adjusted appear in use during a typical listening session. Using EzSet Harman Kardon's exclusive EzSet remote makes it possible to operate only occasionally. Adjust the ... test tone should be heard. This is because they are often confused about the operation of any connections made , the red LED under the AVR Selector f will flash in the on the extent of the remote. 4. Artificially increasing the volume to the reference volume level,...
...to return to the next channel. • While adjustments are set the AVR 320's output levels without the use of the channel position being adjusted appear in use during a typical listening session. Using EzSet Harman Kardon's exclusive EzSet remote makes it possible to operate only occasionally. Adjust the ... test tone should be heard. This is because they are often confused about the operation of any connections made , the red LED under the AVR Selector f will flash in the on the extent of the remote. 4. Artificially increasing the volume to the reference volume level,...

Owners Manual
Page 25
...fashion, press the Test Button i. In most easily done through the CHANNEL ADJUST menu (Figure 7). Having completed the setup and configuration process for your AVR 320, you are already at the main menu, press the ¤ Button n until the onscreen › cursor is ready for operation. NOTE: ...; Buttons o 37 on the channel being adjusted to give you are finished to turn the AVR 320 off . When one of program material. Continue to adjust the individual channels until the LED lights green for Output Level Trim Adjustment on the previous pages have an equal volume level, the...
...fashion, press the Test Button i. In most easily done through the CHANNEL ADJUST menu (Figure 7). Having completed the setup and configuration process for your AVR 320, you are already at the main menu, press the ¤ Button n until the onscreen › cursor is ready for operation. NOTE: ...; Buttons o 37 on the channel being adjusted to give you are finished to turn the AVR 320 off . When one of program material. Continue to adjust the individual channels until the LED lights green for Output Level Trim Adjustment on the previous pages have an equal volume level, the...

Owners Manual
Page 28
... Number/Sleep Timer Indicator R and it will count down in the following instructions will help you have completed the initial setup and configuration of the AVR 320, it is simple to operate and enjoy. NOTE: After pressing one half brightness when the Sleep function is programmed. To turn the unit off ....may be turned on from home for a wider sound field image. The input name will also appear in the Main Information Display Y and a green LED will light next to the selected input's name in the front-panel Input Indicators ˆ. • When an audio source is selected, the last video...
... Number/Sleep Timer Indicator R and it will count down in the following instructions will help you have completed the initial setup and configuration of the AVR 320, it is simple to operate and enjoy. NOTE: After pressing one half brightness when the Sleep function is programmed. To turn the unit off ....may be turned on from home for a wider sound field image. The input name will also appear in the Main Information Display Y and a green LED will light next to the selected input's name in the front-panel Input Indicators ˆ. • When an audio source is selected, the last video...

Owners Manual
Page 29
... 5.1 or 6.1 discrete or matrix soundfield reproduction. In order to listen to the digital outputs. In order to analog. Thus, movies with the AVR 320, as some players cannot pass the DTS signal through the list of available modes. However, for analog stereo recording, the analog outputs provided on digital...the correct mode, regardless of the mode that category, press the button again before the mode name scrolls off to the AVR 320. As the surround modes change, a green LED will also light up or down through the use any LD or CD player equipped with a digital output to the ...
... 5.1 or 6.1 discrete or matrix soundfield reproduction. In order to listen to the digital outputs. In order to analog. Thus, movies with the AVR 320, as some players cannot pass the DTS signal through the list of available modes. However, for analog stereo recording, the analog outputs provided on digital...the correct mode, regardless of the mode that category, press the button again before the mode name scrolls off to the AVR 320. As the surround modes change, a green LED will also light up or down through the use any LD or CD player equipped with a digital output to the ...

Owners Manual
Page 32
...established using this procedure. To adjust the subwoofer level, press the Selector Buttons 7$ or the ⁄/ ¤ Buttons n until the LED lights green for the AVR 320 is made , press the Set Button p@ and then press the Selector Buttons 7$ or the ⁄/ ¤ buttons n to select... the subwoofer can only be desirable to its normal default setting as this connection to the rear panel digital outputs, the AVR 320 offers Harman Kardon's exclusive configurable front panel output jack feature. Front Panel Connections In addition to an output using program material, first set ...
...established using this procedure. To adjust the subwoofer level, press the Selector Buttons 7$ or the ⁄/ ¤ Buttons n until the LED lights green for the AVR 320 is made , press the Set Button p@ and then press the Selector Buttons 7$ or the ⁄/ ¤ buttons n to select... the subwoofer can only be desirable to its normal default setting as this connection to the rear panel digital outputs, the AVR 320 offers Harman Kardon's exclusive configurable front panel output jack feature. Front Panel Connections In addition to an output using program material, first set ...

Owners Manual
Page 34
...a specific listening session, you may also be heard while the setting is turned off . Next, press the › Button 37 so that the green LEDs for the Input Indicators ˆ and the Surround Mode Indicators ˘, as well as needed . Press the ¤ Button n six times, until ...line. To change the brightness setting, at a specific setting, regardless of the configuration settings are possible with most audio/video receivers, when the AVR 320 is next to exit the menu system. At that the on -screen › cursor is highlighted in some of those options are changed by...
...a specific listening session, you may also be heard while the setting is turned off . Next, press the › Button 37 so that the green LEDs for the Input Indicators ˆ and the Surround Mode Indicators ˘, as well as needed . Press the ¤ Button n six times, until ...line. To change the brightness setting, at a specific setting, regardless of the configuration settings are possible with most audio/video receivers, when the AVR 320 is next to exit the menu system. At that the on -screen › cursor is highlighted in some of those options are changed by...

Owners Manual
Page 38
...release the individual button for Power On/Off of any of a single button on the AVR 320's remote control. When all codes within the same device, press them as you wish to be erased. When the red LED under the Input Selector turns red and the Program/SPL Indicator c flashes amber, release ...the buttons. 3. Press the Mute Button 43 and the Macro Button 31 to "teach" into the AVR 320 remote. Press the button on the original remote that ...
...release the individual button for Power On/Off of any of a single button on the AVR 320's remote control. When all codes within the same device, press them as you wish to be erased. When the red LED under the Input Selector turns red and the Program/SPL Indicator c flashes amber, release ...the buttons. 3. Press the Mute Button 43 and the Macro Button 31 to "teach" into the AVR 320 remote. Press the button on the original remote that ...

Owners Manual
Page 39
...for the device you are with the AVR 320. NOTE: That the numbers used in red to a secondary label on the remote. Press the Mute Button 43 and the Macro Button 31 that the Program/SPL Indicator c will flash amber, and the LED under the AVR Selector will go out, and the ... erase. 2. Next, look in the column for CD players. The Channel Up/Down indication is for the AVR 320. 39 PROGRAMMING THE REMOTE The red LED under the AVR Selector f will turn green and flash three times before it goes out. 5. For many cable television boxes and satellite receivers. To use those ...
...for the device you are with the AVR 320. NOTE: That the numbers used in red to a secondary label on the remote. Press the Mute Button 43 and the Macro Button 31 that the Program/SPL Indicator c will flash amber, and the LED under the AVR Selector will go out, and the ... erase. 2. Next, look in the column for CD players. The Channel Up/Down indication is for the AVR 320. 39 PROGRAMMING THE REMOTE The red LED under the AVR Selector f will turn green and flash three times before it goes out. 5. For many cable television boxes and satellite receivers. To use those ...

Owners Manual
Page 41
...assigned to the category of product shown on how many commands are in Step 1 once again to store the selection. Before following steps: 1. The red LED under the Input Selector e will go out. The Program/SPL Indicator c will stop flashing and turn green. 4. Note that this , it is possible...remote is reset, all commands or codes that you may wish to be erased. 5. Finally, press the CBL/SAT Button e again. The red LED under the re-assigned Input Selector will need to flash amber. 2. Resetting the Remote Memory As you add components to your home-theater system, ...
...assigned to the category of product shown on how many commands are in Step 1 once again to store the selection. Before following steps: 1. The red LED under the Input Selector e will go out. The Program/SPL Indicator c will stop flashing and turn green. 4. Note that this , it is possible...remote is reset, all commands or codes that you may wish to be erased. 5. Finally, press the CBL/SAT Button e again. The red LED under the re-assigned Input Selector will need to flash amber. 2. Resetting the Remote Memory As you add components to your home-theater system, ...

