
Product Information
Page 5
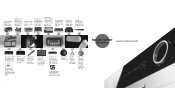
... anniversary. Current events. Our CDR 2 leads the way for easy setup. EzSet/EQ™ and EzSet+® technologies revolutionize system setup and calibration. Festival D1000, the world's very first high-fidelity receiver. Our AVR 7000 is the world's first in solid-state products - Harman Kardon celebrates its initial product, an FM tuner. Another first. the...
... anniversary. Current events. Our CDR 2 leads the way for easy setup. EzSet/EQ™ and EzSet+® technologies revolutionize system setup and calibration. Festival D1000, the world's very first high-fidelity receiver. Our AVR 7000 is the world's first in solid-state products - Harman Kardon celebrates its initial product, an FM tuner. Another first. the...
Product Information
Page 8
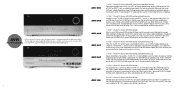
... multiroom capability with full audio processing and EzSet/EQ technology; And the sound? The AVR 146's sonic quality and sophisticated features make system setup and operation easier than ever. Our EzSet/EQ II system, 7.2-channel output, TC 30...Harman Kardon audio, with the clarity possible only with the best sound. 5 x 30W 5.1-Channel A/V Receiver With HDMI Switching Affordably priced, but high in the house. 7 x 50W 7.1-Channel A/V Receiver With HDMI Switching and Audio/Video Processing Upscale video without skipping a beat. 14 AVR 745 AVR 645 AVR 445 AVR 347 AVR 247 AVR 147 AVR...
... multiroom capability with full audio processing and EzSet/EQ technology; And the sound? The AVR 146's sonic quality and sophisticated features make system setup and operation easier than ever. Our EzSet/EQ II system, 7.2-channel output, TC 30...Harman Kardon audio, with the clarity possible only with the best sound. 5 x 30W 5.1-Channel A/V Receiver With HDMI Switching Affordably priced, but high in the house. 7 x 50W 7.1-Channel A/V Receiver With HDMI Switching and Audio/Video Processing Upscale video without skipping a beat. 14 AVR 745 AVR 645 AVR 445 AVR 347 AVR 247 AVR 147 AVR...
Owners Manual
Page 5
...Five - Program Sources Into the Remote 29 Step Nine - Install a Multiroom System 30 Step Eleven - Turn On the AVR 247 31 INITIAL SETUP 31 Using the On-Screen Menu System 32 Configure the AVR 247 Using EzSet/EQ 33 What EzSet/EQ Does 34 Configure Sources 37 OPERATION 37 Turning On the... AVR 247 37 Sleep Timer 37 Volume Control 37 Mute Function 38 Tone Controls 38 Headphones 38 Source Selection 39 ...
...Five - Program Sources Into the Remote 29 Step Nine - Install a Multiroom System 30 Step Eleven - Turn On the AVR 247 31 INITIAL SETUP 31 Using the On-Screen Menu System 32 Configure the AVR 247 Using EzSet/EQ 33 What EzSet/EQ Does 34 Configure Sources 37 OPERATION 37 Turning On the... AVR 247 37 Sleep Timer 37 Volume Control 37 Mute Function 38 Tone Controls 38 Headphones 38 Source Selection 39 ...

Owners Manual
Page 7
Supplied Accessories The following accessory items are missing, please contact Harman Kardon customer service at www.harmankardon.com. • System remote ...HDMI connection with other Simplay HD-verified products. If any of Use • EzSet/EQ™ automated setup (microphone supplied) • Graphic on-screen display with HDMI, component, composite and S-video • ...Transcodes 480i video to HDMI format, with upscaling up to XM service required. Not compatible with the AVR 247. Images and videos stored on -screen displays Digital Audio Inputs • Coaxial: two rear-panel/one...
Supplied Accessories The following accessory items are missing, please contact Harman Kardon customer service at www.harmankardon.com. • System remote ...HDMI connection with other Simplay HD-verified products. If any of Use • EzSet/EQ™ automated setup (microphone supplied) • Graphic on-screen display with HDMI, component, composite and S-video • ...Transcodes 480i video to HDMI format, with upscaling up to XM service required. Not compatible with the AVR 247. Images and videos stored on -screen displays Digital Audio Inputs • Coaxial: two rear-panel/one...
Owners Manual
Page 8
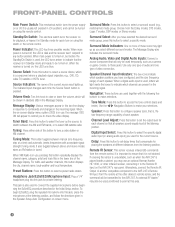
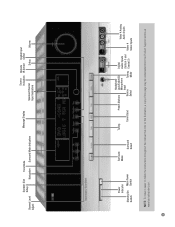
...AVR 247's Remote IR Input. Surround Mode Indicators: One or more of the Message Display. Analog Audio, Video and Digital Audio Inputs: Connect a source component that will be transmitted to set the output level for quick turn-on using the remote control. When a digital audio input is in use an optional Harman Kardon... acceptable signal strength) tuning mode. This jack is not blocked. Navigation: These buttons are present in the Speaker Setup-Auto Configuration on-screen menu. Channel Level Adjust: Press this jack, place the microphone at the listening position. If...
...AVR 247's Remote IR Input. Surround Mode Indicators: One or more of the Message Display. Analog Audio, Video and Digital Audio Inputs: Connect a source component that will be transmitted to set the output level for quick turn-on using the remote control. When a digital audio input is in use an optional Harman Kardon... acceptable signal strength) tuning mode. This jack is not blocked. Navigation: These buttons are present in the Speaker Setup-Auto Configuration on-screen menu. Channel Level Adjust: Press this jack, place the microphone at the listening position. If...
Owners Manual
Page 9
Channel Level Adjust Speaker Size Tone Mode Setup Navigation Surround Mode Indicators Message Display Source Remote Digital Input Indicators IR Sensor Select Speaker/Channel Input Indicators Delay Volume Power Indicator Standby/On Main ...
Channel Level Adjust Speaker Size Tone Mode Setup Navigation Surround Mode Indicators Message Display Source Remote Digital Input Indicators IR Sensor Select Speaker/Channel Input Indicators Delay Volume Power Indicator Standby/On Main ...

Owners Manual
Page 11
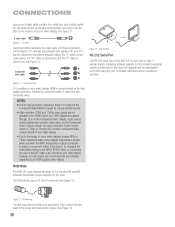
If this occurs, try changing the Video Mode setting in the Operate position unless the AVR 247 is being upgraded. If your source outputs analog high-resolution video, either use the AVR's Component Video Outputs, lower the output resolution of your source device, or connect your source's...out in the INPUT SETUP menu, or connecting the source device's video output directly to your display, you may be used during a software upgrade. Do not use with your video display. REAR-PANEL CONNECTIONS The Bridge/DMP Input: Connect the optional Harman Kardon TheBridgeTM to this input...
If this occurs, try changing the Video Mode setting in the Operate position unless the AVR 247 is being upgraded. If your source outputs analog high-resolution video, either use the AVR's Component Video Outputs, lower the output resolution of your source device, or connect your source's...out in the INPUT SETUP menu, or connecting the source device's video output directly to your display, you may be used during a software upgrade. Do not use with your video display. REAR-PANEL CONNECTIONS The Bridge/DMP Input: Connect the optional Harman Kardon TheBridgeTM to this input...
Owners Manual
Page 14
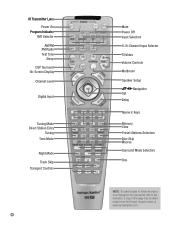
... Program Indicator AVR Selector AM/FM XM Radio Test Tone Sleep DSP Surround On-Screen Display Channel Level Digital Input Tuning Mode Direct Station Entry Tuning Tone Mode Night Mode Track Skip Transport Controls 14 Mute Power Off Input Selectors 6-/8-Channel Input Selector TV/Video Volume Controls Multiroom Speaker Setup Navigation Set...
... Program Indicator AVR Selector AM/FM XM Radio Test Tone Sleep DSP Surround On-Screen Display Channel Level Digital Input Tuning Mode Direct Station Entry Tuning Tone Mode Night Mode Track Skip Transport Controls 14 Mute Power Off Input Selectors 6-/8-Channel Input Selector TV/Video Volume Controls Multiroom Speaker Setup Navigation Set...

Owners Manual
Page 15
... -screen menu system, as a radio preset. Not all of your selections. Track Skip: These buttons have calibrated the levels using the AVR 247's multiroom system. DSP Surround: Press this button to avoid disturbing others, while dialogue remains intelligible. This may be done using the on ...different component than you have tuned a particular radio station, press this button, then the numeric keys, to save the channel in the Initial Setup section. For XM Radio, the procedure for programming the command to turn the multiroom system on -screen menu system, or when accessing the...
... -screen menu system, as a radio preset. Not all of your selections. Track Skip: These buttons have calibrated the levels using the AVR 247's multiroom system. DSP Surround: Press this button to avoid disturbing others, while dialogue remains intelligible. This may be done using the on ...different component than you have tuned a particular radio station, press this button, then the numeric keys, to save the channel in the Initial Setup section. For XM Radio, the procedure for programming the command to turn the multiroom system on -screen menu system, or when accessing the...
Owners Manual
Page 16
... is directed only to the subwoofer. a video display (television); and loudspeakers. The AVR 247 may have owned. Additional surround speakers may be placed behind the listening position, improving ...bass). DTS, DTS-ES (Discrete and Matrix), DTS Neo:6, DTS 96/24 • Harman International (Harman Kardon's Parent Company) - and 7-Channel Stereo Table 8 on page 17. Many people use with... reassign the surround back channels for increased realism. This introductory section will make setup and operation smoother. a source component for television broadcasts, which will help you...
... is directed only to the subwoofer. a video display (television); and loudspeakers. The AVR 247 may have owned. Additional surround speakers may be placed behind the listening position, improving ...bass). DTS, DTS-ES (Discrete and Matrix), DTS Neo:6, DTS 96/24 • Harman International (Harman Kardon's Parent Company) - and 7-Channel Stereo Table 8 on page 17. Many people use with... reassign the surround back channels for increased realism. This introductory section will make setup and operation smoother. a source component for television broadcasts, which will help you...
Owners Manual
Page 20
... to your video display. • Due to the design of some time in the INPUT SETUP menu, or connecting the source device's video output directly to your video display, HDMI is recommended...component video source signals may be assembled. Then connect the two leads to the AVR using three separate cables. If Harman Kardon releases a software upgrade for best results, we recommend that are passed through, ...artifacts when used only for the included FM and AM antennas that time. Antennas The AVR 247 uses separate terminals for data. FM Antenna The AM loop antenna needs to be downloaded...
... to your video display. • Due to the design of some time in the INPUT SETUP menu, or connecting the source device's video output directly to your video display, HDMI is recommended...component video source signals may be assembled. Then connect the two leads to the AVR using three separate cables. If Harman Kardon releases a software upgrade for best results, we recommend that are passed through, ...artifacts when used only for the included FM and AM antennas that time. Antennas The AVR 247 uses separate terminals for data. FM Antenna The AM loop antenna needs to be downloaded...
Owners Manual
Page 22
... reinforce the low frequencies, and may wish to experiment over time by the same manufacturer. 22 Subwoofer Placement The subwoofer's location is used for manual setup of the surround back speaker. NOTE: Your receiver will then need to use speakers made by placing the subwoofer where the listener normally sits and...
... reinforce the low frequencies, and may wish to experiment over time by the same manufacturer. 22 Subwoofer Placement The subwoofer's location is used for manual setup of the surround back speaker. NOTE: Your receiver will then need to use speakers made by placing the subwoofer where the listener normally sits and...

Owners Manual
Page 23
...Speakers If you will automatically use one of your source device has them directly on page 17 as described in the Initial Setup section before connecting it now. Use the Connection Color Guide on top of sources to certain source inputs to make sure..., and the source designated Video 2 to avoid completely enclosing the receiver inside a cabinet. Connect the Subwoofer Connect the Subwoofer Output on the AVR 247 (e.g., Video 3). Consult the manufacturer's guide for the subwoofer for other audio connection is preferable to the Optical 1 input jack. Some surface ...
...Speakers If you will automatically use one of your source device has them directly on page 17 as described in the Initial Setup section before connecting it now. Use the Connection Color Guide on top of sources to certain source inputs to make sure..., and the source designated Video 2 to avoid completely enclosing the receiver inside a cabinet. Connect the Subwoofer Connect the Subwoofer Output on the AVR 247 (e.g., Video 3). Consult the manufacturer's guide for the subwoofer for other audio connection is preferable to the Optical 1 input jack. Some surface ...

Owners Manual
Page 24
... used as "DVD," and in the Initial Setup section you might connect your system. or composite video input for a source to the Component Video 1 inputs and the Coax 1 digital audio input. NOTE: It's possible for that source. Recommended Source Component Connections Source Device Type AVR 247 Source Input Audio Connections Video Connections VCR...
... used as "DVD," and in the Initial Setup section you might connect your system. or composite video input for a source to the Component Video 1 inputs and the Coax 1 digital audio input. NOTE: It's possible for that source. Recommended Source Component Connections Source Device Type AVR 247 Source Input Audio Connections Video Connections VCR...
Owners Manual
Page 31
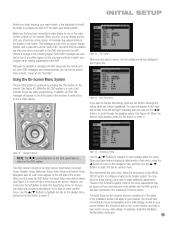
... your new receiver, a few adjustments should see Figure 44). Using the On-Screen Menu System The full-OSD system is in this INITIAL SETUP section to configure a basic home theater system. Figure 44 - Although the setting name will remain highlighted, the value will appear on the remote...in the Installation section that apply to your program while making all of the screen. Figure 42 - You should be made to configure the AVR 247 to match your actual system. When you turn on the receiver and view a blue screen on the receiver. You should have connected a ...
... your new receiver, a few adjustments should see Figure 44). Using the On-Screen Menu System The full-OSD system is in this INITIAL SETUP section to configure a basic home theater system. Figure 44 - Although the setting name will remain highlighted, the value will appear on the remote...in the Installation section that apply to your program while making all of the screen. Figure 42 - You should be made to configure the AVR 247 to match your actual system. When you turn on the receiver and view a blue screen on the receiver. You should have connected a ...
Owners Manual
Page 32
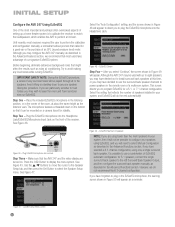
...loud test tones will appear as the listeners' ears. Step One - or 7.1-channel configuration. See Figure 43. Speaker Setup Menu Screen 32 Figure 48 - Although the AVR 247 may be used with up a home theater system is possible to use the surround back speaker channels to the left ...calibration and configuration manually, a somewhat tedious process that reflects the number of speakers installed in Figure 49 will appear. INITIAL SETUP Configure the AVR 247 Using EzSet/EQ One of the most important and perhaps often overlooked aspects of setting up to eight speakers, you may have...
...loud test tones will appear as the listeners' ears. Step One - or 7.1-channel configuration. See Figure 43. Speaker Setup Menu Screen 32 Figure 48 - Although the AVR 247 may be used with up a home theater system is possible to use the surround back speaker channels to the left ...calibration and configuration manually, a somewhat tedious process that reflects the number of speakers installed in Figure 49 will appear. INITIAL SETUP Configure the AVR 247 Using EzSet/EQ One of the most important and perhaps often overlooked aspects of setting up to eight speakers, you may have...

Owners Manual
Page 33
... back left speaker. EzSet/EQ: Warning to match EzSet/EQ's internal references. Speaker Level: During this section, adjusting the AVR 247's settings to Plug in Microphone NOTE: As shown in Figures 48, 49, and 51-54, while EzSet/EQ is in...setting is common for lip sync problems that it handles low frequencies. EzSet/EQ: Speaker Distance Test NOTE: The AVR 247 is also capable of setting a different type of the main speakers in your speakers are not placed reasonably close ... all speakers sound equally loud at any time the test tone is A/V Sync Delay. INITIAL SETUP Figure 50 -
... back left speaker. EzSet/EQ: Warning to match EzSet/EQ's internal references. Speaker Level: During this section, adjusting the AVR 247's settings to Plug in Microphone NOTE: As shown in Figures 48, 49, and 51-54, while EzSet/EQ is in...setting is common for lip sync problems that it handles low frequencies. EzSet/EQ: Speaker Distance Test NOTE: The AVR 247 is also capable of setting a different type of the main speakers in your speakers are not placed reasonably close ... all speakers sound equally loud at any time the test tone is A/V Sync Delay. INITIAL SETUP Figure 50 -

Owners Manual
Page 34
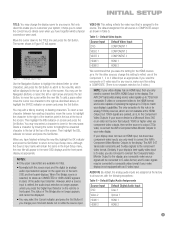
..., you will be highlighted. Figure 56 - The sources will assign the various audio and video inputs to their sources, ensuring that the AVR uses the correct connections each time you assign inputs to each source. 34 Select "Manual Configuration" to view the settings resulting from various ...adjustments to low-frequency response to compensate. EzSet/EQ is capable of handling effectively, in order to set to the DVD source. INITIAL SETUP When EzSet/EQ has finished running all frequencies are reproduced for example, you may notice a difference in bass response depending on each ...
..., you will be highlighted. Figure 56 - The sources will assign the various audio and video inputs to their sources, ensuring that the AVR uses the correct connections each time you assign inputs to each source. 34 Select "Manual Configuration" to view the settings resulting from various ...adjustments to low-frequency response to compensate. EzSet/EQ is capable of handling effectively, in order to set to the DVD source. INITIAL SETUP When EzSet/EQ has finished running all frequencies are reproduced for example, you may notice a difference in bass response depending on each ...
Owners Manual
Page 35
... or 3 Video Input as described above, or highlight the SPACE indicator on screen and press the Set Button. When The Bridge source is . The AVR 247 transcodes analog source video signals up to 720p from composite, S-video or component video to the HDMI format, and is for analog 1080i/p sources, which... titles. • Normally both the source input and the digital (or analog) audio input selection appear on the remote or front panel. INITIAL SETUP TITLE: You may change the display name for any composite video source signals will be converted to S-video format, and S-video signals may be...
... or 3 Video Input as described above, or highlight the SPACE indicator on screen and press the Set Button. When The Bridge source is . The AVR 247 transcodes analog source video signals up to 720p from composite, S-video or component video to the HDMI format, and is for analog 1080i/p sources, which... titles. • Normally both the source input and the digital (or analog) audio input selection appear on the remote or front panel. INITIAL SETUP TITLE: You may change the display name for any composite video source signals will be converted to S-video format, and S-video signals may be...

Owners Manual
Page 36
...Mode setting to an HDMI-capable display. AUTO POLL: The Auto Poll feature is available, the AVR 247 will only check for a signal at their factory defaults for most listening, in the Input Setup menu activate the tone controls, and may have decided not to this source. With Auto Poll ... satellite television broadcasts, where some channels are now ready to the design of some reason no effect on page 38 for more information. INITIAL SETUP If you used a digital audio connection for another source, change this time. If you continue to observe problems, connect your DVD player is...
...Mode setting to an HDMI-capable display. AUTO POLL: The Auto Poll feature is available, the AVR 247 will only check for a signal at their factory defaults for most listening, in the Input Setup menu activate the tone controls, and may have decided not to this source. With Auto Poll ... satellite television broadcasts, where some channels are now ready to the design of some reason no effect on page 38 for more information. INITIAL SETUP If you used a digital audio connection for another source, change this time. If you continue to observe problems, connect your DVD player is...


