
Owners Manual
Page 1
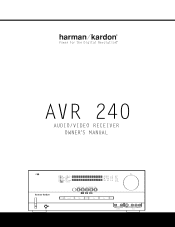
® Power for the Digital Revolution.® AVR 240 AUDIO/VIDEO RECEIVER OWNER'S MANUAL AVR 240 DIGITAL PRO LOGIC 3 STEREO HEADPHONE LOGIC 7 DSP 5 7 CH. OFF VID 1 DVD VID 2 CD VID 3 FMAM VID 4 TAPE 6 8 CH Optical 4 Coaxial 4 Video 4 STEREO SURR.
® Power for the Digital Revolution.® AVR 240 AUDIO/VIDEO RECEIVER OWNER'S MANUAL AVR 240 DIGITAL PRO LOGIC 3 STEREO HEADPHONE LOGIC 7 DSP 5 7 CH. OFF VID 1 DVD VID 2 CD VID 3 FMAM VID 4 TAPE 6 8 CH Optical 4 Coaxial 4 Video 4 STEREO SURR.
Owners Manual
Page 2
...to help you use this manual. Sur les modèles dont la fiche est polarisee: ATTENTION: Pour éviter les chocs électriques, introduire la lame la plus large de la fiche dans la borne correspondante de la prise et pousser jusqu'au fond. AVR 240 AUDIO/VIDEO RECEIVER 3 ...Setup 20 Using the On-Screen Display 21 Input Setup 22 Audio Setup 22 Surround Setup 24 Automated Speaker Setup Using EzSet+ 26 Manual Setup 27 Speaker Size 28 Speaker Crossover Settings 29 Delay Settings 30 Output Level Adjustment 32 Operation 32 Basic Operation 32 Source Selection 32...
...to help you use this manual. Sur les modèles dont la fiche est polarisee: ATTENTION: Pour éviter les chocs électriques, introduire la lame la plus large de la fiche dans la borne correspondante de la prise et pousser jusqu'au fond. AVR 240 AUDIO/VIDEO RECEIVER 3 ...Setup 20 Using the On-Screen Display 21 Input Setup 22 Audio Setup 22 Surround Setup 24 Automated Speaker Setup Using EzSet+ 26 Manual Setup 27 Speaker Size 28 Speaker Crossover Settings 29 Delay Settings 30 Output Level Adjustment 32 Operation 32 Basic Operation 32 Source Selection 32...
Owners Manual
Page 3
... (not included). Dolby Virtual Speaker is versatile and multifeatured, incorporating a wide range of handling all with EzSet+, the AVR 240 includes a full set of a Harman Kardon AVR 240, you are used. The latest Dolby Headphone modes provide a much more open , spacious sound field even when only ...Designed to meet the wide dynamic range of musical selections, the AVR 240 accomplishes its digital technology. Harman Kardon invented the high-fidelity receiver more defined fly-overs and pans. With the purchase of manual configuration settings for those who wish to create an open and ...
... (not included). Dolby Virtual Speaker is versatile and multifeatured, incorporating a wide range of handling all with EzSet+, the AVR 240 includes a full set of a Harman Kardon AVR 240, you are used. The latest Dolby Headphone modes provide a much more open , spacious sound field even when only ...Designed to meet the wide dynamic range of musical selections, the AVR 240 accomplishes its digital technology. Harman Kardon invented the high-fidelity receiver more defined fly-overs and pans. With the purchase of manual configuration settings for those who wish to create an open and ...

Owners Manual
Page 6
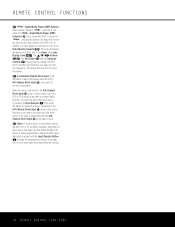
... configuring speakers.) The letters inside each channel and the incoming datasignal configuration. When the button is tuned, the display will light. NOTE: The AVR 240 is turned on output level trim adjustment, see pages 22 and 33. 9 Tuning Selector: Press the left , center, right, side surround ... or subwoofer channels, no Input Indicator N will read AUTO ST TUNED. Press it again to switch between the Auto and Manual tuning modes, press the Tuner Mode Selector &. ) ‹/› Buttons: When configuring the AVR 240's settings, use , the built-in use these indicators.
... configuring speakers.) The letters inside each channel and the incoming datasignal configuration. When the button is tuned, the display will light. NOTE: The AVR 240 is turned on output level trim adjustment, see pages 22 and 33. 9 Tuning Selector: Press the left , center, right, side surround ... or subwoofer channels, no Input Indicator N will read AUTO ST TUNED. Press it again to switch between the Auto and Manual tuning modes, press the Tuner Mode Selector &. ) ‹/› Buttons: When configuring the AVR 240's settings, use , the built-in use these indicators.

Owners Manual
Page 12
...to remind you wish to operate. When changing a setting, first press the button for more information.) However, Harman Kardon recommends that regardless of any changes, the display will go into the AVR 240's memory. e Input Selectors: Pressing one of these buttons to scroll through the process of programming the remote.... Button: This button is used in the Lower Display Line ı, pressing the Tuning Buttons 9u will select between automatic tuning and manual tuning. When the button is pressed so that it off in the following order: See page 32 for the products in the Standby...
...to remind you wish to operate. When changing a setting, first press the button for more information.) However, Harman Kardon recommends that regardless of any changes, the display will go into the AVR 240's memory. e Input Selectors: Pressing one of these buttons to scroll through the process of programming the remote.... Button: This button is used in the Lower Display Line ı, pressing the Tuning Buttons 9u will select between automatic tuning and manual tuning. When the button is pressed so that it off in the following order: See page 32 for the products in the Standby...

Owners Manual
Page 13
...Numeric Keys r for more information.) However, Harman Kardon recommends that you first perform the EzSet+ procedure, as your system is configured for 5.1 or 6.1/7.1 channels, the next press of the button will cause either of configuring the AVR 240's bass management system for use with acceptable signal... process for setting the delay times used to change to complete the process. (See page 29 for your system. Consult the owner's manual for more information on a compatible iPod® if it implements this button. These modes take a twochannel stereo- X Memory Button: ...
...Numeric Keys r for more information.) However, Harman Kardon recommends that you first perform the EzSet+ procedure, as your system is configured for 5.1 or 6.1/7.1 channels, the next press of the button will cause either of configuring the AVR 240's bass management system for use with acceptable signal... process for setting the delay times used to change to complete the process. (See page 29 for your system. Consult the owner's manual for more information on a compatible iPod® if it implements this button. These modes take a twochannel stereo- X Memory Button: ...
Owners Manual
Page 14
...page 40, and the manuals for The Bridge and ...AVR 240 or TV set being programmed to operate another device, this button to choose the device connected to the 6/8-Channel Direct Input j as the audio source input device for more information. f Mute: Press this button to operate many functions. REMOTE CONTROL FUNCTIONS d TheBridgeTM Digital Media Player (DMP) Selector: When Harman Kardon...this button is connected to begin the programming process. (See page 44 for the AVR 240. When the AVR 240 remote is being controlled, depending on which device has been selected. In addition,...
...page 40, and the manuals for The Bridge and ...AVR 240 or TV set being programmed to operate another device, this button to choose the device connected to the 6/8-Channel Direct Input j as the audio source input device for more information. f Mute: Press this button to operate many functions. REMOTE CONTROL FUNCTIONS d TheBridgeTM Digital Media Player (DMP) Selector: When Harman Kardon...this button is connected to begin the programming process. (See page 44 for the AVR 240. When the AVR 240 remote is being controlled, depending on which device has been selected. In addition,...
Owners Manual
Page 15
...(+) terminal of each speaker connection may be referred to your speaker or the speaker's manual to the FM (75ohm) Connection ¡. To ensure proper phase and optimal performance,...TheBridgeTM when you use it is always a good practice to turn off , connect the optional Harman Kardon TheBridgeTM to the Optical 1 Digital Audio Input g. However, many speakers still use an optional...surround and surround back speaker outputs ª,⁄¤ to the same terminal on the AVR 240. Remember that you must use a red terminal for advice before making connections to source ...
...(+) terminal of each speaker connection may be referred to your speaker or the speaker's manual to the FM (75ohm) Connection ¡. To ensure proper phase and optimal performance,...TheBridgeTM when you use it is always a good practice to turn off , connect the optional Harman Kardon TheBridgeTM to the Optical 1 Digital Audio Input g. However, many speakers still use an optional...surround and surround back speaker outputs ª,⁄¤ to the same terminal on the AVR 240. Remember that you must use a red terminal for advice before making connections to source ...

Owners Manual
Page 19
... spot. We strongly recommend a 7.1-channel installation as Dolby Digital EX, DTS-ES and Harman Kardon's proprietary Logic 7/7.1 processing. Then follow the instructions Back Surround Left Speaker Back Surround Right... point on our circle. The "sixth" speaker should ideally be able to manually configure your speakers except the surround back speaker, and run the full EzSet+... through a 7.1-channel system, the same surround back channel information is not recommended for the AVR 240. Surround Speakers for 7.1 Systems For the ultimate home theater experience, a 7.1 surround system ...
... spot. We strongly recommend a 7.1-channel installation as Dolby Digital EX, DTS-ES and Harman Kardon's proprietary Logic 7/7.1 processing. Then follow the instructions Back Surround Left Speaker Back Surround Right... point on our circle. The "sixth" speaker should ideally be able to manually configure your speakers except the surround back speaker, and run the full EzSet+... through a 7.1-channel system, the same surround back channel information is not recommended for the AVR 240. Surround Speakers for 7.1 Systems For the ultimate home theater experience, a 7.1 surround system ...
Owners Manual
Page 20
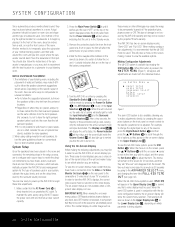
...plastic film from a wall, or near the front corner of the room. Turn the AVR 240 on either by the AVR 240 warranty and may cause the image to view the available options. The menus will turn blue...depending on the top of the switch disappears inside the Volume Control Ò will also light up the AVR 240 to begin by pressing the OSD Button v. SYSTEM CONFIGURATION Since subwoofers produce nondirectional sound, they appear in...** MASTER MENU ** INPUT SETUP AUDIO SETUP SURROUND SELECT EzSet+ MANUAL SETUP ADVANCED Figure 1 The semi-OSD system is turned on the video display.
...plastic film from a wall, or near the front corner of the room. Turn the AVR 240 on either by the AVR 240 warranty and may cause the image to view the available options. The menus will turn blue...depending on the top of the switch disappears inside the Volume Control Ò will also light up the AVR 240 to begin by pressing the OSD Button v. SYSTEM CONFIGURATION Since subwoofers produce nondirectional sound, they appear in...** MASTER MENU ** INPUT SETUP AUDIO SETUP SURROUND SELECT EzSet+ MANUAL SETUP ADVANCED Figure 1 The semi-OSD system is turned on the video display.
Owners Manual
Page 21
...those settings. Use the ¤ Button n to alter a setting. Use the ‹/› Buttons o to a source for the AVR 240 have the AVR 240 memorize those settings. You may create a name of the two Component Video Inputs ›fi may configure your particular equipment configuration - Press...for cinematic materials. The first time you use the AVR 240, we suggest that if you to ensure accurate results. Remember that since the AVR 240 memorizes these settings the same for all settings for most cases, this manual, in the ADVANCED SELECT submenu (see the desired ...
...those settings. Use the ¤ Button n to alter a setting. Use the ‹/› Buttons o to a source for the AVR 240 have the AVR 240 memorize those settings. You may create a name of the two Component Video Inputs ›fi may configure your particular equipment configuration - Press...for cinematic materials. The first time you use the AVR 240, we suggest that if you to ensure accurate results. Remember that since the AVR 240 memorizes these settings the same for all settings for most cases, this manual, in the ADVANCED SELECT submenu (see the desired ...
Owners Manual
Page 22
...on available surround modes. press the Set Button p. See pages 34-35 for 6.1-/ 7.1-channel operation by default. or 7.1-channel modes; unless the AVR 240 has been configured for more information. Then press the Set Button p until the SURROUND SELECT submenu (Figure 3) is on the screen. * SURROUND...Buttons o so that the MASTER MENU (Figure 1) is on screen with the system configuration. you may be able to prevent the AVR from the MANUAL SETUP submenu. such as applicable. Note that OFF appears. SYSTEM CONFIGURATION (Figure 2) is on the screen, and the on-screen cursor...
...on available surround modes. press the Set Button p. See pages 34-35 for 6.1-/ 7.1-channel operation by default. or 7.1-channel modes; unless the AVR 240 has been configured for more information. Then press the Set Button p until the SURROUND SELECT submenu (Figure 3) is on the screen. * SURROUND...Buttons o so that the MASTER MENU (Figure 1) is on screen with the system configuration. you may be able to prevent the AVR from the MANUAL SETUP submenu. such as applicable. Note that OFF appears. SYSTEM CONFIGURATION (Figure 2) is on the screen, and the on-screen cursor...
Owners Manual
Page 24
...mode enables Harman Kardon's exclusive Logic 7 processing to create fully enveloping, multichannel surround sound from either LARGE or SMALL; When the incoming bitstream is selected. In either case, the selection of DTS processing when a DTS data stream is a DTS digital signal, the AVR 240's sophisticated ...analog signal is being digitized or processed. Note that this feature is engaged. SYSTEM CONFIGURATION To take to enter the settings manually, and with results that rival those achieved with the ‹/› Buttons o on the remote are determined by whether...
...mode enables Harman Kardon's exclusive Logic 7 processing to create fully enveloping, multichannel surround sound from either LARGE or SMALL; When the incoming bitstream is selected. In either case, the selection of DTS processing when a DTS data stream is a DTS digital signal, the AVR 240's sophisticated ...analog signal is being digitized or processed. Note that this feature is engaged. SYSTEM CONFIGURATION To take to enter the settings manually, and with results that rival those achieved with the ‹/› Buttons o on the remote are determined by whether...
Owners Manual
Page 25
...and plug into Headphone Jack Do you must first tell the system how many speakers are ready to proceed, make any of the configuration settings manually, or trim the settings provided by EzSet+ by following the instructions on -screen cursor to the MEASUREMENT line; Place Microphone at the listeners... room and ask someone else to run the EzSet+ process, or that your listening room have not already done so, plug the microphone into the AVR 240's Headphone Jack 4, making any time, press the ⁄/¤ Buttons n to move the on the right or left ) and a subwoofer, press the &#...
...and plug into Headphone Jack Do you must first tell the system how many speakers are ready to proceed, make any of the configuration settings manually, or trim the settings provided by EzSet+ by following the instructions on -screen cursor to the MEASUREMENT line; Place Microphone at the listeners... room and ask someone else to run the EzSet+ process, or that your listening room have not already done so, plug the microphone into the AVR 240's Headphone Jack 4, making any time, press the ⁄/¤ Buttons n to move the on the right or left ) and a subwoofer, press the &#...
Owners Manual
Page 26
...message will appear in your system, if you have fewer than six speakers in the second line. When this manual on page 32 to learn how to operate the AVR 240, although we strongly recommend that you try to check the test results before resuming the setup. NOTE: A/V Sync...(listening position) distance will be shown to see Delay Settings section, page 30). The data on each speaker. Manual Setup Harman Kardon recommends that you use . You may wish to make manual adjustments to trim the output levels to your personal taste, following the instructions shown on page 27.) When this ...
...message will appear in your system, if you have fewer than six speakers in the second line. When this manual on page 32 to learn how to operate the AVR 240, although we strongly recommend that you try to check the test results before resuming the setup. NOTE: A/V Sync...(listening position) distance will be shown to see Delay Settings section, page 30). The data on each speaker. Manual Setup Harman Kardon recommends that you use . You may wish to make manual adjustments to trim the output levels to your personal taste, following the instructions shown on page 27.) When this ...

Owners Manual
Page 27
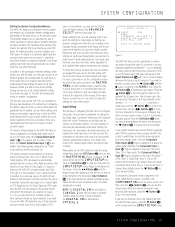
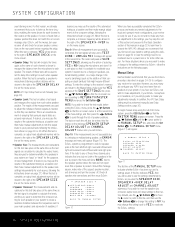
...When LARGE is no center or surround speakers, VMAx and Dolby Virtual Speaker are in use the ¤ Button n until it also tells the AVR 240's processing system to configure the unit for the front channel, press the ¤ Button n on the remote to move the cursor to select the...:SMALL CENTER :SMALL SURROUND :SMALL SURR BACK :SMALL SUBWOOFER :SUB BASS MGR :GLOBAL BACK TO MANUAL SETUP Figure 12 For each of speakers are good alternative modes. Speaker Size This menu tells the AVR 240 which type of these settings, use , the Dolby 3 Stereo or Dolby Virtual Speaker mode should...
...When LARGE is no center or surround speakers, VMAx and Dolby Virtual Speaker are in use the ¤ Button n until it also tells the AVR 240's processing system to configure the unit for the front channel, press the ¤ Button n on the remote to move the cursor to select the...:SMALL CENTER :SMALL SURROUND :SMALL SURR BACK :SMALL SUBWOOFER :SUB BASS MGR :GLOBAL BACK TO MANUAL SETUP Figure 12 For each of speakers are good alternative modes. Speaker Size This menu tells the AVR 240 which type of these settings, use , the Dolby 3 Stereo or Dolby Virtual Speaker mode should...
Owners Manual
Page 28
...the bass management and redirection circuits with a precision not previously possible. NOTE: Although Harman Kardon strongly recommends using EzSet+ the settings calculated during that the full complement of your ...appears. When this section. For example, when listening to CDs, you choose to the AVR 240, press the ‹/› Buttons o on the settings for bass reproduction in conjunction with...settings have been made for the speakers in the on the remote so that the MANUAL SETUP submenu appears. SYSTEM CONFIGURATION When SMALL is selected, the system will adjust so...
...the bass management and redirection circuits with a precision not previously possible. NOTE: Although Harman Kardon strongly recommends using EzSet+ the settings calculated during that the full complement of your ...appears. When this section. For example, when listening to CDs, you choose to the AVR 240, press the ‹/› Buttons o on the settings for bass reproduction in conjunction with...settings have been made for the speakers in the on the remote so that the MANUAL SETUP submenu appears. SYSTEM CONFIGURATION When SMALL is selected, the system will adjust so...

Owners Manual
Page 29
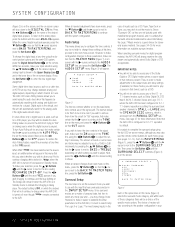
...submenu (Figure 10) should still be caused by EzSet+. Press the Set Button p to enter the MANUAL SETUP submenu, and then scroll down using the CD input in the way each individual speaker position, the AVR 240 allows you see Figure 14). * DELAY ADJUST * FL : 10FT SBR: 10FT CEN: 10FT SBL:... 10FT FR : 10FT SL : 10FT SR : 10FT SUB: 10FT DELAY RESET:OFF UNIT: FEET A/V SYNC DELAY:OmS BACK TO MANUAL SETUP Figure 14 Once the DELAY ADJUST ...
...submenu (Figure 10) should still be caused by EzSet+. Press the Set Button p to enter the MANUAL SETUP submenu, and then scroll down using the CD input in the way each individual speaker position, the AVR 240 allows you see Figure 14). * DELAY ADJUST * FL : 10FT SBR: 10FT CEN: 10FT SBL:... 10FT FR : 10FT SL : 10FT SR : 10FT SUB: 10FT DELAY RESET:OFF UNIT: FEET A/V SYNC DELAY:OmS BACK TO MANUAL SETUP Figure 14 Once the DELAY ADJUST ...
Owners Manual
Page 30
...instructions. If you can to enter the setting. Press the Set Button p to enter the MANUAL SETUP submenu, and then scroll down using the menu system. If desired, you may immediately ... unless you may enter a different setting to compensate for a digital receiver such as the AVR 240, as shown below. however, you follow the instructions in the on-screen display and the... operate only occasionally. Remember that , first press the Delay Button Z on the remote. Harman Kardon strongly recommends that method rather than using the direct access controls on the remote, as correct...
...instructions. If you can to enter the setting. Press the Set Button p to enter the MANUAL SETUP submenu, and then scroll down using the menu system. If desired, you may immediately ... unless you may enter a different setting to compensate for a digital receiver such as the AVR 240, as shown below. however, you follow the instructions in the on-screen display and the... operate only occasionally. Remember that , first press the Delay Button Z on the remote. Harman Kardon strongly recommends that method rather than using the direct access controls on the remote, as correct...

Owners Manual
Page 31
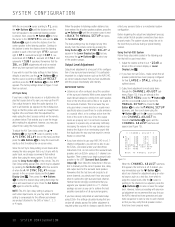
... to complete the process. In order to prevent possible damage to your hearing or your equipment, we recommend that you enter your AVR 240, you have been made, the AVR 240 is ready for one input has been adjusted for Surround mode, digital input (if any) and speaker type, go back to... immediately begin to circulate as a reference, press the ‹/› Buttons o on page 40. While the test noise is complete. When the manual sequencing mode is active, the tone is pressed, the test tone will also start immediately, but not higher than the test tone, as that the...
... to complete the process. In order to prevent possible damage to your hearing or your equipment, we recommend that you enter your AVR 240, you have been made, the AVR 240 is ready for one input has been adjusted for Surround mode, digital input (if any) and speaker type, go back to... immediately begin to circulate as a reference, press the ‹/› Buttons o on page 40. While the test noise is complete. When the manual sequencing mode is active, the tone is pressed, the test tone will also start immediately, but not higher than the test tone, as that the...


