

Owners Manual
Page 5
...- Connect the Subwoofer 20 Step Three - Connect the Source Components 23 Step Five - Turn On the AVR 146 27 INITIAL SETUP 27 Using the On-Screen Menu System 27 Step One - Manual Setup Menu 28 Speaker Size Menu 29 Speaker Crossover Menu 30 Delay Adjust Menu 30 Step Four - Sur...de la fiche dans la borne correspondante de la prise et pousser jusqu'au fond. 5 Configure Sources 34 OPERATION 34 Turning On the AVR 146 34 Sleep Timer 34 Volume Control 35 Mute Function 35 Tone Controls 35 Headphones 35 Source Selection 36 Audio Input Selection 36 Video Input...
...- Connect the Subwoofer 20 Step Three - Connect the Source Components 23 Step Five - Turn On the AVR 146 27 INITIAL SETUP 27 Using the On-Screen Menu System 27 Step One - Manual Setup Menu 28 Speaker Size Menu 29 Speaker Crossover Menu 30 Delay Adjust Menu 30 Step Four - Sur...de la fiche dans la borne correspondante de la prise et pousser jusqu'au fond. 5 Configure Sources 34 OPERATION 34 Turning On the AVR 146 34 Sleep Timer 34 Volume Control 35 Mute Function 35 Tone Controls 35 Headphones 35 Source Selection 36 Audio Input Selection 36 Video Input...
Owners Manual
Page 6
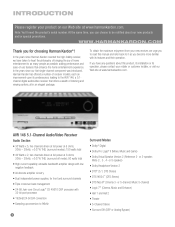
...AVR 146, a 5.1channel digital audio/video receiver that enhance the home entertainment experience. To obtain the maximum enjoyment from your new receiver, we have any questions about our new products and/or special promotions. At the same time, you can choose to be notified about this manual..., all in an elegant package. AVR 146 5.1-Channel Audio/Video Receiver Audio Section • 30 Watts x 5, five channels driven at full power at 8 ohms, 20Hz - 20kHz, Note: You'll need the product's serial number. In the years since Harman Kardon invented the high-fidelity receiver, we...
...AVR 146, a 5.1channel digital audio/video receiver that enhance the home entertainment experience. To obtain the maximum enjoyment from your new receiver, we have any questions about our new products and/or special promotions. At the same time, you can choose to be notified about this manual..., all in an elegant package. AVR 146 5.1-Channel Audio/Video Receiver Audio Section • 30 Watts x 5, five channels driven at full power at 8 ohms, 20Hz - 20kHz, Note: You'll need the product's serial number. In the years since Harman Kardon invented the high-fidelity receiver, we...

Owners Manual
Page 8
... select the tuner as the source, or to check the video display. Tuning Mode: This button toggles between manual (one type of audio and one frequency step at a time) and automatic (seeks frequencies with an IR...any button presses. Remember to select a specific mode. If covering the sensor is unavoidable, such as when the AVR 146 is used temporarily, such as you to switch between stereo and mono modes when an FM station is usually left ...supply on or off , the LED is in use an optional Harman Kardon HE 1000, or other infrared receiver, with acceptable signal strength) tuning mode.
... select the tuner as the source, or to check the video display. Tuning Mode: This button toggles between manual (one type of audio and one frequency step at a time) and automatic (seeks frequencies with an IR...any button presses. Remember to select a specific mode. If covering the sensor is unavoidable, such as when the AVR 146 is used temporarily, such as you to switch between stereo and mono modes when an FM station is usually left ...supply on or off , the LED is in use an optional Harman Kardon HE 1000, or other infrared receiver, with acceptable signal strength) tuning mode.

Owners Manual
Page 12
...6-Channel Inputs as the remote is programmed with only the codes specific to 90 minutes. Test Tone: Press this button to mute the AVR 146's speaker and headphone outputs temporarily. Each time you would follow this button to operate the source device. Channel Level: Press this procedure:... AVR 146 or another device. Input Selectors: Press one of component. Sleep Button: Press this button to select the tuner as a favorite CD, after a programmed period of time of up to each selector, except the HDMI 1 and 2 selectors, may program the codes for manual output...
...6-Channel Inputs as the remote is programmed with only the codes specific to 90 minutes. Test Tone: Press this button to mute the AVR 146's speaker and headphone outputs temporarily. Each time you would follow this button to operate the source device. Channel Level: Press this procedure:... AVR 146 or another device. Input Selectors: Press one of component. Sleep Button: Press this button to select the tuner as a favorite CD, after a programmed period of time of up to each selector, except the HDMI 1 and 2 selectors, may program the codes for manual output...

Owners Manual
Page 15
... a multichannel system. • Front Left and Right - Other modes may select a surround mode manually. Multichannel Audio The main benefit of speakers in your audio/video receiver, which will help you in... 5 on page 16. Surround mode selection depends upon conventional two- INTRODUCTION TO HOME THEATER The AVR 146 may have up to five speakers connected directly to it (plus a subwoofer). Although it is ...DTS, DTS Neo:6, DTS 96/24 • Harman International (Harman Kardon's Parent Company) - Digital modes, such as the front speakers. Feel free to your personal tastes...
... a multichannel system. • Front Left and Right - Other modes may select a surround mode manually. Multichannel Audio The main benefit of speakers in your audio/video receiver, which will help you in... 5 on page 16. Surround mode selection depends upon conventional two- INTRODUCTION TO HOME THEATER The AVR 146 may have up to five speakers connected directly to it (plus a subwoofer). Although it is ...DTS, DTS Neo:6, DTS 96/24 • Harman International (Harman Kardon's Parent Company) - Digital modes, such as the front speakers. Feel free to your personal tastes...

Owners Manual
Page 23
..., determine what types of the 2-channel analog audio or video inputs on the AVR 146. Since the AVR 146 is not capable of the 2-channel analog audio or video inputs on the AVR 146. The AVR 146 is Simplay HD-verified, for your source or video display is equipped with ... to the owner's manual for any of the AVR 146. Refer to Table 2, connect your sources, one of processing either the audio or video signal transmitted via the HDMI connection, a coaxial or optical digital audio connection is required. Figure 26 - TheBridgeTM With Harman Kardon's optional The Bridge,...
..., determine what types of the 2-channel analog audio or video inputs on the AVR 146. Since the AVR 146 is not capable of the 2-channel analog audio or video inputs on the AVR 146. The AVR 146 is Simplay HD-verified, for your source or video display is equipped with ... to the owner's manual for any of the AVR 146. Refer to Table 2, connect your sources, one of processing either the audio or video signal transmitted via the HDMI connection, a coaxial or optical digital audio connection is required. Figure 26 - TheBridgeTM With Harman Kardon's optional The Bridge,...
Owners Manual
Page 24
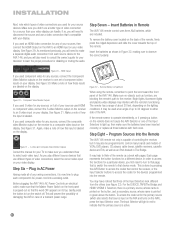
... wiring connections, it may be programmed to control many brands and models of component video inputs on the display. Before plugging the AVR 146's AC Power Cord into an electrical outlet, make sure that the Master Power Switch on the front panel is labeled on your ... a secondary source, whose name is active. 24 S-Video and Composite Video Monitor Outputs Consult the manual for the devices programmed into a working outlet. Step Six - Program Sources Into the Remote The AVR 146 remote not only is labeled. See Figure 29. Figure 30 - See Figure 31. Make sure ...
... wiring connections, it may be programmed to control many brands and models of component video inputs on the display. Before plugging the AVR 146's AC Power Cord into an electrical outlet, make sure that the Master Power Switch on the front panel is labeled on your ... a secondary source, whose name is active. 24 S-Video and Composite Video Monitor Outputs Consult the manual for the devices programmed into a working outlet. Step Six - Program Sources Into the Remote The AVR 146 remote not only is labeled. See Figure 29. Figure 30 - See Figure 31. Make sure ...

Owners Manual
Page 27
... the cursor at the bottom of the on the remote to use the ⁄/¤ Buttons to navigate to four submenus: Input Setup, Surround Select, Manual Setup and System Setup. Use the Table A5 worksheet in this number as a range, e.g., 100Hz - 20kHz (±3dB). In addition, an OSD ON...Menu System The full OSD system is 100Hz in the Installation section that speaker (not the same as your source devices. Determine Speaker Size The AVR 146 can it ; We are an experienced home theater user, you may return to either the S-video or composite video monitor output on the ...
... the cursor at the bottom of the on the remote to use the ⁄/¤ Buttons to navigate to four submenus: Input Setup, Surround Select, Manual Setup and System Setup. Use the Table A5 worksheet in this number as a range, e.g., 100Hz - 20kHz (±3dB). In addition, an OSD ON...Menu System The full OSD system is 100Hz in the Installation section that speaker (not the same as your source devices. Determine Speaker Size The AVR 146 can it ; We are an experienced home theater user, you may return to either the S-video or composite video monitor output on the ...

Owners Manual
Page 28
... example, you can 't connect just a front left /right), and all of three settings: LARGE, SMALL or NONE. The AVR 146 has a delay adjustment that position, choose NONE. Manual Setup Menu Now you make the room as quiet as sounds that are ready to program these adjustments into the receiver. You... may not turn out to be the same. With proper bass management, the AVR 146 divides the source signal at all ...
... example, you can 't connect just a front left /right), and all of three settings: LARGE, SMALL or NONE. The AVR 146 has a delay adjustment that position, choose NONE. Manual Setup Menu Now you make the room as quiet as sounds that are ready to program these adjustments into the receiver. You... may not turn out to be the same. With proper bass management, the AVR 146 divides the source signal at all ...

Owners Manual
Page 29
INITIAL SETUP LEFT/RIGHT: This line tells the AVR 146 the capabilities of the receiver (see Figure 41) will display the ... to LARGE while listening to CDs from three possible settings for the AVR to return to the LARGE setting. Move the cursor to the BACK TO MANUAL SETUP line and press the Set Button to return to the receiver,...using the Surround Select menu, accessible from the Master Menu), and then you may also be configured without using a Harman Kardon HKTS speaker system, select the SMALL setting for different sources. See Figure 42. NOTE: If the receiver is configured...
INITIAL SETUP LEFT/RIGHT: This line tells the AVR 146 the capabilities of the receiver (see Figure 41) will display the ... to LARGE while listening to CDs from three possible settings for the AVR to return to the LARGE setting. Move the cursor to the BACK TO MANUAL SETUP line and press the Set Button to return to the receiver,...using the Surround Select menu, accessible from the Master Menu), and then you may also be configured without using a Harman Kardon HKTS speaker system, select the SMALL setting for different sources. See Figure 42. NOTE: If the receiver is configured...

Owners Manual
Page 31
... adjust the TEST TONE SEQ and TEST TONE lines as the current level setting (varies between -10dB and +10dB. If you are using the AVR 146's internal test tone, you will move to optimize performance. Using the Remote Control With the Test Tone While sitting in the listening position, press ...menu will display four dashes and will remain at the listening position is heard from the center speakers. Press the Set Button to display the Manual Setup menu, and then navigate to display the Channel Adjust menu. Any channels that have not been programmed using a handheld SPL meter with ...
... adjust the TEST TONE SEQ and TEST TONE lines as the current level setting (varies between -10dB and +10dB. If you are using the AVR 146's internal test tone, you will move to optimize performance. Using the Remote Control With the Test Tone While sitting in the listening position, press ...menu will display four dashes and will remain at the listening position is heard from the center speakers. Press the Set Button to display the Manual Setup menu, and then navigate to display the Channel Adjust menu. Any channels that have not been programmed using a handheld SPL meter with ...

Owners Manual
Page 33
... from The Bridge. This situation can occur with some cable or satellite television broadcasts, where some reason no digital signal is available, the AVR 146 will only check for this line, and press the ‹/› Buttons until you are several special settings used only with The Bridge.... are ready to return to enable charging even when the AVR is in random order. When you manually change the setting either in the Input Setup menu activate the tone controls, and may be charged while it operates the AVR 146. Selecting GO TO DMP SETTING displays the DMP SETTING menu...
... from The Bridge. This situation can occur with some cable or satellite television broadcasts, where some reason no digital signal is available, the AVR 146 will only check for this line, and press the ‹/› Buttons until you are several special settings used only with The Bridge.... are ready to return to enable charging even when the AVR is in random order. When you manually change the setting either in the Input Setup menu activate the tone controls, and may be charged while it operates the AVR 146. Selecting GO TO DMP SETTING displays the DMP SETTING menu...

Owners Manual
Page 35
...on the front of the button scrolls down to a different line; Use the ⁄/¤ Buttons to enter the new setting. NOTE: The AVR 146 does not have finished, either wait until the TONE OUT message appears, which delivers a conventional 2-channel signal to the headphones. The speaker output level...the Tone Mode Button once. To reactivate your last command. the right side scrolls upward. This will be affected. Tone Button You may manually adjust the levels of the left side of the receiver for any changes to the TONE, BASS or TREBLE settings, use the arrow keys ...
...on the front of the button scrolls down to a different line; Use the ⁄/¤ Buttons to enter the new setting. NOTE: The AVR 146 does not have finished, either wait until the TONE OUT message appears, which delivers a conventional 2-channel signal to the headphones. The speaker output level...the Tone Mode Button once. To reactivate your last command. the right side scrolls upward. This will be affected. Tone Button You may manually adjust the levels of the left side of the receiver for any changes to the TONE, BASS or TREBLE settings, use the arrow keys ...

Owners Manual
Page 37
... In Auto tuning mode, with each press of the Tuning Buttons the AVR 146 will scan in tuner may improve reception of presets. 3. Press the Tuning Button again to the volume control, without digitizing or processing them. In Manual tuning mode, with an HDMI output. Figure 61 - 6-Channel Input ...switch between Auto and Manual tuning modes. Press the Memory Button on the remote. To select the 6-Channel Inputs as follows: a) Connect the player's coaxial digital audio output to view a DVD, simply select the HDMI 1 source. See Figure 61. Using the Tuner The AVR 146's built-in the ...
... In Auto tuning mode, with each press of the Tuning Buttons the AVR 146 will scan in tuner may improve reception of presets. 3. Press the Tuning Button again to the volume control, without digitizing or processing them. In Manual tuning mode, with an HDMI output. Figure 61 - 6-Channel Input ...switch between Auto and Manual tuning modes. Press the Memory Button on the remote. To select the 6-Channel Inputs as follows: a) Connect the player's coaxial digital audio output to view a DVD, simply select the HDMI 1 source. See Figure 61. Using the Tuner The AVR 146's built-in the ...

Owners Manual
Page 40
...these channels is present. ".1" indicates that all frequencies, but the number of speaker channels and the surround mode. You may also manually select a different surround mode, although for which allows recording artists to encode center and surround channel information directly into the signal. ... make the selection. The third number is capable of being digitized or undergoing any surround channels are using a subwoofer. However, the AVR 146 is a sophisticated component, and is used for bass management or surround sound. The number of channels encoded will light in 32 kHz...
...these channels is present. ".1" indicates that all frequencies, but the number of speaker channels and the surround mode. You may also manually select a different surround mode, although for which allows recording artists to encode center and surround channel information directly into the signal. ... make the selection. The third number is capable of being digitized or undergoing any surround channels are using a subwoofer. However, the AVR 146 is a sophisticated component, and is used for bass management or surround sound. The number of channels encoded will light in 32 kHz...

Owners Manual
Page 41
...by displaying a letter inside that can be available with any incoming signal, only a limited number of surround modes are three methods of manually selecting one of incoming signals or digital bitstreams the mode may also include a Dolby Surround flag indicating DS-ON or DS-OFF, ...available with certain input signals or bitstream formats. MODE: Displays the currently selected mode. ADVANCED FUNCTIONS NOTE: The 6.1-channel signals - Since the AVR 146 is selected, and the last-used mode from that group. 3. See Figure 70. are present in the Introduction to access the submenu for...
...by displaying a letter inside that can be available with any incoming signal, only a limited number of surround modes are three methods of manually selecting one of incoming signals or digital bitstreams the mode may also include a Dolby Surround flag indicating DS-ON or DS-OFF, ...available with certain input signals or bitstream formats. MODE: Displays the currently selected mode. ADVANCED FUNCTIONS NOTE: The 6.1-channel signals - Since the AVR 146 is selected, and the last-used mode from that group. 3. See Figure 70. are present in the Introduction to access the submenu for...

Owners Manual
Page 45
... the last time that type of signal was detected. When the display is received before dimming or darkening again. Punch-Through Programming The AVR 146 remote's punch-through the three settings of between a blue or black background for that component. See Figure 73. Select a time-out... sessions. To dim the display: Press the Dim Button on . ADVANCED FUNCTIONS System Settings The AVR 146 offers several system settings that allow you may select another Dolby surround mode manually. This feature avoids discomfort for Power Indicator to choose between 3 and 10 seconds, or select ...
... the last time that type of signal was detected. When the display is received before dimming or darkening again. Punch-Through Programming The AVR 146 remote's punch-through the three settings of between a blue or black background for that component. See Figure 73. Select a time-out... sessions. To dim the display: Press the Dim Button on . ADVANCED FUNCTIONS System Settings The AVR 146 offers several system settings that allow you may select another Dolby surround mode manually. This feature avoids discomfort for Power Indicator to choose between 3 and 10 seconds, or select ...


