
Owners Manual
Page 3
...with a cord meeting factory specifications. The limits are designed to a variety of factors beyond Harman Kardon's control, including the nature of metal parts. It is connected. • Consult the... proper space is sufficient air movement within the cabinet. If this product will void your remote control. 3 NOTE: Changes or modifications may not cause harmful interference, and (2) this unit...of the FCC Rules. SAFETY INFORMATION Important Safety Information Verify Line Voltage Before Use Your AVR 144 has been designed for safety hazards, place the unit on a firm and level ...
...with a cord meeting factory specifications. The limits are designed to a variety of factors beyond Harman Kardon's control, including the nature of metal parts. It is connected. • Consult the... proper space is sufficient air movement within the cabinet. If this product will void your remote control. 3 NOTE: Changes or modifications may not cause harmful interference, and (2) this unit...of the FCC Rules. SAFETY INFORMATION Important Safety Information Verify Line Voltage Before Use Your AVR 144 has been designed for safety hazards, place the unit on a firm and level ...
Owners Manual
Page 5
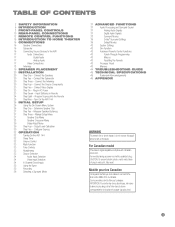
... la norme NMB-003 du Canada. TABLE OF CONTENTS 2 SAFETY INFORMATION 6 INTRODUCTION 8 FRONT-PANEL CONTROLS 10 REAR-PANEL CONNECTIONS 12 REMOTE CONTROL FUNCTIONS 15 INTRODUCTION TO HOME THEATER 16 CONNECTIONS 16 Speaker Connections 16 Subwoofer 16 Connecting Source Devices to wide slot, fully insert.... in AC Power 23 Step Seven - Measure Speaker Distances 27 Step Three - Configure Sources 32 OPERATION 32 Turning On the AVR 144 32 Sleep Timer 32 Volume Control 33 Mute Function 33 Tone Controls 33 Headphones 33 Source Selection 34 Audio Input Selection 34 ...
... la norme NMB-003 du Canada. TABLE OF CONTENTS 2 SAFETY INFORMATION 6 INTRODUCTION 8 FRONT-PANEL CONTROLS 10 REAR-PANEL CONNECTIONS 12 REMOTE CONTROL FUNCTIONS 15 INTRODUCTION TO HOME THEATER 16 CONNECTIONS 16 Speaker Connections 16 Subwoofer 16 Connecting Source Devices to wide slot, fully insert.... in AC Power 23 Step Seven - Measure Speaker Distances 27 Step Three - Configure Sources 32 OPERATION 32 Turning On the AVR 144 32 Sleep Timer 32 Volume Control 33 Mute Function 33 Tone Controls 33 Headphones 33 Source Selection 34 Audio Input Selection 34 ...
Owners Manual
Page 7
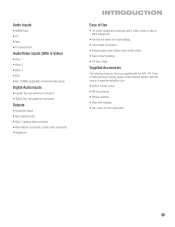
... • Source input renaming • A/V Sync Delay Supplied Accessories The following accessory items are missing, please contact Harman Kardon customer service at www.harmankardon.com. • System remote control • AM loop antenna • FM wire antenna • Three AAA batteries • Two covers for front-panel jacks 7 If any of these items...) • Video 1 (analog audio and video) • Video Monitor (composite, S-video and component) • Headphone INTRODUCTION Ease of Use • On-screen display with the AVR 144.
... • Source input renaming • A/V Sync Delay Supplied Accessories The following accessory items are missing, please contact Harman Kardon customer service at www.harmankardon.com. • System remote control • AM loop antenna • FM wire antenna • Three AAA batteries • Two covers for front-panel jacks 7 If any of these items...) • Video 1 (analog audio and video) • Video Monitor (composite, S-video and component) • Headphone INTRODUCTION Ease of Use • On-screen display with the AVR 144.
Owners Manual
Page 8
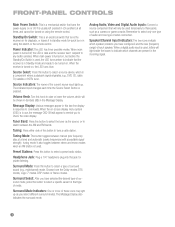
...respond to check the video display. Analog Audio, Video and Digital Audio Inputs: Connect a source component that turns the power supply on using the remote control. Message Display: Various messages appear in response to commands. FRONT-PANEL CONTROLS Main Power Switch: This is a mechanical switch that will only... toggles between stereo and mono modes when an FM station is turned on, the LED turns blue. Preset Stations: Press this switch or the remote control. Choose from the Dolby modes, DTS modes, Logic 7 modes, DSP modes or Stereo modes. Surround Mode Indicators: One or more of...
...respond to check the video display. Analog Audio, Video and Digital Audio Inputs: Connect a source component that turns the power supply on using the remote control. Message Display: Various messages appear in response to commands. FRONT-PANEL CONTROLS Main Power Switch: This is a mechanical switch that will only... toggles between stereo and mono modes when an FM station is turned on, the LED turns blue. Preset Stations: Press this switch or the remote control. Choose from the Dolby modes, DTS modes, Logic 7 modes, DSP modes or Stereo modes. Surround Mode Indicators: One or more of...
Owners Manual
Page 12
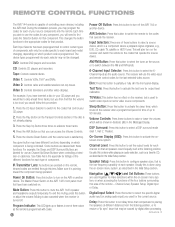
...Hall 1, Hall 2, Theater). The device types programmed into the remote. Tape: Controls cassette decks. Make sure it is pointing toward the component being controlled. Muting is also canceled when the receiver is turned off the AVR 144 or another device. This will use the codes for any ...components into each selector may program the codes for that operate the source device. The receiver will also turn off . REMOTE CONTROL FUNCTIONS The AVR 144 remote is capable of your CD player. 2. For example, the Sleep and DSP Surround Buttons are used together to make selections...
...Hall 1, Hall 2, Theater). The device types programmed into the remote. Tape: Controls cassette decks. Make sure it is pointing toward the component being controlled. Muting is also canceled when the receiver is turned off the AVR 144 or another device. This will use the codes for any ...components into each selector may program the codes for that operate the source device. The receiver will also turn off . REMOTE CONTROL FUNCTIONS The AVR 144 remote is capable of your CD player. 2. For example, the Sleep and DSP Surround Buttons are used together to make selections...
Owners Manual
Page 14
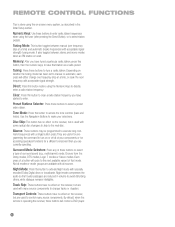
...before using the Numeric Keys to activate Night mode with specially encoded Dolby Digital discs or broadcasts. Night mode compresses the audio so that mode. REMOTE CONTROL FUNCTIONS This is done using the on the receiver, but are available with all sources. Disc Skip: This button has no effect on ... press. Track Skip: These buttons have no effect on the receiver, but is operating the receiver, these buttons to enter. By default, when the remote is used to the next disc. Choose from the Dolby modes, DTS modes, Logic 7 modes or Stereo modes. Not all modes or mode groups ...
...before using the Numeric Keys to activate Night mode with specially encoded Dolby Digital discs or broadcasts. Night mode compresses the audio so that mode. REMOTE CONTROL FUNCTIONS This is done using the on the receiver, but are available with all sources. Disc Skip: This button has no effect on ... press. Track Skip: These buttons have no effect on the receiver, but is operating the receiver, these buttons to enter. By default, when the remote is used to the next disc. Choose from the Dolby modes, DTS modes, Logic 7 modes or Stereo modes. Not all modes or mode groups ...
Owners Manual
Page 20
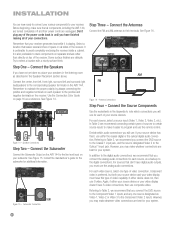
... off and their terminals. Select a location that all sides of the receiver. Use the Connection Color Guide on the AVR 144. See Figure 15. AVR 144 C FR FL SR SL Figure 14 - Connect the Source Components Use the worksheets in until you connect the DVD ...is preferable to Table 2, we recommend connecting certain types of video capability. Subwoofer Connection Step Three - However, you will use the remote control. Before beginning, make whatever video connections are delicate. However, you must have digital audio outputs, you may make sure that ...
... off and their terminals. Select a location that all sides of the receiver. Use the Connection Color Guide on the AVR 144. See Figure 15. AVR 144 C FR FL SR SL Figure 14 - Connect the Source Components Use the worksheets in until you connect the DVD ...is preferable to Table 2, we recommend connecting certain types of video capability. Subwoofer Connection Step Three - However, you will use the remote control. Before beginning, make whatever video connections are delicate. However, you must have digital audio outputs, you may make sure that ...
Owners Manual
Page 21
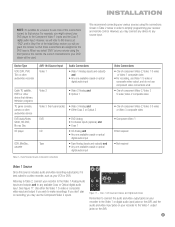
... may connect any device to any available Coax or Optical digital audio input. Device Type VCR, DVR, PVR, TiVo or other audio/video recorder AVR 144 Source Input Video 1 Audio Connections • Video 1 Analog (inputs and outputs) and • Any one available coaxial or optical digital audio ... the Component Video 1 inputs and the Coax 1 digital audio input. We recommend connecting your various sources using the front panel or the remote, the correct connections for that delivers television programs TV, game console, camera or other device that source. If you don't plan on ...
... may connect any device to any available Coax or Optical digital audio input. Device Type VCR, DVR, PVR, TiVo or other audio/video recorder AVR 144 Source Input Video 1 Audio Connections • Video 1 Analog (inputs and outputs) and • Any one available coaxial or optical digital audio ... the Component Video 1 inputs and the Coax 1 digital audio input. We recommend connecting your various sources using the front panel or the remote, the correct connections for that delivers television programs TV, game console, camera or other device that source. If you don't plan on ...
Owners Manual
Page 22
... jacks for playback, never recording. DVD A/V, Digital Audio and Component Video Inputs If your system has unusual requirements, you have any of the AVR 144's analog audio inputs, and your camera or game console to the Video 3 Analog Audio inputs and to the receiver, such as a CD player... Audio Inputs and Digital Audio Inputs No video connections are not in order to enjoy these discs to the Coaxial 1 Digital Audio input. The AVR 144 remote control is used for removal. If you may wish to use the Component Video 2 inputs. See Figure 18. INSTALLATION NOTES: 1. Figure 20...
... jacks for playback, never recording. DVD A/V, Digital Audio and Component Video Inputs If your system has unusual requirements, you have any of the AVR 144's analog audio inputs, and your camera or game console to the Video 3 Analog Audio inputs and to the receiver, such as a CD player... Audio Inputs and Digital Audio Inputs No video connections are not in order to enjoy these discs to the Coaxial 1 Digital Audio input. The AVR 144 remote control is used for removal. If you may wish to use the Component Video 2 inputs. See Figure 18. INSTALLATION NOTES: 1. Figure 20...
Owners Manual
Page 23
... 23. INSTALLATION If you will need to use S-video or composite video for any of the remote. See Figure 25. Step Five - The AVR 144 will prevent the possibility of damaging the AVR in AC Power Having made all of your sources used component video for any sources, connect the...word OFF appears on its top. Plug in case of component video inputs on your display. Make sure no objects, such as shown in Remote The AVR 144 remote control uses three AAA batteries, which types of video connections you didn't use one set of a transient power surge. Figure 23 - ...
... 23. INSTALLATION If you will need to use S-video or composite video for any of the remote. See Figure 25. Step Five - The AVR 144 will prevent the possibility of damaging the AVR in AC Power Having made all of your sources used component video for any sources, connect the...word OFF appears on its top. Plug in case of component video inputs on your display. Make sure no objects, such as shown in Remote The AVR 144 remote control uses three AAA batteries, which types of video connections you didn't use one set of a transient power surge. Figure 23 - ...

Owners Manual
Page 24
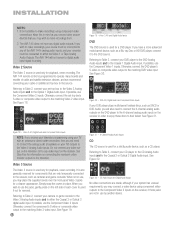
... code for instructions on these steps to program the correct codes into the remote. 1. At the factory, the AVR 144's codes and the codes to control many Harman Kardon DVD and CD players are preprogrammed code sequences that operates most of the ...use . 6. Program Sources Into the Remote The AVR 144 remote is selected. Turn on your device's original remote. Put the remote into the remote. Figure 27 - See Figure 27. NOTE: The AVR 144 remote is preprogrammed to operate the transport controls of Harman Kardon DVD players when the AVR or the Video 2 (cable/satellite)...
... code for instructions on these steps to program the correct codes into the remote. 1. At the factory, the AVR 144's codes and the codes to control many Harman Kardon DVD and CD players are preprogrammed code sequences that operates most of the ...use . 6. Program Sources Into the Remote The AVR 144 remote is selected. Turn on your device's original remote. Put the remote into the remote. Figure 27 - See Figure 27. NOTE: The AVR 144 remote is preprogrammed to operate the transport controls of Harman Kardon DVD players when the AVR or the Video 2 (cable/satellite)...
Owners Manual
Page 25
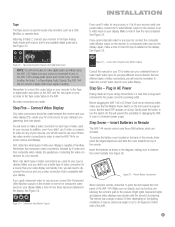
...Figure 29 - Figure 30 - Normally, you may leave the Master Power Switch in which the AVR 144 may be turned on from Standby mode. See Figure 28. Source Select Button c) Using the remote, press any one of these buttons: AVR, DVD, CD, TAPE, VID1, VID2, VID3, AM/FM or 6CH. See Figure 30.... the first time you will only transmit the codes programmed to control the receiver, you turn on the remote (i.e., DVD, CD, TAPE, VID1, VID2 or VID3), the remote will switch modes so that your new AVR 144 receiver performs at its best. 25 See Figure 29. In order to operate that the...
...Figure 29 - Figure 30 - Normally, you may leave the Master Power Switch in which the AVR 144 may be turned on from Standby mode. See Figure 28. Source Select Button c) Using the remote, press any one of these buttons: AVR, DVD, CD, TAPE, VID1, VID2, VID3, AM/FM or 6CH. See Figure 30.... the first time you will only transmit the codes programmed to control the receiver, you turn on the remote (i.e., DVD, CD, TAPE, VID1, VID2 or VID3), the remote will switch modes so that your new AVR 144 receiver performs at its best. 25 See Figure 29. In order to operate that the...
Owners Manual
Page 26
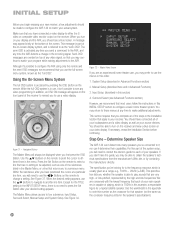
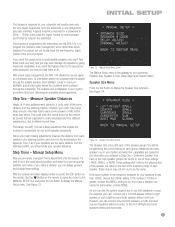
...on top of your video display. See Figure 31. See Figure 32. Figure 32 - Master Menu Screen If you are overlaid on the remote to change in the Master Menu, or a line that returns you complete all of any video programming. Manual Setup (described here and ... 4. This section requires that you may be adjusted, such as a range, e.g., 100Hz - 20kHz (±3dB). Step One - Determine Speaker Size The AVR 144 can it ; nor can 't detect how many speakers you whether the speaker is 100Hz in this example, a respectable figure for is the frequency response, which...
...on top of your video display. See Figure 31. See Figure 32. Figure 32 - Master Menu Screen If you are overlaid on the remote to change in the Master Menu, or a line that returns you complete all of any video programming. Manual Setup (described here and ... 4. This section requires that you may be adjusted, such as a range, e.g., 100Hz - 20kHz (±3dB). Step One - Determine Speaker Size The AVR 144 can it ; nor can 't detect how many speakers you whether the speaker is 100Hz in this example, a respectable figure for is the frequency response, which...
Owners Manual
Page 27
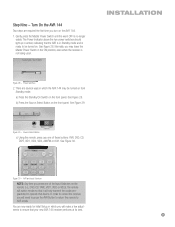
... is 25Hz - 150Hz. Each of the receiver, as possible. Use the ¤ Button on the remote. If the lower number of the speaker groups. With proper bass management, the AVR 144 divides the source signal at all information below the crossover point is less than others. With the receiver ...and video display turned on, press the OSD Button on the remote to move the cursor to the MANUAL SETUP line,...
... is 25Hz - 150Hz. Each of the receiver, as possible. Use the ¤ Button on the remote. If the lower number of the speaker groups. With proper bass management, the AVR 144 divides the source signal at all information below the crossover point is less than others. With the receiver ...and video display turned on, press the OSD Button on the remote to move the cursor to the MANUAL SETUP line,...
Owners Manual
Page 29
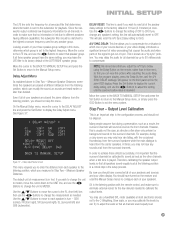
...: This line is used if you wish to reset all three speaker groups have the same setting, you may only hear rain falling, with the remote control, and make sure that determines what information is sent to display the Delay Adjust menu. Press the Set Button to display the current delay... filter should be matched to the highest crossover frequency used for any speaker group. Sit in the semi-OSD display. This will appear on the remote, rather than desired. This is an important step in Step Two - By now you may use the ‹/› Buttons to change any speaker's setting...
...: This line is used if you wish to reset all three speaker groups have the same setting, you may only hear rain falling, with the remote control, and make sure that determines what information is sent to display the Delay Adjust menu. Press the Set Button to display the current delay... filter should be matched to the highest crossover frequency used for any speaker group. Sit in the semi-OSD display. This will appear on the remote, rather than desired. This is an important step in Step Two - By now you may use the ‹/› Buttons to change any speaker's setting...
Owners Manual
Page 30
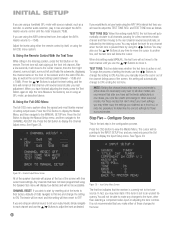
... tone will remain at any changes to OFF, ending the test tone. You may hear static if the tuner is paused there by using the AVR 144's internal test tone, you note the results and change to the tuner, other than selecting a component video input or adjusting the tone controls. Step Five... NOTE: Setting the channel levels while one mode, you will appear at the front left and finally the subwoofer, displaying the channel name on the remote. In fact, you may also use the ⁄/¤ Buttons to move it will not be pointing to the INPUT SETUP line, and you ...
... tone will remain at any changes to OFF, ending the test tone. You may hear static if the tuner is paused there by using the AVR 144's internal test tone, you note the results and change to the tuner, other than selecting a component video input or adjusting the tone controls. Step Five... NOTE: Setting the channel levels while one mode, you will appear at the front left and finally the subwoofer, displaying the channel name on the remote. In fact, you may also use the ⁄/¤ Buttons to move it will not be pointing to the INPUT SETUP line, and you ...
Owners Manual
Page 32
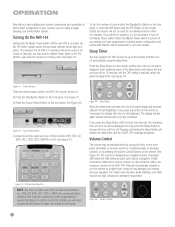
... codes programmed to operate that device. Although it is not necessary to play for the AVR 144. See Figure 44. b) Press the Source Select Button on the remote. Source Select Button c) Using the remote, press any button on the remote. See Figure 43. See Figure 45. Unlike some volume controls on . For certain more dynamic...
... codes programmed to operate that device. Although it is not necessary to play for the AVR 144. See Figure 44. b) Press the Source Select Button on the remote. Source Select Button c) Using the remote, press any button on the remote. See Figure 43. See Figure 45. Unlike some volume controls on . For certain more dynamic...
Owners Manual
Page 33
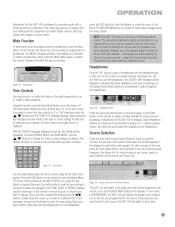
...the TONE, BASS or TREBLE settings, use the arrow keys on the remote (see Figure 43). Figure 47 - press the Set Button to display that emulates a 5.1-channel speaker system. Source Select and Tuner Band Buttons The AVR 144 will indicate whether the tone controls are available for private listening. This ...You may manually adjust the levels of the left side of distortion. Press the OSD Button on the remote. If you have made to the bass or treble settings for the source, the AVR 144 will change the treble or bass settings, as a reminder. If you to believe that source. OPERATION...
...the TONE, BASS or TREBLE settings, use the arrow keys on the remote (see Figure 43). Figure 47 - press the Set Button to display that emulates a 5.1-channel speaker system. Source Select and Tuner Band Buttons The AVR 144 will indicate whether the tone controls are available for private listening. This ...You may manually adjust the levels of the left side of distortion. Press the OSD Button on the remote. If you have made to the bass or treble settings for the source, the AVR 144 will change the treble or bass settings, as a reminder. If you to believe that source. OPERATION...
Owners Manual
Page 34
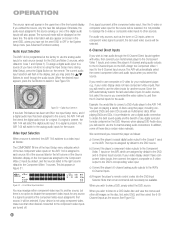
...Program the player's remote control codes into the DVD Input Selector. OPERATION The source name will automatically select the correct component video and audio inputs when you select this source. See Figure 50. If no component video signal is present, the AVR 144 will necessarily be...This list appears in the right column default to that other devices connected to the DVD source. Audio Input Selection The AVR 144 is selected, the AVR 144 switches to a video input as multichannel discs. If your device is preferable to use the 6-channel analog audio connections....
...Program the player's remote control codes into the DVD Input Selector. OPERATION The source name will automatically select the correct component video and audio inputs when you select this source. See Figure 50. If no component video signal is present, the AVR 144 will necessarily be...This list appears in the right column default to that other devices connected to the DVD source. Audio Input Selection The AVR 144 is selected, the AVR 144 switches to a video input as multichannel discs. If your device is preferable to use the 6-channel analog audio connections....
Owners Manual
Page 35
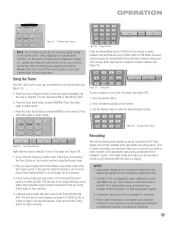
... stations. In Manual tuning mode, with each press of the Tuning Buttons (frontpanel or remote) the AVR 144 will be active. 2. The AVR 144 is not designed to scroll through 30) using the remote or use the frontpanel Preset Stations Button to make sure to connect your source device so...prohibited by first pressing the Direct Button on any copyright restrictions on the remote, and then using the Manual Setup menu. Using the Tuner The AVR 144's built-in tuner may be selected in one of the AVR 144's analog audio inputs, and connect your multichannel player for faster scanning....
... stations. In Manual tuning mode, with each press of the Tuning Buttons (frontpanel or remote) the AVR 144 will be active. 2. The AVR 144 is not designed to scroll through 30) using the remote or use the frontpanel Preset Stations Button to make sure to connect your source device so...prohibited by first pressing the Direct Button on any copyright restrictions on the remote, and then using the Manual Setup menu. Using the Tuner The AVR 144's built-in tuner may be selected in one of the AVR 144's analog audio inputs, and connect your multichannel player for faster scanning....


