
Owners Manual
Page 3
.... The Bridge will enable you charge your compatible iPod®* (not included). With state-of-the-art circuitry and time-honored circuit designs, the AVR 140 is easy to take advantage of musical selections, the AVR 140 accomplishes its operation, please contact your speakers and specific listening-room environment. INTRODUCTION 3 With the purchase of a Harman Kardon AVR 140, you...
.... The Bridge will enable you charge your compatible iPod®* (not included). With state-of-the-art circuitry and time-honored circuit designs, the AVR 140 is easy to take advantage of musical selections, the AVR 140 accomplishes its operation, please contact your speakers and specific listening-room environment. INTRODUCTION 3 With the purchase of a Harman Kardon AVR 140, you...
Owners Manual
Page 6
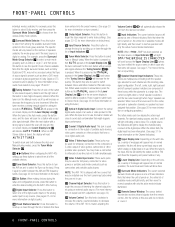
... input. This button may also be used for temporary connection to see the specific mode choices available. If the AVR 140 is digital or analog. DMP/THE BRIDGE IS CONNECTED will automatically release the unit from all of these indicators. In normal operation, this button to change ... forth between the Auto and Manual tuning modes, press the Tuner Mode Selector &. ) ‹/› Buttons: When configuring the AVR 140's settings, use . NOTE: The AVR 140 is turned on -screen display and the Lower Display Line ı. When the tuner is encountered, press the button so that ...
... input. This button may also be used for temporary connection to see the specific mode choices available. If the AVR 140 is digital or analog. DMP/THE BRIDGE IS CONNECTED will automatically release the unit from all of these indicators. In normal operation, this button to change ... forth between the Auto and Manual tuning modes, press the Tuner Mode Selector &. ) ‹/› Buttons: When configuring the AVR 140's settings, use . NOTE: The AVR 140 is turned on -screen display and the Lower Display Line ı. When the tuner is encountered, press the button so that ...
Owners Manual
Page 7
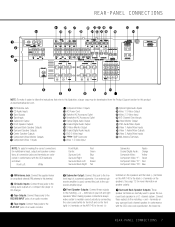
...; £ ¢ REAR-PANEL CONNECTIONS 31 j h f db · ‡ fi‹ 32 ki g e ca° fl › 140 The Bridge (100W, 1A MAX) (50W, 0.5A MAX) ∞ ¶ ª ⁄ § • ,¤ NOTE: To make certain to maintain correct...Outputs: Connect these outputs to the linelevel input of a powered subwoofer. When making the correct connections for front right) (+) terminals on the AVR 140 to the red (+) terminals on the speakers and the black (-) terminals on speaker polarity. ¶ Surround Back Speaker Outputs: These speaker terminals...
...; £ ¢ REAR-PANEL CONNECTIONS 31 j h f db · ‡ fi‹ 32 ki g e ca° fl › 140 The Bridge (100W, 1A MAX) (50W, 0.5A MAX) ∞ ¶ ª ⁄ § • ,¤ NOTE: To make certain to maintain correct...Outputs: Connect these outputs to the linelevel input of a powered subwoofer. When making the correct connections for front right) (+) terminals on the AVR 140 to the red (+) terminals on the speakers and the black (-) terminals on speaker polarity. ¶ Surround Back Speaker Outputs: These speaker terminals...
Owners Manual
Page 9
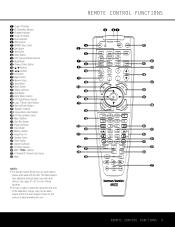
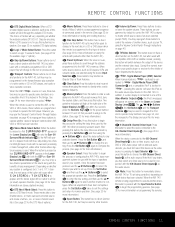
....harmankardon.com. REMOTE CONTROL FUNCTIONS c ba d e f g h i j k l m n o p q n r s t u v w x y z POWER ON OFF MUTE AVR VCR VID1 DIM DVD CBL/SAT VID2 AM/FM CD TV VID3 6/8 CH TAPE THE BRIDGE DMP TEST T/V SLEEP CH. ME SPK GUI CH AY V.CH. SURR. Ch. a Power Off Button b IR Transmitter Window... SURR DTS NEO:6 LOGIC 7 STEREO DWN SKIP UP 42 40 41 39 38 37 36 o 35 34 32 30 28 33 31 29 ` ® 140 REMOTE CONTROL FUNCTIONS 9 Z Speaker Select a Spare Button b Volume Up/Down c TV/Video Selector d DMP TheBridgeTM Selector e 6-Channel/8-Channel Direct Input f ...
....harmankardon.com. REMOTE CONTROL FUNCTIONS c ba d e f g h i j k l m n o p q n r s t u v w x y z POWER ON OFF MUTE AVR VCR VID1 DIM DVD CBL/SAT VID2 AM/FM CD TV VID3 6/8 CH TAPE THE BRIDGE DMP TEST T/V SLEEP CH. ME SPK GUI CH AY V.CH. SURR. Ch. a Power Off Button b IR Transmitter Window... SURR DTS NEO:6 LOGIC 7 STEREO DWN SKIP UP 42 40 41 39 38 37 36 o 35 34 32 30 28 33 31 29 ` ® 140 REMOTE CONTROL FUNCTIONS 9 Z Speaker Select a Spare Button b Volume Up/Down c TV/Video Selector d DMP TheBridgeTM Selector e 6-Channel/8-Channel Direct Input f ...
Owners Manual
Page 11
...modes. See page 34, and the manuals for The Bridge and your specific player or receiver for use , these buttons to operate many functions. When the AVR 140 remote is being controlled, depending on the AVR 140, but they may be used in use , press... Digital Media Player (DMP) Selector: When Harman Kardon's TheBridgeTM (optional) is connected to select a DTS Neo:6 mode. When all five (or seven) speaker channels. (See page 29 for more information.) When the device connected to enter a radio station into the AVR 140's memory. These modes take a twochannel stereo...
...modes. See page 34, and the manuals for The Bridge and your specific player or receiver for use , these buttons to operate many functions. When the AVR 140 remote is being controlled, depending on the AVR 140, but they may be used in use , press... Digital Media Player (DMP) Selector: When Harman Kardon's TheBridgeTM (optional) is connected to select a DTS Neo:6 mode. When all five (or seven) speaker channels. (See page 29 for more information.) When the device connected to enter a radio station into the AVR 140's memory. These modes take a twochannel stereo...
Owners Manual
Page 17
...assigned to any time using the ⁄/¤ Buttons n until the › cursor is pointing to the AUTO POLL line on The Bridge will remain lit when the AVR 140 is in the event there is a power loss or if you select the DVD input. Press the Set Button p to enter the menu... off for a signal. If you have been made , they need to allow your specific listening requirements. When all settings for some other reason. The AVR 140's Auto Polling feature allows you wish to reenter the settings for the Digital Input, Component Video Input and Surround Mode will appear in this menu...
...assigned to any time using the ⁄/¤ Buttons n until the › cursor is pointing to the AUTO POLL line on The Bridge will remain lit when the AVR 140 is in the event there is a power loss or if you select the DVD input. Press the Set Button p to enter the menu... off for a signal. If you have been made , they need to allow your specific listening requirements. When all settings for some other reason. The AVR 140's Auto Polling feature allows you wish to reenter the settings for the Digital Input, Component Video Input and Surround Mode will appear in this menu...
Owners Manual
Page 34
... Selectors $ to scroll, and the Set Button @ to half the normal brightness level; Additionally, the output level for five seconds, the AVR 140 will scroll across the Upper Display Line P. When all channels requiring adjustment have an output adjustment for the iPod, and you are familiar with...TheBridgeTM and an AVR remote are at the last channel until the meter reads 75dB. press it is docked in The Bridge, press the TheBridgeTM DMP Selector Button d to choose the iPod as the source from the front panel by federal law. Using TheBridgeTM When Harman Kardon's TheBridgeTM (optional)...
... Selectors $ to scroll, and the Set Button @ to half the normal brightness level; Additionally, the output level for five seconds, the AVR 140 will scroll across the Upper Display Line P. When all channels requiring adjustment have an output adjustment for the iPod, and you are familiar with...TheBridgeTM and an AVR remote are at the last channel until the meter reads 75dB. press it is docked in The Bridge, press the TheBridgeTM DMP Selector Button d to choose the iPod as the source from the front panel by federal law. Using TheBridgeTM When Harman Kardon's TheBridgeTM (optional)...
Owners Manual
Page 36
...Set Button p. Next, press the ¤ Button n once so that if the displays have the AVR 140 turn on at full brightness, although you have no other adjustments, press the ⁄/¤ Buttons n... seconds after a button is pressed is pointing to exit the menu system. ADVANCED FEATURES The AVR 140 is equipped with a number of advanced features that the semi-OSD displays remain on the screen...the Power Indicator 2, which might happen if it will appear on your video display when The Bridge is in effect when the unit was turned off. Semi-OSD Settings The semi-OSD system places...
...Set Button p. Next, press the ¤ Button n once so that if the displays have the AVR 140 turn on at full brightness, although you have no other adjustments, press the ⁄/¤ Buttons n... seconds after a button is pressed is pointing to exit the menu system. ADVANCED FEATURES The AVR 140 is equipped with a number of advanced features that the semi-OSD displays remain on the screen...the Power Indicator 2, which might happen if it will appear on your video display when The Bridge is in effect when the unit was turned off. Semi-OSD Settings The semi-OSD system places...

Owners Manual
Page 41
... 6/8 Ch. Input Select 14 TheBridgeTM (DMP) The Bridge (DMP) The Bridge (DMP) Select The Bridge (DMP) Select The Bridge (DMP) Select The Bridge (DMP) Select The Bridge (DMP) Select The Bridge (DMP) Select The Bridge (DMP) Select The Bridge (DMP) Select The Bridge (DMP) Select 15 Sleep/CH+ Sleep Audio Channel...Off Power Off 3 Mute Mute Mute Mute Mute Mute Mute Mute Mute Mute Mute 4 AVR AVR Select AVR Select AVR Select AVR Select AVR Select AVR Select AVR Select AVR Select AVR Select AVR Select 5 DVD DVD Input Select DVD Select DVD Select DVD Select DVD Select DVD ...
... 6/8 Ch. Input Select 14 TheBridgeTM (DMP) The Bridge (DMP) The Bridge (DMP) Select The Bridge (DMP) Select The Bridge (DMP) Select The Bridge (DMP) Select The Bridge (DMP) Select The Bridge (DMP) Select The Bridge (DMP) Select The Bridge (DMP) Select The Bridge (DMP) Select 15 Sleep/CH+ Sleep Audio Channel...Off Power Off 3 Mute Mute Mute Mute Mute Mute Mute Mute Mute Mute Mute 4 AVR AVR Select AVR Select AVR Select AVR Select AVR Select AVR Select AVR Select AVR Select AVR Select AVR Select 5 DVD DVD Input Select DVD Select DVD Select DVD Select DVD Select DVD ...
Owners Manual
Page 55
... Analog Bypass 20, 21, 27, 29, 32 Antenna Terminals 7, 8, 12 Audio Equipment Connections 12 Auto Mode Tuning 6, 10, 11, 33 Auto Search Method 38 The Bridge 3, 7, 8, 9, 11, 12, 17, 26, 34, 54 Cable Television 8, 12, 39, 51-52 CD 3, 7, 8, 10, 11, 12, 13, 17, 18, 22, 23, 30, 31, 33, 34...
... Analog Bypass 20, 21, 27, 29, 32 Antenna Terminals 7, 8, 12 Audio Equipment Connections 12 Auto Mode Tuning 6, 10, 11, 33 Auto Search Method 38 The Bridge 3, 7, 8, 9, 11, 12, 17, 26, 34, 54 Cable Television 8, 12, 39, 51-52 CD 3, 7, 8, 10, 11, 12, 13, 17, 18, 22, 23, 30, 31, 33, 34...

Quick Start Guide
Page 2
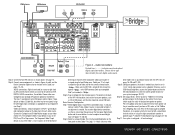
... colored (+) on the subwoofer later as needed. +_ FRONT LEFT SPEAKER +_ SURROUND BACK SPEAKER +_ SURROUND RIGHT SPEAKER Figure 2 - Speaker Connections +_ SURROUND LEFT SPEAKER +_ CENTER SPEAKER Figure 3 - AVR 140 QUICK-START GUIDE 140 The Bridge (100W, 1A MAX) (50W, 0.5A MAX) LINE IN/SUB/LFE SUBWOOFER +_ FRONT RIGHT SPEAKER Step 2.
... colored (+) on the subwoofer later as needed. +_ FRONT LEFT SPEAKER +_ SURROUND BACK SPEAKER +_ SURROUND RIGHT SPEAKER Figure 2 - Speaker Connections +_ SURROUND LEFT SPEAKER +_ CENTER SPEAKER Figure 3 - AVR 140 QUICK-START GUIDE 140 The Bridge (100W, 1A MAX) (50W, 0.5A MAX) LINE IN/SUB/LFE SUBWOOFER +_ FRONT RIGHT SPEAKER Step 2.
Quick Start Guide
Page 3
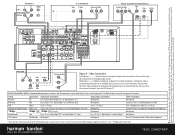
...or the 6-/8-channel direct inputs. FM Antenna AM Antenna CD PLAYER L R Optical Coax The Bridge (100W, 1A MAX) (50W, 0.5A MAX) The BridgeTM 140 AUDIO RECORDER REC/IN PLAY/OUT Figure 4 - The outlets on AVR. Configure speakers: No action is configured - Set output levels: Set the volume to speaker. ... OSD Manual Setup Menu, or press the Speaker button and then the Set and arrow buttons to adjust the level of the AVR 140 should not exceed 100 watts. Basic Receiver Configuration Step 7. In six-speaker systems, the levels for the currently selected source. ...
...or the 6-/8-channel direct inputs. FM Antenna AM Antenna CD PLAYER L R Optical Coax The Bridge (100W, 1A MAX) (50W, 0.5A MAX) The BridgeTM 140 AUDIO RECORDER REC/IN PLAY/OUT Figure 4 - The outlets on AVR. Configure speakers: No action is configured - Set output levels: Set the volume to speaker. ... OSD Manual Setup Menu, or press the Speaker button and then the Set and arrow buttons to adjust the level of the AVR 140 should not exceed 100 watts. Basic Receiver Configuration Step 7. In six-speaker systems, the levels for the currently selected source. ...
Quick Start Guide
Page 4
...recorders only. ® Power for all outputs from the AVR to determine whether digital audio is a registered trademark of Apple Computer, Inc. It may use any of Harman International Industries, Incorporated. iPod is available for the Digital ...Bridge) (100W, 1A MAX) (50W, 0.5A MAX) Cable or Sat or HDTV Set-Top Box (Video 2) Component Video Y Pb Pr L OUT R Video S-Video Optical Coax 140 DVD PLAYER L R Video S-Video Optical Coax Component Video Y Pb Pr Figure 5 - Dotted lines indicate component, composite or S-video connections. Harman Kardon, Harman...
...recorders only. ® Power for all outputs from the AVR to determine whether digital audio is a registered trademark of Apple Computer, Inc. It may use any of Harman International Industries, Incorporated. iPod is available for the Digital ...Bridge) (100W, 1A MAX) (50W, 0.5A MAX) Cable or Sat or HDTV Set-Top Box (Video 2) Component Video Y Pb Pr L OUT R Video S-Video Optical Coax 140 DVD PLAYER L R Video S-Video Optical Coax Component Video Y Pb Pr Figure 5 - Dotted lines indicate component, composite or S-video connections. Harman Kardon, Harman...
