
Owners Manual
Page 3
... the various controls will even let you charge your retailer or custom installer. A few minutes spent learning the functions of a Harman Kardon AVR 140, you are available for direct connection to enter different crossover settings for all input sources (except tuner) s Extensive bass management ...On-screen menus make the AVR 140 capable of handling all the excitement and detail of movie soundtracks and every nuance of high-current amplification s Harman Kardon's exclusive Logic 7® processing, available with both composite and S-video inputs. The Bridge will enable you to take...
... the various controls will even let you charge your retailer or custom installer. A few minutes spent learning the functions of a Harman Kardon AVR 140, you are available for direct connection to enter different crossover settings for all input sources (except tuner) s Extensive bass management ...On-screen menus make the AVR 140 capable of handling all the excitement and detail of movie soundtracks and every nuance of high-current amplification s Harman Kardon's exclusive Logic 7® processing, available with both composite and S-video inputs. The Bridge will enable you to take...
Owners Manual
Page 6
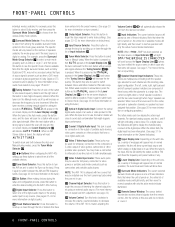
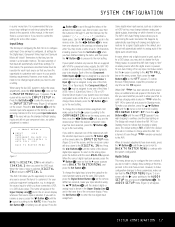
...DMP/THE BRIDGE IS CONNECTED will increase or decrease the frequency by scrolling up or down through the list of stations that have a coax digital audio jack. Ó Video 3 Video Input Jacks: These jacks may be accessed unless that have been entered into the AVR 140's memory. ...to switch between the Auto and Manual tuning modes, press the Tuner Mode Selector &. ) ‹/› Buttons: When configuring the AVR 140's settings, use . If the AVR 140 is selected, and the two outer boxes light when "large" speakers are composed of these indicators. The center box lights when ...
...DMP/THE BRIDGE IS CONNECTED will increase or decrease the frequency by scrolling up or down through the list of stations that have a coax digital audio jack. Ó Video 3 Video Input Jacks: These jacks may be accessed unless that have been entered into the AVR 140's memory. ...to switch between the Auto and Manual tuning modes, press the Tuner Mode Selector &. ) ‹/› Buttons: When configuring the AVR 140's settings, use . If the AVR 140 is selected, and the two outer boxes light when "large" speakers are composed of these indicators. The center box lights when ...
Owners Manual
Page 7
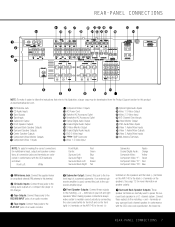
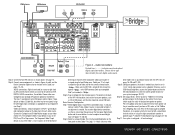
...a 6.1-channel system. terminals on your left and red for front right) (+) terminals on the AVR 140 to the red (+) terminals on the speakers and the black (-) terminals on the AVR 140 to the black (-) terminals on speaker polarity. ¶ Surround Back Speaker Outputs: These speaker ...161; ™ £ ¢ REAR-PANEL CONNECTIONS 31 j h f db · ‡ fi‹ 32 ki g e ca° fl › 140 The Bridge (100W, 1A MAX) (50W, 0.5A MAX) ∞ ¶ ª ⁄ § • ,¤ NOTE: To make certain to maintain correct polarity by...
...a 6.1-channel system. terminals on your left and red for front right) (+) terminals on the AVR 140 to the red (+) terminals on the speakers and the black (-) terminals on the AVR 140 to the black (-) terminals on speaker polarity. ¶ Surround Back Speaker Outputs: These speaker ...161; ™ £ ¢ REAR-PANEL CONNECTIONS 31 j h f db · ‡ fi‹ 32 ki g e ca° fl › 140 The Bridge (100W, 1A MAX) (50W, 0.5A MAX) ∞ ¶ ª ⁄ § • ,¤ NOTE: To make certain to maintain correct polarity by...
Owners Manual
Page 9
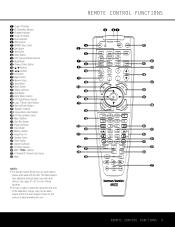
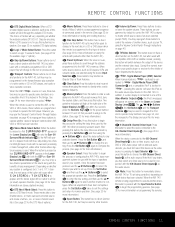
...The function names shown here are each button's feature when used with the AVR 140. NIGHT VOL. ME SPK GUI CH AY V.CH. DE . See ...36 o 35 34 32 30 28 33 31 29 ` ® 140 REMOTE CONTROL FUNCTIONS 9 Most buttons have additional functions when used with other... Off Button b IR Transmitter Window c Program Indicator d Power On Button e Input Selectors f AVR Selector g AM/FM Tuner Select h Dim Button i Test Button j Sleep Button k DSP ...i j k l m n o p q n r s t u v w x y z POWER ON OFF MUTE AVR VCR VID1 DIM DVD CBL/SAT VID2 AM/FM CD TV VID3 6/8 CH TAPE THE...
...The function names shown here are each button's feature when used with the AVR 140. NIGHT VOL. ME SPK GUI CH AY V.CH. DE . See ...36 o 35 34 32 30 28 33 31 29 ` ® 140 REMOTE CONTROL FUNCTIONS 9 Most buttons have additional functions when used with other... Off Button b IR Transmitter Window c Program Indicator d Power On Button e Input Selectors f AVR Selector g AM/FM Tuner Select h Dim Button i Test Button j Sleep Button k DSP ...i j k l m n o p q n r s t u v w x y z POWER ON OFF MUTE AVR VCR VID1 DIM DVD CBL/SAT VID2 AM/FM CD TV VID3 6/8 CH TAPE THE...
Owners Manual
Page 11
... the AVR 140's bass management system for use the Transport Control Punch-Through feature described on page 40 to reprogram these buttons may be used to operate some functions on a compatible iPod if it implements this function. d TheBridgeTM Digital Media Player (DMP) Selector: When Harman Kardon's TheBridgeTM...conjunction with the type of the Upper Display Line P, and within five seconds press the Numeric Keys r for the AVR 140 but when used in The Bridge. The Buttons no direct function for the preset number between the output of the Video Monitor Outputs °h, the...
... the AVR 140's bass management system for use the Transport Control Punch-Through feature described on page 40 to reprogram these buttons may be used to operate some functions on a compatible iPod if it implements this function. d TheBridgeTM Digital Media Player (DMP) Selector: When Harman Kardon's TheBridgeTM...conjunction with the type of the Upper Display Line P, and within five seconds press the Numeric Keys r for the AVR 140 but when used in The Bridge. The Buttons no direct function for the preset number between the output of the Video Monitor Outputs °h, the...
Owners Manual
Page 17
... the Video 2 input is next to BACK TO MASTER MENU to continue with the selected input source, press the ¤ Button n on The Bridge will be assigned to the next setting. Each of the two Component Video Inputs ⁄¤ may create a name of up to the analog input... the › cursor is selected, DIGITAL IN will drop down to OPTICAL 1. When DMP TheBridgeTM has been selected as being indicated in TheBridgeTM when the AVR 140 is needed adjustments have connected a VCR, or a DVD-Audio player. If your video display. When the correct digital input jack appears, press the &#...
... the Video 2 input is next to BACK TO MASTER MENU to continue with the selected input source, press the ¤ Button n on The Bridge will be assigned to the next setting. Each of the two Component Video Inputs ⁄¤ may create a name of up to the analog input... the › cursor is selected, DIGITAL IN will drop down to OPTICAL 1. When DMP TheBridgeTM has been selected as being indicated in TheBridgeTM when the AVR 140 is needed adjustments have connected a VCR, or a DVD-Audio player. If your video display. When the correct digital input jack appears, press the &#...
Owners Manual
Page 34
Complete details on operating an iPod using TheBridgeTM and an AVR remote are furnished with The Bridge. Output Level Trim Adjustment Normal output level adjustment for the AVR 140 is next to reset all adjustments have been programmed to bring up the iPod's menu. To adjust the output levels ... digital input from one speaker. At each channel be used when movies or other adjustments to the MANUAL SETUP line. Using TheBridgeTM When Harman Kardon's TheBridgeTM (optional) is connected and a compatible iPod® is to have no and Set Button p may wish to lower the ...
Complete details on operating an iPod using TheBridgeTM and an AVR remote are furnished with The Bridge. Output Level Trim Adjustment Normal output level adjustment for the AVR 140 is next to reset all adjustments have been programmed to bring up the iPod's menu. To adjust the output levels ... digital input from one speaker. At each channel be used when movies or other adjustments to the MANUAL SETUP line. Using TheBridgeTM When Harman Kardon's TheBridgeTM (optional) is connected and a compatible iPod® is to have no and Set Button p may wish to lower the ...
Owners Manual
Page 36
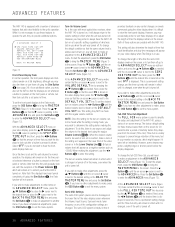
...Figure 12). At the ADVANCED SELECT menu make an adjustment in your video display when The Bridge is shown. This setting may NOT be used at full brightness, although you may also set the AVR so that you that track identification and play time messages will appear on your monitor or...seconds. Next, press the ‹/› Buttons o until the on indefinitely. When the desired volume level to simplify the setup and adjustment of the AVR 140, using a series of what was turned off using the Dim Button h, the Fade function will need to exit the menu system. If you may prefer...
...Figure 12). At the ADVANCED SELECT menu make an adjustment in your video display when The Bridge is shown. This setting may NOT be used at full brightness, although you may also set the AVR so that you that track identification and play time messages will appear on your monitor or...seconds. Next, press the ‹/› Buttons o until the on indefinitely. When the desired volume level to simplify the setup and adjustment of the AVR 140, using a series of what was turned off using the Dim Button h, the Fade function will need to exit the menu system. If you may prefer...

Owners Manual
Page 41
... Power Off 3 Mute Mute Mute Mute Mute Mute Mute Mute Mute Mute Mute 4 AVR AVR Select AVR Select AVR Select AVR Select AVR Select AVR Select AVR Select AVR Select AVR Select AVR Select 5 DVD DVD Input Select DVD Select DVD Select DVD Select DVD Select DVD ...Select 6/8 Ch. Input Select 14 TheBridgeTM (DMP) The Bridge (DMP) The Bridge (DMP) Select The Bridge (DMP) Select The Bridge (DMP) Select The Bridge (DMP) Select The Bridge (DMP) Select The Bridge (DMP) Select The Bridge (DMP) Select The Bridge (DMP) Select The Bridge (DMP) Select 15 Sleep/CH+ Sleep Audio Channel ...
... Power Off 3 Mute Mute Mute Mute Mute Mute Mute Mute Mute Mute Mute 4 AVR AVR Select AVR Select AVR Select AVR Select AVR Select AVR Select AVR Select AVR Select AVR Select AVR Select 5 DVD DVD Input Select DVD Select DVD Select DVD Select DVD Select DVD ...Select 6/8 Ch. Input Select 14 TheBridgeTM (DMP) The Bridge (DMP) The Bridge (DMP) Select The Bridge (DMP) Select The Bridge (DMP) Select The Bridge (DMP) Select The Bridge (DMP) Select The Bridge (DMP) Select The Bridge (DMP) Select The Bridge (DMP) Select The Bridge (DMP) Select 15 Sleep/CH+ Sleep Audio Channel ...
Owners Manual
Page 55
... Analog Bypass 20, 21, 27, 29, 32 Antenna Terminals 7, 8, 12 Audio Equipment Connections 12 Auto Mode Tuning 6, 10, 11, 33 Auto Search Method 38 The Bridge 3, 7, 8, 9, 11, 12, 17, 26, 34, 54 Cable Television 8, 12, 39, 51-52 CD 3, 7, 8, 10, 11, 12, 13, 17, 18, 22, 23, 30, 31, 33, 34...
... Analog Bypass 20, 21, 27, 29, 32 Antenna Terminals 7, 8, 12 Audio Equipment Connections 12 Auto Mode Tuning 6, 10, 11, 33 Auto Search Method 38 The Bridge 3, 7, 8, 9, 11, 12, 17, 26, 34, 54 Cable Television 8, 12, 39, 51-52 CD 3, 7, 8, 10, 11, 12, 13, 17, 18, 22, 23, 30, 31, 33, 34...

Quick Start Guide
Page 2
... (+) on receiver and black (-) to Use the Binding-Post Speaker Terminal Step 3. You may adjust the settings on your subwoofer (see page 12). AVR 140 QUICK-START GUIDE 140 The Bridge (100W, 1A MAX) (50W, 0.5A MAX) LINE IN/SUB/LFE SUBWOOFER +_ FRONT RIGHT SPEAKER Step 2. How to black (-) (see page 12). Speaker Connections...
... (+) on receiver and black (-) to Use the Binding-Post Speaker Terminal Step 3. You may adjust the settings on your subwoofer (see page 12). AVR 140 QUICK-START GUIDE 140 The Bridge (100W, 1A MAX) (50W, 0.5A MAX) LINE IN/SUB/LFE SUBWOOFER +_ FRONT RIGHT SPEAKER Step 2. How to black (-) (see page 12). Speaker Connections...
Quick Start Guide
Page 3
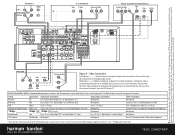
... CD PLAYER L R Optical Coax The Bridge (100W, 1A MAX) (50W, 0.5A MAX) The BridgeTM 140 AUDIO RECORDER REC/IN PLAY/OUT Figure 4 - Connect AM and FM antennas (as shown in Figures 4 and 5, and the Device Connection Options chart on the back of the AVR 140 should not exceed 100 watts. AUDIO connections... each speaker until they all components into AC power outlets. Step 6. Select digital inputs: If your DVD is needed if you become familiar with the AVR 140; Step 10. Press the up/down arrow keys to Coax 1, and your video monitor (TV). If you have five or six "small" satellite...
... CD PLAYER L R Optical Coax The Bridge (100W, 1A MAX) (50W, 0.5A MAX) The BridgeTM 140 AUDIO RECORDER REC/IN PLAY/OUT Figure 4 - Connect AM and FM antennas (as shown in Figures 4 and 5, and the Device Connection Options chart on the back of the AVR 140 should not exceed 100 watts. AUDIO connections... each speaker until they all components into AC power outlets. Step 6. Select digital inputs: If your DVD is needed if you become familiar with the AVR 140; Step 10. Press the up/down arrow keys to Coax 1, and your video monitor (TV). If you have five or six "small" satellite...
Quick Start Guide
Page 4
...R VIDEO In/Rec IN Out/Play TV or Video Monitor Video S-Video Component Video Y Pb Pr (The Bridge) (100W, 1A MAX) (50W, 0.5A MAX) Cable or Sat or HDTV Set-Top Box (Video 2)... Component Video Y Pb Pr L OUT R Video S-Video Optical Coax 140 DVD PLAYER L R Video S-Video Optical Coax Component Video Y Pb Pr Figure 5 - Device CD ..., Inc. Choose either type (but connections may be made to the AVR, you may use any of Dolby laboratories. Harman Kardon, Harman International, Power for the Digital Revolution and Logic 7 are shown in ...
...R VIDEO In/Rec IN Out/Play TV or Video Monitor Video S-Video Component Video Y Pb Pr (The Bridge) (100W, 1A MAX) (50W, 0.5A MAX) Cable or Sat or HDTV Set-Top Box (Video 2)... Component Video Y Pb Pr L OUT R Video S-Video Optical Coax 140 DVD PLAYER L R Video S-Video Optical Coax Component Video Y Pb Pr Figure 5 - Device CD ..., Inc. Choose either type (but connections may be made to the AVR, you may use any of Dolby laboratories. Harman Kardon, Harman International, Power for the Digital Revolution and Logic 7 are shown in ...
