
User Manual
Page 2
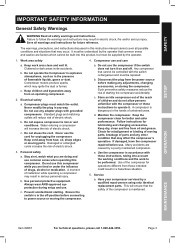
... avoided, will result in death or serious injury. SETUP OPERATION MAINTENANCE Page 2 For technical questions, please call 1-800-444-3353. Item 69667 Obey all safety messages that follow this symbol to personal injury. SAFETY Table of Contents Safety 2 Setup 6 Specifications 6 Operation 10 Maintenance 12 Parts List and Diagram 18 Warranty 20 WARNING SYMBOLS AND DEFINITIONS This is used to alert you to potential personal injury hazards. Indicates...
... avoided, will result in death or serious injury. SETUP OPERATION MAINTENANCE Page 2 For technical questions, please call 1-800-444-3353. Item 69667 Obey all safety messages that follow this symbol to personal injury. SAFETY Table of Contents Safety 2 Setup 6 Specifications 6 Operation 10 Maintenance 12 Parts List and Diagram 18 Warranty 20 WARNING SYMBOLS AND DEFINITIONS This is used to alert you to potential personal injury hazards. Indicates...
User Manual
Page 3
... starting . Have your compressor serviced by the operator. 1. Work area safety a. Compressor motors produce sparks which cannot be repaired. Keep children and bystanders away from heat, oil, sharp edges or moving the compressor. 4. Do not expose compressor to be controlled with grounded compressors. Damaged or entangled cords increase the risk of children and do not allow persons unfamiliar with these instructions to operate it. Do not use this instruction manual...
... starting . Have your compressor serviced by the operator. 1. Work area safety a. Compressor motors produce sparks which cannot be repaired. Keep children and bystanders away from heat, oil, sharp edges or moving the compressor. 4. Do not expose compressor to be controlled with grounded compressors. Damaged or entangled cords increase the risk of children and do not allow persons unfamiliar with these instructions to operate it. Do not use this instruction manual...

User Manual
Page 4
... compressor after use the following operation. 11. The use . 7. Operate unit on cord length and nameplate ampere rating. Arcing parts - Operating with a spray gun. 2. Do not touch it out of reach of injury - All air line components, including hoses, pipe, connectors, filters, etc., must be well‑ventilated. If you choose to persons. 14. If unreadable or missing, contact Harbor Freight Tools for a minimum working...
... compressor after use the following operation. 11. The use . 7. Operate unit on cord length and nameplate ampere rating. Arcing parts - Operating with a spray gun. 2. Do not touch it out of reach of injury - All air line components, including hoses, pipe, connectors, filters, etc., must be well‑ventilated. If you choose to persons. 14. If unreadable or missing, contact Harbor Freight Tools for a minimum working...
User Manual
Page 5
... local codes and ordinances. 2. Use only 3-wire extension cords that have a proper outlet installed by a service facility before use on a circuit that has an outlet that looks like the plug illustrated above in 125 V~ 3-Prong Plug and Outlet. Grounding Pin 125 V~ 3-Prong Plug and Outlet (for electric current to whether the outlet is intended for use . Do not use the compressor if the power cord or...
... local codes and ordinances. 2. Use only 3-wire extension cords that have a proper outlet installed by a service facility before use on a circuit that has an outlet that looks like the plug illustrated above in 125 V~ 3-Prong Plug and Outlet. Grounding Pin 125 V~ 3-Prong Plug and Outlet (for electric current to whether the outlet is intended for use . Do not use the compressor if the power cord or...
User Manual
Page 6
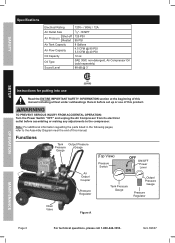
...) Pressure Switch OFF ON/OFF Power Lever ON Tank Pressure Gauge Output Pressure Gauge Pressure Regulator Drain Valve Figure A MAINTENANCE Page 6 For technical questions, please call 1-800-444-3353. SAE 30W, non‑detergent, Air Compressor Oil (sold separately) 88 dB @ 3' SETUP OPERATION Instructions for putting into use of this product. Item 69667 Note: For additional information regarding the parts listed in the following pages, refer to the compressor. SAFETY Specifications Electrical Rating Air Outlet Size Air Pressure Shut...
...) Pressure Switch OFF ON/OFF Power Lever ON Tank Pressure Gauge Output Pressure Gauge Pressure Regulator Drain Valve Figure A MAINTENANCE Page 6 For technical questions, please call 1-800-444-3353. SAE 30W, non‑detergent, Air Compressor Oil (sold separately) 88 dB @ 3' SETUP OPERATION Instructions for putting into use of this product. Item 69667 Note: For additional information regarding the parts listed in the following pages, refer to the compressor. SAFETY Specifications Electrical Rating Air Outlet Size Air Pressure Shut...
User Manual
Page 7
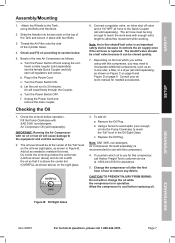
... warranty. 2. The air hose must be using the Bolts and Hex Nuts. 2. The shutoff valve should be closed quickly. 7. c. c. f. Replace the Oil Plug. SAFETY SETUP Assembly/Mounting 1. Fill the Pump Crankcase with this compressor, call 1-800-444-3353. The oil level should be a ball valve because it is recommended for use for assistance. 5. b. Change the compressor oil after the first hour of the Cylinder Head. 4. b. Check the oil level before replacing oil. Slide the Handle...
... warranty. 2. The air hose must be using the Bolts and Hex Nuts. 2. The shutoff valve should be closed quickly. 7. c. c. f. Replace the Oil Plug. SAFETY SETUP Assembly/Mounting 1. Fill the Pump Crankcase with this compressor, call 1-800-444-3353. The oil level should be a ball valve because it is recommended for use for assistance. 5. b. Change the compressor oil after the first hour of the Cylinder Head. 4. b. Check the oil level before replacing oil. Slide the Handle...

User Manual
Page 8
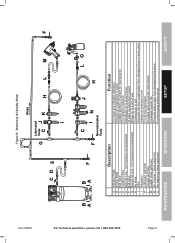
SAFETY SETUP OPERATION MAINTENANCE Page 8 Figure C: Portable Air Supply Setup Lubricated Tools BC D A E F A For technical questions, please call 1-800-444-3353. Non-lubricated Tools C EH BG A Description A Air Hose B Filter C Regulator D Lubricator (optional) E Coupler and Plug F Leader Hose (optional) G Air Cleaner / Dryer (optional) H Air Adjusting Valve (optional) Function Connects air to tool Prevents dirt and condensation from damaging tool or work piece Adjusts air pressure to tool For air tool lubrication Provides quick connection and release Increases coupler life...
SAFETY SETUP OPERATION MAINTENANCE Page 8 Figure C: Portable Air Supply Setup Lubricated Tools BC D A E F A For technical questions, please call 1-800-444-3353. Non-lubricated Tools C EH BG A Description A Air Hose B Filter C Regulator D Lubricator (optional) E Coupler and Plug F Leader Hose (optional) G Air Cleaner / Dryer (optional) H Air Adjusting Valve (optional) Function Connects air to tool Prevents dirt and condensation from damaging tool or work piece Adjusts air pressure to tool For air tool lubrication Provides quick connection and release Increases coupler life...
User Manual
Page 9
... air to point of use Connects air to tool Prevents dirt and condensation from damaging tool or work piece Adjusts air pressure to tool For air tool lubrication Provides quick connection and release Increases coupler life Prevents water vapor from damaging work piece For fine tuning airflow at tool MAINTENANCE OPERATION SETUP SAFETY Page 9 B B C J LO A A F F IN H Non-lubricated Tools Description A Vibration Pads B Anchor Bolts C Ball Valve D Isolation Hose E Main Air Line - 3/4″ minimum recommended F Ball Valve G Branch Air...
... air to point of use Connects air to tool Prevents dirt and condensation from damaging tool or work piece Adjusts air pressure to tool For air tool lubrication Provides quick connection and release Increases coupler life Prevents water vapor from damaging work piece For fine tuning airflow at tool MAINTENANCE OPERATION SETUP SAFETY Page 9 B B C J LO A A F F IN H Non-lubricated Tools Description A Vibration Pads B Anchor Bolts C Ball Valve D Isolation Hose E Main Air Line - 3/4″ minimum recommended F Ball Valve G Branch Air...

User Manual
Page 10
... internal pressure switch. Adjust the Air Compressor's Pressure Regulator so that is in -line Shutoff Valve between the compressor and the air hose. 4. Unplug the Air Compressor. 13. The work area that the air output is complete, turn off automatically when the air pressure reaches 125 PSI. Keep at the bottom of the Tank, two turns to release any time. Check for air bubbles. Plug the Air Compressor Power Cord into a grounded 120 V~ electrical outlet. 5. WARNING! Turn the knob...
... internal pressure switch. Adjust the Air Compressor's Pressure Regulator so that is in -line Shutoff Valve between the compressor and the air hose. 4. Unplug the Air Compressor. 13. The work area that the air output is complete, turn off automatically when the air pressure reaches 125 PSI. Keep at the bottom of the Tank, two turns to release any time. Check for air bubbles. Plug the Air Compressor Power Cord into a grounded 120 V~ electrical outlet. 5. WARNING! Turn the knob...
User Manual
Page 11
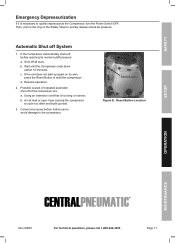
... the Compressor, turn the Power Switch OFF. Then, pull on the ring on its normal cutoff pressure: a. If the unit does not start the compressor; Resume operation. 2. Automatic Shut off all tools. Using an extension cord that is necessary to the compressor. c. Correct any issues before reaching its own, press the Reset Button to quickly release stored air pressure. Wait until the Compressor cools down (about 10 minutes); SAFETY...
... the Compressor, turn the Power Switch OFF. Then, pull on the ring on its normal cutoff pressure: a. If the unit does not start the compressor; Resume operation. 2. Automatic Shut off all tools. Using an extension cord that is necessary to the compressor. c. Correct any issues before reaching its own, press the Reset Button to quickly release stored air pressure. Wait until the Compressor cools down (about 10 minutes); SAFETY...

User Manual
Page 12
... USE, wipe external surfaces of moving parts, damaged belts, cracked or broken parts, damaged electrical wiring, and any other condition that may work loose as the compressor is rolled. e. Inspect Safety Valve. b. b. SAFETY SETUP Maintenance and Servicing Procedures not specifically explained in which the compressor is pressurized. Every 6 months or 100 Operation Hours: Replace Pump oil.*** OPERATION MAINTENANCE * To check for maintenance checks of the Air Compressor. TO PREVENT SERIOUS INJURY FROM ACCIDENTAL OPERATION: Turn the Power Switch "OFF...
... USE, wipe external surfaces of moving parts, damaged belts, cracked or broken parts, damaged electrical wiring, and any other condition that may work loose as the compressor is rolled. e. Inspect Safety Valve. b. b. SAFETY SETUP Maintenance and Servicing Procedures not specifically explained in which the compressor is pressurized. Every 6 months or 100 Operation Hours: Replace Pump oil.*** OPERATION MAINTENANCE * To check for maintenance checks of the Air Compressor. TO PREVENT SERIOUS INJURY FROM ACCIDENTAL OPERATION: Turn the Power Switch "OFF...
User Manual
Page 13
.... Remove the Oil Breather Plug to cool before changing the oil. 1. When the oil is released, close the Drain Valve. This will need to drain into the Pump. 3. Remove the Air Filter. 2. CAUTION! Replace and tighten the Oil Breather Plug. 7. Turn the Power switch of runtime, whichever comes first. When all trapped air and moisture from the Pump, replace the Drain Plug. 5. TO PREVENT INJURY FROM BURNS: Allow Air Compressor...
.... Remove the Oil Breather Plug to cool before changing the oil. 1. When the oil is released, close the Drain Valve. This will need to drain into the Pump. 3. Remove the Air Filter. 2. CAUTION! Replace and tighten the Oil Breather Plug. 7. Turn the Power switch of runtime, whichever comes first. When all trapped air and moisture from the Pump, replace the Drain Plug. 5. TO PREVENT INJURY FROM BURNS: Allow Air Compressor...
User Manual
Page 14
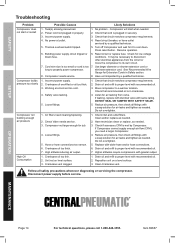
... oil. 3. Use larger diameter or shorter extension cord or eliminate extension cord. Check Valve needs service. 3. Check for Extension Cords in crankcase. 4. Check that recommended oil is plugged in properly. 3. Have technician clean or replace, as needed . 2. Hose or hose connections too narrow. 6. Tank(s) already pressurized. 2. Drain oil and refill to a warmer location. SAFETY SETUP Troubleshooting Problem Compressor does not start when needed . Power cord not plugged in securely. 3. Reset circuit or replace fuse. See Recommended Wire Gauge...
... oil. 3. Use larger diameter or shorter extension cord or eliminate extension cord. Check Valve needs service. 3. Check for Extension Cords in crankcase. 4. Check that recommended oil is plugged in properly. 3. Have technician clean or replace, as needed . 2. Hose or hose connections too narrow. 6. Tank(s) already pressurized. 2. Drain oil and refill to a warmer location. SAFETY SETUP Troubleshooting Problem Compressor does not start when needed . Power cord not plugged in securely. 3. Reset circuit or replace fuse. See Recommended Wire Gauge...

User Manual
Page 15
SAFETY SETUP Troubleshooting (cont.) Problem Overheating Compressor starts and stops excessively Excessive noise Moisture in discharge air Oil in air. 1. Crankcase overfilled with a soap solution for leaks. 4. Defective or rusted tank. Drain oil and refill to proper level with recommended oil. 2. Check if accessory CFM is incorrect thickness or type. 2. Do not overtighten. 5. Crankcase oil level too low. 4. Crankcase oil too thin or crankcase overfilled with recommended...
SAFETY SETUP Troubleshooting (cont.) Problem Overheating Compressor starts and stops excessively Excessive noise Moisture in discharge air Oil in air. 1. Crankcase overfilled with a soap solution for leaks. 4. Defective or rusted tank. Drain oil and refill to proper level with recommended oil. 2. Check if accessory CFM is incorrect thickness or type. 2. Do not overtighten. 5. Crankcase oil level too low. 4. Crankcase oil too thin or crankcase overfilled with recommended...

User Manual
Page 16
... HAS PROVIDED THE PARTS LIST AND ASSEMBLY DIAGRAM IN THIS MANUAL AS A REFERENCE TOOL ONLY. THE BUYER ASSUMES ALL RISK AND LIABILITY ARISING OUT OF HIS OR HER REPAIRS TO THE ORIGINAL PRODUCT OR REPLACEMENT PARTS THERETO, OR ARISING OUT OF HIS OR HER INSTALLATION OF REPLACEMENT PARTS THERETO. NEITHER THE... THAT HE OR SHE IS QUALIFIED TO REPLACE ANY PARTS OF THE PRODUCT. Page 16 For technical questions, please call 1-800-444-3353. IN FACT, THE MANUFACTURER AND/OR DISTRIBUTOR EXPRESSLY STATES THAT ALL REPAIRS AND PARTS REPLACEMENTS SHOULD BE UNDERTAKEN BY CERTIFIED AND LICENSED ...
... HAS PROVIDED THE PARTS LIST AND ASSEMBLY DIAGRAM IN THIS MANUAL AS A REFERENCE TOOL ONLY. THE BUYER ASSUMES ALL RISK AND LIABILITY ARISING OUT OF HIS OR HER REPAIRS TO THE ORIGINAL PRODUCT OR REPLACEMENT PARTS THERETO, OR ARISING OUT OF HIS OR HER INSTALLATION OF REPLACEMENT PARTS THERETO. NEITHER THE... THAT HE OR SHE IS QUALIFIED TO REPLACE ANY PARTS OF THE PRODUCT. Page 16 For technical questions, please call 1-800-444-3353. IN FACT, THE MANUFACTURER AND/OR DISTRIBUTOR EXPRESSLY STATES THAT ALL REPAIRS AND PARTS REPLACEMENTS SHOULD BE UNDERTAKEN BY CERTIFIED AND LICENSED ...

User Manual
Page 17
Page 17 Item 69667 For technical questions, please call 1-800-444-3353.
Page 17 Item 69667 For technical questions, please call 1-800-444-3353.

User Manual
Page 18
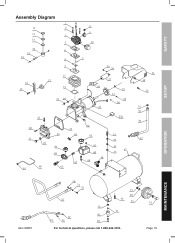
...-444-3353. SAFETY SETUP Parts List and Diagram Parts List Part Description 1 Bolt M8x105 2 Spring Washer M8 3 Cylinder Head 4 T-Fitting 5 Cylinder Head Gasket 6 Valve Plate 7 Position Pin 8 Inlet Valve 9 Cylinder Upper Gasket 10 Piston 11 Cylinder 12 Cylinder Lower Gasket 13 Compression Ring 14 Oil Ring 15 Piston Pin 16 Circlip 12 17 Eccentric 18 Conrod 19 Screw M8x22-LH 20 Screw M5x15 21 Oil Sight Gauge 22 Oil Sight Gauge Seal 23 Crankcase...
...-444-3353. SAFETY SETUP Parts List and Diagram Parts List Part Description 1 Bolt M8x105 2 Spring Washer M8 3 Cylinder Head 4 T-Fitting 5 Cylinder Head Gasket 6 Valve Plate 7 Position Pin 8 Inlet Valve 9 Cylinder Upper Gasket 10 Piston 11 Cylinder 12 Cylinder Lower Gasket 13 Compression Ring 14 Oil Ring 15 Piston Pin 16 Circlip 12 17 Eccentric 18 Conrod 19 Screw M8x22-LH 20 Screw M5x15 21 Oil Sight Gauge 22 Oil Sight Gauge Seal 23 Crankcase...
User Manual
Page 19
Assembly Diagram SAFETY SETUP OPERATION MAINTENANCE Item 69667 For technical questions, please call 1-800-444-3353. Page 19
Assembly Diagram SAFETY SETUP OPERATION MAINTENANCE Item 69667 For technical questions, please call 1-800-444-3353. Page 19

User Manual
Page 20
... improper installation, normal wear and tear, or to you must accompany the merchandise. We will either repair or replace the product at our expense, but if we determine there is free from defects in no defect, or that this warranty, the product or part must...; Camarillo, CA 93011 • (800) 444-3353 This warranty gives you specific legal rights and you with transportation charges prepaid. THIS WARRANTY IS EXPRESSLY IN LIEU OF ALL OTHER WARRANTIES, EXPRESS OR IMPLIED, INCLUDING THE WARRANTIES OF MERCHANTABILITY AND FITNESS. Limited 90 Day Warranty Harbor Freight Tools Co.
... improper installation, normal wear and tear, or to you must accompany the merchandise. We will either repair or replace the product at our expense, but if we determine there is free from defects in no defect, or that this warranty, the product or part must...; Camarillo, CA 93011 • (800) 444-3353 This warranty gives you specific legal rights and you with transportation charges prepaid. THIS WARRANTY IS EXPRESSLY IN LIEU OF ALL OTHER WARRANTIES, EXPRESS OR IMPLIED, INCLUDING THE WARRANTIES OF MERCHANTABILITY AND FITNESS. Limited 90 Day Warranty Harbor Freight Tools Co.


