
User Manual
Page 1
... the manual near the assembly diagram (or month and year of Harbor Freight Tools. Tools required for assembly and service may not be included. Diagrams within this manual or any parts are missing or broken, please call 1-888-866-5797 as soon as possible. All rights reserved. Read this material before using this manual and the receipt in serious injury. Write the product's serial number in...
... the manual near the assembly diagram (or month and year of Harbor Freight Tools. Tools required for assembly and service may not be included. Diagrams within this manual or any parts are missing or broken, please call 1-888-866-5797 as soon as possible. All rights reserved. Read this material before using this manual and the receipt in serious injury. Write the product's serial number in...
User Manual
Page 2
.... Table of electric shock. Save all safety warnings and instructions. Work area safety 1. Do not operate power tools in explosive atmospheres, such as in the warnings refers to lose control. Indicates a hazardous situation which , if not avoided, will increase the risk of Contents Safety 2 Specifications 7 Setup 7 Operation 8 Maintenance 10 Parts List and Diagram 11 Warranty 12 SAFETY SETUP OPERATION WARNING SYMBOLS AND DEFINITIONS This is used to alert you to your battery-operated (cordless) power tool. Failure...
.... Table of electric shock. Save all safety warnings and instructions. Work area safety 1. Do not operate power tools in explosive atmospheres, such as in the warnings refers to lose control. Indicates a hazardous situation which , if not avoided, will increase the risk of Contents Safety 2 Specifications 7 Setup 7 Operation 8 Maintenance 10 Parts List and Diagram 11 Warranty 12 SAFETY SETUP OPERATION WARNING SYMBOLS AND DEFINITIONS This is used to alert you to your battery-operated (cordless) power tool. Failure...
User Manual
Page 3
... power tool for the specific hazards in the hands of untrained users. 5. Stay alert, watch what you are tired or under the influence of starting . Use personal protective equipment. Safety equipment such as dust mask, non-skid safety shoes, hard hat, or hearing protection used for your hair, clothing and gloves away from the power tool before making any adjusting key or wrench before connecting the battery...
... power tool for the specific hazards in the hands of untrained users. 5. Stay alert, watch what you are tired or under the influence of starting . Use personal protective equipment. Safety equipment such as dust mask, non-skid safety shoes, hard hat, or hearing protection used for your hair, clothing and gloves away from the power tool before making any adjusting key or wrench before connecting the battery...
User Manual
Page 4
..., keys, nails, screws or other small metal objects, that can make exposed metal parts of your power tool serviced by a qualified repair person using a handheld power tool, maintain a firm grip on the Charger. The battery Charger gets hot during use and care 1. The Charger's heat can grab the surface and pull the tool out of the tool ″live ″ wire will ensure that is suitable for a replacement. 4. Place the Charger...
..., keys, nails, screws or other small metal objects, that can make exposed metal parts of your power tool serviced by a qualified repair person using a handheld power tool, maintain a firm grip on the Charger. The battery Charger gets hot during use and care 1. The Charger's heat can grab the surface and pull the tool out of the tool ″live ″ wire will ensure that is suitable for a replacement. 4. Place the Charger...
User Manual
Page 5
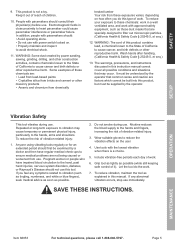
...(s) before use. It must be supplied by power sanding, sawing, grinding, drilling, and other construction activities, contains chemicals known to the State of California to ensure medical problems are factors which cannot be examined by the operator that common...work in this manual. To reduce your exposure to avoid electrical shock. 11. WARNING: Some dust created by the operator. Page 5 Use tools with power switch locked on how often you feel any abnormal vibration occurs, stop use with the lowest vibration when there is not a toy. OPERATION MAINTENANCE Item 68853...
...(s) before use. It must be supplied by power sanding, sawing, grinding, drilling, and other construction activities, contains chemicals known to the State of California to ensure medical problems are factors which cannot be examined by the operator that common...work in this manual. To reduce your exposure to avoid electrical shock. 11. WARNING: Some dust created by the operator. Page 5 Use tools with power switch locked on how often you feel any abnormal vibration occurs, stop use with the lowest vibration when there is not a toy. OPERATION MAINTENANCE Item 68853...
User Manual
Page 6
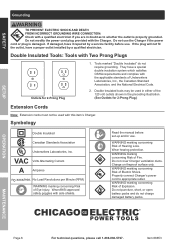
... outlet installed by a service facility before set-up and/or use the Charger if the power cord or plug is properly grounded. Double insulated tools may be used with side shields. No Load Revolutions per Minute (RPM) WARNING marking concerning Risk of Fire. Read the manual before use. Properly connect Charger's power cord to whether the outlet is damaged. Do not puncture, short, or open battery...
... outlet installed by a service facility before set-up and/or use the Charger if the power cord or plug is properly grounded. Double insulated tools may be used with side shields. No Load Revolutions per Minute (RPM) WARNING marking concerning Risk of Fire. Read the manual before use. Properly connect Charger's power cord to whether the outlet is damaged. Do not puncture, short, or open battery...
User Manual
Page 7
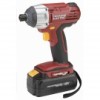
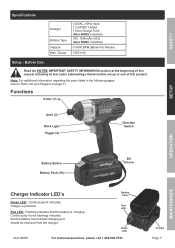
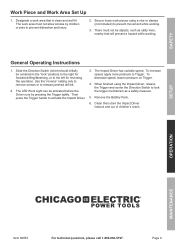
..., refer to Parts List and Diagram on page 11. Functions Collar (11-1) Anvil (2) Work Light Trigger (4) Direction Switch SETUP OPERATION MAINTENANCE Battery Button Battery Pack (16) Bit Groove Charger Indicator LED's Battery Pack Green LED: Continuously lit indicates charger is charging. Red LED: Flashing indicates that the battery has finished charging and should be removed from the charger. Charger Page 7 Continuously lit (not flashing) indicates that the battery is powered. SAFETY Specifications Charger Battery Type Impacts Max. Before Use: Read the...
..., refer to Parts List and Diagram on page 11. Functions Collar (11-1) Anvil (2) Work Light Trigger (4) Direction Switch SETUP OPERATION MAINTENANCE Battery Button Battery Pack (16) Bit Groove Charger Indicator LED's Battery Pack Green LED: Continuously lit indicates charger is charging. Red LED: Flashing indicates that the battery has finished charging and should be removed from the charger. Charger Page 7 Continuously lit (not flashing) indicates that the battery is powered. SAFETY Specifications Charger Battery Type Impacts Max. Before Use: Read the...
User Manual
Page 8
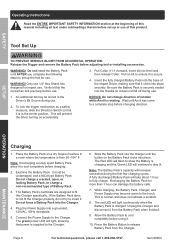
... stop before adjusting tool or installing accessories. Be sure the Battery Pack is charged. SETUP OPERATION MAINTENANCE Charging 1. Do not charge a cracked, open, or leaking Battery Pack, or charge a non‑recommended type of Battery Pack. 3. Pull Collar (11-1) forward, insert bit into the Handle so it from the Charger. Examine the Battery Pack. Note: The Battery Pack's capacity will continue to set up the tool for use. While charging, the Battery...
... stop before adjusting tool or installing accessories. Be sure the Battery Pack is charged. SETUP OPERATION MAINTENANCE Charging 1. Do not charge a cracked, open, or leaking Battery Pack, or charge a non‑recommended type of Battery Pack. 3. Pull Collar (11-1) forward, insert bit into the Handle so it from the Charger. Examine the Battery Pack. Note: The Battery Pack's capacity will continue to set up the tool for use. While charging, the Battery...
User Manual
Page 9
... a safety measure. 5. Secure loose work area that will present a hazard while working . 3. General Operating Instructions 1. Slide the Direction Switch (which should initially be activated before the Driver runs by children or pets to prevent distraction and injury. 2. The Impact Driver has variable speed. Remove the Battery Pack. 6. SETUP OPERATION MAINTENANCE Item 68853 For technical questions, please call 1-888-866-5797. Page 9 Designate a work pieces using the Impact Driver, release the Trigger and center the Direction Switch to...
... a safety measure. 5. Secure loose work area that will present a hazard while working . 3. General Operating Instructions 1. Slide the Direction Switch (which should initially be activated before the Driver runs by children or pets to prevent distraction and injury. 2. The Impact Driver has variable speed. Remove the Battery Pack. 6. SETUP OPERATION MAINTENANCE Item 68853 For technical questions, please call 1-888-866-5797. Page 9 Designate a work pieces using the Impact Driver, release the Trigger and center the Direction Switch to...
User Manual
Page 10
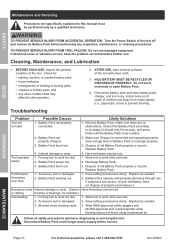
... cutting accessories sharp. Replace as needed . 2. brushes or bearings, for Battery Pack to recharge properly. 3. SAFETY SETUP Maintenance and Servicing Procedures not specifically explained in dry, indoor area out of reach of children and away from metal objects (i.e., paperclips, coins) to prevent shorting. If abnormal noise or vibration occurs, have the problem corrected before service. Disconnect battery pack and store battery pack, charger, and tool in this manual...
... cutting accessories sharp. Replace as needed . 2. brushes or bearings, for Battery Pack to recharge properly. 3. SAFETY SETUP Maintenance and Servicing Procedures not specifically explained in dry, indoor area out of reach of children and away from metal objects (i.e., paperclips, coins) to prevent shorting. If abnormal noise or vibration occurs, have the problem corrected before service. Disconnect battery pack and store battery pack, charger, and tool in this manual...
User Manual
Page 11
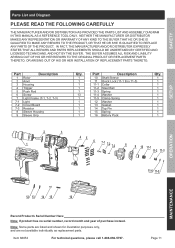
... 6 Screw 7 Light Frame (7-1, 7-2, 7-3) 7-1 Light 7-2 Circuit Board 7-3 Resistor 8 Sleeve Housing 9 Sleeve Grip Qty. 1 1 1 1 1 13 1 1 1 1 1 1 Part Description 10 Shaft Sleeve 11 Quick Lock (11-1 thru 11-5) 11-1 Collar 11-2 Steel Ball 11-3 Spring 11-4 Washer 11-5 Clamp Spring 12 Washer 13 Gasket 14 Top Pin 15 Spring 16 Battery Pack Qty. 1 1 1 1 1 1 1 1 1 1 1 1 2 3 1 45 6 7-1 7-2 7-3 8 9 10 11-1 11-2 11-3 11-4 11-5 OPERATION MAINTENANCE 12 13 14 15 16 Record Product's Serial Number...
... 6 Screw 7 Light Frame (7-1, 7-2, 7-3) 7-1 Light 7-2 Circuit Board 7-3 Resistor 8 Sleeve Housing 9 Sleeve Grip Qty. 1 1 1 1 1 13 1 1 1 1 1 1 Part Description 10 Shaft Sleeve 11 Quick Lock (11-1 thru 11-5) 11-1 Collar 11-2 Steel Ball 11-3 Spring 11-4 Washer 11-5 Clamp Spring 12 Washer 13 Gasket 14 Top Pin 15 Spring 16 Battery Pack Qty. 1 1 1 1 1 1 1 1 1 1 1 1 2 3 1 45 6 7-1 7-2 7-3 8 9 10 11-1 11-2 11-3 11-4 11-5 OPERATION MAINTENANCE 12 13 14 15 16 Record Product's Serial Number...
User Manual
Page 12
...warranty gives you specific legal rights and you . Limited 90 Day Warranty Harbor Freight Tools Co. To take advantage of this product is no event be returned to refund the purchase price if we cannot readily and quickly provide you must bear the cost of exclusion may elect to us with a replacement. We will either repair or replace...from the date of maintenance. This warranty does not apply to damage due directly or indirectly, to misuse, abuse, negligence or accidents, repairs or alterations outside our facilities, criminal activity, improper installation, normal wear and tear...
...warranty gives you specific legal rights and you . Limited 90 Day Warranty Harbor Freight Tools Co. To take advantage of this product is no event be returned to refund the purchase price if we cannot readily and quickly provide you must bear the cost of exclusion may elect to us with a replacement. We will either repair or replace...from the date of maintenance. This warranty does not apply to damage due directly or indirectly, to misuse, abuse, negligence or accidents, repairs or alterations outside our facilities, criminal activity, improper installation, normal wear and tear...


