
User Manual
Page 2
... Class B Radio Frequency Interference Statement This equipment has been tested and found to comply with the instructions, may not cause harmful interference﹔ and (2) this manual thoroughly. This equipment generates, uses and can be determined by turning the equipment off and on a circuit different from that interference will not occur in a particular installation. If this equipment...
... Class B Radio Frequency Interference Statement This equipment has been tested and found to comply with the instructions, may not cause harmful interference﹔ and (2) this manual thoroughly. This equipment generates, uses and can be determined by turning the equipment off and on a circuit different from that interference will not occur in a particular installation. If this equipment...

User Manual
Page 5
TABLE OF CONTENTS User's Manual SAFETY NOTICE 6 PRECAUTIONS 6 SPECIAL NOTES ON LCD MONITORS 7 BEFORE YOU OPERATE THE MONITOR 8 FEATURES...8 CHECKING THE CONTENTS OF THE PACKAGE 8 INSTALLATION INSTRUCTIONS 9 POWER...9 MAKING CONNECTIONS 10 ADJUSTING THE VIEWING ANGLE 11 OPERATING INSTRUCTIONS 12 GENERAL INSTRUCTIONS 12 FRONT PANEL CONTROL 13 HOW TO ADJUST A SETTINGS 15 PLUG AND PLAY 18 TECHNICAL SUPPORT (FAQ 19 Q & A FOR GENERAL PROBLEMS 19 ERROR MESSAGE & POSSIBLE SOLUTIONS 21 APPENDIX ...23 SPECIFICATIONS 23 5
TABLE OF CONTENTS User's Manual SAFETY NOTICE 6 PRECAUTIONS 6 SPECIAL NOTES ON LCD MONITORS 7 BEFORE YOU OPERATE THE MONITOR 8 FEATURES...8 CHECKING THE CONTENTS OF THE PACKAGE 8 INSTALLATION INSTRUCTIONS 9 POWER...9 MAKING CONNECTIONS 10 ADJUSTING THE VIEWING ANGLE 11 OPERATING INSTRUCTIONS 12 GENERAL INSTRUCTIONS 12 FRONT PANEL CONTROL 13 HOW TO ADJUST A SETTINGS 15 PLUG AND PLAY 18 TECHNICAL SUPPORT (FAQ 19 Q & A FOR GENERAL PROBLEMS 19 ERROR MESSAGE & POSSIBLE SOLUTIONS 21 APPENDIX ...23 SPECIFICATIONS 23 5
User Manual
Page 6
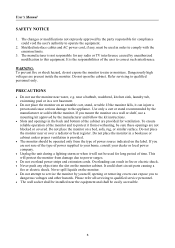
... of power source indicated on an unstable cart, stand, or table. PRECAUTIONS • Do not use a mounting kit approved by the manufacturer or sold with the emission limits. 3. Shielded interface cables and AC power cord, if any, must be easily accessible. 6 User's Manual SAFETY NOTICE 1. Use only a cart or stand recommended by the manufacturer and follow the kit instructions. • Slots and openings in...
... of power source indicated on an unstable cart, stand, or table. PRECAUTIONS • Do not use a mounting kit approved by the manufacturer or sold with the emission limits. 3. Shielded interface cables and AC power cord, if any, must be easily accessible. 6 User's Manual SAFETY NOTICE 1. Use only a cart or stand recommended by the manufacturer and follow the kit instructions. • Slots and openings in...

User Manual
Page 7
... by changing the image or turning off the Power Switch and then turn it on again to make sure the flicker disappears. • You may find slightly uneven brightness on the screen depending on the desktop pattern you use . Lamp Disposal LAMP(S) INSIDE THIS PRODUCT CONTAIN MERCURY AND MUST BE RECYCLED OR DISPOSED OF ACCORDING TO LOCAL, STATE OR FEDERAL LAWS. User's Manual...
... by changing the image or turning off the Power Switch and then turn it on again to make sure the flicker disappears. • You may find slightly uneven brightness on the screen depending on the desktop pattern you use . Lamp Disposal LAMP(S) INSIDE THIS PRODUCT CONTAIN MERCURY AND MUST BE RECYCLED OR DISPOSED OF ACCORDING TO LOCAL, STATE OR FEDERAL LAWS. User's Manual...
User Manual
Page 8
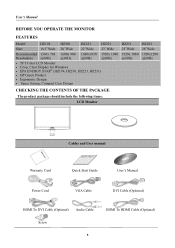
...; TFT Color LCD Monitor • Crisp, Clear Display for Windows • EPA ENERGY STAR® (HZ194, HZ201, HZ221, HZ231) • GP Green Product • Ergonomic Design • Space Saving, Compact Case Design HZ251 25"Wide 1920x 1080 @60Hz HZ281 28"Wide 1920x1200 @60Hz CHECKING THE CONTENTS OF THE PACKAGE The product package should include the following items: LCD Monitor Cables and User manual Warranty Card Quick Start Guide User's Manual Power Cord VGA Cable DVI Cable (Optional) HDMI To DVI Cable...
...; TFT Color LCD Monitor • Crisp, Clear Display for Windows • EPA ENERGY STAR® (HZ194, HZ201, HZ221, HZ231) • GP Green Product • Ergonomic Design • Space Saving, Compact Case Design HZ251 25"Wide 1920x 1080 @60Hz HZ281 28"Wide 1920x1200 @60Hz CHECKING THE CONTENTS OF THE PACKAGE The product package should include the following items: LCD Monitor Cables and User manual Warranty Card Quick Start Guide User's Manual Power Cord VGA Cable DVI Cable (Optional) HDMI To DVI Cable...
User Manual
Page 9
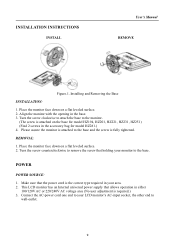
.../240V AC voltage area (No user adjustment is attached to wall-outlet. 9 INSTALLATION INSTRUCTIONS INSTALL User's Manual REMOVE Figure.1. Connect the AC-power cord one end to your monitor to the monitor. (The screw is attached on the base for model HZ281.) 4. Turn the screw clockwise to attach the base to the base. Turn the screw counterclockwise to remove the screw that the power cord is fully tightened. Make sure that holding your LCD monitor's AC-input socket, the other end...
.../240V AC voltage area (No user adjustment is attached to wall-outlet. 9 INSTALLATION INSTRUCTIONS INSTALL User's Manual REMOVE Figure.1. Connect the AC-power cord one end to your monitor to the monitor. (The screw is attached on the base for model HZ281.) 4. Turn the screw clockwise to attach the base to the base. Turn the screw counterclockwise to remove the screw that the power cord is fully tightened. Make sure that holding your LCD monitor's AC-input socket, the other end...

User Manual
Page 10
... port. 2. Plug one end of the VGA cable to the back of the AC power cord to the LCD monitor's AC input socket, and the other end to the computer's DVI-D port. 3. HZ251D HZ201H; HZ194A HZ201D; Connecting to Wall outlet. 6. HZ221D; HZ231D; Connect one end of the monitor and connect the other end to a PC 1 Power AC Input 3 VGA Input 5 HDMI Input 2 Audio Input 4 DVI Input 6 Earphone 10 Connect the audio cable between the monitor's audio input and the PC's audio output (green port). 5. HZ231H; Turn...
... port. 2. Plug one end of the VGA cable to the back of the AC power cord to the LCD monitor's AC input socket, and the other end to the computer's DVI-D port. 3. HZ251D HZ201H; HZ194A HZ201D; Connecting to Wall outlet. 6. HZ221D; HZ231D; Connect one end of the monitor and connect the other end to a PC 1 Power AC Input 3 VGA Input 5 HDMI Input 2 Audio Input 4 DVI Input 6 Earphone 10 Connect the audio cable between the monitor's audio input and the PC's audio output (green port). 5. HZ231H; Turn...

User Manual
Page 12
...8226; The power cord should be connected. • Connect the Signal cable from the monitor to the VGA card. • Press the power button to turn on or off. Menu / Return ▲ [-] Brightness adjustment button ▼ [+] Volume adjustment button Auto adjustment/ Enter 《Analog Input Models》 Input source change/ Enter 《Digital Input Models》 Power Button Figure.4. User's Manual OPERATING INSTRUCTIONS GENERAL INSTRUCTIONS Press the power button to turn the monitor on the monitor. Control Panel Buttons 12 The other control buttons are located...
...8226; The power cord should be connected. • Connect the Signal cable from the monitor to the VGA card. • Press the power button to turn on or off. Menu / Return ▲ [-] Brightness adjustment button ▼ [+] Volume adjustment button Auto adjustment/ Enter 《Analog Input Models》 Input source change/ Enter 《Digital Input Models》 Power Button Figure.4. User's Manual OPERATING INSTRUCTIONS GENERAL INSTRUCTIONS Press the power button to turn the monitor on the monitor. Control Panel Buttons 12 The other control buttons are located...
User Manual
Page 13
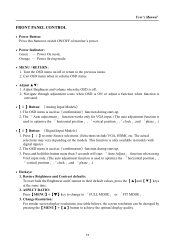
...; i 】Button: 《Analog Input Models》 1. Press【 i 】to achieve the optimal display quality. 13 Exit OSD menu when in models with digital inputs) 2. User's Manual FRONT PANEL CONTROL • Power Button: Press this button more than 3 seconds will start 「Auto Adjust」 function when using VGA input only. (The auto adjustment function is used to optimize the 「horizontal position」, 「vertical position」,「clock」,and 「phase」.) • Hotkeys: 1. Power Saving mode. • MENU / RETURN...
...; i 】Button: 《Analog Input Models》 1. Press【 i 】to achieve the optimal display quality. 13 Exit OSD menu when in models with digital inputs) 2. User's Manual FRONT PANEL CONTROL • Power Button: Press this button more than 3 seconds will start 「Auto Adjust」 function when using VGA input only. (The auto adjustment function is used to optimize the 「horizontal position」, 「vertical position」,「clock」,and 「phase」.) • Hotkeys: 1. Power Saving mode. • MENU / RETURN...

User Manual
Page 15
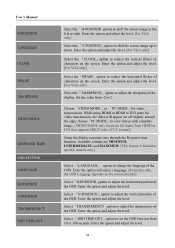
... the screen showing black bands. [The availability of the display according to activate or deactivate the automatic signal search function. [For DVI/ HDMI Input only] COLOR SETTING WARM NATURE (6500K) COOL USER IMAGE SETTING Adjust the color temperature value of the image are automatically detected, and the contrast is or in initial scale.「FIT」indicates scaling by using this function depends upon the selected model] 15 X-CONTRAST Optimal setting...
... the screen showing black bands. [The availability of the display according to activate or deactivate the automatic signal search function. [For DVI/ HDMI Input only] COLOR SETTING WARM NATURE (6500K) COOL USER IMAGE SETTING Adjust the color temperature value of the image are automatically detected, and the contrast is or in initial scale.「FIT」indicates scaling by using this function depends upon the selected model] 15 X-CONTRAST Optimal setting...
User Manual
Page 16
... using HDMI or HDMI to 100 seconds. Enter the option and adjust the level. Enter the option and adjust the level. [For VGA only] Select the 「V-POSITION」option to view videos with complete image. (VIDEO MODE only functions for inputs from HDMI or DVI that supports HDCP video (YUV format)) Setup the display response time through the Response time function. choose「PC MODE」to shift the screen image...
... using HDMI or HDMI to 100 seconds. Enter the option and adjust the level. Enter the option and adjust the level. [For VGA only] Select the 「V-POSITION」option to view videos with complete image. (VIDEO MODE only functions for inputs from HDMI or DVI that supports HDCP video (YUV format)) Setup the display response time through the Response time function. choose「PC MODE」to shift the screen image...

User Manual
Page 17
... to the monitor's default setting. Adjusting the volume while muted cancels Mute mode.] Select the 「DDC/CI」option to switch the function On or Off. [Dual input mode optional] Select the 「FACTORY RESET」option to reset to switch the function On or Off. [The availability of this function depends upon the selected model. Display Horizontal frequency/Vertical frequency/Resolution information. 17 While transferring via the HDMI port, it...
... to the monitor's default setting. Adjusting the volume while muted cancels Mute mode.] Select the 「DDC/CI」option to switch the function On or Off. [Dual input mode optional] Select the 「FACTORY RESET」option to reset to switch the function On or Off. [The availability of this function depends upon the selected model. Display Horizontal frequency/Vertical frequency/Resolution information. 17 While transferring via the HDMI port, it...

User Manual
Page 19
... picture. User's Manual TECHNICAL SUPPORT (FAQ) Q & A FOR GENERAL PROBLEMS PROBLEM & QUESTION Power LED is not on No Plug & Play The display is not centered or sized properly. Missing one of the pins are bent. * Adjust pixel frequency CLOCK and PHASE or press hot-key ( i Button). POSSIBLE SOLUTION *Check if the Power Switch is in the ON position. *Power Cord should be connected. *Check if the PC system is Plug & Play compatible. *Check if the Video Card is Plug & Play compatible. *Check...
... picture. User's Manual TECHNICAL SUPPORT (FAQ) Q & A FOR GENERAL PROBLEMS PROBLEM & QUESTION Power LED is not on No Plug & Play The display is not centered or sized properly. Missing one of the pins are bent. * Adjust pixel frequency CLOCK and PHASE or press hot-key ( i Button). POSSIBLE SOLUTION *Check if the Power Switch is in the ON position. *Power Cord should be connected. *Check if the PC system is Plug & Play compatible. *Check if the Video Card is Plug & Play compatible. *Check...
User Manual
Page 21
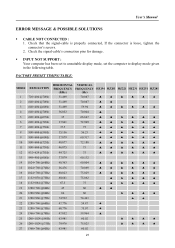
Check the signal-cable's connection pins for damage. ƒ INPUT NOT SUPPORT : Your computer has been set to unsuitable display mode, set the computer to display mode given in the following table. User's Manual ERROR MESSAGE & POSSIBLE SOLUTIONS ƒ CABLE NOT CONNECTED : 1. Check that the signal-cable is properly connected, If the connector is loose, tighten the connector's screws. 2. FACTORY PRESET TIMING TABLE: MODE 1 RESOLUTION 720×400 @70Hz HORIZONTAL FREQUENCY (KHz) 31.469 VERTICAL FREQUENCY (Hz) 70.087 HZ194 ▲ HZ201...
Check the signal-cable's connection pins for damage. ƒ INPUT NOT SUPPORT : Your computer has been set to unsuitable display mode, set the computer to display mode given in the following table. User's Manual ERROR MESSAGE & POSSIBLE SOLUTIONS ƒ CABLE NOT CONNECTED : 1. Check that the signal-cable is properly connected, If the connector is loose, tighten the connector's screws. 2. FACTORY PRESET TIMING TABLE: MODE 1 RESOLUTION 720×400 @70Hz HORIZONTAL FREQUENCY (KHz) 31.469 VERTICAL FREQUENCY (Hz) 70.087 HZ194 ▲ HZ201...

User Manual
Page 23
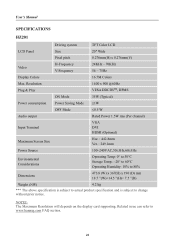
... will depends on the display card supporting. User's Manual APPENDIX SPECIFICATIONS HZ194 Driving system TFT Color LCD LCD Panel Size 18.5" Wide Pixel pitch 0.3mm(H) x 0.3mm(V) Video H-Frequency V-Frequency 24KHz - 61KHz 56- 75Hz Display Colors 16.7M Colors Max. Resolution Plug & Play 1366 x 768 @60Hz VESA DDC2BTM, DPMS ON Mode 28W (Typical) Power consumption Power Saving Mode ≤1W OFF Mode ≤0.5 W Audio output Rated Power 1.5W rms (Per channel) Input Terminal VGA Maximum Screen Size Hor. : 409.8 mm Ver. : 230.4 mm Power Source 100~240VAC,50±...
... will depends on the display card supporting. User's Manual APPENDIX SPECIFICATIONS HZ194 Driving system TFT Color LCD LCD Panel Size 18.5" Wide Pixel pitch 0.3mm(H) x 0.3mm(V) Video H-Frequency V-Frequency 24KHz - 61KHz 56- 75Hz Display Colors 16.7M Colors Max. Resolution Plug & Play 1366 x 768 @60Hz VESA DDC2BTM, DPMS ON Mode 28W (Typical) Power consumption Power Saving Mode ≤1W OFF Mode ≤0.5 W Audio output Rated Power 1.5W rms (Per channel) Input Terminal VGA Maximum Screen Size Hor. : 409.8 mm Ver. : 230.4 mm Power Source 100~240VAC,50±...
User Manual
Page 24
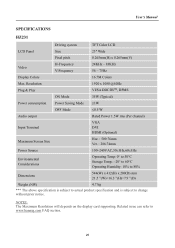
... prior notice. User's Manual SPECIFICATIONS HZ201 Driving system TFT Color LCD LCD Panel Size 20" Wide Pixel pitch 0.276mm(H) x 0.276mm(V) Video H-Frequency V-Frequency 24KHz - 70KHz 56 - 75Hz Display Colors 16.7M Colors Max. NOTES: The Maximum Resolution will depends on the display card supporting. Resolution 1600 x 900 @60Hz Plug & Play VESA DDC2BTM, DPMS ON Mode 35W (Typical) Power consumption Power Saving Mode ≤1W OFF Mode ≤0.5 W Audio output Rated Power 1.5W rms (Per channel) Input Terminal VGA DVI HDMI (Optional) Maximum Screen Size Hor...
... prior notice. User's Manual SPECIFICATIONS HZ201 Driving system TFT Color LCD LCD Panel Size 20" Wide Pixel pitch 0.276mm(H) x 0.276mm(V) Video H-Frequency V-Frequency 24KHz - 70KHz 56 - 75Hz Display Colors 16.7M Colors Max. NOTES: The Maximum Resolution will depends on the display card supporting. Resolution 1600 x 900 @60Hz Plug & Play VESA DDC2BTM, DPMS ON Mode 35W (Typical) Power consumption Power Saving Mode ≤1W OFF Mode ≤0.5 W Audio output Rated Power 1.5W rms (Per channel) Input Terminal VGA DVI HDMI (Optional) Maximum Screen Size Hor...
User Manual
Page 25
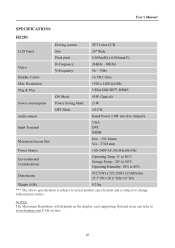
... depends on the display card supporting. User's Manual SPECIFICATIONS HZ231 Driving system TFT Color LCD LCD Panel Size 23" Wide Pixel pitch 0.265mm(H) x 0.265mm(V) Video H-Frequency V-Frequency 24KHz - 83KHz 56 - 75Hz Display Colors 16.7M Colors Max. Resolution 1920 x 1080 @60Hz Plug & Play VESA DDC2BTM, DPMS ON Mode 35W (Typical) Power consumption Power Saving Mode ≤1W OFF Mode ≤0.5 W Audio output Rated Power 1.5W rms (Per channel) Input Terminal VGA DVI HDMI (Optional) Maximum Screen Size Hor. : 509.76mm Ver. : 286.74mm Power Source 100~240VAC,50...
... depends on the display card supporting. User's Manual SPECIFICATIONS HZ231 Driving system TFT Color LCD LCD Panel Size 23" Wide Pixel pitch 0.265mm(H) x 0.265mm(V) Video H-Frequency V-Frequency 24KHz - 83KHz 56 - 75Hz Display Colors 16.7M Colors Max. Resolution 1920 x 1080 @60Hz Plug & Play VESA DDC2BTM, DPMS ON Mode 35W (Typical) Power consumption Power Saving Mode ≤1W OFF Mode ≤0.5 W Audio output Rated Power 1.5W rms (Per channel) Input Terminal VGA DVI HDMI (Optional) Maximum Screen Size Hor. : 509.76mm Ver. : 286.74mm Power Source 100~240VAC,50...

User Manual
Page 26
NOTES: The Maximum Resolution will depends on the display card supporting. Related issue can refer to change without prior notice. Resolution 1920 x 1080 @60Hz Plug & Play VESA DDC2BTM, DPMS ON Mode 48W (Typical) Power consumption Power Saving Mode ≤1W OFF Mode ≤0.5 W Audio output Rated Power 2.0W rms (Per channel) Input Terminal VGA DVI HDMI (Optional) Maximum Screen Size Hor. : 543.46mm Ver. : 305.69mm Power Source 100~240VAC,50±3Hz,60±3Hz...
NOTES: The Maximum Resolution will depends on the display card supporting. Related issue can refer to change without prior notice. Resolution 1920 x 1080 @60Hz Plug & Play VESA DDC2BTM, DPMS ON Mode 48W (Typical) Power consumption Power Saving Mode ≤1W OFF Mode ≤0.5 W Audio output Rated Power 2.0W rms (Per channel) Input Terminal VGA DVI HDMI (Optional) Maximum Screen Size Hor. : 543.46mm Ver. : 305.69mm Power Source 100~240VAC,50±3Hz,60±3Hz...
User Manual
Page 27
User's Manual SPECIFICATIONS HZ281 Driving system TFT Color LCD LCD Panel Size 28" Wide Pixel pitch 0.309m(H) x 0.309mm(V) Video H-Frequency V-Frequency 24KHz - 80KHz 56 - 75Hz Display Colors 16.7M Colors Max. Related issue can refer to change without prior notice. Resolution 1920 x 1200 @60Hz Plug & Play VESA DDC2BTM, DPMS ON Mode 95W (Typical) Power consumption Power Saving Mode ≤1W OFF Mode ≤0.5 W Audio output Rated Power 2.0W rms (Per channel) Input Terminal VGA DVI HDMI Maximum Screen Size Hor. : 593.28mm Ver. : 370.8 mm Power Source 100~...
User's Manual SPECIFICATIONS HZ281 Driving system TFT Color LCD LCD Panel Size 28" Wide Pixel pitch 0.309m(H) x 0.309mm(V) Video H-Frequency V-Frequency 24KHz - 80KHz 56 - 75Hz Display Colors 16.7M Colors Max. Related issue can refer to change without prior notice. Resolution 1920 x 1200 @60Hz Plug & Play VESA DDC2BTM, DPMS ON Mode 95W (Typical) Power consumption Power Saving Mode ≤1W OFF Mode ≤0.5 W Audio output Rated Power 2.0W rms (Per channel) Input Terminal VGA DVI HDMI Maximum Screen Size Hor. : 593.28mm Ver. : 370.8 mm Power Source 100~...
Brochure
Page 1
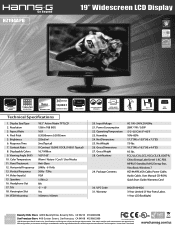
... STEREO SPEAKERS ULTRA-WIDE VIEWING ANGLE TILT VESA WALL-MOUNTABLE VGA INPUT 20. UPC Code 31. All brand, product, service names and logos are trademarks and/or registered trademarks of their respective manufacturers and companies. FCC, UL/CUL, CCC, VCCI, CE, CB, GOST-R, China Energy Label Level 1, KC, PSB, MPRII, E-Standby, RoHS, Energy Star, Vista Basic, Windows 7 HZ194APB, VGA Cable, Power Cable, Audio Cable, User Manual CD-ROM, Quick Start Guide, Warranty Card 30. Pixel Pitch...
... STEREO SPEAKERS ULTRA-WIDE VIEWING ANGLE TILT VESA WALL-MOUNTABLE VGA INPUT 20. UPC Code 31. All brand, product, service names and logos are trademarks and/or registered trademarks of their respective manufacturers and companies. FCC, UL/CUL, CCC, VCCI, CE, CB, GOST-R, China Energy Label Level 1, KC, PSB, MPRII, E-Standby, RoHS, Energy Star, Vista Basic, Windows 7 HZ194APB, VGA Cable, Power Cable, Audio Cable, User Manual CD-ROM, Quick Start Guide, Warranty Card 30. Pixel Pitch...


