
User Manual
Page 1
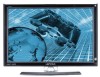
28 inch Wide Screen TFT LCD Monitor HG281 USER'S MANUAL
28 inch Wide Screen TFT LCD Monitor HG281 USER'S MANUAL

User Manual
Page 2
... to Low Voltage directive. This device complies with requirement of the FCC Rule. This manual should be retained for help. This equipment generates, uses and can be accessible. 2 User's Manual Before operating the monitor, please read this equipment does cause harmful interference to radio or.... CANADA This Class B digital apparatus meets all requirements of the FCC Rules. These limits are designed to radio communications. If this manual thoroughly. Socket-outlet shall be near the equipment and shall be determined by turning the equipment off and on a circuit different from...
... to Low Voltage directive. This device complies with requirement of the FCC Rule. This manual should be retained for help. This equipment generates, uses and can be accessible. 2 User's Manual Before operating the monitor, please read this equipment does cause harmful interference to radio or.... CANADA This Class B digital apparatus meets all requirements of the FCC Rules. These limits are designed to radio communications. If this manual thoroughly. Socket-outlet shall be near the equipment and shall be determined by turning the equipment off and on a circuit different from...

User Manual
Page 3
... collaboration with media, graphics, web design and other applications that your display is designed for luminance, contrast, resolution, reflectance, color rendition and response time. User's Manual Congratulations! Features such as a sign of certified products can be certified to some of researchers, experts, users and manufacturers. Since the program's inception, TCO labelled...
... collaboration with media, graphics, web design and other applications that your display is designed for luminance, contrast, resolution, reflectance, color rendition and response time. User's Manual Congratulations! Features such as a sign of certified products can be certified to some of researchers, experts, users and manufacturers. Since the program's inception, TCO labelled...

User Manual
Page 4
...-new marvels. For more information, please visit www.hannsg.com 4 We strongly encourage you to contact the provided information to hazardous and poisoned substances. User's Manual Recycling Information We, the Hanns.G care very much about our environment protection strategy and firmly believe that it helps us have healthier earth via appropriate...
...-new marvels. For more information, please visit www.hannsg.com 4 We strongly encourage you to contact the provided information to hazardous and poisoned substances. User's Manual Recycling Information We, the Hanns.G care very much about our environment protection strategy and firmly believe that it helps us have healthier earth via appropriate...

User Manual
Page 5
TABLE OF CONTENTS User's Manual SAFETY NOTICE 6 PRECAUTIONS 6 SPECIAL NOTES ON LCD MONITORS 7 BEFORE YOU OPERATE THE MONITOR 8 FEATURES 8 CHECKING THE CONTENTS OF THE PACKAGE 8 POWER...9 MAKING CONNECTIONS 9 ADJUSTING THE VIEWING ANGLE 11 OPERATING INSTRUCTIONS 12 GENERAL INSTRUCTIONS 12 CONTROL PANEL BUTTON FUNCTIONS 13 HOW TO ADJUST A SETTING 14 PLUG AND PLAY 17 TECHNICAL SUPPORT (FAQ 18 Q & A FOR GENERAL PROBLEMS 18 ERROR MESSAGE & POSSIBLE SOLUTIONS 19 APPENDIX 20 SPECIFICATIONS 20 5
TABLE OF CONTENTS User's Manual SAFETY NOTICE 6 PRECAUTIONS 6 SPECIAL NOTES ON LCD MONITORS 7 BEFORE YOU OPERATE THE MONITOR 8 FEATURES 8 CHECKING THE CONTENTS OF THE PACKAGE 8 POWER...9 MAKING CONNECTIONS 9 ADJUSTING THE VIEWING ANGLE 11 OPERATING INSTRUCTIONS 12 GENERAL INSTRUCTIONS 12 CONTROL PANEL BUTTON FUNCTIONS 13 HOW TO ADJUST A SETTING 14 PLUG AND PLAY 17 TECHNICAL SUPPORT (FAQ 18 Q & A FOR GENERAL PROBLEMS 18 ERROR MESSAGE & POSSIBLE SOLUTIONS 19 APPENDIX 20 SPECIFICATIONS 20 5
User Manual
Page 6
... circuit parts causing a fire or electric shock. Please refer all servicing to dangerous voltages and other hazards. The manufacturer is not responsible for ventilation. User's Manual SAFETY NOTICE 1. Shielded interface cables and AC power cord, if any object into the slot on an unstable cart, stand, or table. Refer servicing to...
... circuit parts causing a fire or electric shock. Please refer all servicing to dangerous voltages and other hazards. The manufacturer is not responsible for ventilation. User's Manual SAFETY NOTICE 1. Shielded interface cables and AC power cord, if any object into the slot on an unstable cart, stand, or table. Refer servicing to...

User Manual
Page 7
... effective pixels of 99.99% or more. FOR MORE INFORMATION, CONTACT THE ELECTRONIC INDUSTRIES ALLIANCE AT WWW.EIAE.ORG. SPECIAL NOTES ON LCD MONITORS User's Manual The following symptoms are normal with LCD monitor and do not indicate a problem. • Due to the nature of the previous screen may remain after...
... effective pixels of 99.99% or more. FOR MORE INFORMATION, CONTACT THE ELECTRONIC INDUSTRIES ALLIANCE AT WWW.EIAE.ORG. SPECIAL NOTES ON LCD MONITORS User's Manual The following symptoms are normal with LCD monitor and do not indicate a problem. • Due to the nature of the previous screen may remain after...

User Manual
Page 8
User's Manual BEFORE YOU OPERATE THE MONITOR FEATURES • 28" Wide screen TFT Color LCD Monitor • Crisp, Clear Display for Windows • Recommended Resolutions: 1920 X 1200 @60Hz • EPA ENERGY STAR® • Ergonomic Design • Space Saving, Compact Case Design CHECKING THE CONTENTS OF THE PACKAGE The product package should include the following items: LCD Monitor Cables and User manual Power Cord VGA Cable Audio Cable HDMI to DVI-D Cable (Optional) D-sub to YPbPr Cable (Optional) 3.5mm Mini Jack to R/L Cable (Optional) User's Manual Warranty Card 8
User's Manual BEFORE YOU OPERATE THE MONITOR FEATURES • 28" Wide screen TFT Color LCD Monitor • Crisp, Clear Display for Windows • Recommended Resolutions: 1920 X 1200 @60Hz • EPA ENERGY STAR® • Ergonomic Design • Space Saving, Compact Case Design CHECKING THE CONTENTS OF THE PACKAGE The product package should include the following items: LCD Monitor Cables and User manual Power Cord VGA Cable Audio Cable HDMI to DVI-D Cable (Optional) D-sub to YPbPr Cable (Optional) 3.5mm Mini Jack to R/L Cable (Optional) User's Manual Warranty Card 8

User Manual
Page 9
... the audio cable between the monitor's audio input and the PC's audio output (green port). 4. Turn on your computer before performing the procedure below. 1. User's Manual POWER POWER SOURCE 1. This LCD monitor has an Internal universal power supply that the power cord is the correct type required in either 100/120V...
... the audio cable between the monitor's audio input and the PC's audio output (green port). 4. Turn on your computer before performing the procedure below. 1. User's Manual POWER POWER SOURCE 1. This LCD monitor has an Internal universal power supply that the power cord is the correct type required in either 100/120V...

User Manual
Page 10
... D-Sub cable to the back of the monitor and connect the other end to the Pb/Cb output connector on your monitor and A/V device. User's Manual CONNECTING TO A A/V DEVICE: Connect A/V devices via the D-sub and Audio Line in connectors at the back of the monitor. 6. Connect the Pb (blue) connector on...
... D-Sub cable to the back of the monitor and connect the other end to the Pb/Cb output connector on your monitor and A/V device. User's Manual CONNECTING TO A A/V DEVICE: Connect A/V devices via the D-sub and Audio Line in connectors at the back of the monitor. 6. Connect the Pb (blue) connector on...

User Manual
Page 11
... or rotating the LCD screen, to prevent damaging or crushing the screen. • Be careful not to 30° horizontally. ADJUSTING THE VIEWING ANGLE User's Manual 1.
... or rotating the LCD screen, to prevent damaging or crushing the screen. • Be careful not to 30° horizontally. ADJUSTING THE VIEWING ANGLE User's Manual 1.

User Manual
Page 12
... on the right side of the monitor (See Figure 5). Control Panel Buttons CONTROL PANEL BUTTONS: 1. Volume - 6. Volume + 5. Auto Adjustment 4. Figure.5. Power Button 2. Menu / Enter 3. User's Manual OPERATING INSTRUCTIONS GENERAL INSTRUCTIONS Press the power button to turn the monitor on or off. Power Indicator 12 The power indicator will light up.
... on the right side of the monitor (See Figure 5). Control Panel Buttons CONTROL PANEL BUTTONS: 1. Volume - 6. Volume + 5. Auto Adjustment 4. Figure.5. Power Button 2. Menu / Enter 3. User's Manual OPERATING INSTRUCTIONS GENERAL INSTRUCTIONS Press the power button to turn the monitor on or off. Power Indicator 12 The power indicator will light up.

User Manual
Page 13
Power On mode. Orange - Activates the volume control when the OSD is active. User's Manual CONTROL PANEL BUTTON FUNCTIONS • Power Button: Press this button for more than two seconds to activate the Auto Adjustment function. (The Auto Adjustment function ...
Power On mode. Orange - Activates the volume control when the OSD is active. User's Manual CONTROL PANEL BUTTON FUNCTIONS • Power Button: Press this button for more than two seconds to activate the Auto Adjustment function. (The Auto Adjustment function ...

User Manual
Page 14
... Setting」option to the left or right. Select the 「V-position」option to reduce the vertical flicker of characters on the screen. User's Manual HOW TO ADJUST A SETTING Main Menu FUNCTION Brightness Contrast Image Setting Color Setting OSD Setting Other Setting Input Setting Exit DESCRIPTION Select the「Brightness...
... Setting」option to the left or right. Select the 「V-position」option to reduce the vertical flicker of characters on the screen. User's Manual HOW TO ADJUST A SETTING Main Menu FUNCTION Brightness Contrast Image Setting Color Setting OSD Setting Other Setting Input Setting Exit DESCRIPTION Select the「Brightness...

User Manual
Page 15
... the level. Exit the OSD menu function. Exit the OSD menu function. Enter the option and adjust the level. Phase Adjustment Exit Color Setting User's Manual Select the「Phase Adjustment」option to the User option and select it .
... the level. Exit the OSD menu function. Exit the OSD menu function. Enter the option and adjust the level. Phase Adjustment Exit Color Setting User's Manual Select the「Phase Adjustment」option to the User option and select it .
User Manual
Page 16
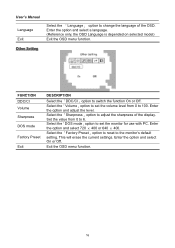
... option and select 720 × 400 or 640 × 400. Select the「DOS mode」option to change the language of the display. User's Manual Language Exit Select the 「Language」 option to set the volume level from 0 to switch the function On or Off. Select the「Volume...
... option and select 720 × 400 or 640 × 400. Select the「DOS mode」option to change the language of the display. User's Manual Language Exit Select the 「Language」 option to set the volume level from 0 to switch the function On or Off. Select the「Volume...

User Manual
Page 17
PLUG AND PLAY User's Manual Plug & Play DDC2B Feature This monitor is equipped with VESA DDC2B capabilities according to inform the host system of its identity and, depending on the ...
PLUG AND PLAY User's Manual Plug & Play DDC2B Feature This monitor is equipped with VESA DDC2B capabilities according to inform the host system of its identity and, depending on the ...
User Manual
Page 18
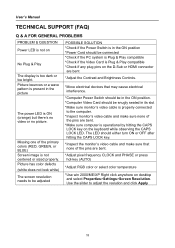
... LED should be snugly seated in its slot *Make sure monitor's video cable is properly connected to adjust the reslution and click Apply 18 User's Manual TECHNICAL SUPPORT (FAQ) Q & A FOR GENERAL PROBLEMS PROBLEM & QUESTION Power LED is not on No Plug & Play The display is not centered or sized properly. Picture...
... LED should be snugly seated in its slot *Make sure monitor's video cable is properly connected to adjust the reslution and click Apply 18 User's Manual TECHNICAL SUPPORT (FAQ) Q & A FOR GENERAL PROBLEMS PROBLEM & QUESTION Power LED is not on No Plug & Play The display is not centered or sized properly. Picture...

User Manual
Page 19
Check that the signal-cable is properly connected, If the connector is loose, tighten the connector's screws. 2. User's Manual ERROR MESSAGE & POSSIBLE SOLUTIONS CABLE NOT CONNECTED : 1. INPUT NOT SUPPORT : Your computer has been set to unsuitable display mode, set the computer to display mode ...
Check that the signal-cable is properly connected, If the connector is loose, tighten the connector's screws. 2. User's Manual ERROR MESSAGE & POSSIBLE SOLUTIONS CABLE NOT CONNECTED : 1. INPUT NOT SUPPORT : Your computer has been set to unsuitable display mode, set the computer to display mode ...

User Manual
Page 20
... (NW) 10.8 kg 23.8 lb ***The above specification is subject to actual product specification and is subject to www.hannsg.com FAQ section. 20 User's Manual APPENDIX SPECIFICATIONS LCD Panel Video Display Colors Driving system Size Pixel pitch H-Frequency V-Frequency TFT Color LCD 28" (27.5" viewable) 0.309mm(H) x 0.309mm(V) 24KHz - 80KHz 56Hz...
... (NW) 10.8 kg 23.8 lb ***The above specification is subject to actual product specification and is subject to www.hannsg.com FAQ section. 20 User's Manual APPENDIX SPECIFICATIONS LCD Panel Video Display Colors Driving system Size Pixel pitch H-Frequency V-Frequency TFT Color LCD 28" (27.5" viewable) 0.309mm(H) x 0.309mm(V) 24KHz - 80KHz 56Hz...