
User Manual
Page 2
... be determined by turning the equipment off and on a circuit different from that to which can radiate radio frequency energy, and if not installed and used in accordance with the limits for a Class B digital device, pursuant to provide reasonable protection against harmful interference in the United States and other countries. 2 User's Manual Before operating the monitor, please read...
... be determined by turning the equipment off and on a circuit different from that to which can radiate radio frequency energy, and if not installed and used in accordance with the limits for a Class B digital device, pursuant to provide reasonable protection against harmful interference in the United States and other countries. 2 User's Manual Before operating the monitor, please read...
User Manual
Page 4
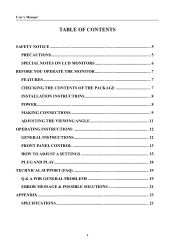
User's Manual TABLE OF CONTENTS SAFETY NOTICE 5 PRECAUTIONS 5 SPECIAL NOTES ON LCD MONITORS 6 BEFORE YOU OPERATE THE MONITOR 7 FEATURES...7 CHECKING THE CONTENTS OF THE PACKAGE 7 INSTALLATION INSTRUCTIONS 8 POWER...8 MAKING CONNECTIONS 9 ADJUSTING THE VIEWING ANGLE 11 OPERATING INSTRUCTIONS 12 GENERAL INSTRUCTIONS 12 FRONT PANEL CONTROL 13 HOW TO ADJUST A SETTINGS 15 PLUG AND PLAY 18 TECHNICAL SUPPORT (FAQ 19 Q & A FOR GENERAL PROBLEMS 19 ERROR MESSAGE & POSSIBLE SOLUTIONS 21 APPENDIX ...23 SPECIFICATIONS 23 4
User's Manual TABLE OF CONTENTS SAFETY NOTICE 5 PRECAUTIONS 5 SPECIAL NOTES ON LCD MONITORS 6 BEFORE YOU OPERATE THE MONITOR 7 FEATURES...7 CHECKING THE CONTENTS OF THE PACKAGE 7 INSTALLATION INSTRUCTIONS 8 POWER...8 MAKING CONNECTIONS 9 ADJUSTING THE VIEWING ANGLE 11 OPERATING INSTRUCTIONS 12 GENERAL INSTRUCTIONS 12 FRONT PANEL CONTROL 13 HOW TO ADJUST A SETTINGS 15 PLUG AND PLAY 18 TECHNICAL SUPPORT (FAQ 19 Q & A FOR GENERAL PROBLEMS 19 ERROR MESSAGE & POSSIBLE SOLUTIONS 21 APPENDIX ...23 SPECIFICATIONS 23 4
User Manual
Page 5
... appliance. opening or removing covers can result in fire or electric shock. • Never push any , must be sure these openings are provided for long period of power supplied to comply with the monitor. Do not open the cabinet. If the monitor falls, it from overheating, be used for ventilation. To ensure reliable operation of power source indicated on a wall or shelf, use a mounting kit...
... appliance. opening or removing covers can result in fire or electric shock. • Never push any , must be sure these openings are provided for long period of power supplied to comply with the monitor. Do not open the cabinet. If the monitor falls, it from overheating, be used for ventilation. To ensure reliable operation of power source indicated on a wall or shelf, use a mounting kit...
User Manual
Page 6
... screen is displayed for repair. User's Manual SPECIAL NOTES ON LCD MONITORS The following symptoms are normal with LCD monitor and do not indicate a problem. • Due to the nature of the fluorescent light, the screen may find slightly uneven brightness on the screen depending on the desktop pattern you use. • The LCD screen has effective pixels of the previous screen may remain after switching the image, when the same image...
... screen is displayed for repair. User's Manual SPECIAL NOTES ON LCD MONITORS The following symptoms are normal with LCD monitor and do not indicate a problem. • Due to the nature of the fluorescent light, the screen may find slightly uneven brightness on the screen depending on the desktop pattern you use. • The LCD screen has effective pixels of the previous screen may remain after switching the image, when the same image...
User Manual
Page 7
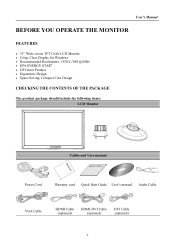
User's Manual BEFORE YOU OPERATE THE MONITOR FEATURES • 23" Wide screen TFT Color LCD Monitor • Crisp, Clear Display for Windows • Recommended Resolutions: 1920X 1080 @60Hz • EPA ENERGY STAR® • GP Green Product • Ergonomic Design • Space Saving, Compact Case Design CHECKING THE CONTENTS OF THE PACKAGE The product package should include the following items: LCD Monitor Cables and User manual Power Cord Warranty card Quick Start Guide User's manual Audio Cable VGA Cable HDMI Cable (optional) HDMI-DVI Cable (optional) DVI Cable (optional) 7
User's Manual BEFORE YOU OPERATE THE MONITOR FEATURES • 23" Wide screen TFT Color LCD Monitor • Crisp, Clear Display for Windows • Recommended Resolutions: 1920X 1080 @60Hz • EPA ENERGY STAR® • GP Green Product • Ergonomic Design • Space Saving, Compact Case Design CHECKING THE CONTENTS OF THE PACKAGE The product package should include the following items: LCD Monitor Cables and User manual Power Cord Warranty card Quick Start Guide User's manual Audio Cable VGA Cable HDMI Cable (optional) HDMI-DVI Cable (optional) DVI Cable (optional) 7
User Manual
Page 8
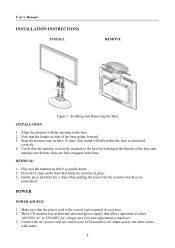
... click sound will affirm that it is connected correctly. 4. Flip over the monitor so that the base is upside down. 2. Make sure that the monitor is required.) 3. Verify that the power cord is the correct type required in place. 3. Connect the AC-power cord one end to your area. 2. User's Manual INSTALLATION INSTRUCTIONS INSTALL REMOVE Figure.1. Align the monitor with the opening in the base. This LCD monitor has an Internal universal power supply...
... click sound will affirm that it is connected correctly. 4. Flip over the monitor so that the base is upside down. 2. Make sure that the monitor is required.) 3. Verify that the power cord is the correct type required in place. 3. Connect the AC-power cord one end to your area. 2. User's Manual INSTALLATION INSTRUCTIONS INSTALL REMOVE Figure.1. Align the monitor with the opening in the base. This LCD monitor has an Internal universal power supply...
User Manual
Page 9
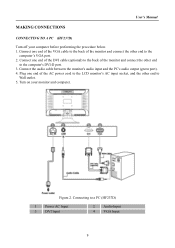
...'s DVI-D port. 3. Connecting to Wall outlet. 5. User's Manual MAKING CONNECTIONS CONNECTING TO A PC (HF237D) Turn off your monitor and computer. Connect the audio cable between the monitor's audio input and the PC's audio output (green port). 4. Figure.2. Turn on your computer before performing the procedure below. 1. Connect one end of the monitor and connect the other end to the computer's VGA port. 2. Plug one end of the VGA cable to the back of the AC power cord to the LCD monitor's AC input socket...
...'s DVI-D port. 3. Connecting to Wall outlet. 5. User's Manual MAKING CONNECTIONS CONNECTING TO A PC (HF237D) Turn off your monitor and computer. Connect the audio cable between the monitor's audio input and the PC's audio output (green port). 4. Figure.2. Turn on your computer before performing the procedure below. 1. Connect one end of the monitor and connect the other end to the computer's VGA port. 2. Plug one end of the VGA cable to the back of the AC power cord to the LCD monitor's AC input socket...
User Manual
Page 10
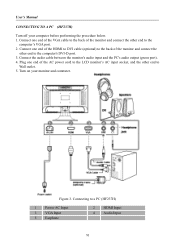
... computer's DVI-D port. 3. Figure.3. Connect one end of the monitor and connect the other end to a PC (HF237H) 1 Power AC Input 3 VGA Input 5 Earphone 2 HDMI Input 4 Audio Input 10 Turn on your computer before performing the procedure below. 1. Connecting to Wall outlet. 5. Connect one end of the HDMI to DVI cable (optional) to the back of the AC power cord to the LCD monitor's AC input socket, and the other end to the computer's VGA port. 2. User's Manual CONNECTING TO...
... computer's DVI-D port. 3. Figure.3. Connect one end of the monitor and connect the other end to a PC (HF237H) 1 Power AC Input 3 VGA Input 5 Earphone 2 HDMI Input 4 Audio Input 10 Turn on your computer before performing the procedure below. 1. Connecting to Wall outlet. 5. Connect one end of the HDMI to DVI cable (optional) to the back of the AC power cord to the LCD monitor's AC input socket, and the other end to the computer's VGA port. 2. User's Manual CONNECTING TO...
User Manual
Page 11
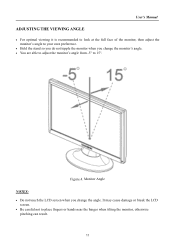
... damage or break the LCD screen. • Be careful not to 15°. Figure.4. User's Manual ADJUSTING THE VIEWING ANGLE • For optimal viewing it is recommended to look at the full face of the monitor, then adjust the monitor's angle to your own preference. • Hold the stand so you do not topple the monitor when you change the monitor's angle. • You are...
... damage or break the LCD screen. • Be careful not to 15°. Figure.4. User's Manual ADJUSTING THE VIEWING ANGLE • For optimal viewing it is recommended to look at the full face of the monitor, then adjust the monitor's angle to your own preference. • Hold the stand so you do not topple the monitor when you change the monitor's angle. • You are...
User Manual
Page 12
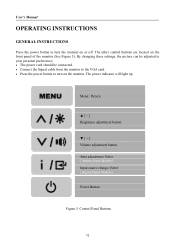
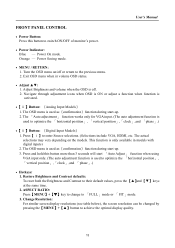
... Buttons 12 By changing these settings, the picture can be adjusted to your personal preferences. • The power cord should be connected. • Connect the Signal cable from the monitor to the VGA card. • Press the power button to turn on the monitor. The power indicator will light up. The other control buttons are located on or off. Menu / Return ▲ [-] Brightness adjustment button ▼ [+] Volume adjustment button Auto adjustment/ Enter 《Analog Input Models》 Input source change/ Enter 《Digital Input Models》 Power Button...
... Buttons 12 By changing these settings, the picture can be adjusted to your personal preferences. • The power cord should be connected. • Connect the Signal cable from the monitor to the VGA card. • Press the power button to turn on the monitor. The power indicator will light up. The other control buttons are located on or off. Menu / Return ▲ [-] Brightness adjustment button ▼ [+] Volume adjustment button Auto adjustment/ Enter 《Analog Input Models》 Input source change/ Enter 《Digital Input Models》 Power Button...
User Manual
Page 13
... screen display resolutions (see table below), the screen resolution can be changed by pressing the【MENU button to enter Source selections. (Selections include VGA, HDMI, etc. User's Manual FRONT PANEL CONTROL • Power Button: Press this button more than 3 seconds will start 「Auto Adjust」 function when using VGA input only. (The auto adjustment function is used to optimize the 「horizontal position」, 「vertical position」,「clock」,and 「phase」.) • Hotkeys: 1. Power On mode. Adjust Brightness and volume...
... screen display resolutions (see table below), the screen resolution can be changed by pressing the【MENU button to enter Source selections. (Selections include VGA, HDMI, etc. User's Manual FRONT PANEL CONTROL • Power Button: Press this button more than 3 seconds will start 「Auto Adjust」 function when using VGA input only. (The auto adjustment function is used to optimize the 「horizontal position」, 「vertical position」,「clock」,and 「phase」.) • Hotkeys: 1. Power On mode. Adjust Brightness and volume...
User Manual
Page 14
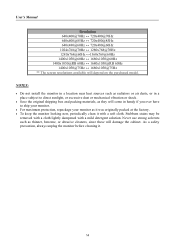
... may be removed with a cloth lightly dampened with a soft cloth. As a safety precaution, always unplug the monitor before cleaning it with a mild detergent solution. Never use strong solvents such as it was originally packed at the factory. • To keep the monitor looking new, periodically clean it . 14 NOTES: • Do not install the monitor in a location near heat sources such as...
... may be removed with a cloth lightly dampened with a soft cloth. As a safety precaution, always unplug the monitor before cleaning it with a mild detergent solution. Never use strong solvents such as it was originally packed at the factory. • To keep the monitor looking new, periodically clean it . 14 NOTES: • Do not install the monitor in a location near heat sources such as...
User Manual
Page 15
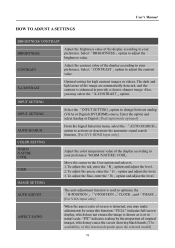
...;option and adjust the level. X-CONTRAST Optimal setting for high contrast images or videos. The dark and light areas of the display according to your preference. INPUT SETTING INPUT SETTING AUTO SEARCH COLOR SETTING WARM NATURE COOL USER IMAGE SETTING AUTO ADJUST ASPECT RATIO Select the 「INPUT SETTING」option to adjust the contrast value. To adjust the green, enter the「G」option and adjust the level. 3. The auto adjustment function is used to optimize the 「H-POSITION」,「V-POSITION」...
...;option and adjust the level. X-CONTRAST Optimal setting for high contrast images or videos. The dark and light areas of the display according to your preference. INPUT SETTING INPUT SETTING AUTO SEARCH COLOR SETTING WARM NATURE COOL USER IMAGE SETTING AUTO ADJUST ASPECT RATIO Select the 「INPUT SETTING」option to adjust the contrast value. To adjust the green, enter the「G」option and adjust the level. 3. The auto adjustment function is used to optimize the 「H-POSITION」,「V-POSITION」...
User Manual
Page 16
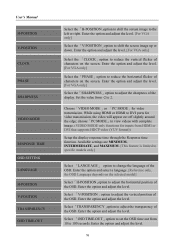
... specific models only.] Select 「LANGUAGE」 option to reduce the horizontal flicker of the display. Select 「TRANSPARENCY」option to adjust the vertical position of the OSD. Select 「V-POSITION」option to adjust the transparency of the OSD. Select 「OSD TIME-OUT」option to set the OSD time out from -2 to the left or right. User's Manual H-POSITION V-POSITION CLOCK PHASE SHARPNESS VIDEO MODE RESPONSE TIME OSD SETTING LANGUAGE H-POSITION V-POSITION TRANSPARENCY OSD...
... specific models only.] Select 「LANGUAGE」 option to reduce the horizontal flicker of the display. Select 「TRANSPARENCY」option to adjust the vertical position of the OSD. Select 「V-POSITION」option to adjust the transparency of the OSD. Select 「OSD TIME-OUT」option to set the OSD time out from -2 to the left or right. User's Manual H-POSITION V-POSITION CLOCK PHASE SHARPNESS VIDEO MODE RESPONSE TIME OSD SETTING LANGUAGE H-POSITION V-POSITION TRANSPARENCY OSD...
User Manual
Page 17
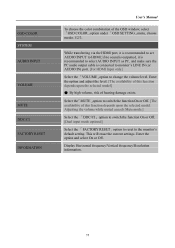
.... [Dual input mode optional] Select the 「FACTORY RESET」option to reset to change the volume level. Display Horizontal frequency/Vertical frequency/Resolution information. 17 OSD COLOR SYSTEM AUDIO INPUT VOLUME MUTE DDC/CI FACTORY RESET INFORMATION User's Manual To choose the color combination of this function depends upon the selected model. While transferring via the HDMI port, it is recommended to select AUDIO INPUT as PC, and make sure the PC audio output cable is recommended to set AUDIO INPUT to switch the...
.... [Dual input mode optional] Select the 「FACTORY RESET」option to reset to change the volume level. Display Horizontal frequency/Vertical frequency/Resolution information. 17 OSD COLOR SYSTEM AUDIO INPUT VOLUME MUTE DDC/CI FACTORY RESET INFORMATION User's Manual To choose the color combination of this function depends upon the selected model. While transferring via the HDMI port, it is recommended to select AUDIO INPUT as PC, and make sure the PC audio output cable is recommended to set AUDIO INPUT to switch the...
User Manual
Page 18
... power saving mode. When there is restored by the Video Electronics Standards Association (VESA) and/or the United States Environmental Protection Agency (EPA) and The Swedish Confederation Employees (NUTEK). The display is no video-input signal present. This monitor meets the Green monitor standards as set by pressing a key on the keyboard, or clicking the mouse. 18 User's Manual PLUG AND PLAY Plug & Play DDC2B Feature This monitor...
... power saving mode. When there is restored by the Video Electronics Standards Association (VESA) and/or the United States Environmental Protection Agency (EPA) and The Swedish Confederation Employees (NUTEK). The display is no video-input signal present. This monitor meets the Green monitor standards as set by pressing a key on the keyboard, or clicking the mouse. 18 User's Manual PLUG AND PLAY Plug & Play DDC2B Feature This monitor...

User Manual
Page 19
... monitor's built-in the picture The power LED is recommended to the computer. *Inspect monitor's video cable and make sure that none of the primary colors (RED, GREEN, or BLUE) Screen image is too dark or too bright. Use the silder to adjust the reslution and click Apply. *Make sure PC audio output cable is connected to screen's LINE IN port (or AUDIO IN port). *Make sure the sound volume adjustment can be in the ON position. *Computer Video Card should either turn...
... monitor's built-in the picture The power LED is recommended to the computer. *Inspect monitor's video cable and make sure that none of the primary colors (RED, GREEN, or BLUE) Screen image is too dark or too bright. Use the silder to adjust the reslution and click Apply. *Make sure PC audio output cable is connected to screen's LINE IN port (or AUDIO IN port). *Make sure the sound volume adjustment can be in the ON position. *Computer Video Card should either turn...
User Manual
Page 20
User's Manual INPUT as a PC option, and make sure PC audio output cable is connected to monitor's LINE IN port(or AUDIO IN port). [For HDMI Input only] 20
User's Manual INPUT as a PC option, and make sure PC audio output cable is connected to monitor's LINE IN port(or AUDIO IN port). [For HDMI Input only] 20
User Manual
Page 21
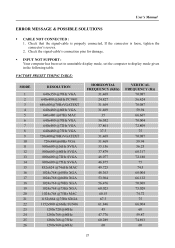
User's Manual ERROR MESSAGE & POSSIBLE SOLUTIONS CABLE NOT CONNECTED : 1. Check that the signal-cable is properly connected, If the connector is loose, tighten the connector's screws. 2. FACTORY PRESET TIMING TABLE: MODE 1 2 3 4 5 6 7 8 9 10 11 12 13 14 15 16 17 18 19 20 21 22 23 24 25 26 RESOLUTION 640×350 @70Hz VGA 640×400 @56Hz ... 70.069 75.029 74.72 75 66.004 60 59.87 74.893 60 21 INPUT NOT SUPPORT : Your computer has been set to unsuitable display mode, set the computer to display mode given in the following table. Check the signal-cable's connection pins for damage.
User's Manual ERROR MESSAGE & POSSIBLE SOLUTIONS CABLE NOT CONNECTED : 1. Check that the signal-cable is properly connected, If the connector is loose, tighten the connector's screws. 2. FACTORY PRESET TIMING TABLE: MODE 1 2 3 4 5 6 7 8 9 10 11 12 13 14 15 16 17 18 19 20 21 22 23 24 25 26 RESOLUTION 640×350 @70Hz VGA 640×400 @56Hz ... 70.069 75.029 74.72 75 66.004 60 59.87 74.893 60 21 INPUT NOT SUPPORT : Your computer has been set to unsuitable display mode, set the computer to display mode given in the following table. Check the signal-cable's connection pins for damage.
User Manual
Page 23
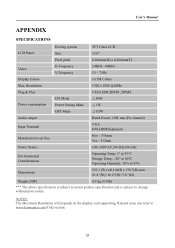
User's Manual APPENDIX SPECIFICATIONS LCD Panel Video Display Colors Max. Resolution Plug & Play Power consumption Audio output Input Terminal Driving system Size Pixel pitch H-Frequency V-Frequency ON Mode Power Saving Mode OFF Mode TFT Color LCD 23.0" 0.266mm(H) x 0.266mm(V) 24KHz -80KHz 55 - 75Hz 16.7M Colors 1920 x 1080 @60Hz VESA DDC2BTM , DPMS ≦49W ≦1W ≦0.5W Rated Power 1.0W rms (Per channel) VGA DVI,HDMI(optional) Maximum Screen Size Power Source Environmental Considerations Hor. : 533mm Ver. : 312mm 100~240VAC,50±3Hz,60±3Hz...
User's Manual APPENDIX SPECIFICATIONS LCD Panel Video Display Colors Max. Resolution Plug & Play Power consumption Audio output Input Terminal Driving system Size Pixel pitch H-Frequency V-Frequency ON Mode Power Saving Mode OFF Mode TFT Color LCD 23.0" 0.266mm(H) x 0.266mm(V) 24KHz -80KHz 55 - 75Hz 16.7M Colors 1920 x 1080 @60Hz VESA DDC2BTM , DPMS ≦49W ≦1W ≦0.5W Rated Power 1.0W rms (Per channel) VGA DVI,HDMI(optional) Maximum Screen Size Power Source Environmental Considerations Hor. : 533mm Ver. : 312mm 100~240VAC,50±3Hz,60±3Hz...


