
User Manual
Page 2
... been taken into consideration at the design and manufacture phase, butinappropriate operation maycause electric shock or fire. Safety of electric shock do not remove cover or back. The User Manual uses the following rules should be observedfor the installation,use and maintenanceof th product. No user-serviceable parts inside refer service to make any kind of this product. To prevent the...
... been taken into consideration at the design and manufacture phase, butinappropriate operation maycause electric shock or fire. Safety of electric shock do not remove cover or back. The User Manual uses the following rules should be observedfor the installation,use and maintenanceof th product. No user-serviceable parts inside refer service to make any kind of this product. To prevent the...

User Manual
Page 4
... to be sure the antenna or cable system is the display device of this can result in wire to an antenna discharge unit, size of grounding conductors, location of other controls may be present on the screen should be acceptable. f. A few minute colored dots may result in the PDP manufacturing process. When the power supply cord or plug is composed of this...
... to be sure the antenna or cable system is the display device of this can result in wire to an antenna discharge unit, size of grounding conductors, location of other controls may be present on the screen should be acceptable. f. A few minute colored dots may result in the PDP manufacturing process. When the power supply cord or plug is composed of this...

User Manual
Page 5
... and V-Position adjust 34 RGB/Default/Auto Sync 35 Color Temperature 35 Black Stretch 35 Lock setup 36 Other functions 39 Teletext functions 41 Maintenance 43 Specifications and functions 44 Troubleshooting 45 Accessories MUTE STILL SCAN SLEEP PIP DISPLAY ABC@ DEF GHI$ JKL% MNO POR& STUV WXYZ TV/AV *#() SWAP P.STD S.STD CH+ VOL- MENU VOL+ CH- H.LOCK CH.LIST TIMER ZOOM EXIT Remote controller User's manual Alkaline battery(AA) 2 Power cable
... and V-Position adjust 34 RGB/Default/Auto Sync 35 Color Temperature 35 Black Stretch 35 Lock setup 36 Other functions 39 Teletext functions 41 Maintenance 43 Specifications and functions 44 Troubleshooting 45 Accessories MUTE STILL SCAN SLEEP PIP DISPLAY ABC@ DEF GHI$ JKL% MNO POR& STUV WXYZ TV/AV *#() SWAP P.STD S.STD CH+ VOL- MENU VOL+ CH- H.LOCK CH.LIST TIMER ZOOM EXIT Remote controller User's manual Alkaline battery(AA) 2 Power cable
User Manual
Page 7
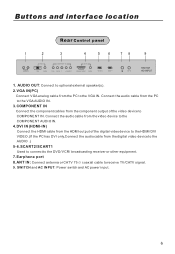
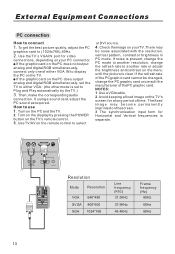
AUDIO OUT: Connect to optional external speaker(s). 2.VGA IN(PC) Connect VGA analog cable from the component output of the digital video device to the HDMI/DVI VIDEO.(If the PC has DVI only,Connect the audio cable from the digital video device to the AUDIO .) 5-6.SCART2/SCART1 Used to connect to the DVD/ VCR/ broadcasting receiver or other equipment. 7.Earphone port 8.ANT IN: Connect antenna or CATV 75 coaxial cable to receive TV/CATV signal. 9. Connect the audio cable from the PC to the VGAAUDIO...
AUDIO OUT: Connect to optional external speaker(s). 2.VGA IN(PC) Connect VGA analog cable from the component output of the digital video device to the HDMI/DVI VIDEO.(If the PC has DVI only,Connect the audio cable from the digital video device to the AUDIO .) 5-6.SCART2/SCART1 Used to connect to the DVD/ VCR/ broadcasting receiver or other equipment. 7.Earphone port 8.ANT IN: Connect antenna or CATV 75 coaxial cable to receive TV/CATV signal. 9. Connect the audio cable from the PC to the VGAAUDIO...
User Manual
Page 9
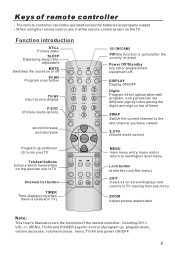
... turns among the digits and sign on the TV. ZOOM Adjust picture aspect ratio Note: This User's Manual covers the functions of the remote controller, including CH+/-, VOL-/+, MENU, TV/AV and POWER keys for control of program up and down , volume decrease, volume increase, menu, TV/AV and power ON/OFF. MENU VOL+ Program up , program down Or turns your TV Teletext buttons buttons which have viewed. Function introduction STILL Picture static SLEEP Displaying sleep time, adjustable MUTE Switches the sound on -screen displays...
... turns among the digits and sign on the TV. ZOOM Adjust picture aspect ratio Note: This User's Manual covers the functions of the remote controller, including CH+/-, VOL-/+, MENU, TV/AV and POWER keys for control of program up and down , volume decrease, volume increase, menu, TV/AV and power ON/OFF. MENU VOL+ Program up , program down Or turns your TV Teletext buttons buttons which have viewed. Function introduction STILL Picture static SLEEP Displaying sleep time, adjustable MUTE Switches the sound on -screen displays...
User Manual
Page 13
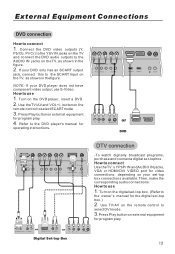
... connect the DVD audio outputs to select DVI mode. 3.Press Play buttonon external equipment for operating instructions. buttonon the remote control toselect SCARTmode. 3. Refer to the SCART input on the TV. Turnon the digitalset-top box. (Referto the owner`s manual for the digital set -topbox. If your set-top box connections available. How touse 1. How toconnect Use theTV`s YPbPrIN andAUDIO IN jacks, VGA or HDMI/DVI VIDEO port for program play . NOTE: If your DVD player does not have component video output,use S-Video. How touse 1. Press Play buttonon external...
... connect the DVD audio outputs to select DVI mode. 3.Press Play buttonon external equipment for operating instructions. buttonon the remote control toselect SCARTmode. 3. Refer to the SCART input on the TV. Turnon the digitalset-top box. (Referto the owner`s manual for the digital set -topbox. If your set-top box connections available. How touse 1. How toconnect Use theTV`s YPbPrIN andAUDIO IN jacks, VGA or HDMI/DVI VIDEO port for program play . NOTE: If your DVD player does not have component video output,use S-Video. How touse 1. Press Play buttonon external...
User Manual
Page 14
... connect 1. NOTES: 1 Use a VGAcable. 2 Avoid keeping afixed image onthe TV's screen for Horizontal and Vertical frequencies is clear. The fixed image may be changed, change the refresh rate to Plug and Play automatically by pressing the POWER button on the TV's remote control. 3. Turn on the TV. If the graphic card on the PC does not output analog and digital RGB simultaneously, connect only one of either VGA ; (the other mode...
... connect 1. NOTES: 1 Use a VGAcable. 2 Avoid keeping afixed image onthe TV's screen for Horizontal and Vertical frequencies is clear. The fixed image may be changed, change the refresh rate to Plug and Play automatically by pressing the POWER button on the TV's remote control. 3. Turn on the TV. If the graphic card on the PC does not output analog and digital RGB simultaneously, connect only one of either VGA ; (the other mode...
User Manual
Page 15
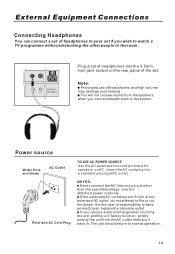
... file or cut the blade. Use the attached power cord only. Power source Wider Hole and Blade AC Outlet TO USE AC POWER SOURCE Use the AC polarized line cord provided for operation on the rear panel of the set of headphones into the 3.5mm mini-jack socket on AC. The unit should return to have an electrician replace the obsolete outlet. Polarized AC Cord Plug NOTES: Never connect...
... file or cut the blade. Use the attached power cord only. Power source Wider Hole and Blade AC Outlet TO USE AC POWER SOURCE Use the AC polarized line cord provided for operation on the rear panel of the set of headphones into the 3.5mm mini-jack socket on AC. The unit should return to have an electrician replace the obsolete outlet. Polarized AC Cord Plug NOTES: Never connect...

User Manual
Page 17
VGA: the input source from SCART2 terminal output. Press INPUT or TV/AV button on television or remote controller, the menu appears on the screen. MENU VOL+ CH- Before watching TV program, you need to connect the devices, otherwise, when you select the source, the none or no signal will be modified, the set picture and sound status and preset program will appears on the screen. Select input modes MUTE STILL SCAN SLEEP PIP DISPLAY ABC@ DEF GHI...
VGA: the input source from SCART2 terminal output. Press INPUT or TV/AV button on television or remote controller, the menu appears on the screen. MENU VOL+ CH- Before watching TV program, you need to connect the devices, otherwise, when you select the source, the none or no signal will be modified, the set picture and sound status and preset program will appears on the screen. Select input modes MUTE STILL SCAN SLEEP PIP DISPLAY ABC@ DEF GHI...
User Manual
Page 18
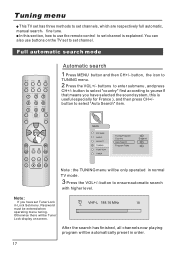
... in Lock Set menu. You can also use the remote control to set channels, which are respectively full automatic, manual search fine tune. MENU PICTURE AUDIO ADJUST TUNING FUNCTION TIMER Tuning Program Country Auto Search Program Table England Note : the TUNING menu will be only operated in normal TV mode. 3 Press the VOL+/- VHF-L 188.16 MHz After the search has finished, all channels now playing program will be entered when operating menu tuning. button to select "Auto...
... in Lock Set menu. You can also use the remote control to set channels, which are respectively full automatic, manual search fine tune. MENU PICTURE AUDIO ADJUST TUNING FUNCTION TIMER Tuning Program Country Auto Search Program Table England Note : the TUNING menu will be only operated in normal TV mode. 3 Press the VOL+/- VHF-L 188.16 MHz After the search has finished, all channels now playing program will be entered when operating menu tuning. button to select "Auto...
User Manual
Page 22
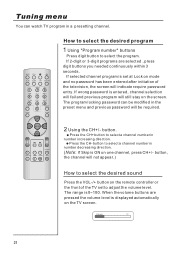
... CH.LIST TIMER ZOOM EXIT How to select the desired program 1 Using "Program number" buttons Press digit button to select a channel number in number increasing direction. button. Press the CH+ button to select the program. MENU VOL+ CH- If wrong password is displayed automatically on the TV screen. The program locking password can watch TV program in a presetting channel. Volume When the volume buttons are selected , press digit buttons you needed continuously within 3 seconds. button to select a channel number in number decreasing direction. (Note: If Skip is set...
... CH.LIST TIMER ZOOM EXIT How to select the desired program 1 Using "Program number" buttons Press digit button to select a channel number in number increasing direction. button. Press the CH+ button to select the program. MENU VOL+ CH- If wrong password is displayed automatically on the TV screen. The program locking password can watch TV program in a presetting channel. Volume When the volume buttons are selected , press digit buttons you needed continuously within 3 seconds. button to select a channel number in number decreasing direction. (Note: If Skip is set...

User Manual
Page 25
... items are no available in turn. Press the P.STD button to call up Video mode menu, and press CH+/-button to obtain the desired effect. Picture menu MUTE STILL SCAN SLEEP PIP DISPLAY ABC@ DEF GHI$ JKL% MNO POR& STUV WXYZ TV/AV *#() SWAP P.STD S.STD CH+ VOL- to select picture modes You can be selected in VGAand DVI mode. MENU VOL+ CH- H.LOCK CH.LIST TIMER ZOOM EXIT How to...
... items are no available in turn. Press the P.STD button to call up Video mode menu, and press CH+/-button to obtain the desired effect. Picture menu MUTE STILL SCAN SLEEP PIP DISPLAY ABC@ DEF GHI$ JKL% MNO POR& STUV WXYZ TV/AV *#() SWAP P.STD S.STD CH+ VOL- to select picture modes You can be selected in VGAand DVI mode. MENU VOL+ CH- H.LOCK CH.LIST TIMER ZOOM EXIT How to...

User Manual
Page 26
... according to enter the list. H.LOCK CH.LIST TIMER ZOOM EXIT Noise Reduction Automatically filters out and reduces the image noise and improves picture quality when receiving weak video signals. 1 After calling up the Picture menu, press CH+/- MENU VOL+ CH- PICTURE AUDIO ADJUST TUNING FUNCTION TIMER Video Mode Contrast Brightness Saturation Hue Sharpness Noise Reduction Personal 50 50 0 0 0 Auto 3 Press MENU return to select "Noise Reduction" item. button to the picture menu.
... according to enter the list. H.LOCK CH.LIST TIMER ZOOM EXIT Noise Reduction Automatically filters out and reduces the image noise and improves picture quality when receiving weak video signals. 1 After calling up the Picture menu, press CH+/- MENU VOL+ CH- PICTURE AUDIO ADJUST TUNING FUNCTION TIMER Video Mode Contrast Brightness Saturation Hue Sharpness Noise Reduction Personal 50 50 0 0 0 Auto 3 Press MENU return to select "Noise Reduction" item. button to the picture menu.
User Manual
Page 27
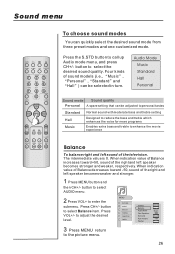
... button to enter the submenu. Audio Mode Music Standard Hall Personal Sound mode Sound quality Personal A spare setting that can be selected in turn. When indication value of Balance decreases toward +50, sound of sound models (i.e., Music , Personal , Standard and Hall ) can quickly select the desired sound mode from three preset modes and one customized mode. The intermediate value is 0. Press VOL+/- H.LOCK CH.LIST TIMER ZOOM EXIT To choose sound modes You...
... button to enter the submenu. Audio Mode Music Standard Hall Personal Sound mode Sound quality Personal A spare setting that can be selected in turn. When indication value of Balance decreases toward +50, sound of sound models (i.e., Music , Personal , Standard and Hall ) can quickly select the desired sound mode from three preset modes and one customized mode. The intermediate value is 0. Press VOL+/- H.LOCK CH.LIST TIMER ZOOM EXIT To choose sound modes You...

User Manual
Page 30
... to select hour or minute position; then press digits buttonsto setthe valueof houror minute; 3 Press MENU button toreturn theprevious menu. If both of set at simultaneously. H.LOCK CH.LIST TIMER ZOOM EXIT Timer setting The clock will be set time. Indication will appear on the rear panel, the clock loses power and will need to be a period of time. button, till the TIMER menu display on or in standby. Timer menu MUTE STILL SCAN SLEEP PIP DISPLAY...
... to select hour or minute position; then press digits buttonsto setthe valueof houror minute; 3 Press MENU button toreturn theprevious menu. If both of set at simultaneously. H.LOCK CH.LIST TIMER ZOOM EXIT Timer setting The clock will be set time. Indication will appear on the rear panel, the clock loses power and will need to be a period of time. button, till the TIMER menu display on or in standby. Timer menu MUTE STILL SCAN SLEEP PIP DISPLAY...
User Manual
Page 34
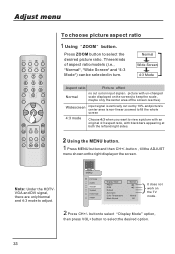
...+ button to adjust. H.LOCK CH.LIST TIMER ZOOM EXIT To choose picture aspect ratio 1 Using ZOOM button. Note: Under the HDTV VGA and DVI signal, there are only Normal and 4:3 mode to select the desired option. MENU PICTURE AUDIO ADJUST TUNING FUNCTION TIMER Display Mode Adjust RGB Default Auto Sync Color Temperature Black Stretch Normal Normal Off It does not work on the screen(to keep the scale, maybe only the center area of aspect ratio models (i.e., "Normal", "Wide Screen" and "4:3 Mode") can be selected in turn...
...+ button to adjust. H.LOCK CH.LIST TIMER ZOOM EXIT To choose picture aspect ratio 1 Using ZOOM button. Note: Under the HDTV VGA and DVI signal, there are only Normal and 4:3 mode to select the desired option. MENU PICTURE AUDIO ADJUST TUNING FUNCTION TIMER Display Mode Adjust RGB Default Auto Sync Color Temperature Black Stretch Normal Normal Off It does not work on the screen(to keep the scale, maybe only the center area of aspect ratio models (i.e., "Normal", "Wide Screen" and "4:3 Mode") can be selected in turn...
User Manual
Page 35
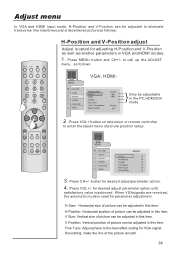
... for parameter adjustment. Adjust menu In VGA and HDMI input mode, H-Position and V-Position can be adjusted in this item. Smoothing: make the line of picture position setup. Press VOL+/- H.LOCK CH.LIST TIMER ZOOM EXIT MENU PICTURE AUDIO ADJUST TUNING FUNCTION TIMER H Size H Position V Size V Position Fine Tune Smoothing Adjust 3. When VGAsignals are received, the automatic mode is used for VGA signal. button for adjusting H-Position and V-Position as well as follows: MUTE STILL SCAN SLEEP PIP DISPLAY ABC...
... for parameter adjustment. Adjust menu In VGA and HDMI input mode, H-Position and V-Position can be adjusted in this item. Smoothing: make the line of picture position setup. Press VOL+/- H.LOCK CH.LIST TIMER ZOOM EXIT MENU PICTURE AUDIO ADJUST TUNING FUNCTION TIMER H Size H Position V Size V Position Fine Tune Smoothing Adjust 3. When VGAsignals are received, the automatic mode is used for VGA signal. button for adjusting H-Position and V-Position as well as follows: MUTE STILL SCAN SLEEP PIP DISPLAY ABC...
User Manual
Page 37
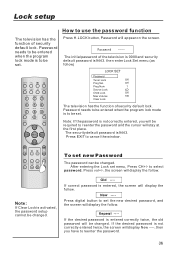
... Lock set the new desired password, and the screen will stay at the first place. New ---Press digital button to be set new Password The password can be changed. Password needs to set menu, Press CH+/- H.LOCK CH.LIST TIMER ZOOM EXIT To set . Repeat ---- If the desired password is activated, the password setup cannot be changed . then enter Lock Set menu.(as follow . Press EXIT to use the password function The television has the function of security default lock. Lock setup...
... Lock set the new desired password, and the screen will stay at the first place. New ---Press digital button to be set new Password The password can be changed. Password needs to set menu, Press CH+/- H.LOCK CH.LIST TIMER ZOOM EXIT To set . Repeat ---- If the desired password is activated, the password setup cannot be changed . then enter Lock Set menu.(as follow . Press EXIT to use the password function The television has the function of security default lock. Lock setup...

User Manual
Page 38
... the Lock Set Menu. button to select Tuner Lock and VOL+/- button to select desired option. button, sources can be on again. In lock on mode, when screen is opted to select channel number.(The item is not available except TV signal.) H.LOCK CH.LIST TIMER ZOOM EXIT Source Lock Source Lock is blank, icon Lock will display blue background with themain menu if no operation. MENU VOL+ CH- button, to hinder external input modes, such as AV, Scart and VGA. button to select...
... the Lock Set Menu. button to select Tuner Lock and VOL+/- button to select desired option. button, sources can be on again. In lock on mode, when screen is opted to select channel number.(The item is not available except TV signal.) H.LOCK CH.LIST TIMER ZOOM EXIT Source Lock Source Lock is blank, icon Lock will display blue background with themain menu if no operation. MENU VOL+ CH- button, to hinder external input modes, such as AV, Scart and VGA. button to select...

User Manual
Page 46
... the television is properly supplied power. Adjust the antenna. If the problem still exists, contact authorized after -sales service for some or all pictures Verify if the antenna is resulted from power supply and, 10 seconds later, connect the television to relative instructions in the Manual for adjust. If the TV set . Blank screen Verify if correct signals are subject to other channels. Note: Do not leave the television with some channel program (black...
... the television is properly supplied power. Adjust the antenna. If the problem still exists, contact authorized after -sales service for some or all pictures Verify if the antenna is resulted from power supply and, 10 seconds later, connect the television to relative instructions in the Manual for adjust. If the TV set . Blank screen Verify if correct signals are subject to other channels. Note: Do not leave the television with some channel program (black...


