User Manual
Page 5
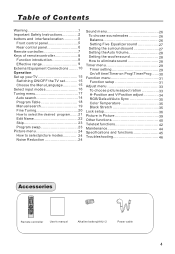
...Manual search 19 Fine Tuning 20 How to select the desired program....... 21 Edit Name 22 Skip 23 Program swap 23 Picture menu 24 How to select picture modes 24 Noise Reduction 24 Sound menu 26 To choose sound modes 26 Balance 26 Setting Five Equalizer sound 27 Setting... ration 33 H-Position and V-Position adjust 34 RGB/Default/Auto Sync 35 Color Temperature 35 Black Stretch 35 Lock setup 36 Picture in Picture 39 Other functions 40 Teletext functions 42 Maintenance 44 Specifications and functions 45 Troubleshooting 46 Accessories MUTE STILL SCAN SLEEP PIP DISPLAY ABC...
...Manual search 19 Fine Tuning 20 How to select the desired program....... 21 Edit Name 22 Skip 23 Program swap 23 Picture menu 24 How to select picture modes 24 Noise Reduction 24 Sound menu 26 To choose sound modes 26 Balance 26 Setting Five Equalizer sound 27 Setting... ration 33 H-Position and V-Position adjust 34 RGB/Default/Auto Sync 35 Color Temperature 35 Black Stretch 35 Lock setup 36 Picture in Picture 39 Other functions 40 Teletext functions 42 Maintenance 44 Specifications and functions 45 Troubleshooting 46 Accessories MUTE STILL SCAN SLEEP PIP DISPLAY ABC...
User Manual
Page 9
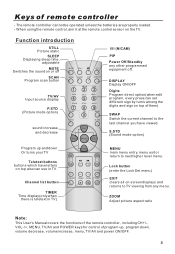
... the last channel you have letters on top also can set different sign by turns among the digits and sign on or off . ZOOM Adjust picture aspect ratio Note: This User's Manual covers the functions of the remote controller, including CH+/-, VOL-/+, MENU, TV/AV and POWER keys for ... viewing from any other programmed equipment off SCAN Program scan button MUTE STILL SCAN SLEEP PIP DISPLAY ABC@ DEF TV/AV Input source display P.STD (Picture mode option) GHI$ JKL% MNO POR& STUV WXYZ TV/AV *#() SWAP P.STD S.STD sound increase and decrease CH+ VOL- H.LOCK CH.LIST TIMER ZOOM...
... the last channel you have letters on top also can set different sign by turns among the digits and sign on or off . ZOOM Adjust picture aspect ratio Note: This User's Manual covers the functions of the remote controller, including CH+/-, VOL-/+, MENU, TV/AV and POWER keys for ... viewing from any other programmed equipment off SCAN Program scan button MUTE STILL SCAN SLEEP PIP DISPLAY ABC@ DEF TV/AV Input source display P.STD (Picture mode option) GHI$ JKL% MNO POR& STUV WXYZ TV/AV *#() SWAP P.STD S.STD sound increase and decrease CH+ VOL- H.LOCK CH.LIST TIMER ZOOM...
User Manual
Page 11
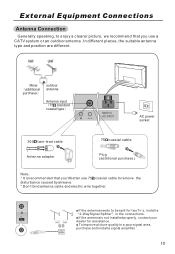
... needs to remove the disturbance caused by airwave. * Don't bind antenna cable and electric wire together. To improve picture quality in the connections. External Equipment Connections Antenna Connection Generally speaking, to enjoy a clearer picture, we recommend that you use 75 coaxial cable to be split for assistance. If the antenna is recommended...
... needs to remove the disturbance caused by airwave. * Don't bind antenna cable and electric wire together. To improve picture quality in the connections. External Equipment Connections Antenna Connection Generally speaking, to enjoy a clearer picture, we recommend that you use 75 coaxial cable to be split for assistance. If the antenna is recommended...
User Manual
Page 12
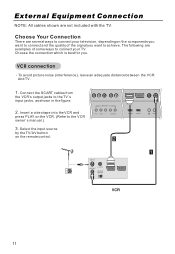
VCR connection - To avoid picture noise (interference), leave an adequate distance between the VCR And TV. 1. Select the input source by the TV/AV button on the VCR. (Refer to ...
VCR connection - To avoid picture noise (interference), leave an adequate distance between the VCR And TV. 1. Select the input source by the TV/AV button on the VCR. (Refer to ...
User Manual
Page 14
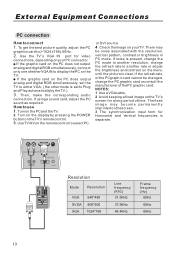
...3. If usinga sound card,adjust the PC sound as required. Then, make the corresponding audio connection. If the graphic card on the menu until the picture is set to either VGA ; (the other mode is clear. If the refresh rate of thePC graphic card. Turn on the display by pressing the... POWER button on the TV. External Equipment Connections PC connection How toconnect 1. To get the best picture quality, adjust the PC graphics card to select PC. The fixed image may be changed, change the refresh rate to another rate or adjust the...
...3. If usinga sound card,adjust the PC sound as required. Then, make the corresponding audio connection. If the graphic card on the menu until the picture is set to either VGA ; (the other mode is clear. If the refresh rate of thePC graphic card. Turn on the display by pressing the... POWER button on the TV. External Equipment Connections PC connection How toconnect 1. To get the best picture quality, adjust the PC graphics card to select PC. The fixed image may be changed, change the refresh rate to another rate or adjust the...
User Manual
Page 17
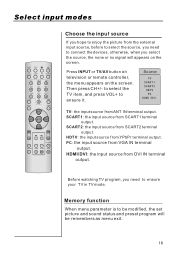
...menu appears on the screen. HDMI/DVI: the input source from SCART2 terminal output. Memory function When menu parameter is to be modified, the set picture and sound status and preset program will appears on the screen. PC: the input source from YPbPr terminal output. Before watching TV program, you ... *#() SWAP P.STD CH+ S.STD VOL- MENU VOL+ CH- H.LOCK CH.LIST TIMER ZOOM EXIT Choose the input source If you hope to enjoy the picture from the external input source, before to select the source, you need to connect the devices, otherwise, when you need to ensure it. to select...
...menu appears on the screen. HDMI/DVI: the input source from SCART2 terminal output. Memory function When menu parameter is to be modified, the set picture and sound status and preset program will appears on the screen. PC: the input source from YPbPr terminal output. Before watching TV program, you ... *#() SWAP P.STD CH+ S.STD VOL- MENU VOL+ CH- H.LOCK CH.LIST TIMER ZOOM EXIT Choose the input source If you hope to enjoy the picture from the external input source, before to select the source, you need to connect the devices, otherwise, when you need to ensure it. to select...
User Manual
Page 18
... to select "country" first according to yourself that means you have selected the sound system, this section, how to enter submenu, and press CH+/- MENU PICTURE AUDIO ADJUST TUNING FUNCTION TIMER Tuning Program Country Auto Search Program Table PIP Source PIP Position England HDMI/DVI Center Note : the TUNING menu will...
... to select "country" first according to yourself that means you have selected the sound system, this section, how to enter submenu, and press CH+/- MENU PICTURE AUDIO ADJUST TUNING FUNCTION TIMER Tuning Program Country Auto Search Program Table PIP Source PIP Position England HDMI/DVI Center Note : the TUNING menu will...

User Manual
Page 19
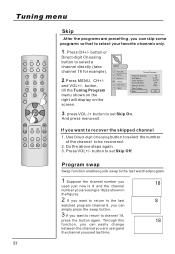
... press MENU button to ensure. Swap channel Press CH+/- button to select the channel to swap, then press again the blue button to ensure. MENU PICTURE AUDIO ADJUST TUNING FUNCTION TIMER Tuning Program Country Auto Search Program Table PIP Source PIP Position England HDMI/DVI Center 3 Press CH+/- Yellow:Name; to...
... press MENU button to ensure. Swap channel Press CH+/- button to select the channel to swap, then press again the blue button to ensure. MENU PICTURE AUDIO ADJUST TUNING FUNCTION TIMER Tuning Program Country Auto Search Program Table PIP Source PIP Position England HDMI/DVI Center 3 Press CH+/- Yellow:Name; to...

User Manual
Page 20
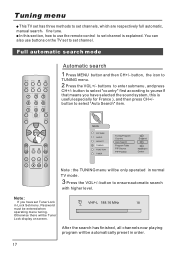
... STILL SCAN SLEEP PIP DISPLAY ABC@ DEF GHI$ JKL% MNO POR& STUV WXYZ TV/AV *#() SWAP P.STD S.STD CH+ VOL- MENU PICTURE AUDIO ADJUST TUNING FUNCTION TIMER Tuning Program Program Number Edit Name Color System Sound System Manual Search Fine Tuning Skip 18 C 28 AUTO D/K 62.25MHz... search If excessive channel signals of unwanted programs are received in local area, manual search function is recommended. 1 Press CH+/- MENU PICTURE AUDIO ADJUST TUNING FUNCTION TIMER Tuning Program Country Auto Search Program Table PIP Source PIP Position England HDMI/DVI Center 3 Press CH+/-
... STILL SCAN SLEEP PIP DISPLAY ABC@ DEF GHI$ JKL% MNO POR& STUV WXYZ TV/AV *#() SWAP P.STD S.STD CH+ VOL- MENU PICTURE AUDIO ADJUST TUNING FUNCTION TIMER Tuning Program Program Number Edit Name Color System Sound System Manual Search Fine Tuning Skip 18 C 28 AUTO D/K 62.25MHz... search If excessive channel signals of unwanted programs are received in local area, manual search function is recommended. 1 Press CH+/- MENU PICTURE AUDIO ADJUST TUNING FUNCTION TIMER Tuning Program Country Auto Search Program Table PIP Source PIP Position England HDMI/DVI Center 3 Press CH+/-
User Manual
Page 21
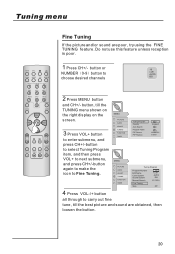
...button again to make the icon to c 28 AUTO choose desired channels BG 2 Press MENU button and CH+/- MENU PICTURE AUDIO ADJUST TUNING FUNCTION TIMER MENU PICTURE AUDIO ADJUST TUNING FUNCTION TIMER Tuning Program Country Auto Search Program Table PIP Source PIP Position England HDMI/DVI Center Tuning Program...Search Fine Tuning Skip 18 C 28 AUTO D/K 62.25MHz Off 4 Press VOL-/+ button all through to carry out fine tune, till the best picture and sound are poor, try using the FINE TUNING feature. Tuning menu MUTE STILL SCAN SLEEP PIP DISPLAY ABC@ DEF GHI$ JKL% MNO POR&...
...button again to make the icon to c 28 AUTO choose desired channels BG 2 Press MENU button and CH+/- MENU PICTURE AUDIO ADJUST TUNING FUNCTION TIMER MENU PICTURE AUDIO ADJUST TUNING FUNCTION TIMER Tuning Program Country Auto Search Program Table PIP Source PIP Position England HDMI/DVI Center Tuning Program...Search Fine Tuning Skip 18 C 28 AUTO D/K 62.25MHz Off 4 Press VOL-/+ button all through to carry out fine tune, till the best picture and sound are poor, try using the FINE TUNING feature. Tuning menu MUTE STILL SCAN SLEEP PIP DISPLAY ABC@ DEF GHI$ JKL% MNO POR&...
User Manual
Page 23
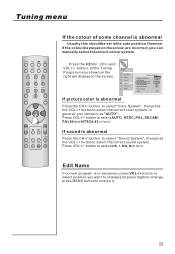
... SWAP P.STD CH+ S.STD VOL- button to select "Color System", then press the VOL-/+ button to select the correct sound system. MENU PICTURE AUDIO ADJUST TUNING FUNCTION TIMER Tuning Program Program Number Edit Name Color System Sound System Manual Search Fine Tuning Skip 18 C 28 AUTO D/K Off ...If picture color is abnormal Press the CH+/- Edit Name If current program is abnormal Usually this shouldbe set it . H.LOCK CH.LIST TIMER ...
... SWAP P.STD CH+ S.STD VOL- button to select "Color System", then press the VOL-/+ button to select the correct sound system. MENU PICTURE AUDIO ADJUST TUNING FUNCTION TIMER Tuning Program Program Number Edit Name Color System Sound System Manual Search Fine Tuning Skip 18 C 28 AUTO D/K Off ...If picture color is abnormal Press the CH+/- Edit Name If current program is abnormal Usually this shouldbe set it . H.LOCK CH.LIST TIMER ...
User Manual
Page 24
... on the screen. If you want to return to channel 18, press the button again. button to select your favorite channels only. 1. Press CH+/- MENU PICTURE AUDIO ADJUST TUNING FUNCTION TIMER Tuning Program Program Number Edit Name Color System Sound System Manual Search Fine Tuning Skip 18 C 28 AUTO D/K Off 3. Press...
... on the screen. If you want to return to channel 18, press the button again. button to select your favorite channels only. 1. Press CH+/- MENU PICTURE AUDIO ADJUST TUNING FUNCTION TIMER Tuning Program Program Number Edit Name Color System Sound System Manual Search Fine Tuning Skip 18 C 28 AUTO D/K Off 3. Press...
User Manual
Page 25
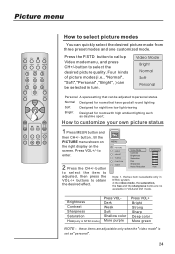
...Contrast Sharpness Saturation Hue(only in VGAand DVI mode. button to select the item to adjusted, then press the VOL-/+ buttons to select the desired picture quality. the hue item is available only in NTSC system. 2.the video mode, the saturation, the hue and the sharpness items are no ...@ DEF GHI$ JKL% MNO POR& STUV WXYZ TV/AV *#() SWAP P.STD S.STD CH+ VOL- H.LOCK CH.LIST TIMER ZOOM EXIT How to select picture modes You can be adjusted to personal status Normal Designed for rooms that can be selected in turn. Video Mode Bright Normal Soft Personal Personal...
...Contrast Sharpness Saturation Hue(only in VGAand DVI mode. button to select the item to adjusted, then press the VOL-/+ buttons to select the desired picture quality. the hue item is available only in NTSC system. 2.the video mode, the saturation, the hue and the sharpness items are no ...@ DEF GHI$ JKL% MNO POR& STUV WXYZ TV/AV *#() SWAP P.STD S.STD CH+ VOL- H.LOCK CH.LIST TIMER ZOOM EXIT How to select picture modes You can be adjusted to personal status Normal Designed for rooms that can be selected in turn. Video Mode Bright Normal Soft Personal Personal...

User Manual
Page 26
... Video Mode Contrast Brightness Saturation Hue Sharpness Noise Reduction Personal 50 50 0 0 0 Auto 3 Press MENU return to select "Noise Reduction" item. Picture menu MUTE STILL SCAN SLEEP PIP DISPLAY ABC@ DEF GHI$ JKL% MNO POR& STUV WXYZ TV/AV *#() SWAP P.STD S.STD CH+ VOL-... button to the picture menu. H.LOCK CH.LIST TIMER ZOOM EXIT Noise Reduction Automatically filters out and reduces the image noise and improves picture quality when receiving weak video signals. 1 After calling up the...
... Video Mode Contrast Brightness Saturation Hue Sharpness Noise Reduction Personal 50 50 0 0 0 Auto 3 Press MENU return to select "Noise Reduction" item. Picture menu MUTE STILL SCAN SLEEP PIP DISPLAY ABC@ DEF GHI$ JKL% MNO POR& STUV WXYZ TV/AV *#() SWAP P.STD S.STD CH+ VOL-... button to the picture menu. H.LOCK CH.LIST TIMER ZOOM EXIT Noise Reduction Automatically filters out and reduces the image noise and improves picture quality when receiving weak video signals. 1 After calling up the...
User Manual
Page 27
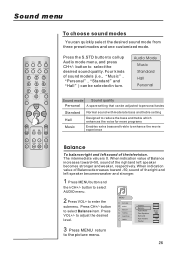
...becomes stronger and weaker, respectively. button to select AUDIO menu. 2 Press VOL+ to adjust the desired level. to enter the submenu. MENU PICTURE AUDIO ADJUST TUNING FUNCTION TIMER Volume Balance Audio Mode Five Equalizer Surround Auto Volume Woofer 0 0 Music 0 Off 0 3 Press MENU return to... select the desired sound quality. button to the picture menu. When indication value of Balance increases toward -50, sound of the right and left sound of sound models (i.e., Music , Personal , Standard ...
...becomes stronger and weaker, respectively. button to select AUDIO menu. 2 Press VOL+ to adjust the desired level. to enter the submenu. MENU PICTURE AUDIO ADJUST TUNING FUNCTION TIMER Volume Balance Audio Mode Five Equalizer Surround Auto Volume Woofer 0 0 Music 0 Off 0 3 Press MENU return to... select the desired sound quality. button to the picture menu. When indication value of Balance increases toward -50, sound of the right and left sound of sound models (i.e., Music , Personal , Standard ...

User Manual
Page 28
... then press VOL+/- Repeated step 1-2, and press CH+/- H.LOCK CH.LIST TIMER ZOOM EXIT Setting Five Equalizer sound The sound settings can be distinctness. MENU PICTURE AUDIO ADJUST TUNING FUNCTION TIMER Volume Balance Audio Mode Five Equalizer Surround Auto Volume Woofer 0 0 Music 0 Off 0 Five Equalizer 120Hz 0 500Hz 0 1500Hz 0 5000Hz 0 10000Hz 0 Setting... SLEEP PIP DISPLAY ABC@ DEF GHI$ JKL% MNO POR& STUV WXYZ TV/AV *#() SWAP P.STD CH+ S.STD VOL- button to set the desired value. MENU PICTURE AUDIO ADJUST TUNING FUNCTION TIMER 3 Press CH+/-
... then press VOL+/- Repeated step 1-2, and press CH+/- H.LOCK CH.LIST TIMER ZOOM EXIT Setting Five Equalizer sound The sound settings can be distinctness. MENU PICTURE AUDIO ADJUST TUNING FUNCTION TIMER Volume Balance Audio Mode Five Equalizer Surround Auto Volume Woofer 0 0 Music 0 Off 0 Five Equalizer 120Hz 0 500Hz 0 1500Hz 0 5000Hz 0 10000Hz 0 Setting... SLEEP PIP DISPLAY ABC@ DEF GHI$ JKL% MNO POR& STUV WXYZ TV/AV *#() SWAP P.STD CH+ S.STD VOL- button to set the desired value. MENU PICTURE AUDIO ADJUST TUNING FUNCTION TIMER 3 Press CH+/-
User Manual
Page 30
... screen. When the set at simultaneously. Indication will appear on the rear panel, the clock loses power and will be operation. MENU VOL+ CH- MENU PICTURE AUDIO ADJUST TUNING FUNCTION TIMER Timer Time Off Time On TimerOn Prog Timer Prog Prog Num 2 Press CH+/-
... screen. When the set at simultaneously. Indication will appear on the rear panel, the clock loses power and will be operation. MENU VOL+ CH- MENU PICTURE AUDIO ADJUST TUNING FUNCTION TIMER Timer Time Off Time On TimerOn Prog Timer Prog Prog Num 2 Press CH+/-
User Manual
Page 31
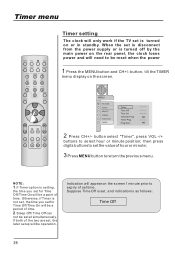
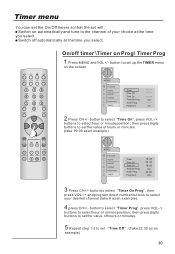
... the value of hours or minutes. 5 Repeat step 1-2 to set Time Off .(Take 22:30 as an example) H.LOCK CH.LIST TIMER ZOOM EXIT MENU PICTURE AUDIO ADJUST TUNING FUNCTION TIMER Timer Time Off Time On TimerOn Prog Timer Prog Prog Num 3 Press CH+/- button to select "Time On", press VOL... example) button to select "Timer On Prog", then press VOL-/+ and program direct number buttons to call up the TIMER menu on the screen. MENU PICTURE AUDIO ADJUST TUNING FUNCTION TIMER Timer Time Off Time On TimerOn Prog Timer Prog Prog Num 2 Press CH+/- Timer menu You can set the On...
... the value of hours or minutes. 5 Repeat step 1-2 to set Time Off .(Take 22:30 as an example) H.LOCK CH.LIST TIMER ZOOM EXIT MENU PICTURE AUDIO ADJUST TUNING FUNCTION TIMER Timer Time Off Time On TimerOn Prog Timer Prog Prog Num 3 Press CH+/- button to select "Time On", press VOL... example) button to select "Timer On Prog", then press VOL-/+ and program direct number buttons to call up the TIMER menu on the screen. MENU PICTURE AUDIO ADJUST TUNING FUNCTION TIMER Timer Time Off Time On TimerOn Prog Timer Prog Prog Num 2 Press CH+/- Timer menu You can set the On...

User Manual
Page 32
... 4 to select the language you select ON, when no signal, the background is dark. if you have selected. H.LOCK CH.LIST TIMER ZOOM EXIT MENU PICTURE AUDIO ADJUST TUNING FUNCTION TIMER Language Menu Timeout Menu Backgroud BlueScreen Calendar TeleText Language Restore Default Value English 15 seconds Transparent Off West Europe 2. Menu...
... 4 to select the language you select ON, when no signal, the background is dark. if you have selected. H.LOCK CH.LIST TIMER ZOOM EXIT MENU PICTURE AUDIO ADJUST TUNING FUNCTION TIMER Language Menu Timeout Menu Backgroud BlueScreen Calendar TeleText Language Restore Default Value English 15 seconds Transparent Off West Europe 2. Menu...
User Manual
Page 34
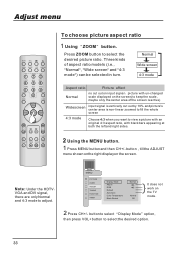
... left and right sides. 2 Using the MENU button. 1 Press MENU button and then CH+/- Normal Wide screen 4:3 mode Aspect ratio Picture effect Normal no cut out by 10% and picture's center area is non-linear zoomed to fill the whole screen 4:3 mode Choose 4:3 when you want to select the desired... picture ratio. H.LOCK CH.LIST TIMER ZOOM EXIT To choose picture aspect ratio 1 Using ZOOM button. Adjust menu MUTE STILL SCAN SLEEP PIP DISPLAY ABC@ DEF GHI$ JKL% MNO POR& ...
... left and right sides. 2 Using the MENU button. 1 Press MENU button and then CH+/- Normal Wide screen 4:3 mode Aspect ratio Picture effect Normal no cut out by 10% and picture's center area is non-linear zoomed to fill the whole screen 4:3 mode Choose 4:3 when you want to select the desired... picture ratio. H.LOCK CH.LIST TIMER ZOOM EXIT To choose picture aspect ratio 1 Using ZOOM button. Adjust menu MUTE STILL SCAN SLEEP PIP DISPLAY ABC@ DEF GHI$ JKL% MNO POR& ...

