

Product Manual
Page 2
Contents Safety and warnings 2-3 Introduction 4 Stand installation guide 5 Installation...6-9 Remote Control 10 Operation...11-15 Trouble Shooting 16 Warranty...17 -1-
Contents Safety and warnings 2-3 Introduction 4 Stand installation guide 5 Installation...6-9 Remote Control 10 Operation...11-15 Trouble Shooting 16 Warranty...17 -1-
Product Manual
Page 3
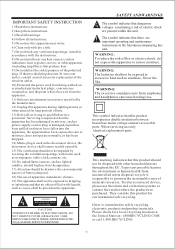
...lighted candles, should be placed on the apparatus. 17) Attention should be drawn to qualified service personnel. When servicing use this apparatus near water. 6) Clean only with dry cloth. 7) Do not block any ventilation openings, install in accordance with the instructions. 8) Do not install near any way, such as power-supply cord or plug... operating and maintenance instructions in the literaturaccompanying this unit. This marking indicates that this product incorporates double insulation between hazardous mains voltage and user accessible parts. Haier is used device, please use the...
...lighted candles, should be placed on the apparatus. 17) Attention should be drawn to qualified service personnel. When servicing use this apparatus near water. 6) Clean only with dry cloth. 7) Do not block any ventilation openings, install in accordance with the instructions. 8) Do not install near any way, such as power-supply cord or plug... operating and maintenance instructions in the literaturaccompanying this unit. This marking indicates that this product incorporates double insulation between hazardous mains voltage and user accessible parts. Haier is used device, please use the...
Product Manual
Page 4
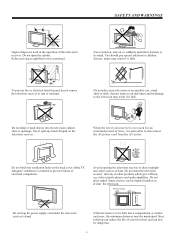
... is advisable to disconnect the AC power cord from the AC outlet. When the television receiver is not used in the operation of electrical components. Do not trap the power supply cord under the television receiver's stand. Dim:515*320mm( If the television is essential to prevent failure of this television receiver. Never stand on, lean on or near the television. Heat build-up can reduce the life...
... is advisable to disconnect the AC power cord from the AC outlet. When the television receiver is not used in the operation of electrical components. Do not trap the power supply cord under the television receiver's stand. Dim:515*320mm( If the television is essential to prevent failure of this television receiver. Never stand on, lean on or near the television. Heat build-up can reduce the life...
Product Manual
Page 5
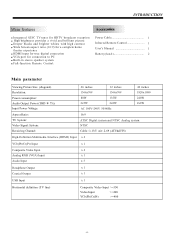
...a vivid and brilliant picture Deeper blacks and brighter whites with high contrast Wide Screen aspect ratio (16:9) for a complete home theater experience HDMI input for true digital connection VGA port for connection to PC Built-in stereo speaker system Full-function Remote Control Power Cable 1 Infrared Remote Control 1 User s Manual 1 Battery(AAA 2 Main parameter Viewing Picture Size (diagonal) Resolution: Power consumption: Audio Output Power (THD Input Power Voltage: 7%): Aspect Ratio: TV System: Video Signal System: Receiving Channel: 26 inches 1366x768 32 inches 1366x768 42...
...a vivid and brilliant picture Deeper blacks and brighter whites with high contrast Wide Screen aspect ratio (16:9) for a complete home theater experience HDMI input for true digital connection VGA port for connection to PC Built-in stereo speaker system Full-function Remote Control Power Cable 1 Infrared Remote Control 1 User s Manual 1 Battery(AAA 2 Main parameter Viewing Picture Size (diagonal) Resolution: Power consumption: Audio Output Power (THD Input Power Voltage: 7%): Aspect Ratio: TV System: Video Signal System: Receiving Channel: 26 inches 1366x768 32 inches 1366x768 42...
Product Manual
Page 6
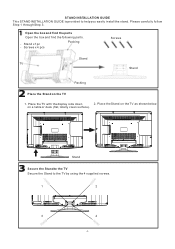
... Step 1 through Step 3. Place the Stand on the TV 1. Screws x 4 pcs Packing Screws Stand TV Stand Packing Place the Stand on the TV as shown below. Stand Secure the Stand to the TV Secure the Stand to help you easily install the stand. STAND INSTALLATION GUIDE This STAND INSTALLATION GUIDE is provided to the TV by using the 4 supplied screws. 1 2 3 4 -5- Stand x1 pc - on a table or desk (flat, totally clean surface). Place the TV...
... Step 1 through Step 3. Place the Stand on the TV 1. Screws x 4 pcs Packing Screws Stand TV Stand Packing Place the Stand on the TV as shown below. Stand Secure the Stand to the TV Secure the Stand to help you easily install the stand. STAND INSTALLATION GUIDE This STAND INSTALLATION GUIDE is provided to the TV by using the 4 supplied screws. 1 2 3 4 -5- Stand x1 pc - on a table or desk (flat, totally clean surface). Place the TV...
Product Manual
Page 7
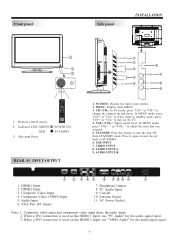
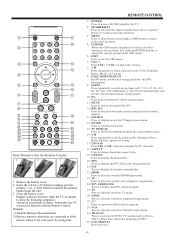
... to turn the unit ON from STANDBY mode. HDMI1 Input 2. When a DVI connection is used on the HDMI 1 Input, use "YPbPr Audio" for the audio signal input. 3. VOL+/VOL-: Adjust sound level. HDMI2 Input 3. VGA Port (PC Input) 7. Antenna Socket 11. REAR AV INPUT/OUTPUT 1. Composite Video Input 4. AC Power Socket AC INPUT 100-240V~50/60Hz 11 Note: 1. SOURCE: Display the input source menu. 2. VIDEO INPUT 8. STANDBY 5 USB 6 VIDEO 7 VIDEO AV2 L 8 L R 9 R 1 2 3 4 5 6 7 8 9 0 + + VOL CH _ _ 1: Remote control sensor. 2: Indicator LED: GREEN RED...
... to turn the unit ON from STANDBY mode. HDMI1 Input 2. When a DVI connection is used on the HDMI 1 Input, use "YPbPr Audio" for the audio signal input. 3. VOL+/VOL-: Adjust sound level. HDMI2 Input 3. VGA Port (PC Input) 7. Antenna Socket 11. REAR AV INPUT/OUTPUT 1. Composite Video Input 4. AC Power Socket AC INPUT 100-240V~50/60Hz 11 Note: 1. SOURCE: Display the input source menu. 2. VIDEO INPUT 8. STANDBY 5 USB 6 VIDEO 7 VIDEO AV2 L 8 L R 9 R 1 2 3 4 5 6 7 8 9 0 + + VOL CH _ _ 1: Remote control sensor. 2: Indicator LED: GREEN RED...
Product Manual
Page 8
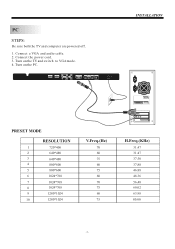
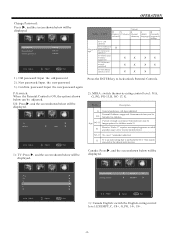
... TV and switch to VGAmode. 4. Connect the power cord. 3. Turn on the PC. HDMI 1 HDMI 2 Pr COMPONENT Pb INPUT AUDIO L INPUT AV1 Y R VGA INPUT HEADPHONE PC AUDIO COAXIAL INPUT RF INPUT AC INPUT 100-240V~50/60Hz INSTALLATION PRESET MODE RESOLUTION 1 720*400 2 640*480 3 640*480 4 800*600 5 800*600 6 1024*768 7 1024*768 8 1024*768 9 1280*1024 10 1280*1024 V.Freq.(Hz) 70 60 ... 75 60 75 H.Freq.(KHz) 31.47 31.47 37.50 37.88 46.88 48.36 56.48 60.02 63.98 80.00 -7- Connect a VGA and audio cable. 2. PC STEPS: Be sure both the TV and computer are...
... TV and switch to VGAmode. 4. Connect the power cord. 3. Turn on the PC. HDMI 1 HDMI 2 Pr COMPONENT Pb INPUT AUDIO L INPUT AV1 Y R VGA INPUT HEADPHONE PC AUDIO COAXIAL INPUT RF INPUT AC INPUT 100-240V~50/60Hz INSTALLATION PRESET MODE RESOLUTION 1 720*400 2 640*480 3 640*480 4 800*600 5 800*600 6 1024*768 7 1024*768 8 1024*768 9 1280*1024 10 1280*1024 V.Freq.(Hz) 70 60 ... 75 60 75 H.Freq.(KHz) 31.47 31.47 37.50 37.88 46.88 48.36 56.48 60.02 63.98 80.00 -7- Connect a VGA and audio cable. 2. PC STEPS: Be sure both the TV and computer are...
Product Manual
Page 9
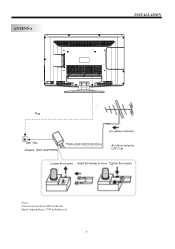
Input impendance:75 unbalanced. -8- ANTENNA INSTALLATION Note: Aerial connections:IEC(female).
Input impendance:75 unbalanced. -8- ANTENNA INSTALLATION Note: Aerial connections:IEC(female).
Product Manual
Page 10
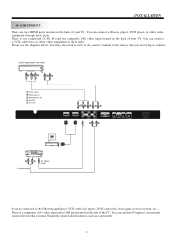
... diagram below. There is a composite (AV) video input and a USB port located on the back of your TV. You can connect a VCR, cable box, or other video equipment through these jacks. You can connect a Blu-ray player, DVD player, or other video equipment to these ports. VIDEO EQUIPMENT with YPbPr GBR WR Y Yellow (video) W White(audio L) R Red(audio R or Pr) B Blue(Pb) G Green(Y) HDMI 1 GBR WR HDMI 2 Pr COMPONENT Pb INPUT AUDIO L INPUT AV1 Y R VGA INPUT W R HEADPHONE PC AUDIO COAXIAL INPUT RF INPUT...
... diagram below. There is a composite (AV) video input and a USB port located on the back of your TV. You can connect a VCR, cable box, or other video equipment through these jacks. You can connect a Blu-ray player, DVD player, or other video equipment to these ports. VIDEO EQUIPMENT with YPbPr GBR WR Y Yellow (video) W White(audio L) R Red(audio R or Pr) B Blue(Pb) G Green(Y) HDMI 1 GBR WR HDMI 2 Pr COMPONENT Pb INPUT AUDIO L INPUT AV1 Y R VGA INPUT W R HEADPHONE PC AUDIO COAXIAL INPUT RF INPUT...
Product Manual
Page 11
... menu. 6: VOL+/Press VOL+ or VOL- REMOTE CONTROL 1: POWER Press to power ON/OFF (standby) the TV. 2: NUMBER KEY Press to enter theTV channel numberand select a channel (Press " " tochoose the sub-channel). 3: MENU Press to open theon screen display (OSD)menu or return to the previous menu. 4: CURSOR When the OSD menuis displayed on-screen,use these buttons as Stereo, SAP or Mono tone, and audio languages of DTV. 30: COLOR...
... menu. 6: VOL+/Press VOL+ or VOL- REMOTE CONTROL 1: POWER Press to power ON/OFF (standby) the TV. 2: NUMBER KEY Press to enter theTV channel numberand select a channel (Press " " tochoose the sub-channel). 3: MENU Press to open theon screen display (OSD)menu or return to the previous menu. 4: CURSOR When the OSD menuis displayed on-screen,use these buttons as Stereo, SAP or Mono tone, and audio languages of DTV. 30: COLOR...
Product Manual
Page 12
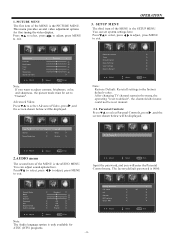
... factory default value. Parental Controls: Press to "Custom". Picture Mode Contrast Brightness Color Tint Sharpness Advanced Video Adjust < Standard > 50 50 50 0 50 > Select Menu Exit Note: If you will be displayed. Enter Password ---- After changingTV channel namein the menu, the operating "reset to adjust contrast, brightness, color, and sharpness, the picture mode must be reset manual. 3.1. Adjust Select Menu Exit 2.AUDIO menu The second item of the MENU is 0000. The factory default password is the AUDIO MENU. Adjust Select Menu Exit Input the password...
... factory default value. Parental Controls: Press to "Custom". Picture Mode Contrast Brightness Color Tint Sharpness Advanced Video Adjust < Standard > 50 50 50 0 50 > Select Menu Exit Note: If you will be displayed. Enter Password ---- After changingTV channel namein the menu, the operating "reset to adjust contrast, brightness, color, and sharpness, the picture mode must be reset manual. 3.1. Adjust Select Menu Exit 2.AUDIO menu The second item of the MENU is 0000. The factory default password is the AUDIO MENU. Adjust Select Menu Exit Input the password...
Product Manual
Page 13
... (age varies insome jurisdictions). Adjust Select Menu Exit Rating Content Content FV V S L D (Fantasy (Violence) (Sexual (Adult (Sexually violence) situation) language) suggestive dialog) TV-Y (All children) TV-Y7(Direct to lock/unlock Parental Controls. 2). Somematerial may be Age PG-13 Inappropriate for children. NC-17 No one 17 andunder admitted. OPERATION Change Password: Press , and the screen shown below will be...
... (age varies insome jurisdictions). Adjust Select Menu Exit Rating Content Content FV V S L D (Fantasy (Violence) (Sexual (Adult (Sexually violence) situation) language) suggestive dialog) TV-Y (All children) TV-Y7(Direct to lock/unlock Parental Controls. 2). Somematerial may be Age PG-13 Inappropriate for children. NC-17 No one 17 andunder admitted. OPERATION Change Password: Press , and the screen shown below will be...
Product Manual
Page 14
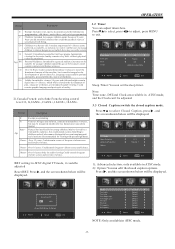
... Adjust Select Menu Exit Mode Font style Font size Font Edge style Font Edge color FG color BG color FG opacity BG opacity Adjust Select Custom > Default > Default > Default > Default Default > Default > Default > Default > Menu Exit NOTE: Only available in a humorousor unrealistic manner . Press to select, press to adjust, press MENU Sleep timer Time zone DST Clock < Off > < Pacific > < Off > 1999/12/31 04:03PM Adjust Select Menu Exit Sleep Timer:Youcan set the sleep timer. Are you sure? OPERATION...
... Adjust Select Menu Exit Mode Font style Font size Font Edge style Font Edge color FG color BG color FG opacity BG opacity Adjust Select Custom > Default > Default > Default > Default Default > Default > Default > Default > Menu Exit NOTE: Only available in a humorousor unrealistic manner . Press to select, press to adjust, press MENU Sleep timer Time zone DST Clock < Off > < Pacific > < Off > 1999/12/31 04:03PM Adjust Select Menu Exit Sleep Timer:Youcan set the sleep timer. Are you sure? OPERATION...
Product Manual
Page 15
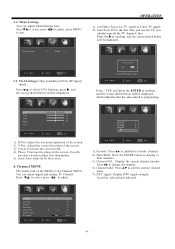
.../cable Auto Scan Favorite Show/Hide Channel NO. 3.4 Menu Settings You can adjust digital and analog TV Channel. OPERATION 1). V-Pos: Adjust the vertical position of the screen. 2). You can adjust Menu Settings here. Air/Cable: Select Air TV signal or Cable TV signal. 2). DTV signal: Adjust < < Select Air > > > > 2-1 > > Good Menu Exit -14- Menu Language < English > Adjust Select Menu Exit 3.5 VGASettings: Only available inVGA (PCinput) mode. Favorite: Press to adjust. Press to display or hide channels. 5). Show/Hide: Press the ENTER button...
.../cable Auto Scan Favorite Show/Hide Channel NO. 3.4 Menu Settings You can adjust digital and analog TV Channel. OPERATION 1). V-Pos: Adjust the vertical position of the screen. 2). You can adjust Menu Settings here. Air/Cable: Select Air TV signal or Cable TV signal. 2). DTV signal: Adjust < < Select Air > > > > 2-1 > > Good Menu Exit -14- Menu Language < English > Adjust Select Menu Exit 3.5 VGASettings: Only available inVGA (PCinput) mode. Favorite: Press to adjust. Press to display or hide channels. 5). Show/Hide: Press the ENTER button...
Product Manual
Page 16
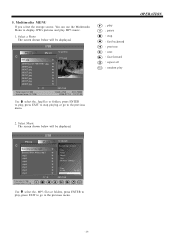
...:42 Use select the. OPERATION -15- Everything I do.mp3 Sealed With AKiss.mp3 .mp3 .mp3 .mp3 .mp3 .mp3 .mp3 .mp3 :17 Total size:3.7 GB Unused size: 3.7 GB C:\laoge\ Everything I do.mp3 Title: Artist: Album: Year: Bit Rate: 128kbps Play 05:49 001/018 06:33 Random Use select the. 5. You can use the Multimedia Menu to display JPEG pictures and play...
...:42 Use select the. OPERATION -15- Everything I do.mp3 Sealed With AKiss.mp3 .mp3 .mp3 .mp3 .mp3 .mp3 .mp3 .mp3 :17 Total size:3.7 GB Unused size: 3.7 GB C:\laoge\ Everything I do.mp3 Title: Artist: Album: Year: Bit Rate: 128kbps Play 05:49 001/018 06:33 Random Use select the. 5. You can use the Multimedia Menu to display JPEG pictures and play...
Product Manual
Page 17
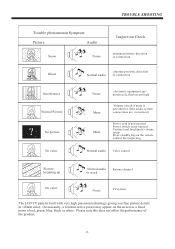
... of red, green, blue, black or white. Occasionally, a few non-active pixels may appear on the remote control for inspecting Normal audio Color control Picture breaking up Normal audio Retune channel or weak No color Noise TVsystem The LCD TV panel is not opened Contrast and brightness/volume setup Press standby key on the screen as a fixed point of the product. -16- TROUBLE SHOOTING Trouble phenomenon Symptom Picture Audio Snow Noise Inspection Check antenna position...
... of red, green, blue, black or white. Occasionally, a few non-active pixels may appear on the remote control for inspecting Normal audio Color control Picture breaking up Normal audio Retune channel or weak No color Noise TVsystem The LCD TV panel is not opened Contrast and brightness/volume setup Press standby key on the screen as a fixed point of the product. -16- TROUBLE SHOOTING Trouble phenomenon Symptom Picture Audio Snow Noise Inspection Check antenna position...

Energy Guide Label
Page 1
$36 Haier L42B1180 $15 $43 (40" - 44") use of this model: 329 kWh
$36 Haier L42B1180 $15 $43 (40" - 44") use of this model: 329 kWh


