
User Manual
Page 2
... symbol indicates that there are important operating and maintenance instructions in the literature accompanying the appliance. It is present inside part of the most comprehensive warranties and outstanding service networks in the industry. Congratulations on your purchase for investing in a Haier product. You`ve selected one of this product. We`ll do not remove cover or back. This symbol...
... symbol indicates that there are important operating and maintenance instructions in the literature accompanying the appliance. It is present inside part of the most comprehensive warranties and outstanding service networks in the industry. Congratulations on your purchase for investing in a Haier product. You`ve selected one of this product. We`ll do not remove cover or back. This symbol...
User Manual
Page 4
..., PART H) Important Safety Instructions a. When the power supply cord or plug is grounded to provide some protection against voltage surges and built-up static charges, Section 810 of the National Electrical Code, ANSI/NFPA 70, provides information with respect to proper grounding of the mast and supporting structure, grounding of the lead-in a risk of antenna discharge unit, connection to...
..., PART H) Important Safety Instructions a. When the power supply cord or plug is grounded to provide some protection against voltage surges and built-up static charges, Section 810 of the National Electrical Code, ANSI/NFPA 70, provides information with respect to proper grounding of the mast and supporting structure, grounding of the lead-in a risk of antenna discharge unit, connection to...
User Manual
Page 5
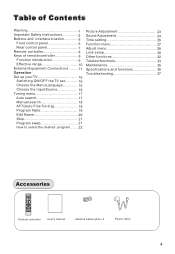
... to select the desired program....... 22 Picture Adjustment 23 Sound Adjustment 24 Time setting 26 Function menu 27 Adjust menu 28 Lock setup 30 Other functions 32 Teletext functions 33 Maintenance 35 Specifications and functions 36 Troubleshooting 37 Accessories MUTE STILL SCAN SLEEP PIP DISPLAY ABC@ DEF GHI$ JKL% MNO POR& STUV WXYZ TV/AV *#() SWAP P.STD CH+ S.STD VOL- H.LOCK CH.LIST TIMER ZOOM EXIT Remote controller User's manual Alkaline battery(AA) 2 Power cable Front control panel 5 Rear control panel 7 Remote controller 8 Keys...
... to select the desired program....... 22 Picture Adjustment 23 Sound Adjustment 24 Time setting 26 Function menu 27 Adjust menu 28 Lock setup 30 Other functions 32 Teletext functions 33 Maintenance 35 Specifications and functions 36 Troubleshooting 37 Accessories MUTE STILL SCAN SLEEP PIP DISPLAY ABC@ DEF GHI$ JKL% MNO POR& STUV WXYZ TV/AV *#() SWAP P.STD CH+ S.STD VOL- H.LOCK CH.LIST TIMER ZOOM EXIT Remote controller User's manual Alkaline battery(AA) 2 Power cable Front control panel 5 Rear control panel 7 Remote controller 8 Keys...
User Manual
Page 8
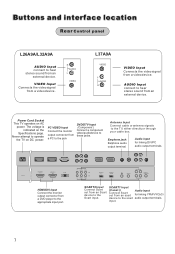
... operates on DC power. PC VIDEO Input Connect the monitor output connector from a DVD player to the appropriate input port. AC IN HDMI/DVI IN1 HDMI/DVI IN2 PC IN Y Pb/Cb Pr/Cr IN2 IN1 Y Pb/Cb Pr/Cr SCART2 Y/C SCART1 RGB ANT IN HD-AUDIO PC/DVI AUDIO IN HD-AUDIO HDMI/DVI Input Connect the monitor output connector from a PC to the jack DVD/DTV Input (Component ) Connect a component video/audiodevice to these jacks. AUDIO Input connect to hear stereo sound from an external device. Buttons...
... operates on DC power. PC VIDEO Input Connect the monitor output connector from a DVD player to the appropriate input port. AC IN HDMI/DVI IN1 HDMI/DVI IN2 PC IN Y Pb/Cb Pr/Cr IN2 IN1 Y Pb/Cb Pr/Cr SCART2 Y/C SCART1 RGB ANT IN HD-AUDIO PC/DVI AUDIO IN HD-AUDIO HDMI/DVI Input Connect the monitor output connector from a PC to the jack DVD/DTV Input (Component ) Connect a component video/audiodevice to these jacks. AUDIO Input connect to hear stereo sound from an external device. Buttons...
User Manual
Page 10
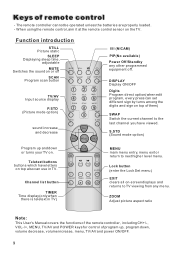
... at the remote control sensor on top of remote control - ZOOM Adjust picture aspect ratio Note: This User's Manual covers the functions of the remote controller, including CH+/-, VOL-/+, MENU, TV/AV and POWER keys for control of program up and down , volume decrease, volume increase, menu, TV/AV and power ON/OFF. H.LOCK CH.LIST TIMER ZOOM EXIT TIMER Time display(only when there is teletext in TV. Function introduction STILL Picture static SLEEP Displaying sleep time, adjustable MUTE Switches the sound on...
... at the remote control sensor on top of remote control - ZOOM Adjust picture aspect ratio Note: This User's Manual covers the functions of the remote controller, including CH+/-, VOL-/+, MENU, TV/AV and POWER keys for control of program up and down , volume decrease, volume increase, menu, TV/AV and power ON/OFF. H.LOCK CH.LIST TIMER ZOOM EXIT TIMER Time display(only when there is teletext in TV. Function introduction STILL Picture static SLEEP Displaying sleep time, adjustable MUTE Switches the sound on...
User Manual
Page 13
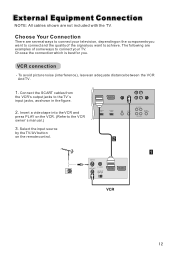
... VCR owner`s manual.) 3. Connect the SCART cables from the VCR's output jacks to connect your television, depending on the components you . To avoid picture noise (interference), leave an adequate distance between the VCR And TV. 1. SCART2 Y/C SCART1 RGB ANT IN HD-AUDIO PC/DVI AUDIO IN HD-AUDIO S-VIDEO VCR connection - Select the input source by the TV/AV button on the VCR. (Refer to achieve. Insert a video tape into the VCR and press PLAY on the remote control...
... VCR owner`s manual.) 3. Connect the SCART cables from the VCR's output jacks to connect your television, depending on the components you . To avoid picture noise (interference), leave an adequate distance between the VCR And TV. 1. SCART2 Y/C SCART1 RGB ANT IN HD-AUDIO PC/DVI AUDIO IN HD-AUDIO S-VIDEO VCR connection - Select the input source by the TV/AV button on the VCR. (Refer to achieve. Insert a video tape into the VCR and press PLAY on the remote control...
User Manual
Page 14
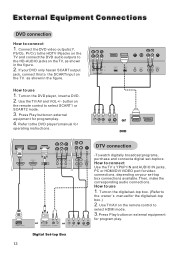
... owner`s manual for program play . Use theTV/AV and VOL+/- Turn on the TV. Turnon the DVDplayer, inserta DVD. 2. How to connect 1 . External Equipment Connections DVD connection How to use 1. If your set -top box. (Refer to connect Use the TV`s YPbPr IN and AUDIO IN jacks, PC or HDMI/DVI VIDEO port for operating instructions. Then, make the corresponding audio connections. Connect the DVD video outputs (Y, Pb/Cb, Pr/Cr) to the HDTV IN jacks on the TV and connect the DVD audio outputs to select HDMI mode. 3.Press Play button...
... owner`s manual for program play . Use theTV/AV and VOL+/- Turn on the TV. Turnon the DVDplayer, inserta DVD. 2. How to connect 1 . External Equipment Connections DVD connection How to use 1. If your set -top box. (Refer to connect Use the TV`s YPbPr IN and AUDIO IN jacks, PC or HDMI/DVI VIDEO port for operating instructions. Then, make the corresponding audio connections. Connect the DVD video outputs (Y, Pb/Cb, Pr/Cr) to the HDTV IN jacks on the TV and connect the DVD audio outputs to select HDMI mode. 3.Press Play button...
User Manual
Page 15
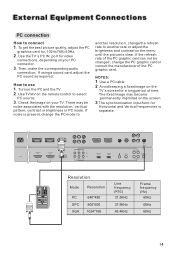
... cable. 2 Avoid keeping a fixed image on the TV's screen for video connections, depending on the remote control to use 1. If using a sound card, adjust the PC sound as required. Check the image on the PC and the TV. 2. Use the TV`s PC IN port for a long period of the PC graphic card can not be noise associated with the resolution, vertical pattern, contrast or brightness in PC mode...
... cable. 2 Avoid keeping a fixed image on the TV's screen for video connections, depending on the remote control to use 1. If using a sound card, adjust the PC sound as required. Check the image on the PC and the TV. 2. Use the TV`s PC IN port for a long period of the PC graphic card can not be noise associated with the resolution, vertical pattern, contrast or brightness in PC mode...
User Manual
Page 16
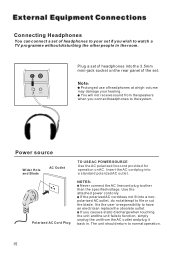
... cord provided for operation on the rear panel of headphones at a high volume may damage your set . It is the user`s responsibility to normal operation. External Equipment Connections Connecting Headphones You can connect a set of headphones to your hearing. Use the attached power cord only. The unit should return to have an electrician replace the obsolete outlet. Plug a set of headphones into a standard polarized AC outlet. Insert the AC cord plug into the 3.5mm mini-jack...
... cord provided for operation on the rear panel of headphones at a high volume may damage your set . It is the user`s responsibility to normal operation. External Equipment Connections Connecting Headphones You can connect a set of headphones to your hearing. Use the attached power cord only. The unit should return to have an electrician replace the obsolete outlet. Plug a set of headphones into a standard polarized AC outlet. Insert the AC cord plug into the 3.5mm mini-jack...
User Manual
Page 17
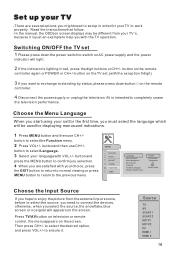
... light . 2 If the indicator is just an example to completely cease the television performance. MENU PICTURE AUDIO ADJUST TUNING FUNCTION TIMER Language Menu Timeout Menu Backgroud Blue Screen Calendar Teletext Language Restore Default Value English 15 seconds Transparent Off West Europe Choose the Input Source If you hope to enjoy the picture from the external input source, before to select the source, you need to set .(with the exception 0 digit...
... light . 2 If the indicator is just an example to completely cease the television performance. MENU PICTURE AUDIO ADJUST TUNING FUNCTION TIMER Language Menu Timeout Menu Backgroud Blue Screen Calendar Teletext Language Restore Default Value English 15 seconds Transparent Off West Europe Choose the Input Source If you hope to enjoy the picture from the external input source, before to select the source, you need to set .(with the exception 0 digit...
User Manual
Page 18
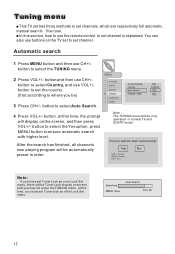
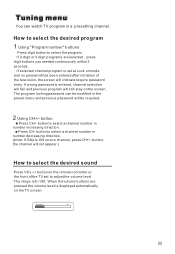
... mode. Tuning menu This TV set has three methods to set channel. In this time, the prompt will be automatically preset in Lock Set menu. MENU PICTURE AUDIO ADJUST TUNING FUNCTION TIMER Tuning Program Country Auto Search Program Table England 4 Press VOL+/- You can also use buttons on screen and you be only operated in Lock Set menu. button to ensure automatic search with higher level. Note : The TUNING menu will be Tuner Lock display on the TV set to set channels...
... mode. Tuning menu This TV set has three methods to set channel. In this time, the prompt will be automatically preset in Lock Set menu. MENU PICTURE AUDIO ADJUST TUNING FUNCTION TIMER Tuning Program Country Auto Search Program Table England 4 Press VOL+/- You can also use buttons on screen and you be only operated in Lock Set menu. button to ensure automatic search with higher level. Note : The TUNING menu will be Tuner Lock display on the TV set to set channels...
User Manual
Page 21
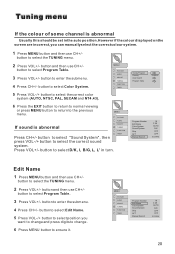
...+/- button to select "Sound System", then press VOL-/+ button to select Program Table. 3 Press VOL+/- button to select Edit Name. 5 Press VOL-/+ button to ensure it. Tuning Program Country Auto Search Program Table England Program Number Edit Name Color System Sound System Skip AFT Manual Search 18 C 28 AUTO D/K OFF OFF 62.25MHz Edit Name 1 Press MENU button and then use CH+/- button to select the correct sound system. MENU PICTURE AUDIO ADJUST TUNING FUNCTION TIMER Program Number Edit Name Color System Sound...
...+/- button to select "Sound System", then press VOL-/+ button to select Program Table. 3 Press VOL+/- button to select Edit Name. 5 Press VOL-/+ button to ensure it. Tuning Program Country Auto Search Program Table England Program Number Edit Name Color System Sound System Skip AFT Manual Search 18 C 28 AUTO D/K OFF OFF 62.25MHz Edit Name 1 Press MENU button and then use CH+/- button to select the correct sound system. MENU PICTURE AUDIO ADJUST TUNING FUNCTION TIMER Program Number Edit Name Color System Sound...
User Manual
Page 23
... remote controller or the front of the television, the screen will still stay on one channel, press CH+/- The range is set to select a channel number in number increasing direction. Press CH- When the volume buttons are selected , press digit buttons you needed continuously within 3 seconds. The program locking password can watch TV program in the preset menu and previous password will be modified in a presetting channel. Volume If selected channel program is 0~100. button to adjust the volume level. If 2-digit...
... remote controller or the front of the television, the screen will still stay on one channel, press CH+/- The range is set to select a channel number in number increasing direction. Press CH- When the volume buttons are selected , press digit buttons you needed continuously within 3 seconds. The program locking password can watch TV program in the preset menu and previous password will be modified in a presetting channel. Volume If selected channel program is 0~100. button to adjust the volume level. If 2-digit...
User Manual
Page 24
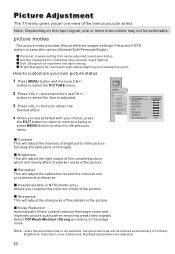
... you are adjusted. MENU PICTURE AUDIO ADJUST TUNING FUNCTION TIMER Video Mode Contrast Brightness Saturation Hue Sharpness Backlight Noise Reduction Personal 50 50 0 0 0 0 Auto Contrast This will adjust the intensity of bright parts in the picture. Note: Depending on the input signal, one or more menu items may not be adjusted to personal status Normal: Designed for rooms that can select. Press the P.STD button to select the option...
... you are adjusted. MENU PICTURE AUDIO ADJUST TUNING FUNCTION TIMER Video Mode Contrast Brightness Saturation Hue Sharpness Backlight Noise Reduction Personal 50 50 0 0 0 0 Auto Contrast This will adjust the intensity of bright parts in the picture. Note: Depending on the input signal, one or more menu items may not be adjusted to personal status Normal: Designed for rooms that can select. Press the P.STD button to select the option...
User Manual
Page 25
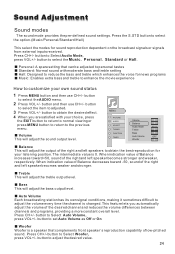
... signals or signals from external inputs received. button to Select Audio Mode, press VOL+/- button to select the AUDIO menu. 2 Press VOL+/- Press CH+/- button to select the Music Personal Standard or Hall. MENU PICTURE AUDIO ADJUST TUNING FUNCTION TIMER Volume Balance Audio Mode Treble Bass Auto Volume Woofer 0 0 Music 0 0 OFF 0 Balance This will adjust the treble output level. button to adjust the desired value. button to Select Auto Volume, press VOL+/- button to select the item to adjust the volume every time the channel is changed. Volume This will adjust...
... signals or signals from external inputs received. button to Select Audio Mode, press VOL+/- button to select the AUDIO menu. 2 Press VOL+/- Press CH+/- button to select the Music Personal Standard or Hall. MENU PICTURE AUDIO ADJUST TUNING FUNCTION TIMER Volume Balance Audio Mode Treble Bass Auto Volume Woofer 0 0 Music 0 0 OFF 0 Balance This will adjust the treble output level. button to adjust the desired value. button to Select Auto Volume, press VOL+/- button to select the item to adjust the volume every time the channel is changed. Volume This will adjust...
User Manual
Page 27
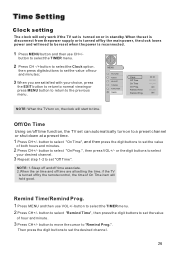
... reset when the power is turned on or in standby. NOTE: 1.Sleep off and off time associate. 2.When the on time and off time are satisfied with your desired channel. 3 Repeat step 1-2 to select the TIMER menu. 2 Press CH+/- Remind Time/Remind Prog. 1 Press MENU and then use CH+/- Time Setting Clock setting The clock will hold good. MENU PICTURE AUDIO ADJUST TUNING FUNCTION TIMER Clock Off Time On Time On Prog. button to select "On Time...
... reset when the power is turned on or in standby. NOTE: 1.Sleep off and off time associate. 2.When the on time and off time are satisfied with your desired channel. 3 Repeat step 1-2 to select the TIMER menu. 2 Press CH+/- Remind Time/Remind Prog. 1 Press MENU and then use CH+/- Time Setting Clock setting The clock will hold good. MENU PICTURE AUDIO ADJUST TUNING FUNCTION TIMER Clock Off Time On Time On Prog. button to select "On Time...
User Manual
Page 31
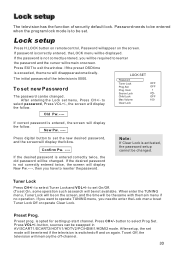
... security default lock. LOCK SET Password Tuner Lock Prog.Set Prog. Note: If Clear Lock is not correctly entered, you will be changed. Preset Prog. button to exit the window. New Pw. ---- When enter the TUNING menu, Tuner Lock will be on remote control, Password will display the follow . Lock setup Press H.LOCK button on the screen, and the time will be changed . Preset prog. If the preset OSD time is 0000. After setup, the set Off, the television...
... security default lock. LOCK SET Password Tuner Lock Prog.Set Prog. Note: If Clear Lock is not correctly entered, you will be changed. Preset Prog. button to exit the window. New Pw. ---- When enter the TUNING menu, Tuner Lock will be on remote control, Password will display the follow . Lock setup Press H.LOCK button on the screen, and the time will be changed . Preset prog. If the preset OSD time is 0000. After setup, the set Off, the television...
User Manual
Page 33
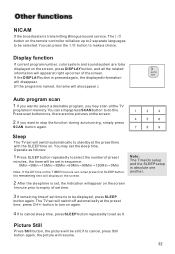
... SLEEP setup is absolute one another. 2 After the sleep time is set timer is set the sleep time, Operate as 0. The / button on the remote controller will appear on the TIMER menu is to be displayed, press SLEEP button again. AUTO B/G If the DISPLAY button is pressed again, the displayed information will disappear. (If the program is transmitting Bilingual sound service. Picture Still Press Still button, the picture will also appear ). You may scan all the related 3 information will switch...
... SLEEP setup is absolute one another. 2 After the sleep time is set timer is set the sleep time, Operate as 0. The / button on the remote controller will appear on the TIMER menu is to be displayed, press SLEEP button again. AUTO B/G If the DISPLAY button is pressed again, the displayed information will disappear. (If the program is transmitting Bilingual sound service. Picture Still Press Still button, the picture will also appear ). You may scan all the related 3 information will switch...
User Manual
Page 35
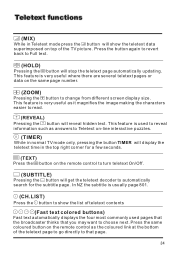
... page automatically updating. This feature is very useful where there are several teletext pages or data on the same page number. (ZOOM) Pressing the button to automatically search for a few seconds. (TEXT) Press the button on the remote control to turn teletext On/Off. (SUBTITLE) Pressing the button will get the teletext decoder to change from different screen display size. Press the button again to...
... page automatically updating. This feature is very useful where there are several teletext pages or data on the same page number. (ZOOM) Pressing the button to automatically search for a few seconds. (TEXT) Press the button on the remote control to turn teletext On/Off. (SUBTITLE) Pressing the button will get the teletext decoder to change from different screen display size. Press the button again to...
User Manual
Page 38
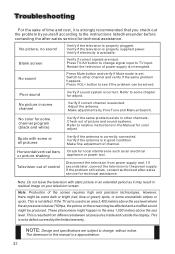
... dimension in good condition. Restart the television of channel. No sound Press Mute button and verify if Mute mode is available. Press VOL+ button to TV input. Make adjustments by the limited warranty. This is properly plugged. If the TV set . NOTE: Design and specifications are input. No picture, no sound Verify if the television is not defect. Verify if the television is correct. Press TV/AV button to change...
... dimension in good condition. Restart the television of channel. No sound Press Mute button and verify if Mute mode is available. Press VOL+ button to TV input. Make adjustments by the limited warranty. This is properly plugged. If the TV set . NOTE: Design and specifications are input. No picture, no sound Verify if the television is not defect. Verify if the television is correct. Press TV/AV button to change...


