
User Manual
Page 1
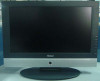
LCD TV OWNER`S MANUAL MODELS:L26A9A L32A9A L37A9A L26A8A L32A8A L37A8A Please READ this manual carefully before operating your TV, and retain it for future reference.
LCD TV OWNER`S MANUAL MODELS:L26A9A L32A9A L37A9A L26A8A L32A8A L37A8A Please READ this manual carefully before operating your TV, and retain it for future reference.
User Manual
Page 2
...inside refer service to operatorsor properties: This symbol indicates that there are important operating and maintenance instructions in Haier. Safety of the Haier "family," you for investing in the industry. Read thefollowing safetyinstruction beforestarting theoperation. This symbol indicates that ...one of this product. No user-serviceable parts inside part of the most comprehensive warranties and outstanding service networks in a Haier product. To prevent the product from being damaged, the following symbols to ensure a safe operation and prevent anydamage to qualified...
...inside refer service to operatorsor properties: This symbol indicates that there are important operating and maintenance instructions in Haier. Safety of the Haier "family," you for investing in the industry. Read thefollowing safetyinstruction beforestarting theoperation. This symbol indicates that ...one of this product. No user-serviceable parts inside part of the most comprehensive warranties and outstanding service networks in a Haier product. To prevent the product from being damaged, the following symbols to ensure a safe operation and prevent anydamage to qualified...
User Manual
Page 3
Retain these openings must not be blocked or covered. Unplug from the appliance. 11. Do not use can result in electrical shock or fire hazards. Use only dry cloth for your safety. Water and moisture -- Use only with the unit. 7. Power cord protection ---Power supply cords should never be routed so that have been adhered to. 8. Servicing ---do not attempt to your home, consult your Appliance dealer or local power company. 9. Refer all servicing to authorized service personnel. 14.Damage Requiring Service ---Unplug this product through PORTABLE CARTWARNING (symbol ...
Retain these openings must not be blocked or covered. Unplug from the appliance. 11. Do not use can result in electrical shock or fire hazards. Use only dry cloth for your safety. Water and moisture -- Use only with the unit. 7. Power cord protection ---Power supply cords should never be routed so that have been adhered to. 8. Servicing ---do not attempt to your home, consult your Appliance dealer or local power company. 9. Refer all servicing to authorized service personnel. 14.Damage Requiring Service ---Unplug this product through PORTABLE CARTWARNING (symbol ...
User Manual
Page 4
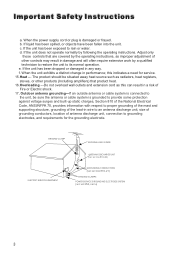
Important Safety Instructions a. this can result in a risk of other controls may result in wire to an antenna discharge unit, size of grounding conductors, location of antenna discharge unit, connection to rain or water. Adjust only those controls that product heat. 16.Overloading ---Do not overload wall outlets and extension cord as improper adjustment of Fire or Electric shock. 17. If liquid has been spilled, or objects have been fallen into the unit. d. GROUND CLAMP ANTENNA LEAD IN WIRE ELECTRIC SERVICE EQUIPMENT ANTENNA DISCHARGE UNIT (NEC SECTION 810-20) ...
Important Safety Instructions a. this can result in a risk of other controls may result in wire to an antenna discharge unit, size of grounding conductors, location of antenna discharge unit, connection to rain or water. Adjust only those controls that product heat. 16.Overloading ---Do not overload wall outlets and extension cord as improper adjustment of Fire or Electric shock. 17. If liquid has been spilled, or objects have been fallen into the unit. d. GROUND CLAMP ANTENNA LEAD IN WIRE ELECTRIC SERVICE EQUIPMENT ANTENNA DISCHARGE UNIT (NEC SECTION 810-20) ...
User Manual
Page 5
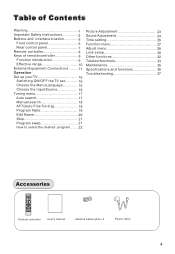
Table of remote controller 9 Function introduction 9 Effective range 10 External Equipment Connections ........ 11 Operation Set up your TV 16 Switching ON/OFF the TV set........... 16 Choose the Menu Language 16 Choose the Input Source 16 Tuning menu 17 Auto search 17 Manual search 18 AFT(Auto Fine Tuning 18 Program Table 19 Edit Name 20 Skip 21 Program swap 21 How to select the desired program....... 22 Picture Adjustment 23 Sound Adjustment 24 Time setting 26 Function menu 27 Adjust menu 28 Lock setup 30 Other functions 32 Teletext functions 33 Maintenance 35 ...
Table of remote controller 9 Function introduction 9 Effective range 10 External Equipment Connections ........ 11 Operation Set up your TV 16 Switching ON/OFF the TV set........... 16 Choose the Menu Language 16 Choose the Input Source 16 Tuning menu 17 Auto search 17 Manual search 18 AFT(Auto Fine Tuning 18 Program Table 19 Edit Name 20 Skip 21 Program swap 21 How to select the desired program....... 22 Picture Adjustment 23 Sound Adjustment 24 Time setting 26 Function menu 27 Adjust menu 28 Lock setup 30 Other functions 32 Teletext functions 33 Maintenance 35 ...

User Manual
Page 6
Buttons and interface location -This is a simplified representation of front panel. -Here shown may be somewhat different from your TV. Remote control signal receive window. 7.Remote Indicator In red when standby mode, in blue when Display. Power 2.CH- /CH+ Program plus and minus, menu options 3.VOL-/VOL+ Volume increase and decrease, menu reset and entry 4.MENU Menu display 5.TV/AV: Source input select 6. Front control panel 26 ,32 67 37 Switch TV/AV 5 MENU 4 VOL- 3 VOL+ CH- 2 CH+ POWER 1 Switch 1.
Buttons and interface location -This is a simplified representation of front panel. -Here shown may be somewhat different from your TV. Remote control signal receive window. 7.Remote Indicator In red when standby mode, in blue when Display. Power 2.CH- /CH+ Program plus and minus, menu options 3.VOL-/VOL+ Volume increase and decrease, menu reset and entry 4.MENU Menu display 5.TV/AV: Source input select 6. Front control panel 26 ,32 67 37 Switch TV/AV 5 MENU 4 VOL- 3 VOL+ CH- 2 CH+ POWER 1 Switch 1.

User Manual
Page 7
Power 2.CH- /CH+ Program plus and minus, menu options 3.VOL-/VOL+ Volume increase and decrease, menu reset and entry 4.MENU Menu display 5.TV/AV: Source input select 6. Remote control signal receive window. 7.Remote Indicator In red when standby mode, in blue when Display. Buttons and interface location Front control panel 26 ,32 Switch 37 TV/AV 5 MENU 4 VOL- 3 VOL+ CH- 2 CH+ POWER 1 Switch 1.
Power 2.CH- /CH+ Program plus and minus, menu options 3.VOL-/VOL+ Volume increase and decrease, menu reset and entry 4.MENU Menu display 5.TV/AV: Source input select 6. Remote control signal receive window. 7.Remote Indicator In red when standby mode, in blue when Display. Buttons and interface location Front control panel 26 ,32 Switch 37 TV/AV 5 MENU 4 VOL- 3 VOL+ CH- 2 CH+ POWER 1 Switch 1.
User Manual
Page 8
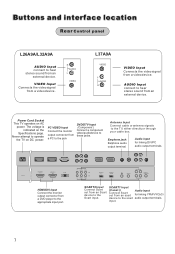
... device to the scart audio output terminals. input. SCART2 Input Connect Scart out from an external device. Buttons and interface location Rear Control panel L26A9A/L32A9A AUDIO Input connect to hear stereo sound from an Scart device to the Scart input. Power Cord Socket This TV operates on the Specifications page...
... device to the scart audio output terminals. input. SCART2 Input Connect Scart out from an external device. Buttons and interface location Rear Control panel L26A9A/L32A9A AUDIO Input connect to hear stereo sound from an Scart device to the Scart input. Power Cord Socket This TV operates on the Specifications page...

User Manual
Page 9
Make sure that there is no obstacle between the remote controller and television set. 8 Keep the remote controller away from heat source or humid area to respective mark) 3.Replace the coverof the battery compartment. paying attention to the polarity diagram in the compartment. Precautions As strong light may interfere the signals, change your position to operate the remote controller if the television cannot be turned on the back of the remote controller. 2.Load two AA alkaline batteries in the battery compartment.(plus and minus poles to ensure effective performance of the remote ...
Make sure that there is no obstacle between the remote controller and television set. 8 Keep the remote controller away from heat source or humid area to respective mark) 3.Replace the coverof the battery compartment. paying attention to the polarity diagram in the compartment. Precautions As strong light may interfere the signals, change your position to operate the remote controller if the television cannot be turned on the back of the remote controller. 2.Load two AA alkaline batteries in the battery compartment.(plus and minus poles to ensure effective performance of the remote ...
User Manual
Page 10
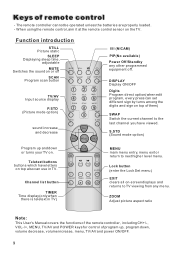
When using the remote control, aim it at the remote control sensor on top also can set different sign by turns among the digits and sign on . Teletext buttons buttons which have viewed. H.LOCK CH.LIST TIMER ZOOM EXIT TIMER Time display(only when there is teletext in TV. ZOOM Adjust picture aspect ratio Note: This User's Manual covers the functions of the remote controller, including CH+/-, VOL-/+, MENU, TV/AV and POWER keys for control of program up and down , volume decrease, volume increase, menu, TV/AV and power ON/OFF. Lock button (enter the Lock Set menu) EXIT ...
When using the remote control, aim it at the remote control sensor on top also can set different sign by turns among the digits and sign on . Teletext buttons buttons which have viewed. H.LOCK CH.LIST TIMER ZOOM EXIT TIMER Time display(only when there is teletext in TV. ZOOM Adjust picture aspect ratio Note: This User's Manual covers the functions of the remote controller, including CH+/-, VOL-/+, MENU, TV/AV and POWER keys for control of program up and down , volume decrease, volume increase, menu, TV/AV and power ON/OFF. Lock button (enter the Lock Set menu) EXIT ...
User Manual
Page 11
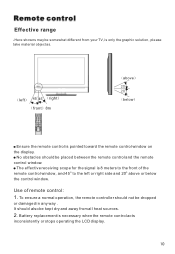
Remote control Effective range -Here showns may be somewhat different from all heat sources. 2. It should also be kept dry and away from your TV, is necessary when the remote control acts inconsistently or stops operating the LCD display. left or right side and 20O above 20 20 below the control window. Use of the remote control window, and 45O to the front of remote control: 1. The effective receiving scope for the signal is 8 meters to the left 45 45 right front 8m above or below Ensure the remote control is pointed toward the remote control window on the display. No ...
Remote control Effective range -Here showns may be somewhat different from all heat sources. 2. It should also be kept dry and away from your TV, is necessary when the remote control acts inconsistently or stops operating the LCD display. left or right side and 20O above 20 20 below the control window. Use of the remote control window, and 45O to the front of remote control: 1. The effective receiving scope for the signal is 8 meters to the left 45 45 right front 8m above or below Ensure the remote control is pointed toward the remote control window on the display. No ...

User Manual
Page 12
If the antenna needs to remove the disturbance caused by airwave. * Don't bind antenna cable and electric wire together. If the antenna is recommended that you 'd better use a CATV system or an outdoor antenna .In different places, the suitable antenna type and position are different. To improve picture quality in the connections. Mixer additional purchase outdoor antenna Antenna input 75 standard coaxial type ANT IN 300 twin-lead cable Antenna adapter 75 coaxial cable Plug (additional purchase) Note * It is not installed properly, contact your dealer for two Tv`s, install a ...
If the antenna needs to remove the disturbance caused by airwave. * Don't bind antenna cable and electric wire together. If the antenna is recommended that you 'd better use a CATV system or an outdoor antenna .In different places, the suitable antenna type and position are different. To improve picture quality in the connections. Mixer additional purchase outdoor antenna Antenna input 75 standard coaxial type ANT IN 300 twin-lead cable Antenna adapter 75 coaxial cable Plug (additional purchase) Note * It is not installed properly, contact your dealer for two Tv`s, install a ...
User Manual
Page 13
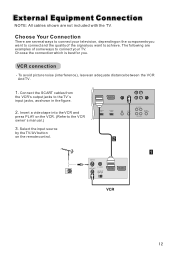
VCR connection - Insert a video tape into the VCR and press PLAY on the VCR. (Refer to achieve. External Equipment Connection NOTE: All cables shown are examples of the signal you . Select the input source by the TV/AV button on the components you want to connect and the quality of some ways to the TV`s input jacks, as shown in the figure. 2. SCART2 Y/C SCART1 RGB ANT IN HD-AUDIO PC/DVI AUDIO IN HD-AUDIO S-VIDEO Choose Your Connection There are several ways to connect your TV. To avoid picture noise (interference), leave an adequate distance between the VCR And TV. 1....
VCR connection - Insert a video tape into the VCR and press PLAY on the VCR. (Refer to achieve. External Equipment Connection NOTE: All cables shown are examples of the signal you . Select the input source by the TV/AV button on the components you want to connect and the quality of some ways to the TV`s input jacks, as shown in the figure. 2. SCART2 Y/C SCART1 RGB ANT IN HD-AUDIO PC/DVI AUDIO IN HD-AUDIO S-VIDEO Choose Your Connection There are several ways to connect your TV. To avoid picture noise (interference), leave an adequate distance between the VCR And TV. 1....
User Manual
Page 14
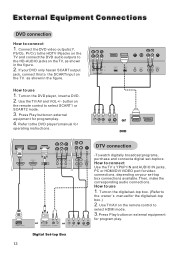
Use theTV/AV and VOL+/- Press Play buttonon external equipment for the digital set -top box. (Refer to the owner`s manual for program play . Turn on the TV. Then, make the corresponding audio connections. If your set -top box. Refer tothe DVD player'smanual for video connections, depending on your DVD only has an SCART output jack, connect this to connect Use the TV`s YPbPr IN and AUDIO IN jacks, PC or HDMI/DVI VIDEO port for operating instructions. How to the SCART input on the digital set -top box.) 2. External Equipment Connections DVD connection How to select ...
Use theTV/AV and VOL+/- Press Play buttonon external equipment for the digital set -top box. (Refer to the owner`s manual for program play . Turn on the TV. Then, make the corresponding audio connections. If your set -top box. Refer tothe DVD player'smanual for video connections, depending on your DVD only has an SCART output jack, connect this to connect Use the TV`s YPbPr IN and AUDIO IN jacks, PC or HDMI/DVI VIDEO port for operating instructions. How to the SCART input on the digital set -top box.) 2. External Equipment Connections DVD connection How to select ...
User Manual
Page 15
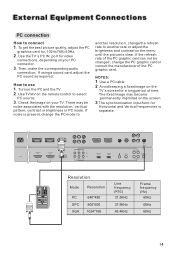
There may become permanently imprinted on your PC connector. 3. The fixed image may be changed, change the refresh rate to select PC source. 3. Turn on the remote control to another resolution, change the PC graphic card or consult the manufacturer of time. AC IN HDMI/DVI IN1 HDMI/DVI IN2 PC IN Y Pb/Cb Pr/Cr IN2 IN1 Y Pb/Cb Pr/Cr SCART2 Y/C SCART1 RGB ANT IN HD-AUDIO PC/DVI AUDIO IN HD-AUDIO Resolution Mode Resolution PC SPC XGA 640*480 800*600 1024*768 Line frequency (Khz) 31.5KHz 37.9KHz 48.4KHz Frame frequency (Hz) 60Hz 60Hz 60Hz If using a sound card, ...
There may become permanently imprinted on your PC connector. 3. The fixed image may be changed, change the refresh rate to select PC source. 3. Turn on the remote control to another resolution, change the PC graphic card or consult the manufacturer of time. AC IN HDMI/DVI IN1 HDMI/DVI IN2 PC IN Y Pb/Cb Pr/Cr IN2 IN1 Y Pb/Cb Pr/Cr SCART2 Y/C SCART1 RGB ANT IN HD-AUDIO PC/DVI AUDIO IN HD-AUDIO Resolution Mode Resolution PC SPC XGA 640*480 800*600 1024*768 Line frequency (Khz) 31.5KHz 37.9KHz 48.4KHz Frame frequency (Hz) 60Hz 60Hz 60Hz If using a sound card, ...
User Manual
Page 16
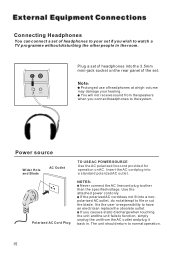
External Equipment Connections Connecting Headphones You can connect a set of the set. Polarized AC Cord Plug NOTES: Never connect the AC line cord plug to function, simply unplug the unit from the speakers when you cause a static discharge when touching the unit and the unit fails to other people in . Use the attached power cord only. Plug a set if you wish to watch a TV programme without disturbing the other than the specified voltage. If you connect headphones to file or cut the blade. The unit should return to have an electrician replace the obsolete outlet. ...
External Equipment Connections Connecting Headphones You can connect a set of the set. Polarized AC Cord Plug NOTES: Never connect the AC line cord plug to function, simply unplug the unit from the speakers when you cause a static discharge when touching the unit and the unit fails to other people in . Use the attached power cord only. Plug a set if you wish to watch a TV programme without disturbing the other than the specified voltage. If you connect headphones to file or cut the blade. The unit should return to have an electrician replace the obsolete outlet. ...
User Manual
Page 17
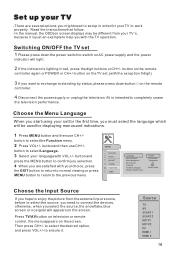
button to ensure it. button and press the MENU button to confirm you selection. 4 When you with the TV operation. to select the Function menu. 2 Press VOL+/- Source button on the screen. Press TV/AV button on television or remote control, the menu appears on the remote controller again or POWER or CH+/- Read the instructions that follow. -In the manual, the OSD(on screen display) may be used for your TV to work properly. button on the TV set.(with the exception 0 digit) 3 If you want to exchange to standing by status, please press down the power switch to switch on AC power ...
button to ensure it. button and press the MENU button to confirm you selection. 4 When you with the TV operation. to select the Function menu. 2 Press VOL+/- Source button on the screen. Press TV/AV button on television or remote control, the menu appears on the remote controller again or POWER or CH+/- Read the instructions that follow. -In the manual, the OSD(on screen display) may be used for your TV to work properly. button on the TV set.(with the exception 0 digit) 3 If you want to exchange to standing by status, please press down the power switch to switch on AC power ...
User Manual
Page 18
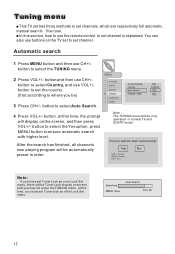
button, at this time, you want to start auto tuning? Do you must set channel is explained. MENU PICTURE AUDIO ADJUST TUNING FUNCTION TIMER Tuning Program Country Auto Search Program Table England 4 Press VOL+/- Automatic search 1 Press MENU button and then use the remote control to set Tuner lock as on the screen, and then press VOL+/- Searching MENU: Stop Auto Search Pos: 28 button to ensure automatic search with higher level. button to select the Yes option, press MENU button to select Auto Search. Yes VOL+/-:Select MENU: Confirm EXIT: Exit No Note: If you ...
button, at this time, you want to start auto tuning? Do you must set channel is explained. MENU PICTURE AUDIO ADJUST TUNING FUNCTION TIMER Tuning Program Country Auto Search Program Table England 4 Press VOL+/- Automatic search 1 Press MENU button and then use the remote control to set Tuner lock as on the screen, and then press VOL+/- Searching MENU: Stop Auto Search Pos: 28 button to ensure automatic search with higher level. button to select the Yes option, press MENU button to select Auto Search. Yes VOL+/-:Select MENU: Confirm EXIT: Exit No Note: If you ...

User Manual
Page 19
If you are poor, try using the Auto Fine Tuning feature. button to select the TUNING menu. 2 Press VOL+/- Note If the AFT harmonious effect is not good, suggested uses manually searches for channel, till the channel is obtained. button to enter the submenu. button to surpass for 3 seconds, then become semiautomatically searches for the adjustment picture the effect MENU PICTURE AUDIO ADJUST TUNING FUNCTION TIMER Program Number Edit Name Color System Sound System Skip AFT Manual Search 18 C 28 AUTO D/K OFF OFF 62.25MHz button to enter the submenu. MENU PICTURE AUDIO ...
If you are poor, try using the Auto Fine Tuning feature. button to select the TUNING menu. 2 Press VOL+/- Note If the AFT harmonious effect is not good, suggested uses manually searches for channel, till the channel is obtained. button to enter the submenu. button to surpass for 3 seconds, then become semiautomatically searches for the adjustment picture the effect MENU PICTURE AUDIO ADJUST TUNING FUNCTION TIMER Program Number Edit Name Color System Sound System Skip AFT Manual Search 18 C 28 AUTO D/K OFF OFF 62.25MHz button to enter the submenu. MENU PICTURE AUDIO ...

User Manual
Page 20
Red button: delete channel name Green button: copy channel Yellow button: Name channel Blue button: Swap Delete name 1 Press CH+/- to select the channel; 2 Press the red button on the remote control; 3 Press the yellow button to display the digital and letter list; 4 Press Vol+/- Name channel 1 Press CH+/- button to select the channel to swap; 4 Press again the blue button to ensure. Tuning menu Program Table 1 Press MENU button and then use CH+/button to select Program Table. 3 Press VOL+/- MENU PICTURE AUDIO ADJUST TUNING FUNCTION TIMER Tuning Program Country Auto Search ...
Red button: delete channel name Green button: copy channel Yellow button: Name channel Blue button: Swap Delete name 1 Press CH+/- to select the channel; 2 Press the red button on the remote control; 3 Press the yellow button to display the digital and letter list; 4 Press Vol+/- Name channel 1 Press CH+/- button to select the channel to swap; 4 Press again the blue button to ensure. Tuning menu Program Table 1 Press MENU button and then use CH+/button to select Program Table. 3 Press VOL+/- MENU PICTURE AUDIO ADJUST TUNING FUNCTION TIMER Tuning Program Country Auto Search ...