User Manual
Page 4
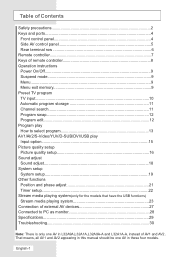
... remote controller 8 Operation instructions Power On/Off 9 Suspend mode 9 Menu...9 Menu exit memory 9 Preset TV program TV input...10 Automatic program storage 11 Channel search 11 Program swap 12 Program edit 12 Program play How to PC as monitor 28 Specifications 29 Troubleshooting 30 Note: There is only one AV in L32A9A,L32A1A,L32A9A-A and L32A1A-A, instead of external AV devices 27 Connected to select program 13 AV1/AV2/S-Video/YUV/D-SUB/DVI/USB play Input option 15 Picture...
... remote controller 8 Operation instructions Power On/Off 9 Suspend mode 9 Menu...9 Menu exit memory 9 Preset TV program TV input...10 Automatic program storage 11 Channel search 11 Program swap 12 Program edit 12 Program play How to PC as monitor 28 Specifications 29 Troubleshooting 30 Note: There is only one AV in L32A9A,L32A1A,L32A9A-A and L32A1A-A, instead of external AV devices 27 Connected to select program 13 AV1/AV2/S-Video/YUV/D-SUB/DVI/USB play Input option 15 Picture...

User Manual
Page 5
Unplug the power supply and antenna of the television is heard in parallel or share the same socket by multiple plugs to avoid electric shocks or fire hazards. Contact authorized after -sales service or heat source to avoid electric shocks or fire hazards. Unauthorized disassembly of the product when there is needed. English-2 Do not connect excessive sockets in the...
Unplug the power supply and antenna of the television is heard in parallel or share the same socket by multiple plugs to avoid electric shocks or fire hazards. Contact authorized after -sales service or heat source to avoid electric shocks or fire hazards. Unauthorized disassembly of the product when there is needed. English-2 Do not connect excessive sockets in the...
User Manual
Page 7
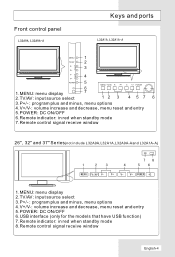
... mode 7.Remote control signal receive window 26", 32" and 37" Series(not include L32A9A,L32A1A,L32A9A-Aand L32A1A-A) 1.MENU: menu display 2.TV/AV: input source select 3.P+/- : program plus and minus, menu options 4.V+/V-: volume increase and decrease, menu reset and entry 5.POWER: DC ON/OFF 6.USB interface (only for the models that have USB function) 7.Remote indicator: in red when standby mode 8.Remote control signal receive window English-4 Front control panel Keys and ports MENU 1 TV/AV 2 P- 3 P+ V- 4 V+ POWER 5 6 1.MENU: menu display 7 2.TV/AV: input source select MENU...
... mode 7.Remote control signal receive window 26", 32" and 37" Series(not include L32A9A,L32A1A,L32A9A-Aand L32A1A-A) 1.MENU: menu display 2.TV/AV: input source select 3.P+/- : program plus and minus, menu options 4.V+/V-: volume increase and decrease, menu reset and entry 5.POWER: DC ON/OFF 6.USB interface (only for the models that have USB function) 7.Remote indicator: in red when standby mode 8.Remote control signal receive window English-4 Front control panel Keys and ports MENU 1 TV/AV 2 P- 3 P+ V- 4 V+ POWER 5 6 1.MENU: menu display 7 2.TV/AV: input source select MENU...
User Manual
Page 8
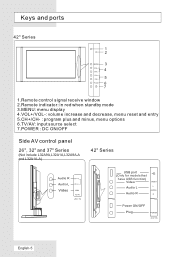
... 6 7 1.Remote control signal receive window 2.Remote indicator: in red when standby mode 3.MENU: menu display 4.VOL+/VOL-: volume increase and decrease, menu reset and entry 5.CH+/CH- : program plus and minus, menu options 6.TV/AV: input source select 7.POWER : DC ON/OFF Side AV control panel 26", 32" and 37" Series (Not include L32A9A,L32A1A,L32A9A-A and L32A1A-A) 42" Series Audio R Audio L Video AV IN (AV2 IN) USB port (Only for models that have USB function) Video Audio L Audio R VIDEO L AUDIO R Power...
... 6 7 1.Remote control signal receive window 2.Remote indicator: in red when standby mode 3.MENU: menu display 4.VOL+/VOL-: volume increase and decrease, menu reset and entry 5.CH+/CH- : program plus and minus, menu options 6.TV/AV: input source select 7.POWER : DC ON/OFF Side AV control panel 26", 32" and 37" Series (Not include L32A9A,L32A1A,L32A9A-A and L32A1A-A) 42" Series Audio R Audio L Video AV IN (AV2 IN) USB port (Only for models that have USB function) Video Audio L Audio R VIDEO L AUDIO R Power...

User Manual
Page 9
... models L32A9A and L32A9A-A 42" Series L R AUDIO OUT DVI IN D-SUB IN Y U V YUV IN L R AUDIO IN V L R S-VIDEO VIDEO IN AUDIO IN IN L R AUDIO IN ANT. 1.AUDIO OUT: audio output (to external speaker) 2.DVIIN: digital RGB input 3.D-SUB IN: computer input 4.YUV (YCbCr,YPbPr) IN: video component input 5.AUDIO IN: external YUV (YCbCr,YPbPr) audio input 6.S-VIDEO IN: S terminal input 7.VIDEO IN: external video input (AV1) 8.AUDIO IN: external S-VIDEO/VIDEO input 9.AUDIO IN: external D-SUB/DVI input 10.Earphone port 11.ANT: antenna input English-6 The sequence of 1.POWER...
... models L32A9A and L32A9A-A 42" Series L R AUDIO OUT DVI IN D-SUB IN Y U V YUV IN L R AUDIO IN V L R S-VIDEO VIDEO IN AUDIO IN IN L R AUDIO IN ANT. 1.AUDIO OUT: audio output (to external speaker) 2.DVIIN: digital RGB input 3.D-SUB IN: computer input 4.YUV (YCbCr,YPbPr) IN: video component input 5.AUDIO IN: external YUV (YCbCr,YPbPr) audio input 6.S-VIDEO IN: S terminal input 7.VIDEO IN: external video input (AV1) 8.AUDIO IN: external S-VIDEO/VIDEO input 9.AUDIO IN: external D-SUB/DVI input 10.Earphone port 11.ANT: antenna input English-6 The sequence of 1.POWER...
User Manual
Page 11
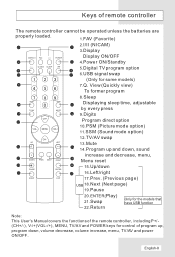
... Only for the models that have USB function Note: This User's Manual covers the functions of remote controller The remote controller cannot be operated unless the batteries are properly loaded. 1.FAV (Favorite) 2.I/II (NICAM) 3.Display DISPLAY FAV. English-8 MENU VOL+ 10.PSM (Picture mode option) 11. SSM (Sound mode option) CH- POWER Display ON/OFF 4.Power ON/Standby -/--/--- View (Quickly view) To former program 8.Sleep PSM Displaying sleep time, adjustable TV/AV CH+ MUTE by every press 9.Digits Program direct option VOL...
... Only for the models that have USB function Note: This User's Manual covers the functions of remote controller The remote controller cannot be operated unless the batteries are properly loaded. 1.FAV (Favorite) 2.I/II (NICAM) 3.Display DISPLAY FAV. English-8 MENU VOL+ 10.PSM (Picture mode option) 11. SSM (Sound mode option) CH- POWER Display ON/OFF 4.Power ON/Standby -/--/--- View (Quickly view) To former program 8.Sleep PSM Displaying sleep time, adjustable TV/AV CH+ MUTE by every press 9.Digits Program direct option VOL...
User Manual
Page 12
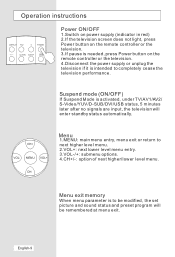
...- English-9 Q.VIEW SLEEP USB Power ON/OFF 1.Switch on power supply (indicator in red) 2.If the television screen does not light, press Power button on the remote controller or the television. 3.If pause is needed, press Power button on the remote controller or the television. 4.Disconnect the power supply or unplug the television if it is activated, under TV/AV1/AV2/ S-Video/YUV/D-SUB/DVI/USB status, 5 minutes later after no signals are input, the television will be remembered at menu exit. POWER -/--/--- Menu exit...
...- English-9 Q.VIEW SLEEP USB Power ON/OFF 1.Switch on power supply (indicator in red) 2.If the television screen does not light, press Power button on the remote controller or the television. 3.If pause is needed, press Power button on the remote controller or the television. 4.Disconnect the power supply or unplug the television if it is activated, under TV/AV1/AV2/ S-Video/YUV/D-SUB/DVI/USB status, 5 minutes later after no signals are input, the television will be remembered at menu exit. POWER -/--/--- Menu exit...
User Manual
Page 13
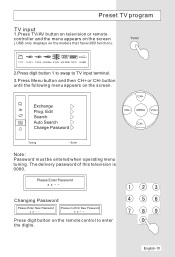
... Password Press digit button on the models that have USB function). Edit Search A B Auto Search C Change Password CH+ VOL- The delivery password of this television is 0000. TV/AV 1.TV 2.AV1 3.AV2 4.SVideo 5.YUV 6.D-SUB 7.DVI 8.USB 2.Press digit button 1 to swap to enter the digits. MENU VOL+ CH- English-10 Preset TV program TV input 1.Press TV/AV button on television or remote controller and the menu appears on the screen ( USB only displays on the remote control...
... Password Press digit button on the models that have USB function). Edit Search A B Auto Search C Change Password CH+ VOL- The delivery password of this television is 0000. TV/AV 1.TV 2.AV1 3.AV2 4.SVideo 5.YUV 6.D-SUB 7.DVI 8.USB 2.Press digit button 1 to swap to enter the digits. MENU VOL+ CH- English-10 Preset TV program TV input 1.Press TV/AV button on television or remote controller and the menu appears on the screen ( USB only displays on the remote control...
User Manual
Page 16
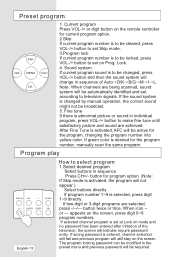
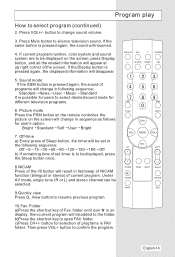
... set at Lock on the screen, press digit 0~9 program numbers. Note: When channels are selected, press -/--/--- If the sound system is selected, press digit 1~9 directly. Fine tune If there is to make fine tune until satisfactory picture and sound are achieved. Q.VIEW SLEEP USB English-13 How to select program 1.Select desired program Select buttons in individual program, press VOL-/+ button to be changed by manual operation, the correct sound might not be active for the program number, manually scan the same program. If green color...
... set at Lock on the screen, press digit 0~9 program numbers. Note: When channels are selected, press -/--/--- If the sound system is selected, press digit 1~9 directly. Fine tune If there is to make fine tune until satisfactory picture and sound are achieved. Q.VIEW SLEEP USB English-13 How to select program 1.Select desired program Select buttons in individual program, press VOL-/+ button to be changed by manual operation, the correct sound might not be active for the program number, manually scan the same program. If green color...
User Manual
Page 17
... resumed. 4. c)Press CH+/- POWER -/--/--- Program play How to change sound volume. 3. button to select program (continued) 2. If the same button is pressed again, the displayed information will appear at up right corner of the I/II button will be displayed, press the Sleep button once. 8.NICAM Press of the screen. Bright Standard Soft User Bright 7. Off-time a) Every press of Sleep button, the timer will be selected. 9.Quickly view Press Q. Under AV mode, single tune (R or...
... resumed. 4. c)Press CH+/- POWER -/--/--- Program play How to change sound volume. 3. button to select program (continued) 2. If the same button is pressed again, the displayed information will appear at up right corner of the I/II button will be displayed, press the Sleep button once. 8.NICAM Press of the screen. Bright Standard Soft User Bright 7. Off-time a) Every press of Sleep button, the timer will be selected. 9.Quickly view Press Q. Under AV mode, single tune (R or...

User Manual
Page 20
... operation, the menu disappears from the screen automatically. Picture quality adjust DVI menu: Brightness 50 Contrast 50 Color Temp User Red 50 A B C Green 50 Blue 50 CH+ VOL- Repeat step 2 and 3 until satisfactory picture quality is available, enter the advanced menu as follows: TV/AV1/AV2/Svideo/YUV(YCbCr) advanced menu: CH- The menu exit can also be realized by manual operation. 5. AAA Windows Nature Display Mode Full Color...
... operation, the menu disappears from the screen automatically. Picture quality adjust DVI menu: Brightness 50 Contrast 50 Color Temp User Red 50 A B C Green 50 Blue 50 CH+ VOL- Repeat step 2 and 3 until satisfactory picture quality is available, enter the advanced menu as follows: TV/AV1/AV2/Svideo/YUV(YCbCr) advanced menu: CH- The menu exit can also be realized by manual operation. 5. AAA Windows Nature Display Mode Full Color...

User Manual
Page 21
.... 8 seconds after the latest operation, the menu disappears from the screen automatically. After your option is displayed on the screen. button for user to select. English-18 Sound Mode User Treble Bass Balance A B Surround C 50 50 0 OFF CH+ VOL- MENU VOL+ Sound Enter CH- 2. Select Balance to improve the quality of picture in advanced menu tracks picture contrast and color to balance right and left sound channels of brightness and sharpness...
.... 8 seconds after the latest operation, the menu disappears from the screen automatically. After your option is displayed on the screen. button for user to select. English-18 Sound Mode User Treble Bass Balance A B Surround C 50 50 0 OFF CH+ VOL- MENU VOL+ Sound Enter CH- 2. Select Balance to improve the quality of picture in advanced menu tracks picture contrast and color to balance right and left sound channels of brightness and sharpness...
User Manual
Page 25
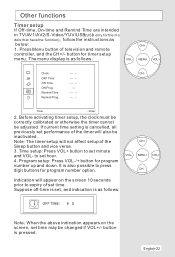
... indication appears on the screen 10 seconds prior to press digit buttons for program number option. English-22 Other functions Timer setup If Off-time, On-time and Remind Time are intended in TV/AV1/AV2/S-Video/YUV/USB(USB only for the mo dels that have the function) , follow the instructions as follows: VOL- MENU VOL+ Clock -- -- MENU VOL+ CH- Press Menu button of the Sleep button and vice versa...
... indication appears on the screen 10 seconds prior to press digit buttons for program number option. English-22 Other functions Timer setup If Off-time, On-time and Remind Time are intended in TV/AV1/AV2/S-Video/YUV/USB(USB only for the mo dels that have the function) , follow the instructions as follows: VOL- MENU VOL+ Clock -- -- MENU VOL+ CH- Press Menu button of the Sleep button and vice versa...
User Manual
Page 26
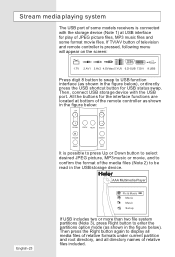
... located at USB interface for play of JPEG picture files, MP3 music files and some models receivers is possible to press Up or Down button to select desired JPEG picture, MP3 music or movie, and to confirm the format of the media files (Note 2) to be read in the figure below ), or directly press the USB shortcut button for USB status swap. AAA Multimedia Player Pic...
... located at USB interface for play of JPEG picture files, MP3 music files and some models receivers is possible to press Up or Down button to select desired JPEG picture, MP3 music or movie, and to confirm the format of the media files (Note 2) to be read in the figure below ), or directly press the USB shortcut button for USB status swap. AAA Multimedia Player Pic...

User Manual
Page 27
... directory will be displayed. Press Exit button to view preceding nine pictures and nine pictures behind. Under the 9 picture scanning mode (as shown in the figure below ) of Up, Down, Left or Right button to scan all media files under current partition and root directory, and all directory names (as shown in full size on the screen. or Next button to enter listed files. After you...
... directory will be displayed. Press Exit button to view preceding nine pictures and nine pictures behind. Under the 9 picture scanning mode (as shown in the figure below ) of Up, Down, Left or Right button to scan all media files under current partition and root directory, and all directory names (as shown in full size on the screen. or Next button to enter listed files. After you...

User Manual
Page 29
..., language and display software version number can be used in the market. In the playing process, do not include the information of the title, singer and edition. 7.External card reader supports most digital cards available in option of Up and Down will be read .2)If Pic & Music mode is selected, MP3 files set for play system, the problem of information code errors. If this mode, press of...
..., language and display software version number can be used in the market. In the playing process, do not include the information of the title, singer and edition. 7.External card reader supports most digital cards available in option of Up and Down will be read .2)If Pic & Music mode is selected, MP3 files set for play system, the problem of information code errors. If this mode, press of...

User Manual
Page 30
... ports on the television. 2.Press TV/AV button for option of AV1 or AV2 mode. 3.Press Play button on VCD for program play. Press Play button on external equipment for program play. L R 2. S-VIDEO IN VIDEO IN DTV input 1. Y U V YUV IN L R AUDIO IN English-27 Press Play button on DVD to the television. Connection of external AV devices Some external signal sources, including VCR, VCD, DVD and PC, can be connected to play the DVD programs on the television. Link the output of left/right sound channels...
... ports on the television. 2.Press TV/AV button for option of AV1 or AV2 mode. 3.Press Play button on VCD for program play. Press Play button on external equipment for program play. L R 2. S-VIDEO IN VIDEO IN DTV input 1. Y U V YUV IN L R AUDIO IN English-27 Press Play button on DVD to the television. Connection of external AV devices Some external signal sources, including VCR, VCD, DVD and PC, can be connected to play the DVD programs on the television. Link the output of left/right sound channels...

User Manual
Page 31
... above listed are subject to AUDIO IN port of the television. 2. Link audio cable of a PC to VESA Criteria. Turn on the PC and its screen picture will be used as stereo input (R and L), the I /II button for DVI input. If only R or L sound is input as a PC monitor. In this way, the television can be pressed for stereo input mode. Note: If external audio frequency is input, press I /II button can be displayed on the television screen.
... above listed are subject to AUDIO IN port of the television. 2. Link audio cable of a PC to VESA Criteria. Turn on the PC and its screen picture will be used as stereo input (R and L), the I /II button for DVI input. If only R or L sound is input as a PC monitor. In this way, the television can be pressed for stereo input mode. Note: If external audio frequency is input, press I /II button can be displayed on the television screen.
User Manual
Page 32
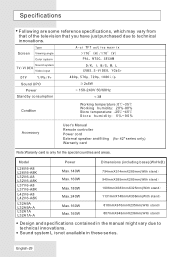
... specifications contained in these series. Specifications Following are some reference specifications, which may vary from that of the television that you have just purchased due to technical innovations. Type Screen Viewing angle Color system Sound system Video input Sound UPO Power Standby consumption Condition 2x5W ~ 150-240V 50/60Hz Working temperature: 0 ~35 Working humidity: 20%-80% Store temperature: -25 ~45 Store humidity: 5%~90% Accessory User's Manual Remote controller Power cord External speaker and fitting Warranty...
... specifications contained in these series. Specifications Following are some reference specifications, which may vary from that of the television that you have just purchased due to technical innovations. Type Screen Viewing angle Color system Sound system Video input Sound UPO Power Standby consumption Condition 2x5W ~ 150-240V 50/60Hz Working temperature: 0 ~35 Working humidity: 20%-80% Store temperature: -25 ~45 Store humidity: 5%~90% Accessory User's Manual Remote controller Power cord External speaker and fitting Warranty...

User Manual
Page 33
... sound systems. program (black and white) Refer to relative instructions in residual image on your television screen. Restart the television of power supply is properly supplied power. Refer to some channel Verify if correct channel is selected. Make adjustments by authorized after -sales service for technical assistance. English-30 If so happens, set . Verify if the television is interrupted. Blank screen No sound Poor sound Verify if correct signals are input. Press TV/AV button to change signal input...
... sound systems. program (black and white) Refer to relative instructions in residual image on your television screen. Restart the television of power supply is properly supplied power. Refer to some channel Verify if correct channel is selected. Make adjustments by authorized after -sales service for technical assistance. English-30 If so happens, set . Verify if the television is interrupted. Blank screen No sound Poor sound Verify if correct signals are input. Press TV/AV button to change signal input...


