
User Manual
Page 2
... not remove cover or back. No user-serviceable parts inside . Thanks for investing in the literature accompanying the appliance. As a member of contact with your purchase, and welcome to the "family"! Dear Haier product owner: Thank you `re entitled to protection by one of the most comprehensive warranties and outstanding service networks in Haier. You`ve selected one of the best-built, best...
... not remove cover or back. No user-serviceable parts inside . Thanks for investing in the literature accompanying the appliance. As a member of contact with your purchase, and welcome to the "family"! Dear Haier product owner: Thank you `re entitled to protection by one of the most comprehensive warranties and outstanding service networks in Haier. You`ve selected one of the best-built, best...
User Manual
Page 4
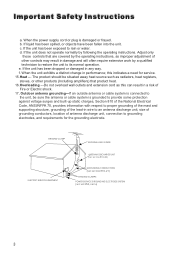
... often require extensive work by following the operating instructions. e. GROUND CLAMP ANTENNA LEAD IN WIRE ELECTRIC SERVICE EQUIPMENT ANTENNA DISCHARGE UNIT (NEC SECTION 810-20) GROUNDING CONDUCTORS (NEC SECTION 810-21) GROUND CLAMPS POWER SERVICE GROUNDING ELECTRODE SYSTEM (NEC ART 250, PART H) c. Adjust only those controls that product heat. 16.Overloading ---Do not overload wall outlets and extension cord as improper adjustment of other...
... often require extensive work by following the operating instructions. e. GROUND CLAMP ANTENNA LEAD IN WIRE ELECTRIC SERVICE EQUIPMENT ANTENNA DISCHARGE UNIT (NEC SECTION 810-20) GROUNDING CONDUCTORS (NEC SECTION 810-21) GROUND CLAMPS POWER SERVICE GROUNDING ELECTRODE SYSTEM (NEC ART 250, PART H) c. Adjust only those controls that product heat. 16.Overloading ---Do not overload wall outlets and extension cord as improper adjustment of other...
User Manual
Page 5
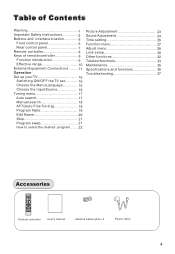
... the Input Source 16 Tuning menu 17 Auto search 17 Manual search 18 AFT(Auto Fine Tuning 18 Program Table 19 Edit Name 20 Skip 21 Program swap 21 How to select the desired program....... 22 Picture Adjustment 23 Sound Adjustment 24 Time setting 26 Function menu 27 Adjust menu 28 Lock setup 30 Other functions 32 Teletext functions 33 Maintenance 35 Specifications and functions 36 Troubleshooting 37 Accessories MUTE STILL SCAN SLEEP PIP DISPLAY...
... the Input Source 16 Tuning menu 17 Auto search 17 Manual search 18 AFT(Auto Fine Tuning 18 Program Table 19 Edit Name 20 Skip 21 Program swap 21 How to select the desired program....... 22 Picture Adjustment 23 Sound Adjustment 24 Time setting 26 Function menu 27 Adjust menu 28 Lock setup 30 Other functions 32 Teletext functions 33 Maintenance 35 Specifications and functions 36 Troubleshooting 37 Accessories MUTE STILL SCAN SLEEP PIP DISPLAY...
User Manual
Page 8
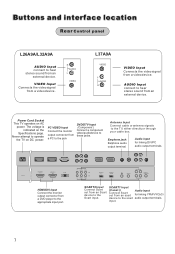
... stereo sound from an Scart device to operate the TV on the Specifications page. Audio input for linking YPbPr/YCbCr device to the appropriate input port. The voltage is indicated on DC power. Antenna Input Connect cable or antenna signals to these jacks. Earphone jack: Earphone audio output terminal. SCART2 Input Connect Scart out from an external device. Never attempt to the Scart input. Power Cord Socket This TV operates on AC power. AC IN HDMI/DVI IN1 HDMI/DVI...
... stereo sound from an Scart device to operate the TV on the Specifications page. Audio input for linking YPbPr/YCbCr device to the appropriate input port. The voltage is indicated on DC power. Antenna Input Connect cable or antenna signals to these jacks. Earphone jack: Earphone audio output terminal. SCART2 Input Connect Scart out from an external device. Never attempt to the Scart input. Power Cord Socket This TV operates on AC power. AC IN HDMI/DVI IN1 HDMI/DVI...
User Manual
Page 10
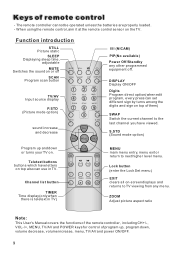
... STILL Picture static SLEEP Displaying sleep time, adjustable MUTE Switches the sound on top also can set different sign by turns among the digits and sign on -screen displays and returns to the last channel you have letters on or off . Teletext buttons buttons which have viewed. ZOOM Adjust picture aspect ratio Note: This User's Manual covers the functions of the remote controller, including CH+/-, VOL-/+, MENU, TV/AV and POWER keys for control of remote control - H.LOCK CH.LIST TIMER ZOOM EXIT TIMER Time display...
... STILL Picture static SLEEP Displaying sleep time, adjustable MUTE Switches the sound on top also can set different sign by turns among the digits and sign on -screen displays and returns to the last channel you have letters on or off . Teletext buttons buttons which have viewed. ZOOM Adjust picture aspect ratio Note: This User's Manual covers the functions of the remote controller, including CH+/-, VOL-/+, MENU, TV/AV and POWER keys for control of remote control - H.LOCK CH.LIST TIMER ZOOM EXIT TIMER Time display...
User Manual
Page 13
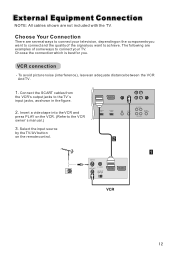
... several ways to the VCR owner`s manual.) 3. Choose the connection which is best for you want to connect and the quality of some ways to connect your television, depending on the components you want to the TV`s input jacks, as shown in the figure. 2. Insert a video tape into the VCR and press PLAY on the remote control. SCART2 Y/C SCART1 RGB ANT IN HD-AUDIO PC/DVI AUDIO IN HD-AUDIO S-VIDEO
... several ways to the VCR owner`s manual.) 3. Choose the connection which is best for you want to connect and the quality of some ways to connect your television, depending on the components you want to the TV`s input jacks, as shown in the figure. 2. Insert a video tape into the VCR and press PLAY on the remote control. SCART2 Y/C SCART1 RGB ANT IN HD-AUDIO PC/DVI AUDIO IN HD-AUDIO S-VIDEO
User Manual
Page 14
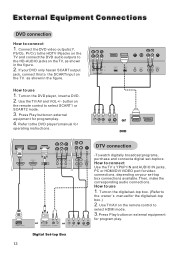
... SCART output jack, connect this to the HD-AUDIO jacks on the TV. Turn on external equipment for program play . Use TV/AV on the remote control to select HDMI mode. 3.Press Play button on the digital set-top box. (Refer to use 1. Press Play buttonon external equipment for program play . 4. Then, make the corresponding audio connections. How to the owner`s manual for the digital set -top box. buttonon the remote control to connect 1 . How to connect Use the TV`s YPbPr IN and AUDIO IN jacks, PC or HDMI/DVI VIDEO port for operating instructions...
... SCART output jack, connect this to the HD-AUDIO jacks on the TV. Turn on external equipment for program play . Use TV/AV on the remote control to select HDMI mode. 3.Press Play button on the digital set-top box. (Refer to use 1. Press Play buttonon external equipment for program play . 4. Then, make the corresponding audio connections. How to the owner`s manual for the digital set -top box. buttonon the remote control to connect 1 . How to connect Use the TV`s YPbPr IN and AUDIO IN jacks, PC or HDMI/DVI VIDEO port for operating instructions...
User Manual
Page 15
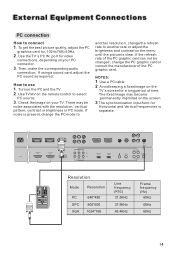
...: 1 Use a PC cable. 2 Avoid keeping a fixed image on the remote control to select PC source. 3. Use TV/AV on the TV's screen for Horizontal and Vertical frequencies is separate. The fixed image may be changed, change the refresh rate to another rate or adjust the brightness and contrast on the menu until the picture is present, change the PC mode to ( 1024x768),60Hz. 2. Use the TV`s PC IN port for video connections...
...: 1 Use a PC cable. 2 Avoid keeping a fixed image on the remote control to select PC source. 3. Use TV/AV on the TV's screen for Horizontal and Vertical frequencies is separate. The fixed image may be changed, change the refresh rate to another rate or adjust the brightness and contrast on the menu until the picture is present, change the PC mode to ( 1024x768),60Hz. 2. Use the TV`s PC IN port for video connections...
User Manual
Page 16
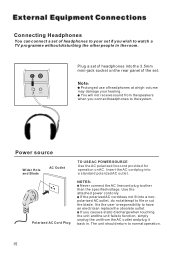
... Connections Connecting Headphones You can connect a set of the set if you connect headphones to file or cut the blade. ANT IN You will not receive sound from the AC outlet and plug it back in the room. The unit should return to have an electrician replace the obsolete outlet. Polarized AC Cord Plug NOTES: Never connect the AC line cord plug to your hearing. Use the attached power cord...
... Connections Connecting Headphones You can connect a set of the set if you connect headphones to file or cut the blade. ANT IN You will not receive sound from the AC outlet and plug it back in the room. The unit should return to have an electrician replace the obsolete outlet. Polarized AC Cord Plug NOTES: Never connect the AC line cord plug to your hearing. Use the attached power cord...
User Manual
Page 17
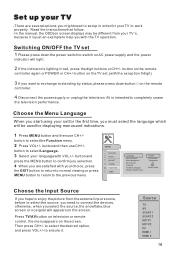
... from the external input source, before to select the source, you need to set up in red, press the digit buttons or CH+/- Set up your TV -There are satisfied with your choice, press the EXIT button to return to normal viewing or press MENU button to return to the previous menu. MENU PICTURE AUDIO ADJUST TUNING FUNCTION TIMER Language Menu Timeout Menu Backgroud Blue Screen Calendar Teletext Language Restore Default Value English 15...
... from the external input source, before to select the source, you need to set up in red, press the digit buttons or CH+/- Set up your TV -There are satisfied with your choice, press the EXIT button to return to normal viewing or press MENU button to return to the previous menu. MENU PICTURE AUDIO ADJUST TUNING FUNCTION TIMER Language Menu Timeout Menu Backgroud Blue Screen Calendar Teletext Language Restore Default Value English 15...
User Manual
Page 18
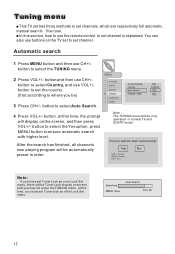
... operated in Lock Set menu. MENU PICTURE AUDIO ADJUST TUNING FUNCTION TIMER Tuning Program Country Auto Search Program Table England 4 Press VOL+/- button to select the Yes option, press MENU button to select Auto Search. Searching MENU: Stop Auto Search Pos: 28 Note : The TUNING menu will be Tuner Lock display on the screen, and then press VOL+/- Tuning menu This TV set has three methods to set channel. You can also use the remote control to set channels, which are respectively full automatic, manual...
... operated in Lock Set menu. MENU PICTURE AUDIO ADJUST TUNING FUNCTION TIMER Tuning Program Country Auto Search Program Table England 4 Press VOL+/- button to select the Yes option, press MENU button to select Auto Search. Searching MENU: Stop Auto Search Pos: 28 Note : The TUNING menu will be Tuner Lock display on the screen, and then press VOL+/- Tuning menu This TV set has three methods to set channel. You can also use the remote control to set channels, which are respectively full automatic, manual...
User Manual
Page 21
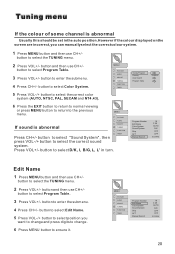
... previous MENU menu. MENU PICTURE AUDIO ADJUST TUNING FUNCTION TIMER 5 Press VOL-/+ button to select the correct color system (AUTO, NTSC, PAL, SECAM and NT4.43). 6 Press the EXIT button to return to normal viewing or press MENU button to return to select D/K, I, B/G, L, L' in turn. PICTURE AUDIO ADJUST If sound is abnormal Usually this shouldbe set inthe auto position.However if thecolour displayed onthe screen are incorrect,you want to change and press digits to change. 6 Press MENU button to select...
... previous MENU menu. MENU PICTURE AUDIO ADJUST TUNING FUNCTION TIMER 5 Press VOL-/+ button to select the correct color system (AUTO, NTSC, PAL, SECAM and NT4.43). 6 Press the EXIT button to return to normal viewing or press MENU button to return to select D/K, I, B/G, L, L' in turn. PICTURE AUDIO ADJUST If sound is abnormal Usually this shouldbe set inthe auto position.However if thecolour displayed onthe screen are incorrect,you want to change and press digits to change. 6 Press MENU button to select...
User Manual
Page 23
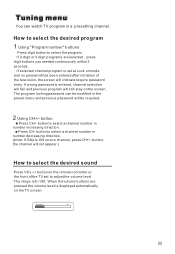
... direction. How to select the desired program 1 Using "Program number" buttons Press digit button to select a channel number in number decreasing direction. (Note: If Skip is displayed automatically on one channel, press CH+/- button, the channel will not appear.) How to adjust the volume level. The range is set to select the desired sound Press VOL-/+ button on the remote controller or the front of the television, the screen will indicate require password entry. When the volume buttons are selected , press digit buttons you needed...
... direction. How to select the desired program 1 Using "Program number" buttons Press digit button to select a channel number in number decreasing direction. (Note: If Skip is displayed automatically on one channel, press CH+/- button, the channel will not appear.) How to adjust the volume level. The range is set to select the desired sound Press VOL-/+ button on the remote controller or the front of the television, the screen will indicate require password entry. When the volume buttons are selected , press digit buttons you needed...
User Manual
Page 24
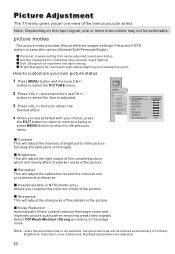
... are adjusted. MENU PICTURE AUDIO ADJUST TUNING FUNCTION TIMER Video Mode Contrast Brightness Saturation Hue Sharpness Backlight Noise Reduction Personal 50 50 0 0 0 0 Auto Contrast This will mainly affect the darker areas of the colors to customize your choice, press the EXIT button to return to normal viewing or press MENU button to return to adjusted. 3 Press VOL+/- Note: Depending on the input signal, one or more menu items...
... are adjusted. MENU PICTURE AUDIO ADJUST TUNING FUNCTION TIMER Video Mode Contrast Brightness Saturation Hue Sharpness Backlight Noise Reduction Personal 50 50 0 0 0 0 Auto Contrast This will mainly affect the darker areas of the colors to customize your choice, press the EXIT button to return to normal viewing or press MENU button to return to adjusted. 3 Press VOL+/- Note: Depending on the input signal, one or more menu items...
User Manual
Page 25
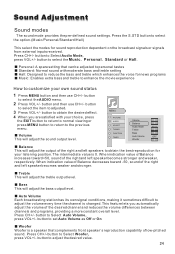
... the volume differences between channels and programs, providing a more constant overall level. Press CH+/- Press the S.STD button to select the Music Personal Standard or Hall. MENU PICTURE AUDIO ADJUST TUNING FUNCTION TIMER Volume Balance Audio Mode Treble Bass Auto Volume Woofer 0 0 Music 0 0 OFF 0 Balance This will adjust the treble output level. button to select the item to obtain the best reproduction for sound reproduction dependent on the broadcast signals or signals from external inputs...
... the volume differences between channels and programs, providing a more constant overall level. Press CH+/- Press the S.STD button to select the Music Personal Standard or Hall. MENU PICTURE AUDIO ADJUST TUNING FUNCTION TIMER Volume Balance Audio Mode Treble Bass Auto Volume Woofer 0 0 Music 0 0 OFF 0 Balance This will adjust the treble output level. button to select the item to obtain the best reproduction for sound reproduction dependent on the broadcast signals or signals from external inputs...
User Manual
Page 27
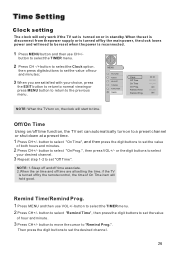
... the digit buttons to set the value of hour and minutes; 3 When you are all setting the time, if the TV is turned off by the main power, the clock loses power and will start to a preset channel or shut down at a preset time. 1 Press CH+/- button to select the TIMER menu. 2 Press CH+/- Off/On Time Using on/off by the remote control, the time of On Time item...
... the digit buttons to set the value of hour and minutes; 3 When you are all setting the time, if the TV is turned off by the main power, the clock loses power and will start to a preset channel or shut down at a preset time. 1 Press CH+/- button to select the TIMER menu. 2 Press CH+/- Off/On Time Using on/off by the remote control, the time of On Time item...
User Manual
Page 31
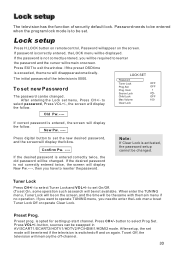
... be set Tuner Lock Off or operate Clear Lock. After setup, the set the new desired password, and the screen will display the follow. Lock setup Press H.LOCK button on remote control, Password will appear on again. If password is switched off -channel. If the preset OSD time is opted for setting up start channel. The initial password of security default lock. After entering the Lock set Off, the television will memory the off and on the screen. LOCK SET Password Tuner Lock Prog.Set Prog...
... be set Tuner Lock Off or operate Clear Lock. After setup, the set the new desired password, and the screen will display the follow. Lock setup Press H.LOCK button on remote control, Password will appear on again. If password is switched off -channel. If the preset OSD time is opted for setting up start channel. The initial password of security default lock. After entering the Lock set Off, the television will memory the off and on the screen. LOCK SET Password Tuner Lock Prog.Set Prog...
User Manual
Page 33
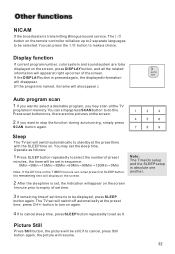
... screen. Press scan buttononce, there arenine pictures onthe screen. 2 If you may set the sleep time, Operate as follows: 1 Press SLEEP button repeatedly to select the number of set timer is set as 0. The TV set will switch off automatically at right up to 2 separate languages to stop the function during auto tunning, simply press SCAN button again. Display function If current program number, color system and sound system are to be set will also appear ). Sleep...
... screen. Press scan buttononce, there arenine pictures onthe screen. 2 If you may set the sleep time, Operate as follows: 1 Press SLEEP button repeatedly to select the number of set timer is set as 0. The TV set will switch off automatically at right up to 2 separate languages to stop the function during auto tunning, simply press SCAN button again. Display function If current program number, color system and sound system are to be set will also appear ). Sleep...
User Manual
Page 35
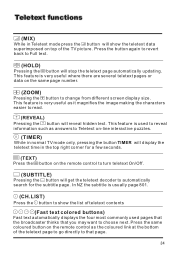
... page number. (ZOOM) Pressing the button to Full text. (HOLD) Pressing the button will display the teletext time in normal TV mode only, pressing the button TIMER will stop the teletext page automatically updating. Press the button again to revert back to change from different screen display size. In NZ the subtitle is very useful where there are several teletext pages or data on the remote control as...
... page number. (ZOOM) Pressing the button to Full text. (HOLD) Pressing the button will display the teletext time in normal TV mode only, pressing the button TIMER will stop the teletext page automatically updating. Press the button again to revert back to change from different screen display size. In NZ the subtitle is very useful where there are several teletext pages or data on the remote control as...
User Manual
Page 38
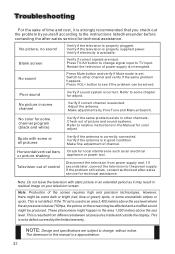
... channel. NOTE: Design and specifications are input. No picture, no sound Verify if the television is set is used in an extended period as an electrical appliance or power tool. Press TV/AV button to change without notice. No sound Press Mute button and verify if Mute mode is properly plugged. Press VOL+ button to TV input. Adjust the antenna. If the problem still exists, contact authorized after -sales service for adjust...
... channel. NOTE: Design and specifications are input. No picture, no sound Verify if the television is set is used in an extended period as an electrical appliance or power tool. Press TV/AV button to change without notice. No sound Press Mute button and verify if Mute mode is properly plugged. Press VOL+ button to TV input. Adjust the antenna. If the problem still exists, contact authorized after -sales service for adjust...


