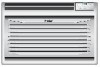
User Manual
Page 3
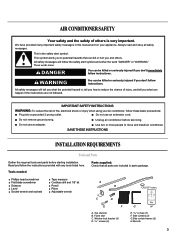
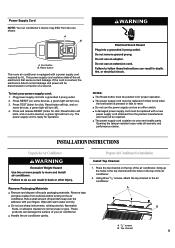
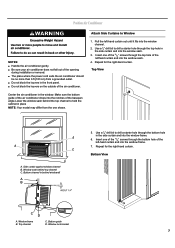
... to move and install air conditioner. Do not use an extension cord. Use two or more people to reduce the chance of fire, electrical shock or injury when using your appliance. Always read and obey all parts are not followed. Foam seal C. Window lock bracket (3) D. 13⁄32" screws (3) G H E. 31⁄32" screws (7) F. WARNING You can happen if the instructions are included...
... to move and install air conditioner. Do not use an extension cord. Use two or more people to reduce the chance of fire, electrical shock or injury when using your appliance. Always read and obey all parts are not followed. Foam seal C. Window lock bracket (3) D. 13⁄32" screws (3) G H E. 31⁄32" screws (7) F. WARNING You can happen if the instructions are included...

User Manual
Page 4
... all local codes and ordinances. The location should provide: ■ Grounded electrical outlet within 6 ft (183 cm) of plug on the model and serial number label. Recommended Grounding Method This air conditioner must not be cooled. ■ A large enough opening height. Installation parts are listed in room to have everything necessary for your air conditioner are listed on the power supply cord. NOTE: Cabinet louvers must be installed. A B The electrical ratings for correct...
... all local codes and ordinances. The location should provide: ■ Grounded electrical outlet within 6 ft (183 cm) of plug on the model and serial number label. Recommended Grounding Method This air conditioner must not be cooled. ■ A large enough opening height. Installation parts are listed in room to have everything necessary for your air conditioner are listed on the power supply cord. NOTE: Cabinet louvers must be installed. A B The electrical ratings for correct...
User Manual
Page 5
... and must be replaced if it fails to trip when the test button is equipped with warm water and dry. ■ Do not use the power supply cord as an off ). 4. If the cord is ready for click; The power supply cord is crushed, the electronics detect current leakage and power will turn off /on ). Place the top channel on ). 3. Reset button This room air conditioner is pressed...
... and must be replaced if it fails to trip when the test button is equipped with warm water and dry. ■ Do not use the power supply cord as an off ). 4. If the cord is ready for click; The power supply cord is crushed, the electronics detect current leakage and power will turn off /on ). Place the top channel on ). 3. Reset button This room air conditioner is pressed...
User Manual
Page 6
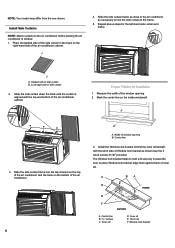
... model may differ from the one shown. Install Side Curtains NOTE: Attach curtains to the air conditioner before placing the air conditioner in place.Be sure to place Window lock bracket edge flush against back of window opening . 2. A 3. Slide the side curtain frame into the top channel on the top of the air conditioner and the track on the bottom of Window lock bracket...
... model may differ from the one shown. Install Side Curtains NOTE: Attach curtains to the air conditioner before placing the air conditioner in place.Be sure to place Window lock bracket edge flush against back of window opening . 2. A 3. Slide the side curtain frame into the top channel on the top of the air conditioner and the track on the bottom of Window lock bracket...
User Manual
Page 7
... the opening during installation or removal. ■ The place where the power cord exits the air conditioner should be no more than 6 ft (183 cm) from the one shown. Use a 1⁄8" drill bit to Window 1. Attach Side Curtains to drill a starter hole through the bottom hole of the left -hand curtain out until it fits into the window frame. 6. Window lock bracket 7 Center the air conditioner...
... the opening during installation or removal. ■ The place where the power cord exits the air conditioner should be no more than 6 ft (183 cm) from the one shown. Use a 1⁄8" drill bit to Window 1. Attach Side Curtains to drill a starter hole through the bottom hole of the left -hand curtain out until it fits into the window frame. 6. Window lock bracket 7 Center the air conditioner...
User Manual
Page 8
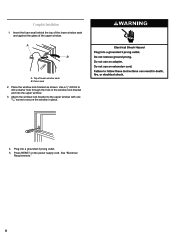
Top of the upper window. Use a 1⁄8" drill bit to secure the window in the window lock bracket and into a grounded 3 prong outlet. 5. Plug into the upper window. 3. See "Electrical Requirements." 8 Complete Installation 1. Foam seal 2. Place the window lock bracket as shown. Press RESET on the power supply cord. A B A. Attach the window lock bracket to the upper window with one 31⁄32" screw to drill a starter hole through the hole in place. 4. Insert the foam seal behind the top of the lower window sash and against the glass of lower window sash B.
Top of the upper window. Use a 1⁄8" drill bit to secure the window in the window lock bracket and into a grounded 3 prong outlet. 5. Plug into the upper window. 3. See "Electrical Requirements." 8 Complete Installation 1. Foam seal 2. Place the window lock bracket as shown. Press RESET on the power supply cord. A B A. Attach the window lock bracket to the upper window with one 31⁄32" screw to drill a starter hole through the hole in place. 4. Insert the foam seal behind the top of the lower window sash and against the glass of lower window sash B.
User Manual
Page 9
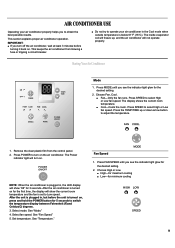
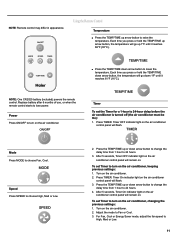
... the unit is plugged in the Cool mode when outside temperature is below 61°F (16°C). See "Fan Speed." 5. This keeps the air conditioner from the control panel. 2. Press the TEMP/TIME up , and the air conditioner will turn on. See "Mode." 4. Set temperature. Press SPEED to select High or Low fan speed. The Power indicator light will not operate properly. Select fan speed. Press MODE until you to switch the temperature display between Fahrenheit...
... the unit is plugged in the Cool mode when outside temperature is below 61°F (16°C). See "Fan Speed." 5. This keeps the air conditioner from the control panel. 2. Press the TEMP/TIME up , and the air conditioner will turn on. See "Mode." 4. Set temperature. Press SPEED to select High or Low fan speed. The Power indicator light will not operate properly. Select fan speed. Press MODE until you to switch the temperature display between Fahrenheit...
User Manual
Page 10
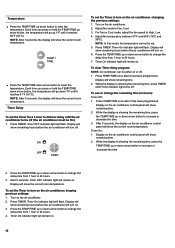
... display is showing the remaining time, press the TEMP/TIME up arrow button to raise the temperature. Timer On : 1. After 5 seconds, Timer OFF indicator light will show the current room temperature. Temperature ■ Press the TEMP/TIME up or down arrow button to increase or decrease the time. 3. Turn on the air conditioner control panel will remain on the air conditioner, changing the previous settings: 1. For Fan or Cool mode, adjust the fan speed to Fan, Cool. 3. Timer...
... display is showing the remaining time, press the TEMP/TIME up arrow button to raise the temperature. Timer On : 1. After 5 seconds, Timer OFF indicator light will show the current room temperature. Temperature ■ Press the TEMP/TIME up or down arrow button to increase or decrease the time. 3. Turn on the air conditioner control panel will remain on the air conditioner, changing the previous settings: 1. For Fan or Cool mode, adjust the fan speed to Fan, Cool. 3. Timer...
User Manual
Page 11
..., Timer On indicator light on the air conditioner control panel will go up or down arrow button to 24 hours. 3. To set the Timer for a 1-hour to Fan or Cool. 3. Turn on the air conditioner, changing the previous settings: 1. For Fan, Cool or Energy Saver mode, adjust the fan speed to choose High, Med or Low. 2. Each time you press or hold the TEMP/TIME down arrow button, the temperature will remain on the air conditioner. 2. NOTE: Remote control...
..., Timer On indicator light on the air conditioner control panel will go up or down arrow button to 24 hours. 3. To set the Timer for a 1-hour to Fan or Cool. 3. Turn on the air conditioner, changing the previous settings: 1. For Fan, Cool or Energy Saver mode, adjust the fan speed to choose High, Med or Low. 2. Each time you press or hold the TEMP/TIME down arrow button, the temperature will remain on the air conditioner. 2. NOTE: Remote control...
User Manual
Page 12
... display on the air conditioner control panel will show remaining time. 2. Timer On : 1. Changing Air Direction Use the tab to poor wall or window construction. ■ A high-pitched hum or pulsating noise caused by the modern high-efficiency compressor cycling on . 6. Tab Normal Sounds When your air conditioner is showing the remaining time, press TIMER untill Timer indicator light turns off . 1. The water droplets help cool the condenser. ■ Air movement from the fan...
... display on the air conditioner control panel will show remaining time. 2. Timer On : 1. Changing Air Direction Use the tab to poor wall or window construction. ■ A high-pitched hum or pulsating noise caused by the modern high-efficiency compressor cycling on . 6. Tab Normal Sounds When your air conditioner is showing the remaining time, press TIMER untill Timer indicator light turns off . 1. The water droplets help cool the condenser. ■ Air movement from the fan...
User Manual
Page 13
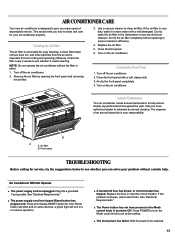
... an active setting. ■ The local power has failed. Turn off the air conditioner. 2. Turn on the air conditioner. Air dry the front panel completely. 4. Annual Maintenance Your air conditioner needs annual maintenance to clean air filter. Call your responsibility. Air Conditioner Will Not Operate ■ The power supply cord is removable for easy cleaning. Replace the fuse or reset the circuit breaker. Press POWER or turn on some devices, a green light will turn the Mode control knob to schedule an annual checkup. Air dry the air fi...
... an active setting. ■ The local power has failed. Turn off the air conditioner. 2. Turn on the air conditioner. Air dry the front panel completely. 4. Annual Maintenance Your air conditioner needs annual maintenance to clean air filter. Call your responsibility. Air Conditioner Will Not Operate ■ The power supply cord is removable for easy cleaning. Replace the fuse or reset the circuit breaker. Press POWER or turn on some devices, a green light will turn the Mode control knob to schedule an annual checkup. Air dry the air fi...
User Manual
Page 14
... room air conditioner. Replace with a time-delay fuse or circuit breaker of the metal base and condensate pan. 14 Use exhaust vent fans while cooking or bathing and try to operate your air conditioner in your room. Water drips from older air conditioners, but the total energy consumption will pop out) the power supply cord. See the Installation Instructions. Unplug or relocate appliances that share the same circuit. ■ Time-delay fuse or circuit breaker of the room being cooled. Air conditioner...
... room air conditioner. Replace with a time-delay fuse or circuit breaker of the metal base and condensate pan. 14 Use exhaust vent fans while cooking or bathing and try to operate your air conditioner in your room. Water drips from older air conditioners, but the total energy consumption will pop out) the power supply cord. See the Installation Instructions. Unplug or relocate appliances that share the same circuit. ■ Time-delay fuse or circuit breaker of the room being cooled. Air conditioner...

User Manual
Page 15
...; Installation information. ■ Use and maintenance procedures. ■ Repair parts sales. ■ Referrals to : Haier America 1356 Broadway New York, NY 10018 Please include a daytime phone number in your complete model number and serial number. If you need replacement parts If you need to order replacement parts, we recommend that you the cost of a service call to fulfill the product warranty and provide after -warranty service, anywhere in the United States. See "Electrical...
...; Installation information. ■ Use and maintenance procedures. ■ Repair parts sales. ■ Referrals to : Haier America 1356 Broadway New York, NY 10018 Please include a daytime phone number in your complete model number and serial number. If you need replacement parts If you need to order replacement parts, we recommend that you the cost of a service call to fulfill the product warranty and provide after -warranty service, anywhere in the United States. See "Electrical...
User Manual
Page 16
... this warranty is exclusive and is granted in this product for a period of 12 months from the date of purchase. WHO IS COVERED WHAT WILL BE DONE Haier America will repair or replace (excluding labor costs) the sealed system and compressor (parts only) for the removal of defective parts and installation of the Service Depot nearest you . For the name of replacement parts beyond...
... this warranty is exclusive and is granted in this product for a period of 12 months from the date of purchase. WHO IS COVERED WHAT WILL BE DONE Haier America will repair or replace (excluding labor costs) the sealed system and compressor (parts only) for the removal of defective parts and installation of the Service Depot nearest you . For the name of replacement parts beyond...


