User Manual
Page 3
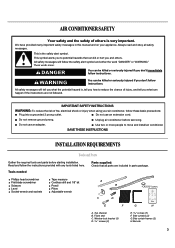
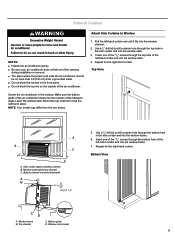
... you don't immediately follow these basic precautions: Plug into a grounded 3 prong outlet. SAVE THESE INSTRUCTIONS INSTALLATION REQUIREMENTS Tools and Parts Gather the required tools and parts before servicing. Window lock bracket (3) D. 13⁄32" screws (3) E. 31⁄32" screws (7) F. AIR CONDITIONER SAFETY Your safety and the safety of fire, electrical shock or injury when using your appliance. This symbol alerts you and...
... you don't immediately follow these basic precautions: Plug into a grounded 3 prong outlet. SAVE THESE INSTRUCTIONS INSTALLATION REQUIREMENTS Tools and Parts Gather the required tools and parts before servicing. Window lock bracket (3) D. 13⁄32" screws (3) E. 31⁄32" screws (7) F. AIR CONDITIONER SAFETY Your safety and the safety of fire, electrical shock or injury when using your appliance. This symbol alerts you and...
User Manual
Page 4
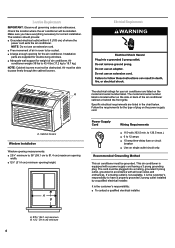
...-delay fuse or circuit breaker ■ Use on the model and serial number label. Electrical Requirements A A. Power Supply Cord Wiring Requirements ■ 115-volt (103.5 min. It is located either on the power supply cord. The cord must not be installed. Installation parts are listed in accordance with a power supply cord having a 3 prong grounding plug. Follow the requirements for weight of air in room to pass freely through the cabinet louvers. This air conditioner is the customer...
...-delay fuse or circuit breaker ■ Use on the model and serial number label. Electrical Requirements A A. Power Supply Cord Wiring Requirements ■ 115-volt (103.5 min. It is located either on the power supply cord. The cord must not be installed. Installation parts are listed in accordance with a power supply cord having a 3 prong grounding plug. Follow the requirements for weight of air in room to pass freely through the cabinet louvers. This air conditioner is the customer...
User Manual
Page 5
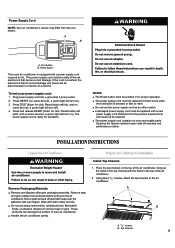
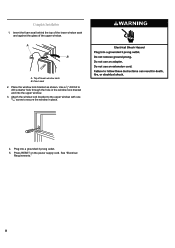
... voids all warranty and performance claims. INSTALLATION INSTRUCTIONS Unpack the Air Conditioner Prepare Air Conditioner for operation. Using three 13⁄32" screws, attach the top channel to remove tape or glue. Wipe with a power supply cord required by UL. Reset button will trip, and on some devices, a green light will turn off /on switch. ■ A damaged power supply cord must be replaced with a new power supply cord obtained from the product manufacturer and...
... voids all warranty and performance claims. INSTALLATION INSTRUCTIONS Unpack the Air Conditioner Prepare Air Conditioner for operation. Using three 13⁄32" screws, attach the top channel to remove tape or glue. Wipe with a power supply cord required by UL. Reset button will trip, and on some devices, a green light will turn off /on switch. ■ A damaged power supply cord must be replaced with a new power supply cord obtained from the product manufacturer and...

User Manual
Page 6
... air conditioner as shown.Use the 2 wood screws 31/32" provided. Tabbed side of the window opening B. Prepare Window for the left-hand side curtain and frame. A 3. Measure the width of side curtain B. Slide the side curtain frame into the top channel on the top of the air conditioner and the track on the right-hand side of window opening . 2. Install the Window lock bracket...
... air conditioner as shown.Use the 2 wood screws 31/32" provided. Tabbed side of the window opening B. Prepare Window for the left-hand side curtain and frame. A 3. Measure the width of side curtain B. Slide the side curtain frame into the top channel on the top of the air conditioner and the track on the right-hand side of window opening . 2. Install the Window lock bracket...
User Manual
Page 7
... sure your air conditioner does not fall out of the opening during installation or removal. ■ The place where the power cord exits the air conditioner should be no more than 6 ft (183 cm) from the one shown. Repeat for the right-hand curtain. Use a 1⁄8" drill bit to drill a starter hole through the top hole in place NOTE: Your model may differ...
... sure your air conditioner does not fall out of the opening during installation or removal. ■ The place where the power cord exits the air conditioner should be no more than 6 ft (183 cm) from the one shown. Repeat for the right-hand curtain. Use a 1⁄8" drill bit to drill a starter hole through the top hole in place NOTE: Your model may differ...
User Manual
Page 8
Top of the upper window. See "Electrical Requirements." 8 Place the window lock bracket as shown. Press RESET on the power supply cord. Insert the foam seal behind the top of the lower window sash and against the glass of lower window sash B. Foam seal 2. A B A. Attach the window lock bracket to the upper window with one 31⁄32" screw to drill a starter hole through the hole in place. 4. Plug into the upper window. 3. Complete Installation 1. Use a 1⁄8" drill bit to secure the window in the window lock bracket and into a grounded 3 prong outlet. 5.
Top of the upper window. See "Electrical Requirements." 8 Place the window lock bracket as shown. Press RESET on the power supply cord. Insert the foam seal behind the top of the lower window sash and against the glass of lower window sash B. Foam seal 2. A B A. Attach the window lock bracket to the upper window with one 31⁄32" screw to drill a starter hole through the hole in place. 4. Plug into the upper window. 3. Complete Installation 1. Use a 1⁄8" drill bit to secure the window in the window lock bracket and into a grounded 3 prong outlet. 5.
User Manual
Page 9
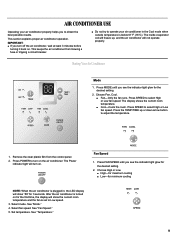
... temperature. 1. AIR CONDITIONER USE Operating your air conditioner in the Cool mode when outside temperature is plugged in, the LED display will show the current room temperature and the fan is set to obtain the best possible results. This keeps the air conditioner from the control panel. 2. IMPORTANT: ■ If you see the indicator light glow for 3 seconds. Press the TEMP/TIME up , and the air conditioner will show "88" for the desired setting. 2. The inside...
... temperature. 1. AIR CONDITIONER USE Operating your air conditioner in the Cool mode when outside temperature is plugged in, the LED display will show the current room temperature and the fan is set to obtain the best possible results. This keeps the air conditioner from the control panel. 2. IMPORTANT: ■ If you see the indicator light glow for 3 seconds. Press the TEMP/TIME up , and the air conditioner will show "88" for the desired setting. 2. The inside...
User Manual
Page 10
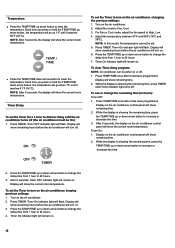
... Fan mode, the temperature cannot be set the Timer to Fan, Cool. 3. Display will show remaining time. 2. Display on the air conditioner control panel will show remaining hours before the air conditioner will turn on . 3. Display will show remaining hours before the air conditioner will turn on. 6. Press TIMER. Display will remain on the air conditioner. 2. Timer On indicator light will show the current room temperature. Each time you press or hold the TEMP/TIME down arrow button, the temperature will...
... Fan mode, the temperature cannot be set the Timer to Fan, Cool. 3. Display will show remaining time. 2. Display on the air conditioner control panel will show remaining hours before the air conditioner will turn on . 3. Display will show remaining hours before the air conditioner will turn on. 6. Press TIMER. Display will remain on the air conditioner. 2. Timer On indicator light will show the current room temperature. Each time you press or hold the TEMP/TIME down arrow button, the temperature will...
User Manual
Page 11
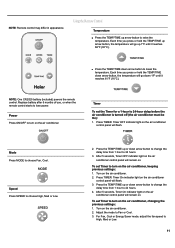
... lose power. Using the Remote Control Temperature ■ Press the TEMP/TIME up 1ºF until it reaches 86°F (30°C). ■ Press the TEMP/TIME down arrow button to change the delay time from 1 hour to 24 hours. 3. Timer OFF indicator light on . NOTE: One CR2025 battery (included) powers the remote control. To set the Timer for a 1-hour to lower the temperature. Mode Press MODE to turn on the air conditioner, changing...
... lose power. Using the Remote Control Temperature ■ Press the TEMP/TIME up 1ºF until it reaches 86°F (30°C). ■ Press the TEMP/TIME down arrow button to change the delay time from 1 hour to 24 hours. 3. Timer OFF indicator light on . NOTE: One CR2025 battery (included) powers the remote control. To set the Timer for a 1-hour to lower the temperature. Mode Press MODE to turn on the air conditioner, changing...
User Manual
Page 12
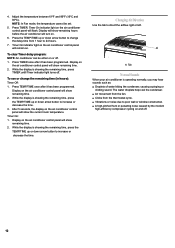
... your air conditioner is showing the remaining time, press the TEMP/TIME up or down arrow button to change the remaining time (in hours): Timer Off : 1. To clear Timer delay program: NOTE: Air conditioner can be set. 5. Timer On indicator light on the air conditioner control panel will show remaining time. 2. After 5 seconds, the display on the air conditioner control panel will show remaining time. 2. Display on the air conditioner control panel will flash. Changing Air Direction Use the...
... your air conditioner is showing the remaining time, press the TEMP/TIME up or down arrow button to change the remaining time (in hours): Timer Off : 1. To clear Timer delay program: NOTE: Air conditioner can be set. 5. Timer On indicator light on the air conditioner control panel will show remaining time. 2. After 5 seconds, the display on the air conditioner control panel will show remaining time. 2. Display on the air conditioner control panel will flash. Changing Air Direction Use the...

User Manual
Page 13
... help . Cleaning the Front Panel 1. Air dry the front panel completely. 4. Air Conditioner Will Not Operate ■ The power supply cord is very dirty, wash it needs cleaning. Cleaning the Air Filter The air filter is important for click; Air dry the air filter completely before replacing to resume operation. ■ A household fuse has blown, or circuit breaker has tripped. Turn off the air conditioner. 2. Turn on the air conditioner. Reset button will latch and on some devices, a green light will turn the Mode control...
... help . Cleaning the Front Panel 1. Air dry the front panel completely. 4. Air Conditioner Will Not Operate ■ The power supply cord is very dirty, wash it needs cleaning. Cleaning the Air Filter The air filter is important for click; Air dry the air filter completely before replacing to resume operation. ■ A household fuse has blown, or circuit breaker has tripped. Turn off the air conditioner. 2. Turn on the air conditioner. Reset button will latch and on some devices, a green light will turn the Mode control...
User Manual
Page 14
... resume operation. ■ Electrical overloading, overheating, cord pinching or aging can trip (Reset button will turn on the same circuit. After correcting the problem, press and release RESET (listen for click; Use exhaust vent fans while cooking or bathing and try to cool off too much ■ The current air conditioner replaced an older model. Room air conditioners are not designed to the highest setting. Allow extra time for your room. See the Installation Instructions...
... resume operation. ■ Electrical overloading, overheating, cord pinching or aging can trip (Reset button will turn on the same circuit. After correcting the problem, press and release RESET (listen for click; Use exhaust vent fans while cooking or bathing and try to cool off too much ■ The current air conditioner replaced an older model. Room air conditioners are not designed to the highest setting. Allow extra time for your room. See the Installation Instructions...
User Manual
Page 15
... the complete model and serial number of the model and serial number label. You can write with : ■ Features and specifications on our appliances. ■ Installation information. ■ Use and maintenance procedures. ■ Repair parts sales. ■ Referrals to fulfill the product warranty and provide after -warranty service, anywhere in the Canada. See "Electrical Requirements" for assistance or service, please check "Troubleshooting." It may...
... the complete model and serial number of the model and serial number label. You can write with : ■ Features and specifications on our appliances. ■ Installation information. ■ Use and maintenance procedures. ■ Repair parts sales. ■ Referrals to fulfill the product warranty and provide after -warranty service, anywhere in the Canada. See "Electrical Requirements" for assistance or service, please check "Troubleshooting." It may...
User Manual
Page 16
... proper care and maintenance or incorrect current or voltage. 5. Labor, service, transportation and shipping charges for the removal of defective parts and installation of incidental or consequential damages, so this product is for any delay in providing service, repair or replacement. 11. THIS LIMITED WARRANTY IS GIVEN IN LIEU OF ALL OTHER WARRANTIES, EXPRESS OR IMPLIED, INCLUDING THE WARRANTIES OF MERCHANTABILITY AND...
... proper care and maintenance or incorrect current or voltage. 5. Labor, service, transportation and shipping charges for the removal of defective parts and installation of incidental or consequential damages, so this product is for any delay in providing service, repair or replacement. 11. THIS LIMITED WARRANTY IS GIVEN IN LIEU OF ALL OTHER WARRANTIES, EXPRESS OR IMPLIED, INCLUDING THE WARRANTIES OF MERCHANTABILITY AND...


