User Manual
Page 1
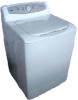
Washing Machine USE & CARE GUIDE MODEL: HWM75TL
Washing Machine USE & CARE GUIDE MODEL: HWM75TL

User Manual
Page 2
TABLE OF CONTENTS PAGE IMPORTANT SAFETY INSTRUCTIONS 2,3 OPERATING INSTRUCTIONS 4 Parts and Features 4 Operating instructions 5 CARE AND CLEANING GUIDE 7 Cleaning and Maintenance 7 Moving & Vacationing 8 TROUBLE SHOOTING 8 INSTALLATION INSTRUCTIONS 10 Tools and Materials Required 10 Unpacking Your Washer 11 Levelling Your Washer 11 Steps for Installation 12 ELECTRICAL REQUIREMENTS 14 Power Interruptions 14 SPECIFICATIONS Back Cover 1
TABLE OF CONTENTS PAGE IMPORTANT SAFETY INSTRUCTIONS 2,3 OPERATING INSTRUCTIONS 4 Parts and Features 4 Operating instructions 5 CARE AND CLEANING GUIDE 7 Cleaning and Maintenance 7 Moving & Vacationing 8 TROUBLE SHOOTING 8 INSTALLATION INSTRUCTIONS 10 Tools and Materials Required 10 Unpacking Your Washer 11 Levelling Your Washer 11 Steps for Installation 12 ELECTRICAL REQUIREMENTS 14 Power Interruptions 14 SPECIFICATIONS Back Cover 1
User Manual
Page 3
... their safety. IMPORTANT SAFETY INSTRUCTIONS Warning - To reduce the risk of children. 5.This appliance must be supervised to hot water entering the machine. Read all instructions before making any repairs. Children should only be controlled, use in this user and care guide. 4. Replace worn power cords, loose plugs and power outlets immediately. 8. Do not operate your appliance before cleaning or before using your appliance when parts are missing or broken...
... their safety. IMPORTANT SAFETY INSTRUCTIONS Warning - To reduce the risk of children. 5.This appliance must be supervised to hot water entering the machine. Read all instructions before making any repairs. Children should only be controlled, use in this user and care guide. 4. Replace worn power cords, loose plugs and power outlets immediately. 8. Do not operate your appliance before cleaning or before using your appliance when parts are missing or broken...
User Manual
Page 4
... the appliance, this appliance to electrical power source. 23. Do not repair or replace any part of electric shock or fire, do not use this appliance unless all panels are stained, spotted or washed in the base, the installation instructions shall state that it comes to remove clothes while the washer is in operation. 17. For washing machines having ventilation openings in gasoline, dry cleaning solvents or any flammable or...
... the appliance, this appliance to electrical power source. 23. Do not repair or replace any part of electric shock or fire, do not use this appliance unless all panels are stained, spotted or washed in the base, the installation instructions shall state that it comes to remove clothes while the washer is in operation. 17. For washing machines having ventilation openings in gasoline, dry cleaning solvents or any flammable or...
User Manual
Page 5
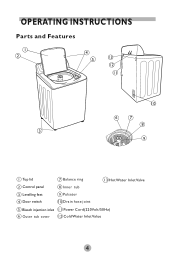
OPERATING INSTRUCTIONS Parts and Features 1 2 4 5 13 12 11 10 6 7 8 3 9 1 Top lid 7 Balance ring 13 Hot Water Inlet Valve 2 Control panel 8 Inner tub 3 Levelling feet 9 Pulsator 4 Door switch 10 Drain hose joint 5 Bleach injection inlet 11 Power Cord(220Volt/50Hz) 6 Ou ter tub cove r 12 Cold Water Inlet Value 4
OPERATING INSTRUCTIONS Parts and Features 1 2 4 5 13 12 11 10 6 7 8 3 9 1 Top lid 7 Balance ring 13 Hot Water Inlet Valve 2 Control panel 8 Inner tub 3 Levelling feet 9 Pulsator 4 Door switch 10 Drain hose joint 5 Bleach injection inlet 11 Power Cord(220Volt/50Hz) 6 Ou ter tub cove r 12 Cold Water Inlet Value 4

User Manual
Page 6
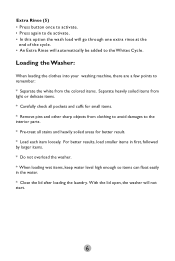
... the wash or in a hurry. • Spin only-Use thiscycle to remove excess water from clothes. Function automatically is an ideal cycle. Use this button to manually replenish water. Use this cycle to wash small, lightly soiled loads that may be susceptible to dye loss. • Heavy Duty - Operating Instructions Soa k Extra Rinse 1 2 3 4 5 Temperature Wash / Rinse (1) • To select inlet water temperature for the water to stop. Load Size(Water Level)(2) • Load Size(Water levels) may be set at the beginning of the wash load. 5 Cycles (3) • Normal -
... the wash or in a hurry. • Spin only-Use thiscycle to remove excess water from clothes. Function automatically is an ideal cycle. Use this button to manually replenish water. Use this cycle to wash small, lightly soiled loads that may be susceptible to dye loss. • Heavy Duty - Operating Instructions Soa k Extra Rinse 1 2 3 4 5 Temperature Wash / Rinse (1) • To select inlet water temperature for the water to stop. Load Size(Water Level)(2) • Load Size(Water levels) may be set at the beginning of the wash load. 5 Cycles (3) • Normal -
User Manual
Page 7
... loading wet items, keep water level high enough so items can float easily in the water. * Close the lid after loading the laundry. Loading the Washer: When loading the clothes into your washing machine, there are a few points to remember: * Separate the white from the colored items. Separate heavily soiled items from light or delicate items. * Carefully check all stains and heavily soiled areas for small items. * Remove...
... loading wet items, keep water level high enough so items can float easily in the water. * Close the lid after loading the laundry. Loading the Washer: When loading the clothes into your washing machine, there are a few points to remember: * Separate the white from the colored items. Separate heavily soiled items from light or delicate items. * Carefully check all stains and heavily soiled areas for small items. * Remove...
User Manual
Page 8
... washer. * Leave lid open after washing to allow inside of damage to dry and assist in preventing unwelcomed bad odours. 7 Cleaning and Maintenance * Use only a damp or sudsy cloth for cleaning the control panel. * To avoid any abrasive, harsh chemicals, ammonia, chlorine bleach, concentrated detergent, solvents or metal scouring pads.These chemicals may result in dispenser. Bleach use a low-sudsing or high-efficiency type detergent. CARE AND CLEANING GUIDE Warning: Always unplug your clothes...
... washer. * Leave lid open after washing to allow inside of damage to dry and assist in preventing unwelcomed bad odours. 7 Cleaning and Maintenance * Use only a damp or sudsy cloth for cleaning the control panel. * To avoid any abrasive, harsh chemicals, ammonia, chlorine bleach, concentrated detergent, solvents or metal scouring pads.These chemicals may result in dispenser. Bleach use a low-sudsing or high-efficiency type detergent. CARE AND CLEANING GUIDE Warning: Always unplug your clothes...
User Manual
Page 9
... out hoses. Check water level selection, it will start automatically. TROUBLE SHOOTING If washer does not operate: * Check the unit is plugged in upright position only. * To prevent mold or mildew, leave lid open .You may need to usage. Moving & Vacationing * Turn off water supply at the faucet and disconnect hoses. Hoses may need to be tangled or kinked. If moving washer disconnect drain hose. * Turn the leveling legs clockwise all hoses. * Disconnect electrical plug. * Dry inner wash tub. Drain water from...
... out hoses. Check water level selection, it will start automatically. TROUBLE SHOOTING If washer does not operate: * Check the unit is plugged in upright position only. * To prevent mold or mildew, leave lid open .You may need to usage. Moving & Vacationing * Turn off water supply at the faucet and disconnect hoses. Hoses may need to be tangled or kinked. If moving washer disconnect drain hose. * Turn the leveling legs clockwise all hoses. * Disconnect electrical plug. * Dry inner wash tub. Drain water from...
User Manual
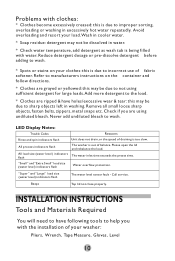
Page 10
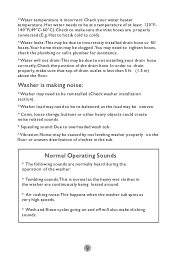
.... * Water will also make clicking sounds. 9 Normal Operating Sounds * The following sounds are properly connected (E.g. * Water temperature is normal as the load may be uneven. * Coins, loose change, buttons or other heavy objects could create noise related sounds. * Squealing sound: Due to overloaded wash tub. * Vibration Noise: may be caused by not leveling washer properly on and off will not drain:This may be due to not installing your water heater temperature. Hot to hot & cold to cold). * Water leaks:This...
.... * Water will also make clicking sounds. 9 Normal Operating Sounds * The following sounds are properly connected (E.g. * Water temperature is normal as the load may be uneven. * Coins, loose change, buttons or other heavy objects could create noise related sounds. * Squealing sound: Due to overloaded wash tub. * Vibration Noise: may be caused by not leveling washer properly on and off will not drain:This may be due to not installing your water heater temperature. Hot to hot & cold to cold). * Water leaks:This...
User Manual
Page 11
...: Trouble Codes Reasons Rinse and spin indicators flash Unit does not drain, or the speed of draining is out of fabric softener. Call service. Avoid overloading and resort your clothes: this is due to the load. * Clothes are using undiluted bleach. Never add undiluted bleach to improper sorting, overloading or washing in water. * Check water temperature, add detergent as wash tub is being filled with clothes: * Clothes become excessively creased: this is due to wash. flash "Small" and "Extra Small" load size (water level...
...: Trouble Codes Reasons Rinse and spin indicators flash Unit does not drain, or the speed of draining is out of fabric softener. Call service. Avoid overloading and resort your clothes: this is due to the load. * Clothes are using undiluted bleach. Never add undiluted bleach to improper sorting, overloading or washing in water. * Check water temperature, add detergent as wash tub is being filled with clothes: * Clothes become excessively creased: this is due to wash. flash "Small" and "Extra Small" load size (water level...

User Manual
Page 12
... plastic bag and other packing material away from babies and children. Accessories Supplied 1.Hot & Cold inlet hoses 2.Drain Hose Hook 3.Pipe Clip/brace 4.Outer Drain Hose 1 2 Quantity 2 1 1 1 3 4 Unpacking Your Washer: * Remove all packing materials.This includes the foam base and all adhesive tape holding the washer accessories inside and outside. * Open the top lid to lower your washer. Pull to prevent vibration during spin. 11
... plastic bag and other packing material away from babies and children. Accessories Supplied 1.Hot & Cold inlet hoses 2.Drain Hose Hook 3.Pipe Clip/brace 4.Outer Drain Hose 1 2 Quantity 2 1 1 1 3 4 Unpacking Your Washer: * Remove all packing materials.This includes the foam base and all adhesive tape holding the washer accessories inside and outside. * Open the top lid to lower your washer. Pull to prevent vibration during spin. 11
User Manual
Page 13
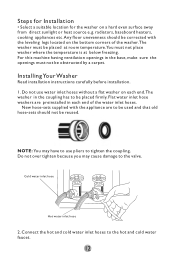
... to use water inlet hoses without a flat washer on each end.The washer in each end of the washer.The washer must be placed at room temperature.You must not be obstructed by a carpet. Installing Your Washer Read installation instructions carefully before installation. 1. Do not over tighten because you may have to tighten the coupling. Connect the hot and cold water inlet hoses to the valve. New hose-sets supplied with the leveling legs located...
... to use water inlet hoses without a flat washer on each end.The washer in each end of the washer.The washer must be placed at room temperature.You must not be obstructed by a carpet. Installing Your Washer Read installation instructions carefully before installation. 1. Do not over tighten because you may have to tighten the coupling. Connect the hot and cold water inlet hoses to the valve. New hose-sets supplied with the leveling legs located...

User Manual
Page 14
... washer is properly installed, it is properly installed, contact a qualified installer. Use the goose neck to the back of the washer using the drain hose clamp provided.The drain hose must be installed by a certified installer. 13 Note :Carefully inspect around the machine for any leaks, and tighten any loose connecti ons. To avoid possible flush back of 1500mm. Goose Neck Water Supply Hose Water Inlet Hose Bend Drain Hose 4.Plug the wash er into a drain...
... washer is properly installed, it is properly installed, contact a qualified installer. Use the goose neck to the back of the washer using the drain hose clamp provided.The drain hose must be installed by a certified installer. 13 Note :Carefully inspect around the machine for any leaks, and tighten any loose connecti ons. To avoid possible flush back of 1500mm. Goose Neck Water Supply Hose Water Inlet Hose Bend Drain Hose 4.Plug the wash er into a drain...
User Manual
Page 15
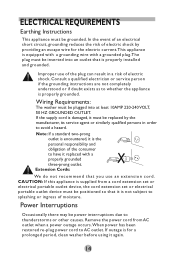
...-plug power cord to whether the appliance is properly installed and grounded. Remove the power cord from a cord extension set or electrical portable outlet device, the cord extension set or electrical portable outlet device must be plugged into an outlet that is properly grounded. If outage is equipped with a grounding wire with a properly grounded three-prong outlet. Consult a qualified electrician or service person if the grounding instructions...
...-plug power cord to whether the appliance is properly installed and grounded. Remove the power cord from a cord extension set or electrical portable outlet device, the cord extension set or electrical portable outlet device must be plugged into an outlet that is properly grounded. If outage is equipped with a grounding wire with a properly grounded three-prong outlet. Consult a qualified electrician or service person if the grounding instructions...
User Manual
Page 16
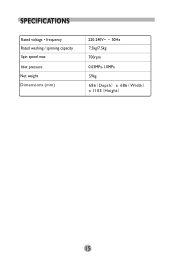
SPECIFICATIONS Rated voltage·frequency Rated washing / spinning capacity Spin speed max Inlet pressure Net weight Dimensions (mm) 220-240V~ · 50Hz 7.5kg/7.5kg 700rpm 0.03MPa-1.0MPa 59kg 686(Depth) x 686(Width) x 1105(Height) 15
SPECIFICATIONS Rated voltage·frequency Rated washing / spinning capacity Spin speed max Inlet pressure Net weight Dimensions (mm) 220-240V~ · 50Hz 7.5kg/7.5kg 700rpm 0.03MPa-1.0MPa 59kg 686(Depth) x 686(Width) x 1105(Height) 15


