Product Manual
Page 2
... the freezer compartment, particularly when hands are still cold - "...Thawed ground meats, poultry, or fish that you can." 1 If your old appliance is designed for its length, the plug or the connector end. 6. Do not use and care guide. 2. Always grasp the plug firmly and pull straight out from the outlet. 5. When your appliance by pulling on the power cord...
... the freezer compartment, particularly when hands are still cold - "...Thawed ground meats, poultry, or fish that you can." 1 If your old appliance is designed for its length, the plug or the connector end. 6. Do not use and care guide. 2. Always grasp the plug firmly and pull straight out from the outlet. 5. When your appliance by pulling on the power cord...
Product Manual
Page 3
... for any repairs. Model number Serial number Date of your freezer before cleaning or before making any reason this product requires service, we strongly recommend that children may not easily climb inside. Remember to defrost your freezer in place so that a certified technician perform the service. 11. Do not operate your freezer. 10. Do not use manual will need it to your old refrigerator or freezer, take off the doors. Unplug your freezer.
... for any repairs. Model number Serial number Date of your freezer before cleaning or before making any reason this product requires service, we strongly recommend that children may not easily climb inside. Remember to defrost your freezer in place so that a certified technician perform the service. 11. Do not operate your freezer. 10. Do not use manual will need it to your old refrigerator or freezer, take off the doors. Unplug your freezer.
Product Manual
Page 4
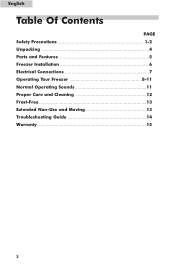
English Table Of Contents PAGE Safety Precautions 1-2 Unpacking 4 Parts and Features 5 Freezer Installation 6 Electrical Connections 7 Operating Your Freezer 8-11 Normal Operating Sounds 11 Proper Care and Cleaning 12 Frost-Free 13 Extended Non-Use and Moving 13 Troubleshooting Guide 14 Warranty 15 3
English Table Of Contents PAGE Safety Precautions 1-2 Unpacking 4 Parts and Features 5 Freezer Installation 6 Electrical Connections 7 Operating Your Freezer 8-11 Normal Operating Sounds 11 Proper Care and Cleaning 12 Frost-Free 13 Extended Non-Use and Moving 13 Troubleshooting Guide 14 Warranty 15 3
Product Manual
Page 5
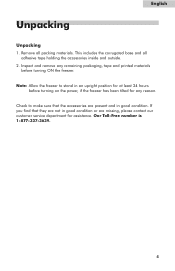
... or are present and in an upright position for at least 24 hours before turning on the power, if the freezer has been tilted for assistance. Check to stand in good condition. Inspect and remove any reason. Our Toll-Free number is 1-877-337-3639. 4 Remove all adhesive tape holding the accessories inside and outside. 2. English Unpacking Unpacking 1. If you...
... or are present and in an upright position for at least 24 hours before turning on the power, if the freezer has been tilted for assistance. Check to stand in good condition. Inspect and remove any reason. Our Toll-Free number is 1-877-337-3639. 4 Remove all adhesive tape holding the accessories inside and outside. 2. English Unpacking Unpacking 1. If you...
Product Manual
Page 6
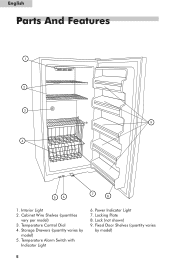
Cabinet Wire Shelves (quantities vary per model) 3. Locking Plate 8. Fixed Door Shelves (quantity varies by model) 5. Interior Light 2. Power Indicator Light 7. Temperature Control Dial 4. Storage Drawers (quantity varies by model) 5 Lock (not shown) 9. Temperature Alarm Switch with Indicator Light 6. English Parts And Features 1 2 3 9 4 56 7 8 1.
Cabinet Wire Shelves (quantities vary per model) 3. Locking Plate 8. Fixed Door Shelves (quantity varies by model) 5. Interior Light 2. Power Indicator Light 7. Temperature Control Dial 4. Storage Drawers (quantity varies by model) 5 Lock (not shown) 9. Temperature Alarm Switch with Indicator Light 6. English Parts And Features 1 2 3 9 4 56 7 8 1.
Product Manual
Page 7
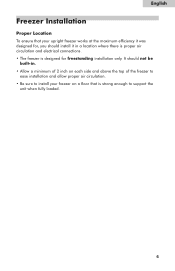
It should not be built-in. • Allow a minimum of the freezer to ease installation and allow proper air circulation. • Be sure to support the unit when fully loaded. 6 English Freezer Installation Proper Location To ensure that your freezer on each side and above the top of 2 inch on a floor that is strong enough to install your upright freezer works at the maximum efficiency it was designed for, you should install it in a location where there is proper air circulation and electrical connections. • The freezer is designed for freestanding installation only.
It should not be built-in. • Allow a minimum of the freezer to ease installation and allow proper air circulation. • Be sure to support the unit when fully loaded. 6 English Freezer Installation Proper Location To ensure that your freezer on each side and above the top of 2 inch on a floor that is strong enough to install your upright freezer works at the maximum efficiency it was designed for, you should install it in a location where there is proper air circulation and electrical connections. • The freezer is designed for freestanding installation only.
Product Manual
Page 8
... third (grounding) prong from the AC outlet when a power outage occurs. Use of Extension Cords • Avoid the use of the plug may be power interruptions due to thunderstorms or other causes. Remove the power cord from the power cord. • Consult a qualified electrician or service center if the grounding instructions are not completely understood or if in doubt as to whether the...
... third (grounding) prong from the AC outlet when a power outage occurs. Use of Extension Cords • Avoid the use of the plug may be power interruptions due to thunderstorms or other causes. Remove the power cord from the power cord. • Consult a qualified electrician or service center if the grounding instructions are not completely understood or if in doubt as to whether the...
Product Manual
Page 9
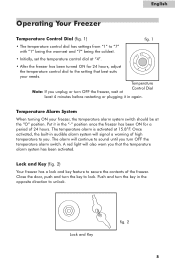
... the freezer. A red light will also warn you that best suits your freezer, the temperature alarm system switch should be at 15.8˚F. Put it in the opposite direction to unlock. The alarm will continue to sound until you turn the key to lock. English Operating Your Freezer Temperature Control Dial (fig. 1) fig. 1 • The temperature control dial has settings from "1" to "7" with "1" being the warmest and "7" being the coldest. 7 • Initially, set the temperature control dial at Control Dial least...
... the freezer. A red light will also warn you that best suits your freezer, the temperature alarm system switch should be at 15.8˚F. Put it in the opposite direction to unlock. The alarm will continue to sound until you turn the key to lock. English Operating Your Freezer Temperature Control Dial (fig. 1) fig. 1 • The temperature control dial has settings from "1" to "7" with "1" being the warmest and "7" being the coldest. 7 • Initially, set the temperature control dial at Control Dial least...
Product Manual
Page 10
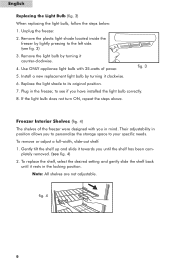
To remove or adjust a full-width, slide-out shelf: 1. To replace the shelf, select the desired setting and gently slide the shelf back until the shelf has been completely removed. (see fig. 4) 2. Plug in position allows you have installed the light bulb correctly. 8. If the light bulb does not turn ON, repeat the steps above. Remove the plastic light shade located inside the freezer by lightly pressing to its original position. 7. Install a new replacement light bulb by turning it clockwise...
To remove or adjust a full-width, slide-out shelf: 1. To replace the shelf, select the desired setting and gently slide the shelf back until the shelf has been completely removed. (see fig. 4) 2. Plug in position allows you have installed the light bulb correctly. 8. If the light bulb does not turn ON, repeat the steps above. Remove the plastic light shade located inside the freezer by lightly pressing to its original position. 7. Install a new replacement light bulb by turning it clockwise...
Product Manual
Page 11
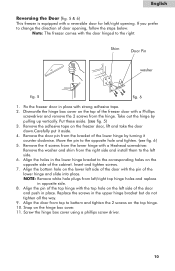
... hinge box cover using a phillips screw driver. 10 Remove the adhesive tape on the opposite side of door opening . If you prefer to the right. Shim Door Pin washer fig. 5 fig. 6 1. Take out the hinge by turning it aside. 4. Replace the screws in opposite side. 8. Remove the 4 screws from top to the corresponding holes on the freezer door, lift and take the door down.Carefully...
... hinge box cover using a phillips screw driver. 10 Remove the adhesive tape on the opposite side of door opening . If you prefer to the right. Shim Door Pin washer fig. 5 fig. 6 1. Take out the hinge by turning it aside. 4. Replace the screws in opposite side. 8. Remove the 4 screws from top to the corresponding holes on the freezer door, lift and take the door down.Carefully...

Product Manual
Page 12
... air inside the interior of the unit maintains the temperature you have selected. • Boiling water, gurgling sounds or slight vibrations are the result of the refrigerant circulating through the cooling coils. • Sizzling or popping sounds result from frost melting during the automatic defrost cycle and dripping onto the defrost heater. • The sound of dripping water occurs as ice melts from the door. 2. Install the handle on...
... air inside the interior of the unit maintains the temperature you have selected. • Boiling water, gurgling sounds or slight vibrations are the result of the refrigerant circulating through the cooling coils. • Sizzling or popping sounds result from frost melting during the automatic defrost cycle and dripping onto the defrost heater. • The sound of dripping water occurs as ice melts from the door. 2. Install the handle on...
Product Manual
Page 13
... outside of water), then rinse and dry thoroughly. Turn the temperature control dial to clean any part of the freezer. For efficient operation, dirt and dust should be removed from the rear and bottom of your freezer every 3 months. • Turn the temperature control dial to "1" and unplug the freezer before cleaning. • Carefully slide the freezer away from the wall slowly to clean inside the freezer or damage the protective coating on the shelves...
... outside of water), then rinse and dry thoroughly. Turn the temperature control dial to clean any part of the freezer. For efficient operation, dirt and dust should be removed from the rear and bottom of your freezer every 3 months. • Turn the temperature control dial to "1" and unplug the freezer before cleaning. • Carefully slide the freezer away from the wall slowly to clean inside the freezer or damage the protective coating on the shelves...

Product Manual
Page 14
...), the unit must be placed in an upright position. Extended Non-Use and Moving Extended Non-Use For long vacations or absences, empty food from the wall outlet. Clean the freezer and door gaskets according to the OFF position and disconnect the power cord from the freezer, move the temperature control dial to the Proper Care and Cleaning section. Ignoring this precautionary measure may result in...
...), the unit must be placed in an upright position. Extended Non-Use and Moving Extended Non-Use For long vacations or absences, empty food from the wall outlet. Clean the freezer and door gaskets according to the OFF position and disconnect the power cord from the freezer, move the temperature control dial to the Proper Care and Cleaning section. Ignoring this precautionary measure may result in...
Product Manual
Page 15
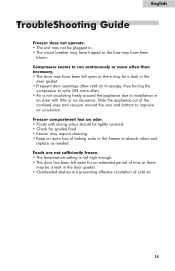
... not high enough. • The door has been left open or there may be a leak in the door gasket. • Overloaded shelves are not sufficiently frozen. • The temperature setting is not circulating freely around the rear and bottom to installation in the freezer to run continuously or more often than necessary. • The door may require cleaning. • Keep an open for spoiled food. • Interior...
... not high enough. • The door has been left open or there may be a leak in the door gasket. • Overloaded shelves are not sufficiently frozen. • The temperature setting is not circulating freely around the rear and bottom to installation in the freezer to run continuously or more often than necessary. • The door may require cleaning. • Keep an open for spoiled food. • Interior...
Product Manual
Page 16
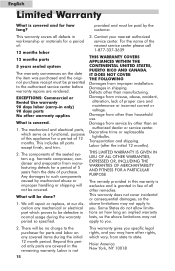
... service center before warranty repairs are covered in the remaining warranty. EXCEPTIONS: Commercial or Rental Use warranty 90 days labor (carry-in shipping. Any damages to such components caused by mechanical abuse or improper handling or shipping will be paid by other warranty applies What is covered. 1. Damages in only) 90 days parts No other than manufacturing. Damage from improper installation...
... service center before warranty repairs are covered in the remaining warranty. EXCEPTIONS: Commercial or Rental Use warranty 90 days labor (carry-in shipping. Any damages to such components caused by mechanical abuse or improper handling or shipping will be paid by other warranty applies What is covered. 1. Damages in only) 90 days parts No other than manufacturing. Damage from improper installation...
Energy Guide Label
Page 1
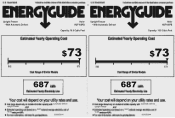
Upright Freezer • With Automatic Defrost Haier HUF168PB Capacity: 16.8 Cubic Feet Upright Freezer • With Automatic Defrost Haier HUF168PB Capacity: 16.8 Cubic Feet $73 $73 $62 $73 $62 $73 687 687 upright freezer 10.65 automatic defrost 2007 9006050644 upright freezer 10.65 automatic defrost 2007 9006050644
Upright Freezer • With Automatic Defrost Haier HUF168PB Capacity: 16.8 Cubic Feet Upright Freezer • With Automatic Defrost Haier HUF168PB Capacity: 16.8 Cubic Feet $73 $73 $62 $73 $62 $73 687 687 upright freezer 10.65 automatic defrost 2007 9006050644 upright freezer 10.65 automatic defrost 2007 9006050644
Energy Guide Label
Page 2
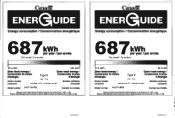
687 This model / Ce modele 515 kWh Type 9 15.5 - 17.4 volume in ft.³ / volume en pi³ HUF168PB 683 kWh 687 This model / Ce modele 515 kWh Type 9 15.5 - 17.4 volume in ft.³ / volume en pi³ HUF168PB 683 kWh 9006050644 9006050644
687 This model / Ce modele 515 kWh Type 9 15.5 - 17.4 volume in ft.³ / volume en pi³ HUF168PB 683 kWh 687 This model / Ce modele 515 kWh Type 9 15.5 - 17.4 volume in ft.³ / volume en pi³ HUF168PB 683 kWh 9006050644 9006050644


