User Manual
Page 1
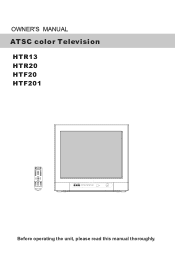
VOL - VOL+ CH- CH+ MENU CH- VOL + CC SLEEP S.MODE GUIDE ARC CH.LIST FAV.LIST AUDIOLIST EXIT VIDEO L-AUDIO-R TV/AV MENU VOL- CH+ Before operating the unit, please read this manual thoroughly. OWNER'S MANUAL ATSC color Television HTR13 HTR20 HTF20 HTF201 MUTE Q.VIEW INPUT INFO TV/DTV 1 2 3 4 5 6 7 8 9 SAP P.MODE 0 OK -
VOL - VOL+ CH- CH+ MENU CH- VOL + CC SLEEP S.MODE GUIDE ARC CH.LIST FAV.LIST AUDIOLIST EXIT VIDEO L-AUDIO-R TV/AV MENU VOL- CH+ Before operating the unit, please read this manual thoroughly. OWNER'S MANUAL ATSC color Television HTR13 HTR20 HTF20 HTF201 MUTE Q.VIEW INPUT INFO TV/DTV 1 2 3 4 5 6 7 8 9 SAP P.MODE 0 OK -
User Manual
Page 2
...control 5 Function buttons and External Connections 6 Front panel of the TV set 6 Rear panel of the TV set 7 Using the remote control 8 The other video and audio equipment 9 Antenna connections 10 Cable TV connections 11 Connections the other equipment 12 Basic operation Setting the language... and blue screen 13 Channel menu 14 Channel selection 16 Volume adjustment 17 Screen information 18 Video menu ...
...control 5 Function buttons and External Connections 6 Front panel of the TV set 6 Rear panel of the TV set 7 Using the remote control 8 The other video and audio equipment 9 Antenna connections 10 Cable TV connections 11 Connections the other equipment 12 Basic operation Setting the language... and blue screen 13 Channel menu 14 Channel selection 16 Volume adjustment 17 Screen information 18 Video menu ...
User Manual
Page 3
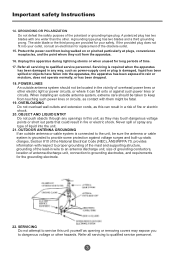
... near water. This unit should be blocked or covered. NO USER SERVICEABLE PARTS INSIDE. Use of controls or adjustments or performance of power supply to . 13. INSTALL IN ACCORDANCE WITH THE MANUFACTURER`S INSTRUCTIONS. 7. For example, near any heat sources such as a bookcase or rack unless proper ventilation is used, use liquid...
... near water. This unit should be blocked or covered. NO USER SERVICEABLE PARTS INSIDE. Use of controls or adjustments or performance of power supply to . 13. INSTALL IN ACCORDANCE WITH THE MANUFACTURER`S INSTRUCTIONS. 7. For example, near any heat sources such as a bookcase or rack unless proper ventilation is used, use liquid...
User Manual
Page 4
GROUNDING OR POLARIZATION Do not defeat the safety purpose of the obsolete outlet. 15. Unplug this can fall onto or against voltage surges and built-up static charges, Section 810 of the National Electrical Code (NEC), ANSI/NFPA 70, provides information with respect to keep from the apparatus. 16. Servicing is required when the apparatus has been damaged in the vicinity of overhead power lines or other electric light or power circuits, or where it can result in wire to an antenna discharge unit, size of grounding conductors, location of liquid into your safety. ...
GROUNDING OR POLARIZATION Do not defeat the safety purpose of the obsolete outlet. 15. Unplug this can fall onto or against voltage surges and built-up static charges, Section 810 of the National Electrical Code (NEC), ANSI/NFPA 70, provides information with respect to keep from the apparatus. 16. Servicing is required when the apparatus has been damaged in the vicinity of overhead power lines or other electric light or power circuits, or where it can result in wire to an antenna discharge unit, size of grounding conductors, location of liquid into your safety. ...
User Manual
Page 5
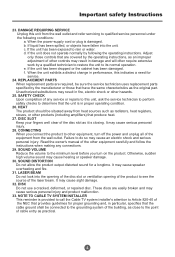
... and unplug all of any connections. 29. LASER BEAM Do not look into the unit. It may cause serious personal injury. 28. NOTE TO CABLE TV SYSTEM INSTALLER This reminder is in proper operating condition. 26. When the power-supply cord or plug is closing. e. It may cause sight damage. 32... service or repairs to this unit, ask the service technician to perform safety checks to determine that the unit is provided to call the Cable TV system installer's attention to rain or water.
... and unplug all of any connections. 29. LASER BEAM Do not look into the unit. It may cause serious personal injury. 28. NOTE TO CABLE TV SYSTEM INSTALLER This reminder is in proper operating condition. 26. When the power-supply cord or plug is closing. e. It may cause sight damage. 32... service or repairs to this unit, ask the service technician to perform safety checks to determine that the unit is provided to call the Cable TV system installer's attention to rain or water.

User Manual
Page 6
Dispose of used for a long period of the battery to the +/marks inside the battery compartment. Tips for the remote control Battery installation !Remove the battery cover. !Insert two size AAA batteries matching the +/-polarities of time or when the batteries are worn out, remove the batteries to avoid interference. *To avoid interference from electrical signals, do not bind the antenna cable together with any mains lead. Installation Antenna connection If the picture is not clear or is snowy, it is recommended that an External Aerial is used, this is usually mounted outside. 300...
Dispose of used for a long period of the battery to the +/marks inside the battery compartment. Tips for the remote control Battery installation !Remove the battery cover. !Insert two size AAA batteries matching the +/-polarities of time or when the batteries are worn out, remove the batteries to avoid interference. *To avoid interference from electrical signals, do not bind the antenna cable together with any mains lead. Installation Antenna connection If the picture is not clear or is snowy, it is recommended that an External Aerial is used, this is usually mounted outside. 300...
User Manual
Page 7
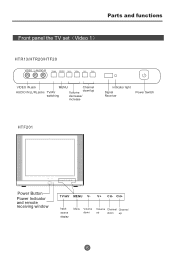
Parts and functions Front panel the TV set Video 1 HTR13/HTR20/HTF20 VIDEO L-AUDIO-R TV/AV MENU VOL- VOL+ CH- CH+ VIDEO IN jack MENU Channel AUDIO IN (L/R) jacks TV/AV down up Volume switching decrease/ increase Indicator light Signal Receiver Power Switch HTF201 TV/AV MENU V- CH+ Power Button Power Indicator and remote receiving window TV/AV MENU V- V+ CH- CH+ Input source display Menu Volume Volume Channel Channel down up down /up 6 V+ CH-
Parts and functions Front panel the TV set Video 1 HTR13/HTR20/HTF20 VIDEO L-AUDIO-R TV/AV MENU VOL- VOL+ CH- CH+ VIDEO IN jack MENU Channel AUDIO IN (L/R) jacks TV/AV down up Volume switching decrease/ increase Indicator light Signal Receiver Power Switch HTF201 TV/AV MENU V- CH+ Power Button Power Indicator and remote receiving window TV/AV MENU V- V+ CH- CH+ Input source display Menu Volume Volume Channel Channel down up down /up 6 V+ CH-

User Manual
Page 8
Parts and functions Rear panel of the TV set HTR13/HTR20/HTF20 Component video input terminal Video output terminal Video input terminal HTF201 Y Cb Cr OUT IN VIDEO1 L R AUDIO1 Antenna input socket Audio right channel ...
Parts and functions Rear panel of the TV set HTR13/HTR20/HTF20 Component video input terminal Video output terminal Video input terminal HTF201 Y Cb Cr OUT IN VIDEO1 L R AUDIO1 Antenna input socket Audio right channel ...
User Manual
Page 9
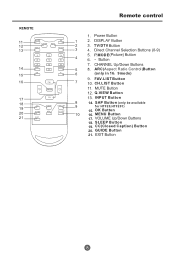
SAP Button (only be available CC SLEEP FAV.LIST 9 for HTF20,HTF201) 19 GUIDE ARC CH.LIST 15. MENU Button 21 EXIT 17. 18. CC(Closed Caption) Button 20. SLEEP Button 19. MENU VOL + Q.VIEW Button CH- 17 INPUT Button 18 8 14. OK Button 20 10 16. Remote control 11 MUTE Q.VIEW INFO 1 12 INPUT 2 TV/DTV 13 3 1 2 3 4 4 5 6 TV/DTV MODE 7 8 9 14 SAP P.MODE 0 5 OK 15 - 6 16 CH+ 7 ARC(Aspect Ratio Control)Button (only in 16 9mode) FAV.LIST Button CH.LIST Button VOL - GUIDE Button 21. 8
SAP Button (only be available CC SLEEP FAV.LIST 9 for HTF20,HTF201) 19 GUIDE ARC CH.LIST 15. MENU Button 21 EXIT 17. 18. CC(Closed Caption) Button 20. SLEEP Button 19. MENU VOL + Q.VIEW Button CH- 17 INPUT Button 18 8 14. OK Button 20 10 16. Remote control 11 MUTE Q.VIEW INFO 1 12 INPUT 2 TV/DTV 13 3 1 2 3 4 4 5 6 TV/DTV MODE 7 8 9 14 SAP P.MODE 0 5 OK 15 - 6 16 CH+ 7 ARC(Aspect Ratio Control)Button (only in 16 9mode) FAV.LIST Button CH.LIST Button VOL - GUIDE Button 21. 8

User Manual
Page 10
The other video and audio equipment Connections You can connect the DVD,VCR and stereo system to the output to enjoy a higher quality of picture and sound effect. ANT IN 1 1 9
The other video and audio equipment Connections You can connect the DVD,VCR and stereo system to the output to enjoy a higher quality of picture and sound effect. ANT IN 1 1 9
User Manual
Page 11
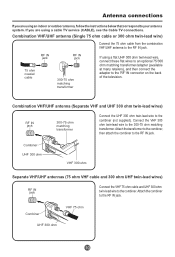
... to the RF IN jack. RF IN jack RF IN jack 75 ohm coaxial cable 300-75 ohm matching transformer If using a cable TV service (CABLE), see the Cable TV connections. If you are using a flat UHF 300 ohm twin-lead wire, connect these flat wires to an optional 75/300 ohm...
... to the RF IN jack. RF IN jack RF IN jack 75 ohm coaxial cable 300-75 ohm matching transformer If using a cable TV service (CABLE), see the Cable TV connections. If you are using a flat UHF 300 ohm twin-lead wire, connect these flat wires to an optional 75/300 ohm...
User Manual
Page 12
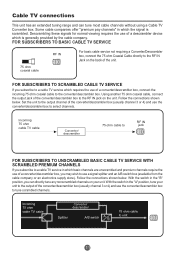
...are unscrambled and premium channels require the use of a converter/descrambler box, you subscribe to tune scrambled channels. FOR SUBSCRIBERS TO SCRAMBLED CABLE TV SERVICE If you may wish to use of a converter/descrambler box, connect the incoming 75 ohm coaxial cable to unit RF IN jack... 11 Follow the connections shown below . Cable TV connections This unit has an extended tuning range and can directly tune any nonscrambled channels on the unit. Descrambling these signals for normal viewing...
...are unscrambled and premium channels require the use of a converter/descrambler box, you subscribe to tune scrambled channels. FOR SUBSCRIBERS TO SCRAMBLED CABLE TV SERVICE If you may wish to use of a converter/descrambler box, connect the incoming 75 ohm coaxial cable to unit RF IN jack... 11 Follow the connections shown below . Cable TV connections This unit has an extended tuning range and can directly tune any nonscrambled channels on the unit. Descrambling these signals for normal viewing...
User Manual
Page 13
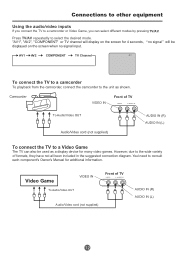
...unit as a display device for many video games. AV1 AV2 COMPONENT TV Channel AV 1 To connect the TV to a camcorder To playback from the camcorder, connect the camcorder to a Video Game The TV can select different modes by pressing TV/AV. However, due to consult each component's Owner's Manual for ..., they have not all been included in the suggested connection diagram. Press TV/AV repeatedly to a camcorder or Video Game, you connect the TV to select the desired mode. "AV1", "AV2", "COMPONENT" or TV channel will display on the screen when no signal will be used as shown...
...unit as a display device for many video games. AV1 AV2 COMPONENT TV Channel AV 1 To connect the TV to a camcorder To playback from the camcorder, connect the camcorder to a Video Game The TV can select different modes by pressing TV/AV. However, due to consult each component's Owner's Manual for ..., they have not all been included in the suggested connection diagram. Press TV/AV repeatedly to a camcorder or Video Game, you connect the TV to select the desired mode. "AV1", "AV2", "COMPONENT" or TV channel will display on the screen when no signal will be used as shown...
User Manual
Page 14
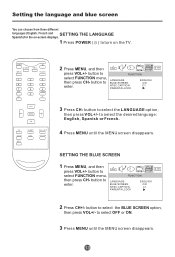
... enter. button to enter. to select the desired language: English, Spanish or French. 4 Press MENU until the MENU screen disappears. 13 button to select the BLUE SCREEN option, then press VOL+/- button to select FUNCTION menu, FUNCTION then press CH- FUNCTION LANGUAGE BLUE ... VOL+/- button to select FUNCTION menu, then press CH- LANGUAGE BLUE SCREEN NTSC CAPTION PARENTAL LOCK ENGLISH ON C1 2 Press CH+/- MUTE Q.VIEW INPUT INFO TV/DTV 1 2 3 4 5 6 7 8 9 SAP P.MODE 0 OK - Setting the language and blue screen You can choose from three different languages (...
... enter. button to enter. to select the desired language: English, Spanish or French. 4 Press MENU until the MENU screen disappears. 13 button to select the BLUE SCREEN option, then press VOL+/- button to select FUNCTION menu, FUNCTION then press CH- FUNCTION LANGUAGE BLUE ... VOL+/- button to select FUNCTION menu, then press CH- LANGUAGE BLUE SCREEN NTSC CAPTION PARENTAL LOCK ENGLISH ON C1 2 Press CH+/- MUTE Q.VIEW INPUT INFO TV/DTV 1 2 3 4 5 6 7 8 9 SAP P.MODE 0 OK - Setting the language and blue screen You can choose from three different languages (...
User Manual
Page 15
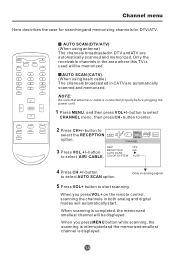
VOL - Only the receivable channels in the area where this TV is completed, the memorized smallest channel will be displayed. button to select the RECEPTION option. COLOR SYSTEM OFF AIR AUTO 4 Press CH +/- When scanning is ... the memorized smallest channel is connected properly before plugging the power cord. 1 Press MENU, and then press VOL+/- button to start . MUTE Q.VIEW INPUT INFO TV/DTV 1 2 3 4 5 6 7 8 9 SAP P.MODE 0 OK - Channel menu Here describes the case for searching and memorizing channels for DTV/ATV. Only in both analog and digital modes...
VOL - Only the receivable channels in the area where this TV is completed, the memorized smallest channel will be displayed. button to select the RECEPTION option. COLOR SYSTEM OFF AIR AUTO 4 Press CH +/- When scanning is ... the memorized smallest channel is connected properly before plugging the power cord. 1 Press MENU, and then press VOL+/- button to start . MUTE Q.VIEW INPUT INFO TV/DTV 1 2 3 4 5 6 7 8 9 SAP P.MODE 0 OK - Channel menu Here describes the case for searching and memorizing channels for DTV/ATV. Only in both analog and digital modes...
User Manual
Page 16
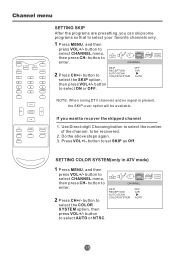
Channel menu MUTE Q.VIEW INPUT INFO TV/DTV 1 2 3 4 5 6 7 8 9 SAP P.MODE 0 OK - VOL - OFF AIR AUTO NOTE: When tuning DTV channels and no signal is present, the SKIP-over option will be recovered. 2. ...
Channel menu MUTE Q.VIEW INPUT INFO TV/DTV 1 2 3 4 5 6 7 8 9 SAP P.MODE 0 OK - VOL - OFF AIR AUTO NOTE: When tuning DTV channels and no signal is present, the SKIP-over option will be recovered. 2. ...
User Manual
Page 17
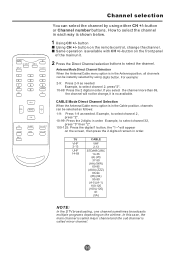
... select the channel in order. How to select channel 2, press "2". 10-99: Press the 2 digits in each way is no available. MUTE Q.VIEW INPUT INFO TV/DTV 1 2 3 4 5 6 7 8 9 SAP P.MODE 0 OK - 1 Using CH +/- button on the air time. For example: 2-9: Press 2-9 as needed . VOL + CC GUIDE EXIT SLEEP ...ARC FAV.LIST CH.LIST CABLE Mode Direct Channel Selection When the Antenna/Cable menu option is available with CH +/- TV VHF 2-13 UHF 14-69 CABLE VHF 2-13 STD/HRC/IRC 14-36 (A) (W) 37-59 (AA) (WW) 60-85 (AAA) (ZZZ) 86-94 (86) (94) 95-99 (A-5) (A-1) ...
... select the channel in order. How to select channel 2, press "2". 10-99: Press the 2 digits in each way is no available. MUTE Q.VIEW INPUT INFO TV/DTV 1 2 3 4 5 6 7 8 9 SAP P.MODE 0 OK - 1 Using CH +/- button on the air time. For example: 2-9: Press 2-9 as needed . VOL + CC GUIDE EXIT SLEEP ...ARC FAV.LIST CH.LIST CABLE Mode Direct Channel Selection When the Antenna/Cable menu option is available with CH +/- TV VHF 2-13 UHF 14-69 CABLE VHF 2-13 STD/HRC/IRC 14-36 (A) (W) 37-59 (AA) (WW) 60-85 (AAA) (ZZZ) 86-94 (86) (94) 95-99 (A-5) (A-1) ...
User Manual
Page 18
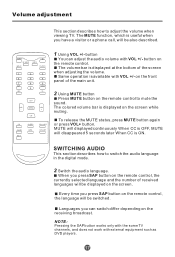
... at the bottom of received languages will be displayed on the receiving broadcast. NOTE: Pressing the SAP button works only with the some TV channels, and does not work with VOL +/- The volume bar is available with external equipment such as DVD players. 17 To release ... how to mute the sound. The MUTE function, which is OFF, MUTE will be switched. The colored volume bar is ON. MUTE Q.VIEW INPUT INFO TV/DTV 1 2 3 4 5 6 7 8 9 SAP P.MODE 0 OK - VOL - button on the screen while muting. SWITCHING AUDIO This section describes how to switch the audio...
... at the bottom of received languages will be displayed on the receiving broadcast. NOTE: Pressing the SAP button works only with the some TV channels, and does not work with VOL +/- The volume bar is available with external equipment such as DVD players. 17 To release ... how to mute the sound. The MUTE function, which is OFF, MUTE will be switched. The colored volume bar is ON. MUTE Q.VIEW INPUT INFO TV/DTV 1 2 3 4 5 6 7 8 9 SAP P.MODE 0 OK - VOL - button on the screen while muting. SWITCHING AUDIO This section describes how to switch the audio...
User Manual
Page 19
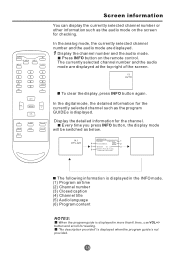
... you press INFO button, the display mode will be switched as the audio mode on the remote control. CH+ MENU CH- MUTE Q.VIEW INPUT INFO TV/DTV 1 2 3 4 5 6 7 8 9 SAP P.MODE 0 OK - Screen information You can display the currently selected channel number or other information such as below. 14.1 DTV-AIR INFORMATION ENCODE...
... you press INFO button, the display mode will be switched as the audio mode on the remote control. CH+ MENU CH- MUTE Q.VIEW INPUT INFO TV/DTV 1 2 3 4 5 6 7 8 9 SAP P.MODE 0 OK - Screen information You can display the currently selected channel number or other information such as below. 14.1 DTV-AIR INFORMATION ENCODE...

User Manual
Page 20
... button. Brightness This will adjust the light output of the complete picture, which will appear. 2 Press VOL+/- Video menu SETTING VIDEO MUTE Q.VIEW INPUT INFO TV/DTV 1 2 3 4 5 6 7 8 9 SAP P.MODE 0 OK - button to select the desired option, then press VOL+/-
... button. Brightness This will adjust the light output of the complete picture, which will appear. 2 Press VOL+/- Video menu SETTING VIDEO MUTE Q.VIEW INPUT INFO TV/DTV 1 2 3 4 5 6 7 8 9 SAP P.MODE 0 OK - button to select the desired option, then press VOL+/-