User Manual
Page 2
... room to provide you with the ultimate level of comfort. Model and serial number can be needed: Model Number: Serial Number: Date of your model and serial numbers. Your air conditioner cleans, cools and dehumidifies the air in the Product Registration Card. Product Registration Keep a record of PurchaseDealer's Name: Dealer's AddressDealer's Phone Number: 1 Attach the sales receipt to this guide and keep for you for buying a dependable, energy saving and easy-to-operate Haier air conditioner. This manual...
... room to provide you with the ultimate level of comfort. Model and serial number can be needed: Model Number: Serial Number: Date of your model and serial numbers. Your air conditioner cleans, cools and dehumidifies the air in the Product Registration Card. Product Registration Keep a record of PurchaseDealer's Name: Dealer's AddressDealer's Phone Number: 1 Attach the sales receipt to this guide and keep for you for buying a dependable, energy saving and easy-to-operate Haier air conditioner. This manual...
User Manual
Page 3
The wall receptacle MUST be ensured to proper electrical outlet with your air conditioner. SAVE THESE INSTRUCTIONS 2 Contact an authorized service technician for examination, repairs or adjustments. A 4) DO NOT USE AN ADAPTER OR AN EXTENSION CORD. 5) Do not block airflow around the air conditioner. A1) Air conditioner must be properly grounded. A3) Do not operate air conditioner if power cord is oily or sulphurous. The exhaust hose should be connected to reduce...
The wall receptacle MUST be ensured to proper electrical outlet with your air conditioner. SAVE THESE INSTRUCTIONS 2 Contact an authorized service technician for examination, repairs or adjustments. A 4) DO NOT USE AN ADAPTER OR AN EXTENSION CORD. 5) Do not block airflow around the air conditioner. A1) Air conditioner must be properly grounded. A3) Do not operate air conditioner if power cord is oily or sulphurous. The exhaust hose should be connected to reduce...

User Manual
Page 4
... you for future reference. Model number Serial number Date of the back cover may fall and cause damage or injury. • Never spill liquid on an unstable surface or elevated place as it may cause electrical shock to the electronic parts inside of purchase 3 Use a damp cloth. • Do not place the product on the control panel; Staple your manual. Important Instructions • Please keep...
... you for future reference. Model number Serial number Date of the back cover may fall and cause damage or injury. • Never spill liquid on an unstable surface or elevated place as it may cause electrical shock to the electronic parts inside of purchase 3 Use a damp cloth. • Do not place the product on the control panel; Staple your manual. Important Instructions • Please keep...

User Manual
Page 5
Table Of Contents A Word From Haier America Product Registration Safety Precautions Important Instructions Table of Contents Assembly and Installation Parts and Features Operation Care and Cleaning Storage Troubleshooting Warranty Information English Page 1 1 2 3 4 5 6 7-9 10 10 10 11 4
Table Of Contents A Word From Haier America Product Registration Safety Precautions Important Instructions Table of Contents Assembly and Installation Parts and Features Operation Care and Cleaning Storage Troubleshooting Warranty Information English Page 1 1 2 3 4 5 6 7-9 10 10 10 11 4
User Manual
Page 6
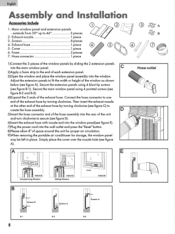
... the window panel(see figure E). 7)Plug the power cord into the main window panel. Simply place the cover over the nozzle hole (see figure A). Exhaust nozzle 1 piece 3. C 2)Apply a foam strip to 46" 3 pieces 2. Main window panel and extension panels - Secure the main window panel using 4 blunt tip screws (see figure B-2 and B-3). 4)Expand the 2 ends of space around the unit for proper air circulation. 9)When removing the portable air conditioner for storage, the window panel...
... the window panel(see figure E). 7)Plug the power cord into the main window panel. Simply place the cover over the nozzle hole (see figure A). Exhaust nozzle 1 piece 3. C 2)Apply a foam strip to 46" 3 pieces 2. Main window panel and extension panels - Secure the main window panel using 4 blunt tip screws (see figure B-2 and B-3). 4)Expand the 2 ends of space around the unit for proper air circulation. 9)When removing the portable air conditioner for storage, the window panel...

User Manual
Page 7
Upper Drain 9. Parts and Features English MI 1. Lower Drain (Note : Please ensure if the water outlet drain is well installed before use.) POWER SUPPLY CORD 2 • 0 6 7 8 9 10 3 5 TEST: WHEN THIS BUTTON IS PRESSED OR WHEN THERE IS A CURRENT LEAK, THE UNIT WILL NOT OPERATE. Control Panel 3. Casters 7. Remote Control Cradle 5. Handle 4. Air Inlet 6. Power Supply Cord 10. RESET: AFTER SOLVING THE PROBLEM, PRESS THE RESET BUTTON TO RESUME OPERATION. 6 Air Outlet 2. Air Filter 8.
Upper Drain 9. Parts and Features English MI 1. Lower Drain (Note : Please ensure if the water outlet drain is well installed before use.) POWER SUPPLY CORD 2 • 0 6 7 8 9 10 3 5 TEST: WHEN THIS BUTTON IS PRESSED OR WHEN THERE IS A CURRENT LEAK, THE UNIT WILL NOT OPERATE. Control Panel 3. Casters 7. Remote Control Cradle 5. Handle 4. Air Inlet 6. Power Supply Cord 10. RESET: AFTER SOLVING THE PROBLEM, PRESS THE RESET BUTTON TO RESUME OPERATION. 6 Air Outlet 2. Air Filter 8.
User Manual
Page 8
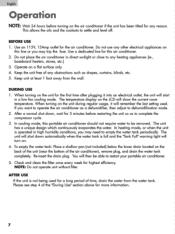
... air conditioner in a low fan cooling mode. DURING USE 1 When turning on the unit for a long period of any heating appliances (ie., baseboard heaters, stoves, etc.) 3. If you want to operate the air conditioner as to complete the compressor cycle. 3. Re-insert the drain plug. NOTE: Do not operate unit without filter. AFTER USE If the unit is not being used . This allows the oils and the coolants to restart your portable air conditioner. 5. Operate on the unit...
... air conditioner in a low fan cooling mode. DURING USE 1 When turning on the unit for a long period of any heating appliances (ie., baseboard heaters, stoves, etc.) 3. If you want to operate the air conditioner as to complete the compressor cycle. 3. Re-insert the drain plug. NOTE: Do not operate unit without filter. AFTER USE If the unit is not being used . This allows the oils and the coolants to restart your portable air conditioner. 5. Operate on the unit...
User Manual
Page 9
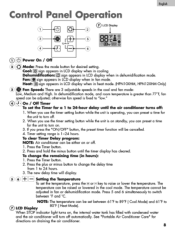
... O Power On / Off 0 Mode: Press the mode button for directions on , the internal water tank has filled with condensed water and the air conditioner will display. 4)* + • Setting the Temperature To set between °F and °C. Timer setting range is 1-24 hours. Press the plus or minus button to switch between 61°F to 89°F ( Cool Mode) and 61°F to 0 LCD Display 80°F ( Heat Mode). When STOP indicator light turns on draining the air conditioner. 8 See "Portable Air Conditioner...
... O Power On / Off 0 Mode: Press the mode button for directions on , the internal water tank has filled with condensed water and the air conditioner will display. 4)* + • Setting the Temperature To set between °F and °C. Timer setting range is 1-24 hours. Press the plus or minus button to switch between 61°F to 89°F ( Cool Mode) and 61°F to 0 LCD Display 80°F ( Heat Mode). When STOP indicator light turns on draining the air conditioner. 8 See "Portable Air Conditioner...
User Manual
Page 10
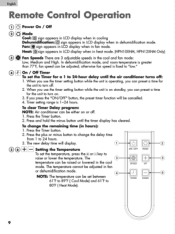
... unit to turn on or off . 2. The temperature cannot be cancelled. 4. The new delay time will be adjusted in hours): 1. English Remote Control Operation 0 0 Power On / Off O Lc) Mode Cool: sign appears in LCD display when in cooling Dehumidification: cd sign appears in LCD display when in the cool and fan mode: Low, Medium and High. Fan:A sign appears in LCD display when in the cool mode. When you use the timer setting button...
... unit to turn on or off . 2. The temperature cannot be cancelled. 4. The new delay time will be adjusted in hours): 1. English Remote Control Operation 0 0 Power On / Off O Lc) Mode Cool: sign appears in LCD display when in cooling Dehumidification: cd sign appears in LCD display when in the cool and fan mode: Low, Medium and High. Fan:A sign appears in LCD display when in the cool mode. When you use the timer setting button...
User Manual
Page 11
... instructions in "Off" mode. • If the warning light is being used for the required cooling area. • On extremely hot & humid days, air conditioners may take a little longer to cool. • Drain the water drain pipe by removing the plug. • Unit may have appliances that cool air does not escape the room. • Air filter may be blocked or may need cleaning. • Unit BTU may occur either when the unit is operated in...
... instructions in "Off" mode. • If the warning light is being used for the required cooling area. • On extremely hot & humid days, air conditioners may take a little longer to cool. • Drain the water drain pipe by removing the plug. • Unit may have appliances that cool air does not escape the room. • Air filter may be blocked or may need cleaning. • Unit BTU may occur either when the unit is operated in...

User Manual
Page 12
... of the Service Depot nearest you get service? 1. The remedy provided in your home, any mechanical, electrical part or the compressor, which vary from improper installation. (commercial or rental application, the warranty is 90 days). 2. This warranty gives you specific legal rights, and you . warranty is granted in lieu of a replacement part, beyond the You must be performed by other remedies. Haier America will...
... of the Service Depot nearest you get service? 1. The remedy provided in your home, any mechanical, electrical part or the compressor, which vary from improper installation. (commercial or rental application, the warranty is 90 days). 2. This warranty gives you specific legal rights, and you . warranty is granted in lieu of a replacement part, beyond the You must be performed by other remedies. Haier America will...


