
User Manual
Page 1
MODELS: HLC26 HLC32 TFT-LCD TV OWNER'S MANUAL Please READ this manual carefully before operating your TV, and retain it for future reference.
MODELS: HLC26 HLC32 TFT-LCD TV OWNER'S MANUAL Please READ this manual carefully before operating your TV, and retain it for future reference.
User Manual
Page 2
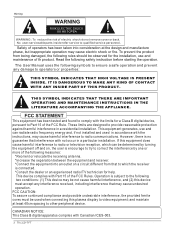
... from that to which can radiate radio frequency energy and, if not installed and used when connecting this plasma display to radio communications. The User Manual uses the following safety instruction before starting the operation. FCC CAUTION: To assure continued compliance and possible undesirable interference, the provided ferrite cores must be...
... from that to which can radiate radio frequency energy and, if not installed and used when connecting this plasma display to radio communications. The User Manual uses the following safety instruction before starting the operation. FCC CAUTION: To assure continued compliance and possible undesirable interference, the provided ferrite cores must be...

User Manual
Page 3
... your outlet, consult an electrician for replacement of the obsolete outlet. 10) Protect the power cord from the apparatus. 11) Only use this appliance. Owner s Manual 3 IMPORTANT SAFETY INSTRUCTIONS Read all of the instructions before using this appliance, always exercise basic safety precautions, including the following: 1) Read these instructions. 2) Keep these...
... your outlet, consult an electrician for replacement of the obsolete outlet. 10) Protect the power cord from the apparatus. 11) Only use this appliance. Owner s Manual 3 IMPORTANT SAFETY INSTRUCTIONS Read all of the instructions before using this appliance, always exercise basic safety precautions, including the following: 1) Read these instructions. 2) Keep these...

User Manual
Page 4
Model number serial number Date of purchase Staple your receipt to your product. You will guide you for using our Haier product. SAVE THESE INSTRUCTIONS Thank you in back of your manual. Remember to obtain warranty service. 4 TV LCD-TFT They are on label in getting the best use of the unit. This easy-to-use manual will need it to record the model and serial number.
Model number serial number Date of purchase Staple your receipt to your product. You will guide you for using our Haier product. SAVE THESE INSTRUCTIONS Thank you in back of your manual. Remember to obtain warranty service. 4 TV LCD-TFT They are on label in getting the best use of the unit. This easy-to-use manual will need it to record the model and serial number.
User Manual
Page 5
... rating and categories Others Functions Bri ef In fo Quick program view Setting up your remote control DVD operation Maintenance Product Specifications Troubleshooting Warranty Owner s Manual 5
... rating and categories Others Functions Bri ef In fo Quick program view Setting up your remote control DVD operation Maintenance Product Specifications Troubleshooting Warranty Owner s Manual 5

User Manual
Page 7
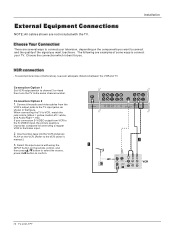
.... DVD/DTV Input (Component ) Connect a component video device to operate the TV on AC power. Power Cord Socket This TV operates on DC power Owner s Manual 7 Never attempt to these ports will not work. The voltage is indicated on the Specifications page.
.... DVD/DTV Input (Component ) Connect a component video device to operate the TV on AC power. Power Cord Socket This TV operates on DC power Owner s Manual 7 Never attempt to these ports will not work. The voltage is indicated on the Specifications page.

User Manual
Page 9
...contact your TV, and retain it for assistance. EARCH TFT-LCD TV OWNER'S MANUAL MODEL:L40A8A Please READ this manual carefully before operating your dealer for future reference. 10+ Remote controller Owner`s manual Alkaline battery(AAA) 2 Power cable Antenna Connection Generally speaking, to wall jack ... that you use a CATV system or an outdoor antenna .In different places, the suitable antenna type and position are different. Owner s Manual 9 Multi-family Dwellings/Apartments (Connect to wall antenna socket) Wall Antenna Socket Bronze Wire RF Coaxial Wire (75 ohm) VHF Antenna UHF...
...contact your TV, and retain it for assistance. EARCH TFT-LCD TV OWNER'S MANUAL MODEL:L40A8A Please READ this manual carefully before operating your dealer for future reference. 10+ Remote controller Owner`s manual Alkaline battery(AAA) 2 Power cable Antenna Connection Generally speaking, to wall jack ... that you use a CATV system or an outdoor antenna .In different places, the suitable antenna type and position are different. Owner s Manual 9 Multi-family Dwellings/Apartments (Connect to wall antenna socket) Wall Antenna Socket Bronze Wire RF Coaxial Wire (75 ohm) VHF Antenna UHF...
User Manual
Page 10
... input source with the TV. Choose Your Connection There are not included with using the INPUT button on the VCR. (Refer to the VCR owner`s manual.) 3. Insert a video tape into the VCR and press PLAY on the remote control, and then press / button to select the source, press the button to...
... input source with the TV. Choose Your Connection There are not included with using the INPUT button on the VCR. (Refer to the VCR owner`s manual.) 3. Insert a video tape into the VCR and press PLAY on the remote control, and then press / button to select the source, press the button to...

User Manual
Page 11
...equipment, match the jack colors (Video = yellow, Audio Left = white, and Audio Right = red). When connecting the TV to the DVD player's manual for program play. 4. Turn on the remote control. 2. Operate the corresponding external equipment. as shown in the figure. 2. Component ports on the TV... Pb Pr Y B-Y R-Y Y Cb Cr Y PB PR Video Game Set Y2 Pb2 Pr2 L R AV OUT L R Y1 Pb1 Pr1 L R S-VIDEO VIDEO L R Owner s Manual 11 Y2 Pb2 Pr2 L R AV OUT L R Y1 Pb1 Pr1 L R S-VIDEO VIDEO L R Camcorder DVD connection How to the TV input jacks, as shown below. External Equipment...
...equipment, match the jack colors (Video = yellow, Audio Left = white, and Audio Right = red). When connecting the TV to the DVD player's manual for program play. 4. Turn on the remote control. 2. Operate the corresponding external equipment. as shown in the figure. 2. Component ports on the TV... Pb Pr Y B-Y R-Y Y Cb Cr Y PB PR Video Game Set Y2 Pb2 Pr2 L R AV OUT L R Y1 Pb1 Pr1 L R S-VIDEO VIDEO L R Owner s Manual 11 Y2 Pb2 Pr2 L R AV OUT L R Y1 Pb1 Pr1 L R S-VIDEO VIDEO L R Camcorder DVD connection How to the TV input jacks, as shown below. External Equipment...

User Manual
Page 12
... turn the TV speakers off. How to external audio equipment (stereo system) via the Audio Output (Optical) port. See the external audio equipment instruction manual for Digital Contents (480p,720p,1080i). Use INPUT on the audio equipment. Note: When connecting with external audio equipments, such as shown below. - ..., PR) , VGA or HDMI jack for the digital set -top box. How to select YPbPr, VGA,or HDMI source. How to the owner`s manual for video connections, depending on your vision. 12 TV LCD-TFT VGA/DVI OPTICAL AUDIO IN AC IN Caution: Do not look into the optical...
... turn the TV speakers off. How to external audio equipment (stereo system) via the Audio Output (Optical) port. See the external audio equipment instruction manual for Digital Contents (480p,720p,1080i). Use INPUT on the audio equipment. Note: When connecting with external audio equipments, such as shown below. - ..., PR) , VGA or HDMI jack for the digital set -top box. How to select YPbPr, VGA,or HDMI source. How to the owner`s manual for video connections, depending on your vision. 12 TV LCD-TFT VGA/DVI OPTICAL AUDIO IN AC IN Caution: Do not look into the optical...

User Manual
Page 13
...*480 800*600 XGA 1024*768 Frame frequency (Hz) 60Hz 60Hz/75Hz 60Hz 75Hz ANT IN HDMI2 VGA HDMI1 VGA/DVI OPTICAL AUDIO IN Owner s Manual 13 Ifusing a soundcard, adjust theVGA soundas required. There may be changed,change therefresh rate toanother rate oradjust the brightness and contrast onthe menu untilthe picture...
...*480 800*600 XGA 1024*768 Frame frequency (Hz) 60Hz 60Hz/75Hz 60Hz 75Hz ANT IN HDMI2 VGA HDMI1 VGA/DVI OPTICAL AUDIO IN Owner s Manual 13 Ifusing a soundcard, adjust theVGA soundas required. There may be changed,change therefresh rate toanother rate oradjust the brightness and contrast onthe menu untilthe picture...

User Manual
Page 14
... monitor for Monitor out. If the source device has an analog audio output connector, connect the source device audio output to 1280x720p. - See the Operating Manual of the source device to DVI Audio In port located on the left side of Select Main source menu. 14 TV LCD-TFT If the...
... monitor for Monitor out. If the source device has an analog audio output connector, connect the source device audio output to 1280x720p. - See the Operating Manual of the source device to DVI Audio In port located on the left side of Select Main source menu. 14 TV LCD-TFT If the...

User Manual
Page 15
Cable sample Installation HDMI Cable (not supplied with the product) HDMI to DVI Cable (not supplied with the product) Analog Audio Cable (Stereo to RCA type) (not supplied with the product) Owner s Manual 15
Cable sample Installation HDMI Cable (not supplied with the product) HDMI to DVI Cable (not supplied with the product) Analog Audio Cable (Stereo to RCA type) (not supplied with the product) Owner s Manual 15

User Manual
Page 17
... -There are several options you can watch your TV, cable TV, VCR, DVD, or any other devices that follow. Operation Operation -In the manual, the OSD (on top and center of the screen. VGA HDMI1 PVR Cable HDMI2 Game Up/Down:Move Cursor Note: OK: Change MP Source ...Right:Activale Source Name Edit Menu 1. Owner s Manual 17 The TV reverts to confirm. Choose the Input source - According to your connection device, you might need to set for the first time, ...
... -There are several options you can watch your TV, cable TV, VCR, DVD, or any other devices that follow. Operation Operation -In the manual, the OSD (on top and center of the screen. VGA HDMI1 PVR Cable HDMI2 Game Up/Down:Move Cursor Note: OK: Change MP Source ...Right:Activale Source Name Edit Menu 1. Owner s Manual 17 The TV reverts to confirm. Choose the Input source - According to your connection device, you might need to set for the first time, ...

User Manual
Page 18
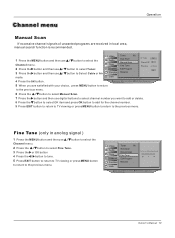
... set to set channels, which are satisfied with your area. 18 TV LCD-TFT Video Tuner Air Air Audio Auto Scan Cable Time A B C Channel Manual Scan Fine Tune Edit Program Function Rename Lock : Move cursor, /OK: Go to submenu, EXIT/ MENU: Exit main menu Video Audio Time A B ...C Channel Function Lock Tuner Air Auto Scan Manual Scan Fine Tune Edit Program Rename OK Cancel Air Tuner Number: 47 Found: 1 : Move cursor, OK: Enter, MENU: Return to Channel menu if ...
... set to set channels, which are satisfied with your area. 18 TV LCD-TFT Video Tuner Air Air Audio Auto Scan Cable Time A B C Channel Manual Scan Fine Tune Edit Program Function Rename Lock : Move cursor, /OK: Go to submenu, EXIT/ MENU: Exit main menu Video Audio Time A B ...C Channel Function Lock Tuner Air Auto Scan Manual Scan Fine Tune Edit Program Rename OK Cancel Air Tuner Number: 47 Found: 1 : Move cursor, OK: Enter, MENU: Return to Channel menu if ...
User Manual
Page 19
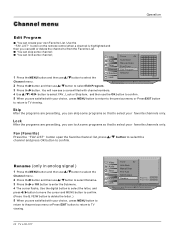
...return to TV viewing or press MENU button to return to the previous menu. Video Audio Time A B C Channel Function Lock Tuner Air Auto Scan Manual Scan Fine Tune Edit Program Rename For the tune of unwanted programs are satisfied with your choice, press MENU button to return : Move cursor, /OK...: Go to submenu, / ME NU: Return to upper menu, EXIT: Exit main menu to the previous menu. 6 Press the / button to select Manual Scan. 7 Press the button and then use digital buttons to select channel number you want to add or delete. 8 Press the button to select OK...
...return to TV viewing or press MENU button to return to the previous menu. Video Audio Time A B C Channel Function Lock Tuner Air Auto Scan Manual Scan Fine Tune Edit Program Rename For the tune of unwanted programs are satisfied with your choice, press MENU button to return : Move cursor, /OK...: Go to submenu, / ME NU: Return to upper menu, EXIT: Exit main menu to the previous menu. 6 Press the / button to select Manual Scan. 7 Press the button and then use digital buttons to select channel number you want to add or delete. 8 Press the button to select OK...
User Manual
Page 20
...previous menu or Press EXIT button to return to select your favorite channels only. Video Audio Time A B C Channel Function Lock Tuner Air Auto Scan Manual Scan Fine Tune Edit Program Rename Program No Program Name : Move cursor, /OK: Go to submenu, / ME NU: Return to confirm. Video Audio... Time A B C Channel Function 1 Press the MENU button and then use / button to select the Lock Tuner Air Auto Scan Manual Scan Fine Tune Edit Program Rename Music Ch No Name Fav Lock Skip Page 1/1 Channel menu. 2 Press the button and then use / button...
...previous menu or Press EXIT button to return to select your favorite channels only. Video Audio Time A B C Channel Function Lock Tuner Air Auto Scan Manual Scan Fine Tune Edit Program Rename Program No Program Name : Move cursor, /OK: Go to submenu, / ME NU: Return to confirm. Video Audio... Time A B C Channel Function 1 Press the MENU button and then use / button to select the Lock Tuner Air Auto Scan Manual Scan Fine Tune Edit Program Rename Music Ch No Name Fav Lock Skip Page 1/1 Channel menu. 2 Press the button and then use / button...

User Manual
Page 21
... on the remote or the front of the TV set to recover the sound, press the MUTE button again or directly press VOL+ button. Owner s Manual 21 button, the channel will display on the TV screen. buttons. Press the CH-
... on the remote or the front of the TV set to recover the sound, press the MUTE button again or directly press VOL+ button. Owner s Manual 21 button, the channel will display on the TV screen. buttons. Press the CH-

User Manual
Page 23
... way an analog picture with a 16:9 ratio picture format. - Zoom1 . In YPbPr, HDMI modes, only 16:9 Mode, 4:3 modes, Zoom1 or Zoom2 can be selected. Owner s Manual 23 Zoom2 . 4:3 Mode. Zoom 2 Choose Zoom 2 when you want to view the picture without any alteration. Note: When enlarging or reducing the picture size, the...
... way an analog picture with a 16:9 ratio picture format. - Zoom1 . In YPbPr, HDMI modes, only 16:9 Mode, 4:3 modes, Zoom1 or Zoom2 can be selected. Owner s Manual 23 Zoom2 . 4:3 Mode. Zoom 2 Choose Zoom 2 when you want to view the picture without any alteration. Note: When enlarging or reducing the picture size, the...

User Manual
Page 25
... programs and SAP (Secondary Audio Program) that accompanies the stereo program; Mono sound is automatically received if the broadcast is only in Mono; Operation Owner s Manual 25 if the station transmits an additional sound signal as well as the original one. - Audio menu SAP Broadcasts Setup -
... programs and SAP (Secondary Audio Program) that accompanies the stereo program; Mono sound is automatically received if the broadcast is only in Mono; Operation Owner s Manual 25 if the station transmits an additional sound signal as well as the original one. - Audio menu SAP Broadcasts Setup -


