
User Manual
Page 1
R HL19R1/HL19K1/HLC19R1/HLC19K1/HL22R1/HL22K1/HLC22R1 HLC22K1/HL22F1 LCD TV & LCD TV/DVD Combo USER MANUAL Please read this manual carefully before using this TV set and keep it for future reference.
R HL19R1/HL19K1/HLC19R1/HLC19K1/HL22R1/HL22K1/HLC22R1 HLC22K1/HL22F1 LCD TV & LCD TV/DVD Combo USER MANUAL Please read this manual carefully before using this TV set and keep it for future reference.

User Manual
Page 4
Safety Instructions(for TV with DVD) PRECAUTIONS FCC WARNING-This equipment may generate or use radio frequency energy.Changes or modifications to this equipment may cause harmful interference unless the modifications are expressly approved in the instruction manual.The user could lose the authority to operate this device,due to service this equipment...
Safety Instructions(for TV with DVD) PRECAUTIONS FCC WARNING-This equipment may generate or use radio frequency energy.Changes or modifications to this equipment may cause harmful interference unless the modifications are expressly approved in the instruction manual.The user could lose the authority to operate this device,due to service this equipment...
User Manual
Page 6
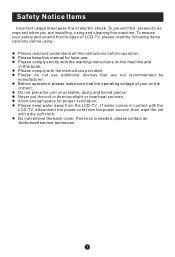
...are not recommended by manufacturer: l Before operation, please make sure that the operating voltage of your safety and extend the life-span of LCD-TV, please read the following items carefully before operation; l Never put the unit in contact with a dry soft cloth; If service is ... keep this manual for proper ventilation; To ensure your unit is needed, please contact an Authorized service technician. l Do not remove the back cover. l Please keep water away from the power source, then wipe the set with the LCD-TV, disconnect the power cord from the LCD-TV . If water...
...are not recommended by manufacturer: l Before operation, please make sure that the operating voltage of your safety and extend the life-span of LCD-TV, please read the following items carefully before operation; l Never put the unit in contact with a dry soft cloth; If service is ... keep this manual for proper ventilation; To ensure your unit is needed, please contact an Authorized service technician. l Do not remove the back cover. l Please keep water away from the power source, then wipe the set with the LCD-TV, disconnect the power cord from the LCD-TV . If water...

User Manual
Page 11
...", " " and "3". 20.Switches the video sound on or off the TV 15.Press to cycle through different sound settings 16.Press to display the sleep timer option 17.Select MONO, STEREO, SAP in NTSC system 18.Press to change a channel 19.Press to jump back and forth between two channels 23.DVD... the remote control, aim it towards the remote sensor on this manual takes remote of the TV screen 13.Shows program schedule in TV 14.Press to turn on and off 21.Accesses the highlighted item in TV Note: the instruction on the TV PICTURE 14 AUDIO 1 15 ARC CCD MTS/SAP SLEEP 2 16 3 17...
...", " " and "3". 20.Switches the video sound on or off the TV 15.Press to cycle through different sound settings 16.Press to display the sleep timer option 17.Select MONO, STEREO, SAP in NTSC system 18.Press to change a channel 19.Press to jump back and forth between two channels 23.DVD... the remote control, aim it towards the remote sensor on this manual takes remote of the TV screen 13.Shows program schedule in TV 14.Press to turn on and off 21.Accesses the highlighted item in TV Note: the instruction on the TV PICTURE 14 AUDIO 1 15 ARC CCD MTS/SAP SLEEP 2 16 3 17...

User Manual
Page 14
... tape into the VCR and press PLAY on the power of the AV device; 4.Press t INPUT button to set the video input mode of the LCD-TV and the AV device are off; COMPONENT IN 1 2 VCR Y Pb HDMI Input HDMI How to connect Connect the cables from the external equipment's output... jacks to the VCR owner s manual.) 3.T.urn on the TV. 2. Operate the corresponding external equipment. Connect the audio and video cables from VCR to use steps: 1.Read the user guide supplied with your AV...
... tape into the VCR and press PLAY on the power of the AV device; 4.Press t INPUT button to set the video input mode of the LCD-TV and the AV device are off; COMPONENT IN 1 2 VCR Y Pb HDMI Input HDMI How to connect Connect the cables from the external equipment's output... jacks to the VCR owner s manual.) 3.T.urn on the TV. 2. Operate the corresponding external equipment. Connect the audio and video cables from VCR to use steps: 1.Read the user guide supplied with your AV...
User Manual
Page 19
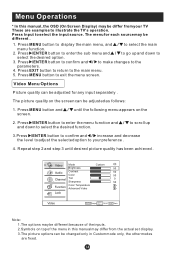
...to select the desired function. 3.Press /ENTER button to confirm and / increase and decrease the level to adjust the selected option to illustrate the TV's operation. The menu for any input separately . Press /ENTER button to confirm and / to make changes to select the input source. Video ...Function Advanced Video Lock Video ENTER Adjust CH+/- Select EXIT Back VOL+/- Press Input to the parameters. 4. Menu Operations * In this manual may differ from your TV These are fixed. Repeat step 2 and step 3 until the following menu appears on top of the menu in Custom mode only, the...
...to select the desired function. 3.Press /ENTER button to confirm and / increase and decrease the level to adjust the selected option to illustrate the TV's operation. The menu for any input separately . Press /ENTER button to confirm and / to make changes to select the input source. Video ...Function Advanced Video Lock Video ENTER Adjust CH+/- Select EXIT Back VOL+/- Press Input to the parameters. 4. Menu Operations * In this manual may differ from your TV These are fixed. Repeat step 2 and step 3 until the following menu appears on top of the menu in Custom mode only, the...

User Manual
Page 20
... Off. Adaptive Luma Control: To adjust changes in Video menu. Color : Press / button and /ENTER to confirm, then press / to allow you change the color manually. Sharpness : Adjust the amount of the picture:On and Off. Custom to adjust color saturation. Advanced Video:To adjust the picture in Custom mode. White...
... Off. Adaptive Luma Control: To adjust changes in Video menu. Color : Press / button and /ENTER to confirm, then press / to allow you change the color manually. Sharpness : Adjust the amount of the picture:On and Off. Custom to adjust color saturation. Advanced Video:To adjust the picture in Custom mode. White...

User Manual
Page 26
... enter the submenu. Select EXIT Back VOL+/- To select Off, the time can not be adjusted. Select Off , you can operate to set the time manually. Time: Press / to select the position and digits button to set the time. Date/Time: Press /ENTER to enter the submenu.
... enter the submenu. Select EXIT Back VOL+/- To select Off, the time can not be adjusted. Select Off , you can operate to set the time manually. Time: Press / to select the position and digits button to set the time. Date/Time: Press /ENTER to enter the submenu.
User Manual
Page 46
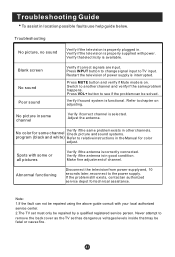
...signals are input. Verify if the antenna is available. Verify if sound system is correctly connected. Spots with your local authorized service center. 2.The TV set has dangerous voltages levels inside that electricity is in good condition. Abnormal functioning Disconnect the television from power supply and, 10 seconds later, ... another channel and verify if the same problem happens. No color for some channel Verify if correct channel is properly plugged in the Manual for technical assistance. Adjust the antenna. Troubleshooting Guide To assist in other channels.
...signals are input. Verify if the antenna is available. Verify if sound system is correctly connected. Spots with your local authorized service center. 2.The TV set has dangerous voltages levels inside that electricity is in good condition. Abnormal functioning Disconnect the television from power supply and, 10 seconds later, ... another channel and verify if the same problem happens. No color for some channel Verify if correct channel is properly plugged in the Manual for technical assistance. Adjust the antenna. Troubleshooting Guide To assist in other channels.

User Manual
Page 47
Specifications Model Picture, sound system Audio output External input port 19 without notice. Dimensions quoted in this manual are subject to change without DVD 19 with DVD NTSC, ATSC, Clear QAM 1.5W+1.5W AV input PC input S-VIDEO input PC audio input YPbPr input Antenna input HDMI input Power requirements ~120V 60Hz Power consumption Temperature Humidity Accessories 60W 80W Working:+5 ~+35 Storage:-15 ~+45 Working:20% ~ 80% Storage: 5% ~ 90% Remote control Batteries User manual Warranty card NOTE Design and specifications are approximate.
Specifications Model Picture, sound system Audio output External input port 19 without notice. Dimensions quoted in this manual are subject to change without DVD 19 with DVD NTSC, ATSC, Clear QAM 1.5W+1.5W AV input PC input S-VIDEO input PC audio input YPbPr input Antenna input HDMI input Power requirements ~120V 60Hz Power consumption Temperature Humidity Accessories 60W 80W Working:+5 ~+35 Storage:-15 ~+45 Working:20% ~ 80% Storage: 5% ~ 90% Remote control Batteries User manual Warranty card NOTE Design and specifications are approximate.


