
User Manual
Page 1
R HL19R1/HL19K1/HLC19R1/HLC19K1/HL22R1/HL22K1/HLC22R1 HLC22K1/HL22F1 LCD TV & LCD TV/DVD Combo USER MANUAL Please read this manual carefully before using this TV set and keep it for future reference.
R HL19R1/HL19K1/HLC19R1/HLC19K1/HL22R1/HL22K1/HLC22R1 HLC22K1/HL22F1 LCD TV & LCD TV/DVD Combo USER MANUAL Please read this manual carefully before using this TV set and keep it for future reference.

User Manual
Page 2
... than that may be of sufficient magnitude to constitute a risk of important operating and maintenance (servicing) instructions in the operating instructions unless you are for TV with arrowhead symbol, within an equilateral triangle is intended to alert the user to the presence of uninsulated dangerous voltage within an equilateral triangle is...
... than that may be of sufficient magnitude to constitute a risk of important operating and maintenance (servicing) instructions in the operating instructions unless you are for TV with arrowhead symbol, within an equilateral triangle is intended to alert the user to the presence of uninsulated dangerous voltage within an equilateral triangle is...

User Manual
Page 4
LASER SAFETY This unit employs a laser.Only a qualified service person should remove the cover or attempt to possible eye injury. Safety Instructions(for TV with DVD) PRECAUTIONS FCC WARNING-This equipment may generate or use radio frequency energy.Changes or modifications to this equipment may cause harmful interference unless ...
LASER SAFETY This unit employs a laser.Only a qualified service person should remove the cover or attempt to possible eye injury. Safety Instructions(for TV with DVD) PRECAUTIONS FCC WARNING-This equipment may generate or use radio frequency energy.Changes or modifications to this equipment may cause harmful interference unless ...

User Manual
Page 5
... Menu Options 14 Video Menu Options Continued 15 Audio Menu Options 16 Audio Menu Options Continued 17 Channel Menu Options 18 Channel Menu Options Continued 19 Function Menu Options 20 Function Menu Options Continued 2. 1 Lock Menu Options 23 Lock Menu Options Continued 24 PC Menu Options 28 PC Menu Options ...only on certain models. Please refer to your original set 11 Choose the input source 11 Audio Control 11 Mute...11 INFO...11 Select the TV Channel You Want 12 Picture Mode 12 Audio Mode 12 Sleep...12 GUIDE 12 ARC button 12 .Button 13 CH.LIST button 13 FAVORATE button...
... Menu Options 14 Video Menu Options Continued 15 Audio Menu Options 16 Audio Menu Options Continued 17 Channel Menu Options 18 Channel Menu Options Continued 19 Function Menu Options 20 Function Menu Options Continued 2. 1 Lock Menu Options 23 Lock Menu Options Continued 24 PC Menu Options 28 PC Menu Options ...only on certain models. Please refer to your original set 11 Choose the input source 11 Audio Control 11 Mute...11 INFO...11 Select the TV Channel You Want 12 Picture Mode 12 Audio Mode 12 Sleep...12 GUIDE 12 ARC button 12 .Button 13 CH.LIST button 13 FAVORATE button...
User Manual
Page 6
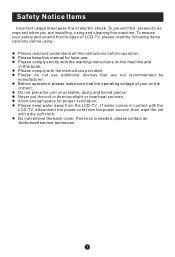
.... l Never put the unit in this , please do not use additional devices that the operating voltage of your safety and extend the life-span of LCD-TV, please read and understand all the instructions before using and cleaning this manual for proper ventilation; l Please keep this machine. To ensure your unit is... in direct sunlight or near heat sources; Safety Notice Items Incorrect usage may cause fire or electric shock. If water comes in contact with the LCD-TV, disconnect the power cord from the...
.... l Never put the unit in this , please do not use additional devices that the operating voltage of your safety and extend the life-span of LCD-TV, please read and understand all the instructions before using and cleaning this manual for proper ventilation; l Please keep this machine. To ensure your unit is... in direct sunlight or near heat sources; Safety Notice Items Incorrect usage may cause fire or electric shock. If water comes in contact with the LCD-TV, disconnect the power cord from the...

User Manual
Page 7
... the remote control. CH- MENU Menu display. Front Panel Controls INPUT MENU VOL- POWER Press to adjust the item in the OSD. VOL+ CH- CH+ TV channel up / Right button to turn on -screen menu display. 4. VOL- CH+ POWER R1 series K1series F1series Control Panel Function...
... the remote control. CH- MENU Menu display. Front Panel Controls INPUT MENU VOL- POWER Press to adjust the item in the OSD. VOL+ CH- CH+ TV channel up / Right button to turn on -screen menu display. 4. VOL- CH+ POWER R1 series K1series F1series Control Panel Function...

User Manual
Page 8
... R-AUDIO IN-L VIDEO USB VGA IN PC AUDIO IN HDMI Pr Pb Y COMPONENT IN 1.ANT IN(Antenna Input) Connect cable or antenna signals to the TV, either directly or through your cable box. 2.Headphone jack : Headphone audio output terminal. 3.Audio in Connect audio output from an external device to these jacks...
... R-AUDIO IN-L VIDEO USB VGA IN PC AUDIO IN HDMI Pr Pb Y COMPONENT IN 1.ANT IN(Antenna Input) Connect cable or antenna signals to the TV, either directly or through your cable box. 2.Headphone jack : Headphone audio output terminal. 3.Audio in Connect audio output from an external device to these jacks...

User Manual
Page 10
....DVD FAST FORWARD 29 16.DVD FAST REVERSE MENU EXIT 17.DVD CALL 10 30 18.DVD MENU 19.DVD SEARCH 11 20.DVD ANGLE ENTER 31 21.Press to switch input source to DVD in 22.Open the ...channel list in TV SLEEP DISPLAY 12 32 13 OPEN/CLOSE PLAY/PAUSE STOP REPEAT 33 14 34 15 REV PREV NEXT 35 ...hold down 20 40 either +/- . 30.Exit On Screen Display 31.Accesses the highlighted item in TV 25.Press to change the aspect ratio 26.Press to change a channel 27.Press to scan through channels. To scan ...
....DVD FAST FORWARD 29 16.DVD FAST REVERSE MENU EXIT 17.DVD CALL 10 30 18.DVD MENU 19.DVD SEARCH 11 20.DVD ANGLE ENTER 31 21.Press to switch input source to DVD in 22.Open the ...channel list in TV SLEEP DISPLAY 12 32 13 OPEN/CLOSE PLAY/PAUSE STOP REPEAT 33 14 34 15 REV PREV NEXT 35 ...hold down 20 40 either +/- . 30.Exit On Screen Display 31.Accesses the highlighted item in TV 25.Press to change the aspect ratio 26.Press to change a channel 27.Press to scan through channels. To scan ...

User Manual
Page 11
... PREV NEXT 24 10 25 11 DISPLAY GUIDE FAVORITE CH.LIST 26 12 27 13 28 (For TV without DVD) 1.Press repeatedly to cycle through the available picture modes 2.Press to change a channel 19.Press to jump back and forth between two channels 23.DVD REPEAT 24.DVD STOP 25.DVD Next... Chapter 26.DVD Previous Chapter 27.Open the channel list in TV 28.Open the favorite channel list in the on the...
... PREV NEXT 24 10 25 11 DISPLAY GUIDE FAVORITE CH.LIST 26 12 27 13 28 (For TV without DVD) 1.Press repeatedly to cycle through the available picture modes 2.Press to change a channel 19.Press to jump back and forth between two channels 23.DVD REPEAT 24.DVD STOP 25.DVD Next... Chapter 26.DVD Previous Chapter 27.Open the channel list in TV 28.Open the favorite channel list in the on the...

User Manual
Page 12
...installed properly, contact your dealer for outdoor antenna) To improve picture quality in the connections. Antenna or Cable Service with the TV If the antenna needs to wall jack for assistance. Multi-family Dwellings/Apartments (Connect to wall antenna socket) wall antenna socket ...antenna UHF antenna Turn clockwise to bend the bronze wire when connecting the antenna. Single-family Dwellings /Houses (Connect to be split for two Tvs, install a 2-Way Signal Splitter in a poor signal area, purchase and install a signal amplifier. Bronze Wire outdoor antenna Be careful not...
...installed properly, contact your dealer for outdoor antenna) To improve picture quality in the connections. Antenna or Cable Service with the TV If the antenna needs to wall jack for assistance. Multi-family Dwellings/Apartments (Connect to wall antenna socket) wall antenna socket ...antenna UHF antenna Turn clockwise to bend the bronze wire when connecting the antenna. Single-family Dwellings /Houses (Connect to be split for two Tvs, install a 2-Way Signal Splitter in a poor signal area, purchase and install a signal amplifier. Bronze Wire outdoor antenna Be careful not...

User Manual
Page 13
...the PC video interface connector on the back of the LCD-TV.Tighten the screws on the PC connectors once they are firmly connected; 4.Turn on the power of the LCD-TV first , and then turn on the power of the ...PC; 5.Press INPUT button to set the video input mode of the LCD -TV and the PC are subject to use steps: 1.Read the user guide supplied with the resolution, vertical...input for your computer and ensure that it has a VGA connector; 2.Make sure that the power of the LCD-TV to the AUDIO IN jacks on the PC. If noise is selected and if you see no image press function...
...the PC video interface connector on the back of the LCD-TV.Tighten the screws on the PC connectors once they are firmly connected; 4.Turn on the power of the LCD-TV first , and then turn on the power of the ...PC; 5.Press INPUT button to set the video input mode of the LCD -TV and the PC are subject to use steps: 1.Read the user guide supplied with the resolution, vertical...input for your computer and ensure that it has a VGA connector; 2.Make sure that the power of the LCD-TV to the AUDIO IN jacks on the PC. If noise is selected and if you see no image press function...

User Manual
Page 14
.... (Refer to the VCR owner s manual.) 3.T.urn on the power of the AV device; 4.Press t INPUT button to set the video input mode of the LCD-TV to use steps: 1.Read the user guide supplied with your AV devices and ensure that it has Composite or S-Video connectors; 2.Make sure that the... power of the LCD-TV and the AV device are off; Operate the corresponding external equipment. ATN IN Connection Option 1 Set VCR output switch to 3 or 4 and then tune...
.... (Refer to the VCR owner s manual.) 3.T.urn on the power of the AV device; 4.Press t INPUT button to set the video input mode of the LCD-TV to use steps: 1.Read the user guide supplied with your AV devices and ensure that it has Composite or S-Video connectors; 2.Make sure that the... power of the LCD-TV and the AV device are off; Operate the corresponding external equipment. ATN IN Connection Option 1 Set VCR output switch to 3 or 4 and then tune...

User Manual
Page 15
...channel switch on the remote control. 2. Connection Option 2 1. Refer to the same selected output channel on the remote control. 3. Tune the TV channel to external equipment operating guide. Select channels at the cable box or with the remote control for cable box. Select the input source by ...jacks to external equipment, match the jack colors (Video = yellow, Audio Left = white, and Audio Right = red). When connecting the TV to the TV input jacks, as shown in the figure. R-AUDIO IN-L VIDEO External Component Source Setup How to connect Connect the audio and video cables ...
...channel switch on the remote control. 2. Connection Option 2 1. Refer to the same selected output channel on the remote control. 3. Tune the TV channel to external equipment operating guide. Select channels at the cable box or with the remote control for cable box. Select the input source by ...jacks to external equipment, match the jack colors (Video = yellow, Audio Left = white, and Audio Right = red). When connecting the TV to the TV input jacks, as shown in the figure. R-AUDIO IN-L VIDEO External Component Source Setup How to connect Connect the audio and video cables ...

User Manual
Page 16
... appear on screen indicating the volume level. 2.Press VOL- Basic Operating Instructions Switch On/Off the TV set When the POWER button is pressed and the LCD-TV is turned off using the power button, the LCD-TV will go into standby mode and the indicator light turns red(or turns dark). When the... LCD-TV is turned on, the indicator light on the screen. 2.Press MUTE button or VOL+ again to display...
... appear on screen indicating the volume level. 2.Press VOL- Basic Operating Instructions Switch On/Off the TV set When the POWER button is pressed and the LCD-TV is turned off using the power button, the LCD-TV will go into standby mode and the indicator light turns red(or turns dark). When the... LCD-TV is turned on, the indicator light on the screen. 2.Press MUTE button or VOL+ again to display...

User Manual
Page 17
...for you to see the information and can press the buttons(CH+/CH-) on the remote control or on the remote control to directly select TV channels and press ENTER to confirm. For desired mode as follows: Off Concert Living Room Hall Bathroom Cave Arena Church Sleep Press SLEEP button ...menu.(This menu is just for menu display . to select information for menu display . ARC button Press to look over. Basic Operating Instructions Select the TV Channel You Want You can use the number buttons and button on the panel to make a selection. For desired mode as follows: Mild Standard Vivid...
...for you to see the information and can press the buttons(CH+/CH-) on the remote control or on the remote control to directly select TV channels and press ENTER to confirm. For desired mode as follows: Off Concert Living Room Hall Bathroom Cave Arena Church Sleep Press SLEEP button ...menu.(This menu is just for menu display . to select information for menu display . ARC button Press to look over. Basic Operating Instructions Select the TV Channel You Want You can use the number buttons and button on the panel to make a selection. For desired mode as follows: Mild Standard Vivid...

User Manual
Page 18
... select additional channels (digital and analog) being broadcast by the same station. to select the channel and press Enter to the channel you desired. Your LCD TV automatically tunes to confirm . Tuning to the next or previous page, press CH+/CH- to turn to a favorite channel Press FAVORATE. The favorite channel list...
... select additional channels (digital and analog) being broadcast by the same station. to select the channel and press Enter to the channel you desired. Your LCD TV automatically tunes to confirm . Tuning to the next or previous page, press CH+/CH- to turn to a favorite channel Press FAVORATE. The favorite channel list...
User Manual
Page 19
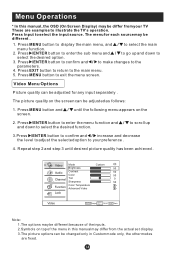
...the actual set display. 3.The picture options can be changed only in Custom mode only, the other modes are examples to illustrate the TV's operation. Video Mode Brightness Custom 50 Audio Contrast 50 Color 50 Channel Tint 0 Sharpness 50 Color Temperature Function Advanced Video Lock Video ENTER... menu, and / to the main menu. 5. Press EXIT button to return to select the main menu function. 2. Press MENU button to your TV These are fixed. The menu for any input separately . Video Menu Options Picture quality can be different . 1. Press /ENTER button to enter the...
...the actual set display. 3.The picture options can be changed only in Custom mode only, the other modes are examples to illustrate the TV's operation. Video Mode Brightness Custom 50 Audio Contrast 50 Color 50 Channel Tint 0 Sharpness 50 Color Temperature Function Advanced Video Lock Video ENTER... menu, and / to the main menu. 5. Press EXIT button to return to select the main menu function. 2. Press MENU button to your TV These are fixed. The menu for any input separately . Video Menu Options Picture quality can be different . 1. Press /ENTER button to enter the...
User Manual
Page 22
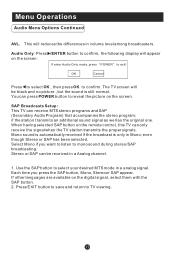
... button, Mono, Stereoor SAP appear. Press EXIT button to save and return to confirm. OK Cancel Press to select OK , then press OK to TV viewing. even though Stereo or SAP has been selected. Each time you want to listen to mono sound during stereo/SAP broadcasting. Mono sound is... sound signal as well as the original one. If other languages are available on the digital signal, select them with the SAP button. 2. The TV screen will be received in volume level among broadcasters. Menu Operations Audio Menu Options Continued AVL This will appear on the screen: If enter Audio...
... button, Mono, Stereoor SAP appear. Press EXIT button to save and return to confirm. OK Cancel Press to select OK , then press OK to TV viewing. even though Stereo or SAP has been selected. Each time you want to listen to mono sound during stereo/SAP broadcasting. Mono sound is... sound signal as well as the original one. If other languages are available on the digital signal, select them with the SAP button. 2. The TV screen will be received in volume level among broadcasters. Menu Operations Audio Menu Options Continued AVL This will appear on the screen: If enter Audio...

User Manual
Page 23
Press /ENTER button to enter the Channel menu and / down to your area to the TV's memory. It deletes any channels on the screen. Video Audio Channel Tuner Channel Scan Channel Skip Channel Label Function Lock Antenna Channel CH+/- Note: Channel ... search has finished, the first program number will appear in main menu only in your preference . 4. This search automatically adds only the active channels in TV mode. 2. Menu Operations Channel Menu Options 1.
Press /ENTER button to enter the Channel menu and / down to your area to the TV's memory. It deletes any channels on the screen. Video Audio Channel Tuner Channel Scan Channel Skip Channel Label Function Lock Antenna Channel CH+/- Note: Channel ... search has finished, the first program number will appear in main menu only in your preference . 4. This search automatically adds only the active channels in TV mode. 2. Menu Operations Channel Menu Options 1.

User Manual
Page 27
... OSD to CC4: For other modes of information displayed by broadcasters. (This blocks a large portion of ABC in your screen). CC1: When CC1is displayed on TV means CC mode is selected. Text1: For program guide and other language that may be on the right of a program as English in a pane will...
... OSD to CC4: For other modes of information displayed by broadcasters. (This blocks a large portion of ABC in your screen). CC1: When CC1is displayed on TV means CC mode is selected. Text1: For program guide and other language that may be on the right of a program as English in a pane will...


